Since 2006, the method of growing plants in the air has been actively developing and improving. The technology is used by both large farms and individuals. This method is called aeroponics - growing plants without a soil layer. Of course, large farms use aeroponic equipment manufactured in factories. However, you can make the equipment yourself. Do-it-yourself aeroponics will allow you to harvest crops all year round, regardless of weather conditions and soil conditions.
Hydroponics
A little history
The first experiments on cultivating plants in the air were carried out in 1911 by Professor V.M. Artsikhovsky, it was he who first assembled a prototype of aeroponic equipment. And in 1957, the American scientist F.W. Vent developed and tested a technology for growing plants without a soil layer, calling it aeroponics. The first universal aeroponic equipment was developed by Russian scientist Yuri Tsaturovich Martirosyan. The device, called "Harvest-9000", was used for cultivating various agricultural plants.
Conclusion
Aeroponics may well become an effective alternative method for growing plants on an industrial scale, especially in regions with poor soils.
For small farms or home use, aeroponics has already proven itself as an effective way to grow herbs and vegetables with the possibility of year-round harvesting at low cost.
Since 2006, the method of growing plants in the air has been actively developing and improving. The technology is used by both large farms and individuals. This method is called aeroponics - growing plants without a soil layer. Of course, large farms use aeroponic equipment manufactured in factories. However, you can make the equipment yourself. Do-it-yourself aeroponics will allow you to harvest crops all year round, regardless of weather conditions and soil conditions.
Aeroponics components
Hydroponics at home
When making aeroponics at home, you will need the following components:
- Container for nutritional mixture.
- A flat, opaque container with an airtight lid. Opacity is a must. This is explained by the fact that as a result of exposure to sunlight, foreign flora (algae) of a blue-green color appears in the mixture, which negatively affects the growth of cultivated plants.
- Hoses. Pay attention to the diameter of the hoses and related accessories: it is necessary to ensure the tightness of all joints and connections.
- Spray. It is selected based on the type of plants grown. For example, coarse roots need an increased amount of moisture, so large drops are allowed to appear. However, it is better to use nozzles that spray water until a fine suspension appears; the nutrient mixture is then absorbed by the plants more efficiently.
components
- Pump. Sometimes novice vegetable growers try to install a pump for an aquarium, but it is not enough to service even a small installation. The best option is to use a car compressor or windshield washer pump. However, if necessary, you can also buy a pump originally intended for aeroponic equipment. The cost for domestic models starts from 2000 rubles.
- Timer, when purchasing this element of a future installation, you should not save. Devices purchased at a low price are not of high quality and often require replacement. There are two types of timers: electronic and mechanical. The latter are reliable, but their minimum interval is fifteen minutes, which is too long for many systems. The root system of growing plants requires moisture every five minutes, and only as they grow, the time between spraying increases to twenty minutes. Therefore, high-quality electronic timers are more preferable.
Manufacturing of aeroponic equipment
Xeh
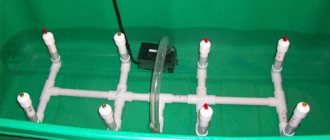
With proper preparation, a small aeroponics setup can be assembled in a few hours. Sprayers are mounted at the bottom of an opaque container, to which a hose is connected. The joints between them are treated with silicone sealant. The other end of the hose is connected to a compressor equipped with a timer. The installation is almost ready. The final stage is planting the plants. Special pots without a bottom are mounted into the lid of the container or container.
Sometimes foam plates are used, in which holes of the required diameter are cut. The nutrient mixture is poured into the prepared container, after which it is closed with a lid or foam plate. The solution will flow from the nutrient solution tank to the sprayers using pumping equipment. As a result of the nozzle operation, an easy-to-digest suspension will fall on the root system.
Important! The root system of young plants is extremely delicate, so do not allow it to come into contact with plastic parts - they can damage them.
System for plants with voluminous roots and seedlings
Large plants need large seedling boxes. A voluminous root system will require massive containers for planting. You can build an aeroponic system for such plants according to the following scheme:
- take two seedling boxes, the top one should be slightly smaller than the bottom one. Turn it over and make small holes in the bottom according to the number of plants;
- place seedlings into the holes and secure them with clamps;
- estimate the volume of the root system and fill the lower container with a nutrient solution so that the roots are 1/3 immersed in it;
- place the top drawer on the bottom one and do not forget to periodically add a nutrient solution, as well as monitor the growth and development of the plants.
An aeroponic system for seedlings is assembled in a similar way .
Creating an installation using an air compressor
In principle, this option is not very different from equipment that uses a car compressor or a special pump. The difference is that an external air compressor is used to supply the nutrient solution to the root system. It is connected to a container with a nutrient mixture instead of pumping equipment. All connecting connections must be carefully sealed. If the joints are insufficiently insulated, the air compressor will not be able to provide the required pressure in the container with the nutrient solution. As a rule, installations made on the basis of an air compressor are designed for cultivating various types of greenery.
Important! For successful operation of units equipped with an air blower, it is necessary to install a pressure gauge, and proper operation of sprayers can be achieved using solenoid valves.
Air compressor
Growbox design
So, literally, “grow box” means “growing box.” We will build on this combination of words when creating the design of a future mini-greenhouse.
Dimensions (especially height) depend on the plants that are planned to be planted. For greens, radishes, and onions, a container with sides of 30 cm is sufficient. For root vegetables and flowers, you need a growbox up to half a meter high. If you want to grow tomatoes or cucumbers, you will need a growbox the size of a closet.
Main components of grow boxes:
- Frame. This can be any suitable size box. From a computer system unit, a bedside table, a used refrigerator to a wardrobe, pantry or an entire room.
- Reflective surface. The inner walls of the box should be painted white or lined with a special material.
- Lighting. As a rule, special grow lamps are used.
- Fan. It is needed to ensure the outflow of heated air. Ventilation holes are also needed to allow oxygen to flow in.
- Climate control devices: thermometer, hygrometer.
- Associated equipment: time relay, heater, humidifier, filter - as necessary.
Ultrasound in aeroponics
The most unusual technology for growing crops without using a soil layer is ultrasonic aeroponics. Similar technology is used in climate control systems. An example is “fog generators”, this is one of the types of ultrasonic aeroponic installations.
The technology is based on the ability of a sound wave to cause the formation of bubbles when passing through a liquid (nutrient solution). When they burst, microparticles of the mixture enter the air, feeding the roots of the system. To generate ultrasound, piezoceramic elements in the form of a membrane or disk are used. However, the use of ultrasound in aeroponic setups comes with some limitations.
This is due to the fact that the temperature of the fog resulting from the ultrasonic wave is 40 degrees, and the temperature of the nutrient mixture should not exceed 20 degrees. Therefore, it is necessary to cool the solution, and this will negatively affect the performance of the equipment.
The features of such aeroponics allow the use of a nutrient mixture only of low concentration. Aeroponic installations of this type are used mainly for growing seedlings and herbs.
Hydroponics ultrasonic
Solution for aeroponic installation
The main elements for preparing a nutrient mixture for aeroponics are nitrogen, potassium and phosphorus. Of course, in addition to them, there are other components, the main requirement is the possibility of their absorption by the root system of plants. Mixtures for aeroponic installations usually contain metal sulfates, citrates and calcium salts. The specialized literature provides detailed recipes for making solutions.
Most of these recipes were developed for hydroponics, but they can be used as a basis for creating mixtures for aeroponics. Pipeline water is not suitable for making nutrient mixtures. It is necessary to use rain or distilled water, this will ensure the absence of unnecessary impurities. Each saline solution is prepared separately, and only then they are mixed, and after mixing they are diluted with the required amount of disinfected water.
By the way, it is not recommended to use excessively hard water. It will need to be softened, for which special filters or tablets are used. The salts themselves are stored in an airtight container, in a dry room, away from sunlight.
nutrient mixtures for hydroponics
Aeroponics. Advantages and disadvantages
Aeroponics is based on the belief that the main component necessary for plant growth is oxygen. Additional elements are contained in the nutrient solution, which is supplied to the plant roots using a drip irrigation system.
The advantages of aeroponic installations are:
- the ability to obtain fresh harvest all year round without the use of artificial additives;
- the air environment in which the roots are located has a positive effect on the dynamics of plant growth;
- careful care and conditions created for crops make it possible to obtain a harvest that is several times superior to analogues grown in the classical way;
- thanks to the accelerated growth of plants, it is possible to harvest crops several times a year;
- growing plants in an artificial environment allows you to create optimal climatic conditions for them;
- caring for the crops grown is quite simple because many processes are automated.
Unfortunately, there are some drawbacks, which include:
- high hygiene requirements. The root system, located in an open air environment, requires protection from microorganisms and viruses;
- the crop may die as a result of a breakdown of the irrigation system or management errors;
- The plant looks unusual due to its powerful root system.
Important! Plant roots should not be left without nutrients. Otherwise, growing a decent harvest will be extremely difficult.
Advantages
Components of the structure
A homemade snow sled requires the presence of a steel plate, brackets, and squares in the area of mounting the rotary stand in front of the ski. Skis must be made of wood. The front area of the body is covered with an element that will serve as a hood. There are steel brackets on its sides. A bicycle headlight will be mounted on the top of the hood. The driver's seat can be made from plywood; you need to take a sheet whose thickness is 8 mm. The front part of this element will rest on two springs borrowed from a bicycle saddle. The cross bars on which the motor is mounted have different lengths. The rear bar will be long, it is attached with tubular struts and acts as a guard for the propeller. At its ends you need to attach plates curved along the radius of the propeller. The latter will need to be painted red during the work process. The rear skis have hog clips. They can be made from strip steel, from which a blank with a size of 5x30 mm is pre-cut.
A homemade snow sled will contain, as already mentioned, hog brackets, with the help of which the skis are mounted on M10 bolts to the corners. The latter are mated with the bars of the transverse beam.