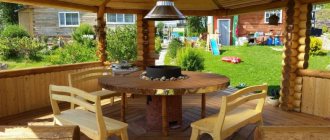
A good owner cannot imagine the yard of his house or dacha without a decent gazebo. There are dozens of materials from which such a canopy can be built, but the vine has remained among the leaders for several hundred years. Next, we will look at which vine is more suitable for a gazebo, how to prepare the material, and most importantly, you will get 3 options for weaving a vine with your own hands and will be able to build a gazebo yourself.
Weaving garden arbors from wicker has been known for several hundred years.
Material used
The popularity of such structures is due to two factors:
- Firstly, available available material - a rod can be cut near any body of water or in the nearest forest;
- Secondly, the simplicity of construction - you don’t need to be a highly skilled craftsman to build a small gazebo. But first, let's figure out what to weave a gazebo from.
| Photo | Explanation |
| Willow. Willow rod is considered the most common material. The vine retains its elasticity for a long time.
| |
| Hazel. For weaving, wild hazelnut rods are used, the popular name is hazel. Hazel branches, compared to willow, have a higher density, but the material can only be used while it is fresh; soaking hazel in water is quite problematic. | |
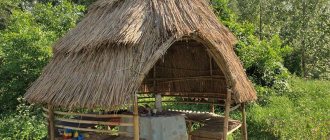
| Reed. Perhaps the most accessible material. There are reed thickets near almost any body of water. Most often, the roofs of gazebos in ethnic style are made from bundles of reeds. Reeds are also suitable for constructing walls and other elements, but you need to cut young flexible shoots. It is useless to soak old and dry stems in water. | |
| Rattan. The rattan palm grows in southeast Asia and parts of Africa. Such rods are now painted, soaked and even covered with plastic. In our country, this material is expensive, so only real enthusiasts use it. |
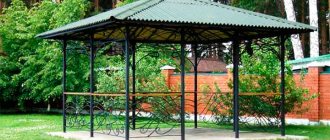
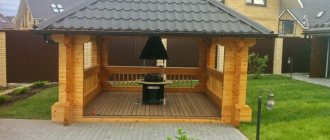
Metal pavilions
Metal gazebos are usually stable, lightweight structures called garden pavilions . metal gazebos can be purchased in supermarkets from 5,000 rubles. The cost of a stronger and more durable structure with a closed roof is from 15,000 . At this price, you can buy a solid gazebo to install directly on your deck or grass. Metal sheds are typically made of forged steel or curved rods, with not much metal tubing. The simplest form of metal gazebo looks elegant and modern, but does not provide much shelter from rain or wind. The advantage is its stability, ease of installation and above average durability, provided that the metal parts are coated with a composition that protects against corrosion. It can also be decorated with curtains or mosquito netting, which add elegance and protection from wind or insects.
Preparation of rods
There are 3 ways to prepare material for weaving a gazebo:
- Buying ready-made young twigs is not a problem now; there are entrepreneurs who grow “business” willow for weaving on an industrial scale;
Buying “business” willow for weaving is not very difficult
- Cutting twigs in the wild - if we are talking about willow, then the method is quite problematic, since perfectly straight young shoots are rare. Hazel can be found, but it is harder to work with;
- Grow willow twigs yourself.
The first two methods do not require any special explanation, but we will look at the instructions on how to grow willow for weaving yourself step by step.
- Willow twig grows to industrial size within a year. The material is planted into the soil either in winter or in spring, after the snow melts;
- You need to find a willow tree and cut healthy branches from it 10 - 20 mm thick. The length of one seedling is about half a meter, but it is important that the seedling has at least 3 - 4 healthy buds;
The most important thing in willow cuttings is the presence of 3 – 4 healthy buds
- When planting willow in winter, the cuttings need to be covered with straw on top;
- When planting in early spring, you will need to build a simple greenhouse. Drive in several stakes and stretch plastic wrap over them;
- It is not necessary to dig up the area for planting, but the fluffed up soil will be a serious plus. It is better to choose a place in the lowlands, where it is damp. Cuttings cannot be planted under trees; the willow will reach towards the sun and grow crooked;
- The planting itself is not difficult; you cut the cutting obliquely and stick it 25 cm into the ground;
- For the first 2 weeks, the area is watered daily, then reduce the number of waterings to once a week;
- It is advisable to plant cuttings in rows, this makes it easier to care for the area, and most importantly, it is easier to cut off the finished material later.
It is advisable to plant willow cuttings in dense rows
If you germinate the cuttings in water before planting, they will take root much faster and grow better, however, such seedlings must be buried and not just stuck into the ground.
Pre-germination of willow cuttings increases yield by a quarter
The first stage of work is sorting the vines, marking the area, constructing the foundation
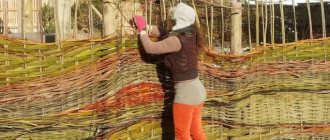
Using high-quality wicker is the key to building a durable and strong gazebo. Therefore, the first thing you need to do is sort the building material. After the branches are cut, the leaves are removed from them. The bark should remain intact, as “bare” branches will quickly lose their color and look unattractive.
Then you need to decide on the size and shape of the gazebo in order to mark the territory. Small gazebos are suitable for two or three people, while larger structures can be used to organize various events with a large number of guests. When the gazebo plan is ready, you need to use pegs and rope to mark the location of the gazebo on the site.
The next stage is the construction of the foundation of the future structure. Since the gazebo is light in weight, the construction of a permanent concrete foundation is not necessary. For summer residents, it is enough to use a shovel to remove the top layer of soil from the area where the gazebo will later stand, level the ground in the cleared area and compact it thoroughly.
After this, they begin to install the supports. Their role can be played by strong wooden beams of the same length and thickness, as well as metal pipes or concrete pillars. The supports are buried in the ground and then concreted. This stage of work must be carried out responsibly, because the strength and stability of the finished gazebo made from branches depends on the quality of installation of the supports.
3 options for weaving a wicker gazebo
Over hundreds of years of practice, several dozen styles of wicker weaving have emerged. Each talented craftsman brings something of his own to this art, but for an amateur it is advisable to start with simple options and then we will look at the 3 available weaving methods, and on their basis you can already develop the acquired skill.
Option #1. Weaving in rows
For this method, predominantly thin vines are used. A series of vertical rods are set up as a base in increments of up to 10 cm. Then a new thread is started in each cell or through a cell. The more often you weave new threads, the denser the mesh will be.
The method of weaving in rows has been repurposed for arranging dense meshes and is designed for the use of thin vines
The method of weaving in rows is universal; it is suitable not only for building a garden gazebo; having mastered this simple science, you can start weaving furniture, baskets and other interesting objects.
Option #2. Rope weaving
In fact, rope weaving can be called the initial version of weaving in rows. Studying the diagram it is difficult to catch the difference; in general terms, the rope provides for the simultaneous use of 2 cross threads and no more. Usually they start learning with rope and then move on to dense weaving in rows.
Weaving with a rope is considered one of the simplest ways to arrange a gazebo.
Option #3. Checkerboard weaving
Checkerboard weaving is commonly used to create hedges. The willow is planted in rows along the boundary of the plot and, as it grows, it is woven into regular squares. In this case, at the initial stage, the intersection of the rods is additionally fixed with some kind of cord.
Checkerboard weaving allows you to create hedges and green gazebos
Checkerboard weaving is interesting from the point of view of creating a living green gazebo. By assembling a rigid frame and planting willow around the perimeter of the building, in 2–3 years you can create a living gazebo with constantly greening leaves.
But when starting such work, keep in mind that you need to trim this gazebo at least 2 times a year. Otherwise, in a couple of years your beautiful wicker fence or gazebo will turn into impassable thickets that can only be cut off.
To make a green willow tent look decent, it needs to be trimmed a couple of times a year
See also:
For most country house owners, the dacha is a place of relaxation. Therefore, it is logical to assume that on its territory there should be communications that provide comfort and coziness.
For example, it is extremely important to organize a recreation area. This may include a barbecue, grill, gazebo and other buildings. As for the gazebo, this can be a great place to spend time with loved ones.
Today there are many original ideas on how and what to build a gazebo from; it can be using metal, wood, plastic, polycarbonate, and the like. However, there is the simplest and most budget option - a gazebo made of wicker. In this article we will tell you about all the features of its production.
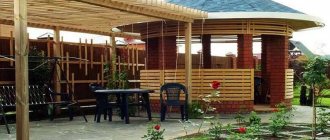
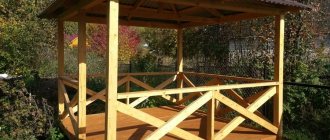
Wicker gazebo "Pergola" on a frame
A wicker tent made from living branches looks beautiful, but from experience, making a large gazebo this way is problematic, plus not everyone is ready to care for a hedge. As practice shows, it is much easier to create a rigid frame with a good roof, and decorate the walls of the gazebo with weaving.
For a wicker gazebo, it is better to make the frame from wooden beams. The minimum cross-section of timber for racks is 50×50 mm. The simplest option is a gazebo with a pitched roof.
- First, you decide on the construction site and the size of the structure. Next, take a garden drill and drill holes in the corners of the future gazebo for installing poles. Hole depth 50 – 70 cm;
- Treat the timber for the racks with an antiseptic a couple of times, and after each time you wait until the wood is completely dry;
- The entire underground part of the rack and 100 mm above the ground must be treated with hot bitumen, and then wrapped with roofing felt;
The more protective layers you apply to the wooden posts, the longer the gazebo will last
- The racks are installed strictly vertically and plumb. Theoretically, they can be concreted, but for a wooden gazebo there is no point in this; just pour in clay or a sand-gravel mixture and compact it well;
- Since our roof is pitched, the front posts are made higher than the rear ones. The slope is planned at the rate of 100 mm per 1 linear meter. That is, if you have 3 m between the front and rear pillars, then the front pillar is made 30 cm higher;
- When the frame is assembled, the simplest and most affordable option is to cover the gazebo with asbestos-cement slate; such a roof will last 10 - 15 years;
- Then you can develop a design concept and braid the frame at your own discretion.
At the moment, there are ready-made wicker panels for gazebos and fences on sale; with their help you can quickly set up an original gazebo
Deciding on the design and size
If we talk about the size of a wicker gazebo, there are no standards. Everyone decides for themselves based on their capabilities and the allocated space for the recreation area. Determining the size is also influenced by the fact how many people will be inside it. If you have a large family, then, of course, make a larger gazebo. To somehow embellish the gazebo, you can make a wicker table, chairs or other decor inside. You can also install all kinds of wooden accessories. Moreover, lighting is provided from a wicker lampshade. All this together will look very original.
It is also worth mentioning the choice of suitable material. If you have already planned and even drawn yourself an approximate drawing, then prepare support posts or stakes that are all the same size. They can be pre-treated with varnish or painted in any other color so that they do not differ too brightly from the color of the vine.
Grape arbors
Arbors braided with grapes are considered the simplest option, while the appearance of such structures is quite decent, plus the grapes do not require as frequent and careful pruning as a willow hedge.
Moreover, such beauty can be installed on almost any gazebo. Above we looked at the technique of creating a wooden pergola frame for weaving with willow, the same frame can be used for a grape version, you just need to attach a metal or wooden mesh to it, and the grapes will catch on to it.
According to the rules, one grape bush is planted per 2 linear meters; it cannot be planted more often, since the bushes will interfere with each other and grow worse. If there is sun, a standard gazebo up to 3 m high is braided within 2 - 3 years.
If there is a good frame, grape arbors are braided within 2 - 3 years
Conclusion
As you can see, making a wicker or grape arbor with your own hands is quite possible for a simple summer resident; the main thing is to choose a good vine, and we showed you the weaving technique. In the video in this article you will find important little things, and if after watching you still have questions, write in the comments, I will try to help.
A gazebo woven with your own hands will become your pride on your site.
Did you like the article? Subscribe to our Yandex.Zen channel
Structural features
A gazebo made of willow twigs not only demonstrates the skill of its owner, but also allows you to show imagination when constructing the desired shape of the building and its original details, and will save money on the purchase of building materials. At the same time, the sides of the gazebo are planted with dense shrubs or climbing plants, which as a result creates an unusual green structure.
Design features are:
- Its construction is carried out without nails, using the weaving method.
- Fastening materials may be needed at the finishing stage, when laying roofing from a polycarbonate sheet (see Roof for a gazebo made of polycarbonate: what are the differences from other materials).
- When making a tent-shaped structure, such a coating is not required. In this case, the ends of the supports are connected at the top.
Willow tent
A gazebo with your own hands from willow twigs is built in the following sequence:
- Materials for work are being prepared.
- A construction site is being set up.
- Supports and rods for weaving the walls are mounted.
- Door and window bays are designed.
- The roof of the gazebo is being built.
How to prepare materials and tools for construction
Before you make a gazebo out of willow, you need to purchase:
- Willow twigs.
- Profiled pipes or wooden beams.
- Roulette.
- Copper or aluminum wire.
- Secateurs.
- Bayonet shovel.
- Locksmith's hammer.
- An ordinary axe.
- Garden shears and knife.
- For roofing - polycarbonate.
- To fill the area under the gazebo and supports, use concrete mortar.
A do-it-yourself willow gazebo is constructed from willow twigs prepared in advance for work.
For this:
- Fresh branches are taken, sufficiently flexible and strong, which, after bending and weaving, retain their integrity.
- The material is collected in the spring. In this case, straight shoots that are one year old should be cut off. Such rods will be the most convenient to work with, they will bend well and will not crack.
Advice: You should not use older shoots for work: they are less reliable.
- The thickness of all the rods should be approximately 2-3 centimeters; it will be most convenient to work with them.
- Ready-made vines, immediately used for weaving, can be purchased on the market, but before starting construction of the gazebo, the rods are steamed in a steam bath or sauna.
- The bark is removed from the branches with a special pinch.
Tip: The bark should subsequently be used to fix individual sections of the structure.
- To make a gazebo, the entire mass of rods is processed. You will need a lot of rods, and when purchasing them, you should check with the seller about their approximate quantity.
- To independently calculate consumption, you must:
- weave a durable sample from the purchased material;
- measure the amount of material per 10 centimeters;
- find out the approximate area of the gazebo being built;
- calculate the total number of rows;
- add 10% of the material to the approximate figure.
How to prepare a site for a structure
Before building a gazebo, you will need to prepare a site for it.
For this:
- The site is cleared (see Site for a gazebo: how to organize it correctly).
- The surface is leveled:
- covered with a not too thick layer of sand and gravel;
- it is laid out with concrete tiles or a wooden platform is installed, which depends on the size and layout of the future wicker gazebo.
Tip: The simplest and best option for a structure made of willow twigs is ordinary, carefully compacted soil. It will take a minimum of time to prepare.
- Holes up to 50 centimeters deep are dug around the perimeter for support posts, which can be:
- wooden;
- metal.
- Supports are installed at all corners of the structure; double posts are installed for the doorway with a distance between them of up to 15 centimeters. The opening is approximately one meter wide. Between the support posts, with a pitch of approximately 50 centimeters, thinner rods are located, around which weaving will be done in the future.
- The posts can be concreted, which will increase the stability of the wicker structure.
Structure care
A “living” gazebo requires constant monitoring: the willow grows quickly and needs pruning. It is better to make the frame at the height of raised hands, so that you do not have to use a ladder. Trimming of excess growth is done while standing in the center of the gazebo. In dry times, plants need watering. A “living” building can delight its owners with beauty and comfort for up to 60 years.
As for artificially wicker structures made of wicker, they do not require special care - just periodically knock off the dust using pressure from a hose. Around the gazebo you can plant beautiful climbing plants: clematis, virgin grapes, Chinese lemongrass, kirkazon, ivy, hops.
A willow gazebo in a living or artificially woven version will become a decoration of the garden and a favorite vacation spot for the whole family.
Source