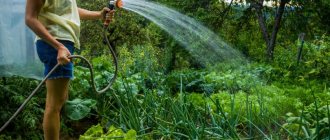
What is DIY drip irrigation? Any gardener knows that water is required for proper growth and development of a plant. Undoubtedly, in a greenhouse or in open beds you can use a hose, but this is more expensive and labor-intensive.
Nowadays, not every family can afford daily watering with high water consumption. Therefore, in order to try to maintain the family budget, many summer residents resort to a homemade watering system.
Drip irrigation - what is it?
The great advantage of this system is that only the root system of the plant absorbs moisture, and the soil layer and leaves do not get wet. This makes it possible to prevent sunburn of vegetation. In addition, when moistened, no active weed growth is observed.
Today, many gardening enthusiasts save their budget on water consumption by up to 80%. At the same time, plants absorb the necessary amount of moisture required for active development.
To manufacture such a system at the dacha, you will need to choose the smoothest surface. Place a bottle filled with purified water at a height of 1 m. Then build the structure and start irrigation.
You can also water your lawn yourself. The most important thing is that there is always only purified liquid in the container, otherwise there is a possibility of filter contamination.
To prevent system clogging, it is better to use liquid fertilizers. In the autumn, dismantle all elements of the drip irrigation system. If such recommendations are followed, the system will be used for more than one season.
We do full automatic watering
Automatic irrigation
Drawing a plan
Let's start by drawing up a site plan. On a scale, we will indicate on it the main elements of our estate: house, veranda, entrance, outdoor stove, etc. - this way we can determine the permissible area of action of sprinklers.
Irrigation scheme
On the diagram we mark the water intake point. If there are several water sources and they are located in different places on the site, we select a tap located approximately in the middle. In such a situation, we will be able to provide approximately equal lengths of irrigation lines
Choosing an irrigation method
Determining the amount of water
In the example under consideration, the system is set up to water a large lawn and several beds, as well as an area with bushes and trees. You can adjust the layout taking into account the characteristics of your site.
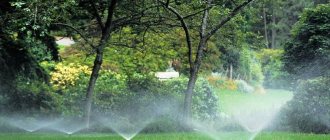
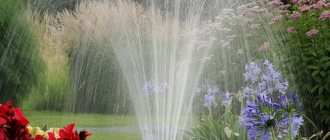
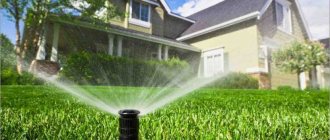
Automatic watering systems
We will water the part with the lawn and flower beds using retractable sprinklers. When turned on, they rise above the surface, and after watering is completed, they lower and become almost invisible.
For the second part of our plot, this irrigation option is not suitable: the plantings are too high, and the width of the plot is small.
Rotary sprinklers
Important note! It is not recommended to use sprinklers to water areas less than 2 m wide. Such devices have too large a range, which can cause a number of inconveniences.
Oscillating sprinklers
To water this part of the plantings, we install a drip line. It is a pipe of the required length with holes arranged along its entire length. Such a pipe can be buried or simply laid between the beds.
Prices for guns, nozzles, hose sprinklers
Guns, nozzles, hose sprinklers
We draw up an irrigation scheme
We mark on the plan of our site the installation points of sprinklers and the radii of their coverage. We adhere to this design order:
- We install sprinklers at the corners of the site for watering at 90 degrees;
- along the borders of the territory we install devices that irrigate the space 180 degrees around;
- in the corners of the site near various buildings and structures we install sprinklers at 270 degrees;
- We install devices that water 360 degrees throughout the area.
We select the number of sprinklers so that the coverage radii of devices installed nearby intersect. With this arrangement of devices, not a single plant will be deprived of moisture. However, this method is only relevant for large areas that have the correct shape.
In our example, the area of the plot is relatively small, but it has a narrow strip along the residential building. Therefore, we draw up the project in the following order:
- First, we mark the installation locations of sprinklers that have the greatest radius of action. We will use them to water the main part of the garden;
- on the narrow side of the site we mark places for sprinklers with a more modest irrigation radius;
- In places where sprinklers cannot reach, we plan to lay a drip line.
Important! Double-check the project. Make sure all plantings will receive water.
We check the water intake for throughput
A ready-made plan allows us to install the required number of sprinklers. However, before installing the system, we must find out whether the productivity of the water supply source is sufficient to effectively service the system being installed. We do it this way:
- take a meter-long hose with a diameter of about 2 cm and connect it to a water source;
Watering hose with PVC fitting - We immerse the second end of the hose in a 10-liter bucket and measure the time it takes for it to fill with water. To obtain more accurate measurement results, we carry out measurements several times during the planned time of watering the site;
- We measure the distance between the water intake point and the most distant sprinkler. Next, for every 15 m of the distance obtained, add 1 second to the time previously spent filling the bucket with water. In our example, the source bandwidth is 60.
Now we determine whether the water intake can ensure the simultaneous operation of all planned irrigation lines. The need for sprinklers remains the same and is determined in accordance with their coverage area. In our example we set:
- 180 degree devices with a coverage area of up to 200 m2—2 pieces. The water requirement of each device is 12, for a total of 24;
- 270 degree sprinklers with a coverage area of up to 200 m2 – 2 pieces. Each person's need is 14, for a total of 28;
- 180 degree device with coverage up to 50 m2 – 1 piece. Need – 7;
- 270 degree device with coverage up to 50 m2 – 1. Requirement – 9;
- 90 degree sprinkler with a coverage area of up to 50 m2 – 1. Water requirement – 6.
In total, the water requirement of our irrigation devices is 74. The water intake is only capable of delivering 60. It will not be possible to connect all devices to one line for simultaneous use. To solve the problem, we make two lines of sprinklers. One will be used to service large devices, the other for small ones.
For drip irrigation we make a third line. It requires individual management, because The main lines are turned on for about half an hour every day, while the drip lines should work for at least 40-50 minutes, depending on the characteristics of the soil and the needs of the plantings.
The drip line and sprinklers cannot be connected to a common line. With such a system arrangement, the area served by sprinklers will either be watered too abundantly, or the area with drip irrigation will not be able to receive liquid in sufficient volume.
We automate the system
We order materials
To regulate the operation of the system, we install a programmable controller. Using this device we can set the time to turn on and off the irrigation. To protect the device, it is recommended to install it indoors, for example, in the basement.
Near the water supply tap we install an inlet column for connecting the system, as well as a special installation box for placing shut-off valves according to the number of irrigation lines. We have 3 of them. We connect each valve to the controller using a two-wire cable. We divert one irrigation line from the valves. Such arrangement of the system will allow it to be programmed to turn on each irrigation line separately.
Automatic watering system
We arranged the lines as follows:
- one was allocated to power large sprinklers. For the manufacture of the line itself, 19 mm pipes were used, for branches to the sprinklers - pipes of 16 mm diameter;
- the second was used for small sprinklers serving an area of up to 50 m2. The pipes used were similar;
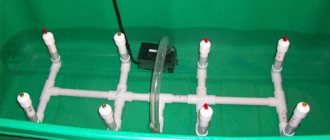
- the third line was allocated for drip irrigation. A 19mm pipe was used to make this line. Next, we connected a special drip pipe to it. It is made in the form of two closed loops. We connected the end of the drip pipe to the supply pipe.
To improve irrigation efficiency, we included a rain sensor in the system. It will not allow watering to turn on during rainfall. We connect the sensor to the controller according to the included instructions. In most cases, the controllers themselves are plugged into a regular outlet, which is very convenient.
Connecting and setting up irrigation
First step. We place irrigation elements on the site and connect them to each other using special connectors and splitters. We make sure that no earth gets into the pipes.
The sprinkler can be installed in any desired location
The design of the connectors is very simple - even a woman can easily handle the work
Second step. We connect the assembled system to the water supply and do a test run. We position the sprinklers in the required directions. If everything is in order, we proceed to excavation work.
Third step. We dig a 200-250 mm ditch along the pipeline.
Fourth step. We fill the bottom of the trench with a layer of crushed stone. The backfill will take on the functions of a drainage cushion, ensuring the removal of residual water.
Fifth step. Carefully lay the pipes and other elements of the system in the ditch.
Carefully lay pipes and other system elements in the ditch
Sixth step. We backfill the trench.
Seventh step. We turn on the system to check. We adjust sprinklers.
Eighth step. We program the controller to turn irrigation on and off at the required time. We remember: the lines must operate alternately; they can be turned on simultaneously only if there is sufficient water intake capacity.
Installation of pump group and tank
Installation of controller and automation
Irrigation is connected and configured. We can accept it for permanent use. In the future, we regularly check the condition and correct operation of the elements of the irrigation system.
The process of implementing a drip irrigation system
This technique has been used since ancient times in areas with arid climatic conditions. Today, manufacturers produce expensive and complicated irrigation systems. Therefore, not everyone manages to purchase such a product for their summer cottage.
But many people do it themselves. Such a system will perform a smaller number of functions compared to model groups of similar products. And with the required operation, it will be no worse than watering plantings.
Watering using medical droppers
This type of watering is extremely convenient for several reasons:
- low cost of components;
- easy water supply to any plant, which is very convenient if your beds are not perfectly level;
- The water pressure can be adjusted using the wheel located on each dropper.
How to make drip irrigation?
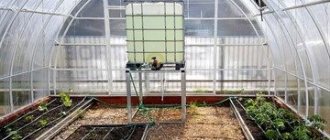
It is best to use a flexible hose. Initially, it is necessary to secure a large container with a capacity of over 100 liters. The height to which the container needs to be fixed is at least 1 m. If there are drainpipes, the container will independently fill with water in rainy weather.
To prevent dirty particles in irrigation hoses, they are fixed at a height of at least 5 cm from the very bottom of the container. First you need to do the wiring and understand where the places for the droppers will be.
- We buy and install an air conditioner
- Do-it-yourself windmill - the best ideas and instructions for building decorative windmills in the garden and on the site (105 photos)
Do-it-yourself walk-behind tractor - how to make a simple and reliable homemade walk-behind tractor for farming (105 photos)
Secondly, take care of the wiring and installation of taps, the number of which is determined based on the characteristics of the system. You can buy the simplest taps, they will be enough to perform the main functions.
Accessories
Pipeline routing along the site is made of polymer pipes. They are resistant to corrosion, do not react to most fertilizers, are reliable, and easy to install (there are installation methods without any special devices). The most commonly used pipes are HDPE (low-density polyethylene). In addition to all the previously described advantages, they are also ultraviolet resistant: they can be laid over a surface. LDPE (high-density polyethylene), PVC (polyvinyl chloride, but it is afraid of ultraviolet radiation) and PPR (polypropylene, its disadvantage is that it must be joined by welding and cannot be disassembled) are also suitable.
Most often, do-it-yourself automatic irrigation systems are assembled from HDPE pipes with compression fittings
For automatic irrigation systems in dachas, greenhouses and vegetable gardens, a pipe of 32 mm in diameter is usually used. If you are going to water a large number of beds, it is better to take a size one step larger - up to 40 mm.
HDPE pipes are assembled using compression fittings (with threaded gaskets). They can withstand the pressure in the water supply systems of high-rise buildings, so they can withstand the pressure for irrigation accurately. Their advantage: at the end of the season they can be untwisted, everything dismantled, and used again next year.
If drip irrigation is selected, drip hoses or tapes can be connected to the main line; droppers can be mounted on ordinary hoses (they make a hole and insert a small device into it). When irrigating by sprinkling, sprinklers are installed. They have different structures and cover areas of different shapes and sizes - round, sector, rectangular.
The types and types of components for automatic irrigation are well described in a video from one of the leaders in the irrigation systems market, the German company Gardena. Their equipment is high-quality, but their prices are very high.
Drip irrigation from plastic bottles
To monitor the growth of seedlings in summer cottages, you will need to know how to water in a greenhouse. The technology will be similar; for these purposes, you can use any container, for example, plastic containers.
A 1.5-2 liter plastic bottle can also be useful in general. The lid of the container is pierced in several places. The transverse distance of the opening is no more than 2 mm. Small holes are made with a hot nail.
Then an incision is made at the bottom of the container to prevent moisture evaporation. Then you need to dig a small hole 15 cm deep and place the bottle in it at an angle of 45 degrees. In this case, you need to be careful, as there is a risk of damaging the root system of the plant.
Fill the container with liquid that will moisten the rhizome through the holes made. In addition to the above, drip irrigation makes it easy to saturate plants with liquid minerals.
This elementary system will hydrate the sprouts over a period of 1-3 days. Do-it-yourself bottle watering is suitable for gardeners who do not have the opportunity to water their plantings every day.
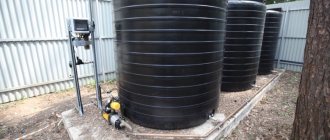
Choosing a water supply source
We provide instructions for installing two irrigation systems: a large-scale automatic one using a programmable controller and a modest non-automated one based on a barrel.
Before proceeding with the arrangement of any of the two systems under consideration, you need to select a water source and pumping equipment suitable for a particular situation. Water can be taken from:
- main water supply. The most convenient option. If your home is equipped with its own water supply, it is enough to simply cut the main pipe of the irrigation system into it. In most situations, no pumps need to be installed;
- wells. Installation of a submersible or surface (depending on the depth of the source) pump is required;
Well pump - well. The system includes a surface or submersible pump;
Surface pump - barrels or other container for water. Installing a pump is usually not necessary;
- natural source (river, lake, pond, etc.). The type of pump and its power are selected in accordance with the conditions of a particular situation.
Find out which pump to choose for watering your garden, and also consider the types and installation process in our article.
Electric water pump prices
Electric water pumps
Table. Pump Malysh, used for pumping water from open reservoirs, wells and wells. Characteristics
| Pump Baby, characteristics | Indicators |
| Pump type | Household vibrating submersible |
| Current consumption | 3 A |
| Power | 165 W |
| Water intake | Lower |
| Pressure | 40 m |
| Performance | 432 l/min |
| Length of cable | 10-40 m |
| Continuous operation | No more than 12 hours at a time |
| The need to turn off the power for 15-20 minutes | Every 2 hours |
| Connection | To flexible hose |
Photo of watering with your own hands
Advantages of plastic pipes
Typically, polypropylene products and HDPE pipes are used for irrigation in the country. If you choose between these options, it is recommended to give preference to polyethylene products, since their installation is simpler, and the pipes themselves have exceptional strength and durability. Let us list their main advantages, thanks to which plastic pipes have gained popularity and appreciation among summer residents:
- The inner walls of the pipes are exceptionally smooth, which eliminates the formation of deposits inside the pipelines. This achieves better throughput with smaller diameters of the pipes themselves;
- The strength of the pipe walls ensures the safety of the products even if they are exposed to relatively heavy garden equipment;
- Plastic products are more durable than their metal counterparts;
- Plastic is inert in relation to an aggressive environment such as soil, so pipelines can be laid even inside the soil layer;
- HDPE pipes do not collapse even when the water in them freezes;
- Installing polyethylene pipes for irrigation at your dacha is extremely easy to do yourself. There is no need to use electrical equipment or any complex tools to connect sections of the highway and insert additional elements.
We described how fittings for polyethylene pipes are installed in a separate article with a video example.
If you are interested in how to make an outdoor washbasin for your dacha with your own hands, then various options for making it are described on our website.
Read about the proper design of a compost pit here.
Advantages of automatic watering systems
Before moving on to the construction of the system, it would be a good idea to find out exactly what advantages it has and what benefits it can bring to the gardener.
- Perhaps the most important advantage is that you will have more free time. Now you don’t need to stand with a hose for hours or, for good measure, carry water in buckets. Plants are watered automatically without your participation.
- The second advantage is saving water. Not every dacha has water in abundance, so drip irrigation becomes a real godsend for many gardeners.
- Since water will be supplied regularly, the yield of vegetables and fruits will increase significantly. By the way, the plants themselves will also look much better.
- You can choose the time of watering - for example, in the morning and evening.
Automatic watering has many advantages - convenience comes first
Root irrigation
If your dacha has plants that require special care and the area is limited, we recommend that you pay attention to a kit for organizing root watering. Irrigation is carried out underground. It prevents roots from growing over the surface. The roots begin to strive for a source of moisture and do not climb up. The plant stays in the ground much more firmly.
Let's weigh the pros and cons. Do-it-yourself automatic watering at the dacha itself is quite economical. It does not require powerful water pressure and can work perfectly due to the difference in height between the vessels. Since the entire set is underground, minimal evaporation is guaranteed.
Root watering for grapes
Disadvantages include labor-intensive assembly and the likelihood of system clogging. The organization of root irrigation in an already landscaped area can hardly be called convenient. It is especially not recommended to install such a greenhouse kit when the plants begin to form inflorescences or fruits. A root irrigation system made in the fall will be much preferable.
Since water does not flow to the surface, but directly into the soil, it is better to use this system for irrigating perennial plants.
During the harvest period, they especially need moisture. To increase the efficiency of the system as a whole, sand and gravel are placed in the root zone. A drainage layer is created, like in a flower pot.
The water supply is exactly the same as in previous watering methods. Pipes can be flexible or rigid - it all depends on what exactly you prefer, what kind of soil, plants, and so on.
How to control automatic watering?
Agree, when the irrigation system is fully automated, it is much easier and more pleasant to manage. Unlike the manual method, the computer control method is more expensive, but it quickly pays off with many years of fairly comfortable use, a magnificent view of the site and a brilliant harvest.
To install computerized auto-irrigation control, you do not need to have any special knowledge. Humidity sensors are placed in regulated areas. As soon as the ground becomes dry, they signal the central computer that it is time to water. You can do without sensors. Simply set up automatic water supply at specified intervals and the garden will be watered at a certain frequency. For example, every day at 7 am or every 2 days at 18.00. Each device has its own specific installation instructions, so we will not describe them in detail.
Interestingly, some modern models can be controlled using a mobile phone and the Internet. That is, being several tens of kilometers from your dacha, you pick up your phone, launch the mobile application - and water starts flowing through the pipes!