Location of the automatic watering system on the site
Each site has its own characteristics. Different plants also require different types of watering. When organizing irrigation at your dacha, you need to take all these points into account, but in general, you can set up an irrigation system on any site. Suitable for flower beds, vegetable gardens and ordinary lawns.
The main thing: you need to organize the system so that water gets evenly to all the right places. Some areas should not be allowed to become overly flooded and others to dry out.
Before starting work on installing the structure, you need to draw a plan of the entire site, mark the buildings and plant locations on it. After installation of the system, control runs are carried out and the irrigation radius is monitored.
If water does not reach some areas, the arrangement of the elements is changed. This is how the final optimal option for arranging the parts of the irrigation system is selected.
In various photos of automatic irrigation systems, you can see examples of the location of sprayers in the garden.
Connecting and setting up irrigation
- First step. We place irrigation elements on the site and connect them to each other using special connectors and splitters. We make sure that no earth gets into the pipes.
- Second step. We connect the assembled system to the water supply and do a test run. We position the sprinklers in the required directions. If everything is in order, we proceed to excavation work.
- Third step. We dig a 200-250 mm ditch along the pipeline.
- Fourth step. We fill the bottom of the trench with a layer of crushed stone. The backfill will take on the functions of a drainage cushion, ensuring the removal of residual water.
- Fifth step. Carefully lay the pipes and other elements of the system in the ditch.
- Sixth step. We backfill the trench.
- Seventh step. We turn on the system to check. We adjust sprinklers.
- Eighth step. We program the controller to turn irrigation on and off at the required time. We remember: the lines must operate alternately; they can be turned on simultaneously only if there is sufficient water intake capacity.
Irrigation is connected and configured. We can accept it for permanent use. In the future, we regularly check the condition and correct operation of the elements of the irrigation system.
Types of automatic watering systems
The irrigation system is chosen depending on what requires irrigation: vegetables in a summer cottage, fruit trees and shrubs, or just a lawn in front of the house.
Types of automatic watering systems:
- Sprinkler
- Drip.
- Subsurface irrigation.
Let's consider the features of these systems and their applications.
Drip irrigation from plastic bottles
To monitor the growth of seedlings in summer cottages, you will need to know how to water in a greenhouse. The technology will be similar; for these purposes, you can use any container, for example, plastic containers.
- A 1.5-2 liter plastic bottle can also be useful in general. The lid of the container is pierced in several places. The transverse distance of the opening is no more than 2 mm. Small holes are made with a hot nail.
- Then an incision is made at the bottom of the container to prevent moisture evaporation. Then you need to dig a small hole 15 cm deep and place the bottle in it at an angle of 45 degrees. In this case, you need to be careful, as there is a risk of damaging the root system of the plant.
Fill the container with liquid that will moisten the rhizome through the holes made. In addition to the above, drip irrigation makes it easy to saturate plants with liquid minerals.
This elementary system will hydrate the sprouts over a period of 1-3 days. Do-it-yourself bottle watering is suitable for gardeners who do not have the opportunity to water their plantings every day.
Sprinkler system
Sprinkler irrigation is the best option for watering your garden and lawn. Advantages of a sprinkler irrigation system:
- possibility of pressure adjustment;
- harmonious integration of elements into landscape design;
- simultaneous irrigation of soil and plant foliage.
The main component of the system is a sprinkler, also known as a water sprayer.
Rotary sprinklers irrigate an area within a radius of up to 30 m. Also, thanks to a moving head, they can change the angle of water supply.
For lawns, retractable sprinklers are produced; they appear above the surface only during operation, and then hide back.
Fan (pulse) sprinklers supply water at regular intervals. They cover an area with a radius of 18 m. Water is supplied in only one direction.
Basic rules for watering plants
It is customary to irrigate crops on the site at a certain time of day: in the evening or early in the morning. It is impossible to carry out such a procedure under bright sunlight, since drops of water act as lenses and leave burns on the leaves and flowers of plants.
In addition, in hot weather, water from the soil will quickly evaporate, and the roots will not have time to become saturated with moisture. Some useful recommendations will help you properly organize watering on your site:
- Crops should be moistened regularly using moderate portions of water. In hot weather, you can give the plants a little more liquid or water them more often. However, you should not allow moisture to stagnate in the soil, otherwise this can lead to the formation of rot and the occurrence of various diseases.
- Do not forget that when the soil dries out after watering, a hard crust forms on its surface. This crust slows down the penetration of air to the roots and prevents moisture absorption during subsequent waterings. To avoid such problems, the soil near the plants must be loosened, but this should be done only after it has dried.
- For most vegetable and garden plants, for example, vegetables, berries and flowers, the watering depth should be at least 20-25 cm. As for trees and shrubs, whose root system lies deeper, they need to be watered with a large amount of liquid so that the soil is saturated with moisture at least 0.5 m.
- Ordinary straw will help make hole watering more effective. Place a small layer of straw in each hole to prevent the soil near the roots from becoming crusty. In addition, straw will help retain water in the soil for quite a long time - this is especially useful if you cannot water the garden every day. It is also useful to use straw when growing strawberries or wild strawberries - this way the berries will remain clean after watering.
- The stream of water during irrigation should not be directed at the roots of the crops. This washes out the soil and damages the root system in young seedlings, and can cause root rot in mature plants.
- You can water the area only when the soil is completely dry after previous moistening. To make sure that the soil is dry not only on the surface, but also in depth, drive a metal rod into the ground. Wet soil will stick to the metal in small lumps.
- For each type of crop, there are certain irrigation norms, which relate to both the frequency of procedures and the amount of water used. Proper planting of plants will help simplify the process of irrigating the site, that is, it is better to plant crops with similar watering rates next to each other.
- When irrigating your garden by hand, you should not rush. Water the soil in small portions, allowing the moisture to be well absorbed into the soil. If you pour out the entire amount of water at one time, the excess will flow to another part of the bed.
- Plants that have been left without water for a long time need to be watered very carefully, supplying moisture in small portions and as often as possible. This will restore the soil's ability to properly absorb liquid.
- If evergreen crops grow on your site, then even before the first frost sets in, you should water them as much as possible - this way they will be saturated with enough liquid and will overwinter well.
- Very often, watering the garden is combined with fertilizing the plants. A small amount of fertilizer is dissolved in water and irrigation is carried out. Thus, crops constantly receive a small portion of nutrients, which has a beneficial effect on their development and growth.
- To water the garden, you can use ordinary tap water, but rainwater is considered the ideal option. If you do not have the opportunity to collect enough water, then try to irrigate with settled water. Pour the liquid into large open containers and leave it in the sun - this way the water will not only settle, but also heat up to the desired temperature.
- It is advisable to moisten the crops with water at a temperature not lower than room temperature. Firstly, excessively cold liquid is poorly absorbed by plant roots, and secondly, a temperature difference can cause shock in young shoots.
Drip system
Drip irrigation is used in vegetable gardens and greenhouses. With drip irrigation, only the root zone of plants is moistened, since water is supplied pointwise.
Advantages:
- saving water. The soil is moistened only near the roots;
- water does not get on the leaves. On a sunny day, water on the leaves can cause the plant to burn;
- Possibility of adjusting water pressure.
When laying a drip system, the water supply pipe should pass close to the plants - at a distance of 20-40 cm. In relatively narrow beds, one pipe is installed between 2 rows of plants.
Drip irrigation from polypropylene pipes
If we compare pipes made of metal and polypropylene, the latter have more advantages. In addition, the material is lower in cost and is better suited for self-assembly of drip irrigation.
At the beginning of assembly, you need to take care of the following points:
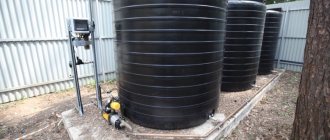
- You will need a 100 liter container. The temperature of the water in it will increase under the influence of sunlight. This also has a positive effect on plant growth.
- Ball valve and filter for water purification. If it is missing, the system will malfunction.
- Bottle for mineral fertilizers
- Pipeline
- Bends from polypropylene pipes.
To determine the size of materials, you need to mark the ground. For irrigation purposes, 1 square meter of area will require approximately 30 liters of water in 24 hours. At the same time, it is necessary to calculate the number of branches and the length of the segment between the droppers.
To maintain the normal pressure, the bottle is fixed at a height of 1-2 m. The tap is installed at a height of 10 cm from the bottom. On the opposite side it is attached to the country water supply.
To fix the set level, it is better to place a valve with a float. Installation of pipes for drip irrigation must be strictly followed according to the instructions. For everything to work correctly, the pipes must be secured to the fittings using soldering.
The pipes come into contact with the main line at a depth of 75 cm. The filtration installation is located on the side. At the end of the main pipe, a plug is made. After all this, you can start drips. That's all, the drip irrigation system is ready for use!
Subsoil irrigation
When installing such automatic watering, pipes are laid underground and water is supplied directly to the roots. The pipes are dug to a depth of 20-30 cm. This is done simultaneously with planting the plants.
The distance between the two supply pipelines is 40-90 cm, and the distance between the water supply holes located on the pipe is 40 cm.
Basically, the subsurface irrigation system is used in greenhouses for growing crops on an industrial scale and in botanical gardens.
Watering vegetables in open ground
Let's look at the watering requirements for some of the most common vegetable crops.
There are 4 groups of vegetables based on their ability to absorb water. For ease of remembering, we have placed them in a table.
| Group | Water requirement | Name of crops |
| 1 | They use up water quickly; fractional but frequent watering is required. | Cabbage, cauliflower, Chinese cabbage, kohlrabi, lettuce, radish, cucumber, spinach, celery |
| 2 | They have a developed root system and are able to extract water at a depth of up to 80 cm. Moisture consumption is economical, so frequent watering is not required. | Tomatoes, carrots, melons |
| 3 | They use water sparingly, although it is not easy for them to extract it from the soil. They need watering only during the first half of growth. | Onions, spring onions, garlic and other onion crops |
| 4 | Absorbs water well and uses it intensively. Responds gratefully to irrigation. | Beet |
Watering also depends on the period of plant growth and soil composition. For young tomato and pepper plants, 0.5 liters per bush is enough. During the flowering period, the norm increases to 0.7 liters. And adult plants need at least 1 liter of water. Cucumbers are more moisture-loving, and they require 0.7 liters even before flowering begins. During fruit formation - 1 liter, and after - at least 1.5 liters per plant.
As for the soil, keep in mind that sandy and light loamy soil dries out much faster than clayey and loamy soil. This means that the plants in it need to be watered more often.
Squeeze a handful of soil in your hand; if a lump has not formed, the soil is too dry.
How to water tomatoes in open ground
1-2 times a week, preferably in the morning, under the root with settled or collected rainwater at the rate of about 30 liters per 1 sq.m. Tomatoes without watering begin to signal their poor condition: the leaves become smaller and turn yellow, curl, the ovaries fall off, the resulting fruits slow down their growth and ripening, and in critical cases, blossom end rot appears on them.
How to water ground cucumbers
After the flowers appear, be sure to use warm water every 3-4 days at the rate of about 30 liters per 1 sq.m. You should not water under the root - if the root collar is constantly flooded, the root may rot. In addition, in good weather, cucumbers tolerate any other method of watering (sprinkling, over leaves).
- How to water cucumbers correctly for a good harvest
Everything you need to know about watering cucumbers, depending on the time of year and growing conditions.
How often to water peppers and eggplants in open ground
For uniform growth and full flowering, they require constant soil moisture, but do not tolerate sprinkling. Water them at the root 1-2 times a week with warm, settled water at the rate of about 15-25 liters per 1 sq.m, soaking the soil under the bushes to a depth of at least 25-30 cm. At temperatures below 15°C, watering should be stopped altogether; in order to avoid damage to plants by gray rot.
How often to water cabbage in the garden
Watering cabbage in open ground should be abundant and frequent - every 2-3 days at a rate of at least 30 liters per 1 sq.m., soaking the soil to a depth of at least 40 cm. In this case, the water can be quite cool. In hot weather, you can use sprinkling; in cloudy weather, water at the root. When there is a lack of moisture, cabbage is actively attacked by pests - cabbage fly and cruciferous flea beetle.
How often to water carrots in open ground
1-2 times a week with cool water at the rate of about 30 liters per 1 sq.m., or sprinkling. The root crop is most demanding of moisture in the first half of the growing season (signaling a lack of liquid by darkened, curled leaves), then the norm can be reduced, and three weeks before harvesting, watering can be stopped altogether.
Is it possible to water beets with cool water?
Yes, it is also not capricious in terms of watering temperature - the main thing is that the soil is moistened at least 30 cm deep. Moreover, over the entire season, in normal, non-drying weather, it is enough to water the beets only 4-5 times, by sprinkling or at the root in the morning at the rate of about 30 liters per 1 sq.m. The plant will “inform” about a lack of moisture by the darkened (purple-brown) color of the tops and the release of flower stalks instead of the formation of root crops.
How to properly water onions and garlic in the garden
These crops should not be watered too much - they are very “thirsty” only during the period of bulb formation, when they will have to allocate at least 35 liters per 1 sq.m. Before this, watering once a week is enough, moistening the soil only 10-15 cm deep (look at the tips of the feather to see if they have begun to turn yellow). About a month before harvesting, watering should be stopped altogether: excess moisture will cause the bulbs to ripen worse and will be poorly stored in winter.
Do not forget that the attitude to watering can be different even within the same crop for different varieties. In general, varieties of early ripening are more demanding in terms of moisture, while later varieties are less demanding.
If 10-12 cm of soil is saturated with moisture, it means you did everything right and the plants will not suffer from thirst.
The principle of operation of automatic watering
First, of course, you need a source of water. A pump is connected to it, which will pump water into the system. A liquid distribution unit is connected to the pump.
Pipes are connected to the block, through which water is supplied under pressure to the sprayers. Filters are installed at the beginning of the chain so that contaminants that may be in the water do not clog the system.
Sensors are also installed, which are responsible for automating the entire process. A programmer is connected to the liquid distribution unit.
It is this computerized controller that controls the garden watering system. The controller programs the time at which the sensors should open the valves to supply water.
Gravity irrigation system for a garden in the steppe
Let's look at several drip irrigation systems used on the plots of FORUMHOUSE users.
A member of the Zyoma portal was disappointed with the results of one of the first dacha seasons on his site (former steppe with a complete lack of shade). There was no rain for two months, and one day it was not possible to go to the dacha for two weeks. During this time, half of the garden trees simply shed their leaves.
ZyomaFORUMHOUSE user
In general, I thought about a drip irrigation system.
Since there were no garden beds at the dacha, only the trees needed water; I didn’t want to waste it on steppe wild plants. Hence the first requirement - watering must be targeted. The second requirement stemmed from the high pressure (with significant surges) in the water supply system at the site, which could lead to the hoses breaking. This means that watering should be free-flowing.
To install a gravity drip irrigation system, the following was required:
- Tank insert - 2 pcs.
- Filter 1/2 – 2 pcs.
- Connection 1/2 for 5 mm hose.
- Microhose 5 mm - 100 m.
- Tees for microhose - 50 pcs.
- Adjustable droppers 0-6 l/h - 60 pcs.
- There were already water containers - two two-hundred-liter oil barrels.
The barrels were placed on four pallets. For convenience, the hoses were pinned to the ground with wire staples. Droppers and tees were simply inserted into the tube. The entire irrigation system (80 meters of microhose) is assembled and disassembled in 10 minutes, and for winter storage it is placed in a plastic bag.
You can see in detail how this system works in the photographs.
These two barrels provided adequate watering for forty fruit trees and shrubs. The optimal watering intensity was selected for each plant.
Depending on the adjustment of the drippers, the water in two barrels with a total volume of 400 liters lasted, on average, 80 hours - that is, in the middle of the week I had to go to the garden and fill the containers. After installing this system, all watering work began to take 10 minutes - on weekends, which were spent at the dacha, the drippers were “opened slightly”, before leaving on Sunday evening they were “covered”. This is all.
Zyoma's mistake was that it chose transparent microtubes.
The hose for the drip irrigation system must be black.
Therefore, the tubes turned green, some droppers had to be opened all the way so that the water pressure would wash away the silt from the walls of the tubes.
Pressure irrigation is more convenient than non-pressure irrigation; it practically eliminates siltation. Zyoma had the idea to fully automate the irrigation system by connecting it to the water supply through a Chinese timer. The experiment ended sadly.
Zyoma
The pressure in our system is quite high and unstable (more than 4 atm sometimes), and it all ended with a pipe burst in my absence (minus 30 cubic meters of water on the meter, it’s good that everything is under the apple tree).
But in general, this irrigation system, although it has a temporary status, has proven to work well - despite the constant +40 in the sun, sometimes turning into +50, all the plants are alive. The next season, the irrigation system was improved - since for 40 fruit trees and shrubs one micropipe with a diameter of 5 mm was still not enough, a main hose of a larger diameter was laid, from which branches with a diameter of 5 mm were already made.
Design and installation
Regardless of the choice of automatic irrigation system, it is important to correctly install all its elements.
When designing, you need to carefully consider where to place the water sprayers so that you don’t have to manually water forgotten areas later.
How to water yourself? Let's look at each design stage in detail.
Useful tips
- The barrel that you will use for fertilizing should be made of plastic. Firstly, this material does not rust, and secondly, it is easier to clean it of fertilizer residues. Read also: Strawberries and garden strawberries.
- Filters in the system must be changed regularly.
- It is advisable to use liquid or water-soluble substances as fertilizers to avoid the formation of deposits on filters and pipes.
- After fertilizing, the drip irrigation system should be thoroughly rinsed with a stream of clean water.
- When putting the system away for winter storage, rinse it thoroughly again, then dry it, and only then fold it and hide it.
Development of a watering system diagram
In order not to make mistakes during development and not forget anything, you need to draw a site plan. The plan should indicate the source of water, buildings and green spaces.
For the plan, choose a scale, for example, 1 meter of plot = 1 cm on the plan. The desired irrigation zones are then marked on the plan.
Next, draw the lines along which the water pipes will be laid. For rain irrigation, the radius of action of the sprayers is indicated on the plan. And when installed, the sprayers are placed relative to each other at a distance from their radius of action.In addition, you need to take into account that tall bushes and trees will retain water, so additional sprinklers are installed to water the plants behind them.
Project calculation
A specialist will help you perform all the necessary calculations for an automatic garden watering project. You need to calculate:
- site watering rate;
- volume of water tank;
- pump parameters;
- diameter of main pipes and tubes inside zones.
If you have knowledge of hydromechanics, you can carry out the calculations yourself, but it is better to turn to professionals, especially if the territory is large.
Selection of sprinklers
For individual planting areas in low parts of the site, drip irrigation is the best choice. But the lines for rain and drip irrigation must be separate. Different types of sprayers cannot be installed on the same line.
Different types of sprayers require different system pressures, so you won't be able to adjust the pressure in such an uneven line.
How to make a budget irrigation system with your own hands
When there is not enough money to buy equipment, ingenuity comes into play. Almost every device described above can be invented with an analogue, assembled from scrap materials.
A container raised to a height will create natural pressure in the system, which is sufficient for drip irrigation.
For drip irrigation, you can use simple garden hoses, in which it is enough to puncture a series of small holes sufficient to allow water to seep through.
When I was a kid, everyone made sprinklers. A similar technology is used for sprinklers.
Necessary materials
If you are knowledgeable about plumbing and electrical installations, you can install automatic irrigation yourself. The following materials and equipment will be required:
- pump;
- programmable controller;
- wires and corrugated pipe to protect them;
- plastic pipes;
- fittings, tees, valves;
- sprinklers (sprayers).
The installation of pipes is carried out in accordance with the lines that were drawn on the plan.
We check the water intake for throughput
A ready-made plan allows us to install the required number of sprinklers. However, before installing the system, we must find out whether the productivity of the water supply source is sufficient to effectively service the system being installed.
We do it this way:
- take a meter-long hose with a diameter of about 2 cm and connect it to a water source;
- We immerse the second end of the hose in a 10-liter bucket and measure the time it takes for it to fill with water. To obtain more accurate measurement results, we carry out measurements several times during the planned time of watering the site;
- We measure the distance between the water intake point and the most distant sprinkler. Next, for every 15 m of the distance obtained, add 1 second to the time previously spent filling the bucket with water. In our example, the source bandwidth is 60.
Now we determine whether the water intake can ensure the simultaneous operation of all planned irrigation lines. The need for sprinklers remains the same and is determined in accordance with their coverage area.
In our example we set:
- 180 degree devices with a coverage area of up to 200 m2—2 pieces. The water requirement of each device is 12, for a total of 24;
- 270 degree sprinklers with a coverage area of up to 200 m2 – 2 pieces. Each person's need is 14, for a total of 28;
- 180 degree device with coverage up to 50 m2 – 1 piece. Need – 7;
- 270 degree device with coverage up to 50 m2 – 1. Requirement – 9;
- 90 degree sprinkler with a coverage area of up to 50 m2 – 1. Water requirement – 6.
In total, the water requirement of our irrigation devices is 74. The water intake is only capable of delivering 60. It will not be possible to connect all devices to one line for simultaneous use. To solve the problem, we make two lines of sprinklers. One will be used to service large devices, the other for small ones.
For drip irrigation we make a third line. It requires individual management, because The main lines are turned on for about half an hour every day, while the drip lines should work for at least 40-50 minutes, depending on the characteristics of the soil and the needs of the plantings.
The drip line and sprinklers cannot be connected to a common line. With such a system arrangement, the area served by sprinklers will either be watered too abundantly, or the area with drip irrigation will not be able to receive liquid in sufficient volume.
Pipe laying
Pipes are laid on the ground or underground. The option of laying on the ground is a summer option for watering the garden plot. This structure is dismantled for the winter.
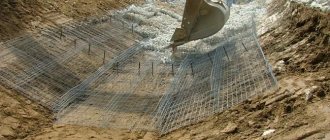
When installing a permanent automatic irrigation system, a trench with a depth of 30 cm is dug to lay the pipeline.
For the main center line, choose a larger diameter pipe. Thinner pipes are connected to it. They use polymer pipes that are not susceptible to rust. Before burying the pipeline, a working test is carried out.
It is also necessary to install a valve to reduce pressure; it will be needed to drain water when preparing the line for winter. The valve is installed in the drainage well.
To save water, install a sensor that detects soil moisture. During rain, such a sensor will block the start of irrigation.
We automate the system
To regulate the operation of the system, we install a programmable controller. Using this device we can set the time to turn on and off the irrigation. To protect the device, it is recommended to install it indoors, for example, in the basement.
Near the water supply tap we install an inlet column for connecting the system, as well as a special installation box for placing shut-off valves according to the number of irrigation lines.
We have 3 of them. We connect each valve to the controller using a two-wire cable. We divert one irrigation line from the valves. Such arrangement of the system will allow it to be programmed to turn on each irrigation line separately.
We arranged the lines as follows:
- one was allocated to power large sprinklers. For the manufacture of the line itself, 19 mm pipes were used, for branches to the sprinklers - pipes of 16 mm diameter;
- the second was used for small sprinklers serving an area of up to 50 m2. The pipes used were similar;
- the third line was allocated for drip irrigation. A 19mm pipe was used to make this line. Next, we connected a special drip pipe to it. It is made in the form of two closed loops. We connected the end of the drip pipe to the supply pipe.
To improve irrigation efficiency, we included a rain sensor in the system. It will not allow watering to turn on during rainfall. We connect the sensor to the controller according to the included instructions. In most cases, the controllers themselves are plugged into a regular outlet, which is very convenient.
Installation of connecting elements
Polymer pipes are fastened together with compression fittings. It is at the connections that leaks can appear over time. Therefore, all tees and taps are mounted in hatches for ease of access.
Such a hatch is not buried in the ground in order to provide quick access to the connections in case of need for repairs. A separate tap is installed for each individual line.We water the garden. Watering methods (assembly)
We water the garden. Watering methods (assembly)
Drinking bottles
As you know, tomatoes are very sensitive to a lack of moisture in the soil, and we cannot always water them often. There is a way to provide them with water. Plastic bottles help us with this. Using a hole punch, we make several holes in them along the entire length and on all sides and bury them in the ground near each bush so that the neck protrudes slightly from the soil. Before leaving, if you need to be away for several days, fill the bottles with water and screw on the cap so that it does not evaporate. Water seeping through the holes slowly penetrates the soil, and your tomatoes are always watered.
Four ways to water your garden
The simplest option. Cut off the bottom of a plastic bottle and make 4-6 holes in the cork. They should be medium so that the water does not flow out quickly. It is better to make small holes first and then enlarge them if necessary. Stepping 15-20 cm away from the stem, dig a hole 10-15 cm deep. Insert the bottle into it with the lid down at an angle of 30-45 degrees. As you walk along the beds, fill your bottles with water. Through the holes in the lids it will slowly flow directly to the roots.
Drip irrigation. To do this, hang the bottles with the bottom cut off, the cork down, slightly to the side of the plants. Pour in water and adjust its flow by unscrewing the cap. The advantage of this method is that the water in bottles warms up well, which is beneficial for plants. To prevent drops from eroding the soil, place small, postcard-sized pieces of film. Another interesting method of watering is a hose with holes along its entire length. Dig it into the garden bed, after making holes near the desired garden plants, and connect it to the tap. Moisture will flow directly to the roots, without being spent on evaporation. Moreover, the soil around the weeds will remain dry. And this will negatively affect their growth.
The most economical option is watering with a wick. Every two meters at soil level, dig in unnecessary but intact containers (plastic buckets, basins) and pour water into them. Prepare a rope of fabric of the required length (wick). Dig it along a row of plants to a depth of 10-15 cm, and lower the end into a container of water. The fabric will be saturated with moisture and transfer it to the plants.
Another way to make watering your garden beds easier
I continue to search for ways to save energy on watering my beds. I’m definitely already doing drip watering in my garden beds. I already saved two barrels. But I came across another simple method, which is also easy to make yourself. Sorry for the poor quality of the drawing-scheme, but, in principle, if you don’t read the letters, everything is clear from the drawings.
So: Watering vegetable crops at the dacha is always a problem both for those who live there permanently in the summer and for those who come on weekends. Systematic watering requires a lot of effort and time. After them, after a day or two, the soil must be loosened, especially on loams, otherwise a soil crust will form, which does not allow air to pass to the roots, cracks and tears the roots.
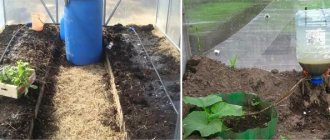
It is advisable to water with warm water. Uneven watering creates increased humidity in greenhouses and shelters. These problems are largely solved by drip irrigation (Fig. 1). I have been using something similar to it in my garden for many years - using wicks I pump water to the roots of plants from various containers. Water flows drop by drop from the container under the plant over a long period of time. I don’t know of a simpler, more reliable and cheaper way. This type of irrigation allows water to be supplied directly to the root zone, using it very economically. Over the past 5–6 years, I have tried various devices for such watering. For example, the simplest and most accessible to everyone. In a plastic 2-liter bottle with a closed cap, I cut a hole on the side (you can leave it with a cap) for the wick and pouring water. I place the bottle horizontally next to the plant with the hole facing up and lower a pre-moistened wick (1 cm wide cloth strip) into it. Such a wick from a 2-liter bottle continuously pumps water under the plant in three days. There is a circle of moist soil around the plant with a radius of 10–15 cm. By adding water to the bottle every 2–3 days, I provide the plants with continuous watering. But, of course, it is better to organize subsoil irrigation. I place the bottles next to the holes prepared for planting seedlings. I lower the wick with one end into the bottle and the other to the bottom of the holes. At the same time, I put strips of film under the wick and on it so that the water does not evaporate from it. I plant the plant in the hole and immediately hill it up. The soil around the plant remains dry and loose, which facilitates air penetration, and moisture flows through the wick directly to the roots. To ensure that the water evaporates less and does not turn green, and the greens do not clog the wick, I close the bottle with a piece of black film. I also cover the soil around the plant with the same film. Instead of bottles, you can use other containers. They should be wide, but no more than 15–16 cm high, so that the wick can completely pump out the water.
For example, from a 10-liter canister lying on its side (a hole is cut in the other side to fill in water and wicks), two wicks pump out all the water in a week. The speed at which water is pumped out by the wick is uneven - faster if the container is filled to the brim, and slower when there is half as much water left in it. If the area is flat, for example, a garden bed, then you can do without containers. In recent years I have been watering tomatoes, cucumbers and cabbage this way. In the spring I add well-rotted organic matter to the beds. I dig up the soil and level it. Then, in the middle of the ridge, along its entire length, I dig a ditch 40–50 cm wide and 10–15 cm deep. I also check its horizontality by level.
I seal the bottom and side walls of the groove. Then I line the bottom and its walls with a strip of film (necessarily intact), which is 30–35 cm wider and longer than the groove. I pour water onto the film. It turns out to be a mini-pool (Fig. 2). Along its long sides I mark places for planting and dig holes for planting seedlings. I arrange the wicks so that one end lies at the bottom of the groove, and the other at the bottom of the hole. I put a strip of film under each of them so that the wick does not touch the ground and only the end, 4–5 cm long, lies on the ground in the hole. I cover the top of the wick with the same strip. Having planted the seedlings in the hole, I water them well and immediately hill them up. So that the water evaporates less, and most importantly, does not turn green and the greenery does not clog the wicks, I cover the pool groove with a strip or pieces of black film. If the bed is sloping, then you can make several pools on it on horizontal sections (steps). As the wicks suck water out of the groove, I add it every 12–14 days. In the greenhouse, to save land, I used a steel pipe with a diameter of 150 mm and a length of 6 m for irrigation. The pipe is installed on supports strictly horizontally, its ends are plugged. Holes are drilled at the top for wicks, and an oval hole is cut at one edge for pouring water. A year ago, I installed fittings from the drain tank (float and valve) into the pipe. As soon as the water level in the pipe decreases, the valve opens and water from the barrel by gravity (the barrel is installed above the pipe) fills the pipe, the valve closes. My neighbor made a long narrow trough instead of a pipe. Thus, equipment for drip irrigation can be made from scrap materials, and the absence of any adjustments facilitates maintenance and makes the system trouble-free in operation. The water in the container is filled with cold water and supplied to the plants with warm water. With this type of watering, the air in the greenhouse remains dry, water is used sparingly and is supplied directly to the roots. The frequency of adding water to the container depends only on its volume. Thanks to the uniform supply of moisture to the plants, cabbage and tomatoes do not crack, and cucumbers do not become bitter. It is also important that water in containers covered with black film heats up well on sunny days, and at night, when it cools, it heats the air. By pouring filtered solutions of minerals or infusions of organic fertilizers into containers, you can fertilize by only reducing the concentration of the solutions.
Winter protection
To prevent the automatic irrigation system from deteriorating when frost sets in, the water from it is completely drained before the onset of real cold weather. To do this, use a pressure reduction valve.
All threaded connections that are above the ground are disconnected and stored for the winter. If you do not want to dismantle the sprayers and drippers for the winter, then the system must be purged after draining the water.
Purge operating pressure up to 6 bar. By completing these measures, you can be sure that when spring comes, your automatic watering system will be in working order.
The cost of installing an automatic irrigation system will pay for itself by saving water and your time. Automatic watering is targeted and adjusted according to the desired schedule. Such a garden watering system will allow you to free up a lot of time for other activities and just relaxation.
Organization of drip irrigation
The drip irrigation device provides the plants with the right amount of water. The portions are small. When carried out correctly, the plant roots and the soil around them are moistened. Water distribution establishes optimal crop nutrition. They do not dry out or rot, which often happens when overwatered.
Not a single drop of liquid is wasted if you carry out drip irrigation yourself correctly. To accomplish the task, you only need to select the necessary tools and materials. After this, making a homemade design will not be difficult.
What will you need?
To install the system, you should take several pipes or plastic bottles. The gardener himself makes the choice of what is easier for him to use. If the area is small, it is suggested to use bottles. For a large area, it is better to take pipes. Let's look at each option in more detail.
How to do it?
To arrange the bottle variety, take a one and a half liter container. It is hung over the beds with the neck down or buried in the soil. First, several small holes are made in the lid, and water that has settled for several days is poured into the container.
You can make holes with a heated needle. Typically, one bottle provides nutrition for the culture for 5 days. The bottom of such a container is cut off, so you can easily replenish the liquid supply.
If the plot has a large area, professional gardeners recommend the use of pipe structures.
In preparation, a water tank is buried in the soil, several pipes are laid, connecting them with adapters and leading them to the main source of moisture. At the next stage, small pipes are laid with holes made in their surface.
There are special branches from the pipes to each plant. Usually, the remains of droppers are used for these purposes. They allow you to moisten crops, providing them with nutrition.
If you do not want to encounter blockages, you should regularly clean the structure. To do this, a filter is installed at the entrance to the tank. It separates water from dirt and sand. Absolutely clean liquid is supplied to the crops.
Photo of watering the site
Total
Category: Garden