Garden paths are necessary on any site. They protect beds and flower beds from destruction by inattentive household members, and allow you to go out into the garden even on a rainy day. Made in the same style as other buildings, the paths will complement the landscape design of the site and help place the right accents. It is very important to carefully consider their creation so that, out of ignorance, a city path that looks more like a sidewalk does not appear in a natural garden. A Japanese step-by-step path will also look unnatural in an English park. A form for pouring garden paths will help you create a path in the desired style. Today we’ll talk about how to do it.
- 2 Should I buy a ready-made mold or make it myself?
2.1 Homemade option #1 – form made from wooden blocks
- 2.2 Homemade option #2 - sheet metal mold
What are the tracks for?
Garden paths perform two important functions:
- Improve landscape design, give the garden a well-groomed appearance;
- After precipitation, it will be possible to cross the site along the paths, get to the gazebo, etc. The paths are easy to clear of snow. So improved trafficability, zoning, emphasizing the boundaries of flower beds - these are the functional tasks of the paths.
Unusual decor
Often, hand-made tiles look gray and monotonous. To give it an original appearance, the following decorative options are used:
- Pebbles and other stones. It is allowed to use multi-colored stones, which are laid out on the surface in a chaotic form, without waiting for hardening. Each element is laid by sinking it into the solution.
- Pieces of dishes or ceramic tiles. Such elements are attached in the same way as in the case of pebbles and various stones. If desired, you can create some original drawing or pattern.
- Prints. This is one of the most original and memorable decorative options, which involves creating any prints by pressing on a solution that has slightly stuck.
To give a unique design, use various prints and patterns. - Dye. Finished products can be painted in any color, interesting designs can be created, but varnish must be used as a fixing agent. Everything needs to be done as carefully and slowly as possible.
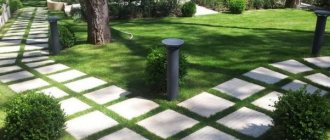
What can garden paths be made from?
- Paving slabs. Paving stones have different shapes and colors. The durability and wear resistance will pleasantly surprise you.
- Concrete paths. Filling paths with concrete is a budget-friendly and effective option, but the aesthetics of such paths leave much to be desired.
- Large format porcelain tiles. Porcelain tiles are dense, highly durable and resistant to temperature changes. All this makes it a popular exterior cladding. Large tiles can be laid on a flat base as a path.
Types of different molds for filling garden paths
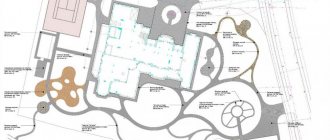
How to arrange paths in the garden
A summer cottage is a place where you want to switch away from the bustle of the city and take a break from the gray, faceless landscapes. Therefore, it’s nice when grass not only grows in the garden, but you can walk along beautiful paths. In addition, equipped paths provide an opportunity for safe walking in the garden at any time. After all, you can slip on the grass after rain. Different materials are used to make tracks :
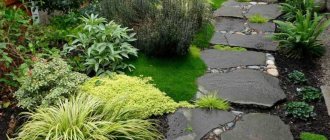
- natural stones (limestone, sandstone, marble, basalt, granite);
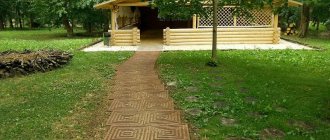
- wood (boards, tiles, saw cuts);
- paving stones;
- paving slabs;
- bricks;
- gravel;
- plastic;
- tennis player (covering the same as on the courts);
- concrete.
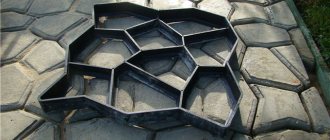
Each of them has its own advantages and disadvantages, but this article will only talk about concrete paths. To make them, you need to buy formwork for the paths. It will become the basis for pouring the concrete mixture.
Formwork for paths Source fermerslife.ru
Paths made using special molds
What's the point? Cement-sand mortar is poured into the molds under the tiles. As a result, the path turns out to be blocks that imitate a path paved with stones. The result is a beautiful and neat pattern that can be diversified and enlivened with unexpected color schemes and variations.
What are the advantages of molds for pouring a garden path?
- Beautiful and neat appearance.
- The filling process is accelerated.
- Unlike a solid concrete path, which will take a long time to dry, a fragmented path will dry faster.
- If you make your own molds, you have the opportunity to come up with an individual design.
The finished concrete path will be durable, resistant to constant walking and friction, and you can even drive a car along it. Additional painting and spraying will improve the strength characteristics and improve the appearance. Purchased form for a garden path - video
Creating a solution
The basis of the solution that will be poured into our paving forms will be cement and sand. You will also need to add crushed stone, plasticizer and fiberglass to them.
Detailed recipes for various solutions can be found on the Internet, although large packages of forms sometimes come with complete instructions.
The last element of the solution can be the dye that we talked about earlier. This is necessary in order to get a certain color of the path, for example, if it goes from the steps of the house, and you want the color to match.
Let us warn you right away - achieving the same color in such conditions is quite difficult, and then you should consider the option of using completely different colors - one for the steps, and the second for the paths along the site.
We use purchased forms
Store-bought products are a great option. They are durable and suitable for refilling. Their cost is low, and time for independent production is saved. Plastic matrices are most often used. How to fill a path with their help?
Let's consider two options:
- pouring all fragments of the path and their subsequent laying;
- pouring a concrete path in place on a prepared base.
First option: laying ready-made elements
- You need to prepare the foundation. Do not pour paths onto turf or unprepared soil. Next spring the grass will sprout, the soil will shrink due to rain and the concrete will crack.
- Remove a layer of soil 5-10 cm thick.
- Cover it with crushed stone and compact it well.
- The boundaries of the path are marked by concrete curbs. For them, trenches of the required depth are dug, after which the curbs are installed on a concrete solution. Their position is checked with a level; they must be in the same plane.
- Sprinkle sand on top of the crushed stone, which is wetted with water. Level the sand so that it is in one plane. Use two pipes or two channels as beacons along which you can pull the sand with a building level.
- The finished fragments are laid on the prepared base. Their position is adjusted with a rubber hammer. You can tap the protruding part a little or add sand where the path has settled.
At the end, to ensure the integrity and density of the concrete elements, the path is sprinkled with dry sand. It gets into the cracks and gaps between the tiles.
Do not forget to make a slight slope; if there is no slope, there will be constant water on the path. The slope will allow water to drain.
Drying concrete tiles
Drying concrete tiles must be properly arranged. Do not dry the tiles in the sun: the moisture will evaporate too quickly and the material will become cracked.
Set up a drying area in a well-ventilated area where the paving stones are not exposed to direct sunlight. Cover the tiles with plastic tiles to help the moisture evaporate more slowly.
Do not stack the tile molds one on top of the other, they may bend and you will end up with a bowed and deformed material.
Filling in place
Filling in place requires the same preparation of the base: you need to remove a layer of soil and make a backfill. Here's what to do:
- Place the matrix on a flat base. Make sure that it stands without distortions and has the required slope.
- Prepare the mortar for concreting. Cement 400 grade, sand and water are used. Crushed stone grade 5-10 can be used as a filler, which will provide greater strength to the material.
- The finished solution should not be liquid, it should not flow beyond the tile form.
- The solution is poured into the matrix, and then the reinforcement is thrown there. The solution is distributed over the entire area using a trowel.
After the solution has set, the mold for making tracks can be removed. To make this easier to do, it is pre-lubricated with mining or something greasy. You can remove the plastic matrix after 30-40 minutes. Basic steps for filling a track.
They practice ironing of set tiles: a layer of cement is sprinkled on top of the paving stones and immediately leveled over the entire area.
If a new form needs to be installed, the previous one will serve as a beacon. You need to make sure that the new fragment is in the same plane as the previous ones.
The main thing in the process of pouring in place is to protect the path from direct sunlight or atmospheric conditions. You can cover the path with a layer of wet sawdust. Under them, within two days the path will gain maximum strength.
You should also protect the flooding area from strong winds and rain by covering the paths with plastic film or making a canopy.
Preparing the base
Before starting work, we need to prepare the plot of land on which our path will be located. First of all, we remove all the grass, especially the weeds.
At the same time, if there are any, you need to remove the remains of the old path. After this we need to remove the top layer of soil.
The standard height of the mold for paths is 6 cm, but we need to remove the soil with a margin of up to 10 cm.
Even though we use plastic molds, the base still needs to be leveled. It is not at all necessary for us to create a perfectly flat surface, like for tiles, because when poured into a mold, our mixture itself will be able to fill in minor unevenness.
Since we are making a path and not building a building, we do not need any foundation and it will be enough to simply compact the earth that will be under the path.
If you wish, you can lay a layer of sand and crushed stone at the base, because it will not only help make the path better, but will also prevent weeds from making their way to the top.
To make the path even, you can initially stretch the cord or thread along the intended boundaries.
DIY forms
Homemade forms for garden paths can be made from wood, metal, plastic or polyurethane. Let's consider the simplest option - wooden molds for pouring. Wooden molds for tiles are divided into:
- into square matrices;
- rectangular options;
- hexagons - reminiscent of a honeycomb. This filling option looks original and unobtrusive.
How to make square shapes
- To make a square matrix, use 5x5 bars. The bars form the formwork - the frame of our form.
- The bars are secured together with wood screws.
- To make the structure rigid, metal corners are attached. Now the matrix can be used many times.
- Options with a bottom are preferable. Use laminated plywood, which must be screwed to the frame.
You can make a mold without a bottom, but then you need to fill it locally. This is not always convenient: it may rain unexpectedly outside. The solution must be protected from direct sunlight, otherwise the moisture will quickly evaporate and there will be cracks in the finished fragment.
Use of wooden matrices
- Pour the prepared solution into them. To increase strength, throw pieces of reinforcement or wire into the solution.
- To make a design on the front side, place a piece of tile or stone on the bottom of the mold. When the solution hardens and you remove the tile, there will be additional decor on the front side.
- Drying is not carried out in the open sun. Place the molds in the shade to air or in a ventilated area.
Stencils for paths and their main differences
The main difference between the stencils sold is the plastic used and the thickness of the mold walls.
The quality of the plastic affects the longevity of the mold and the number of possible castings. This plus the thickness of the walls determines the cost of the stencil for the track.
The quality and comparative characteristics of plastics used in the manufacture of molds for artificial stone have been described in sufficient detail here and we will not dwell on this today.
It should be noted that stencils with a thin wall are not rigid enough and are difficult to work with both when pouring the solution and when removing the mold from the finished stone.
Plastics can have different adhesion to the cement mixture (this was also indicated in the earlier article) and this must be taken into account when choosing a lubricant.
Of course, it is better to use a specialized lubricant (there are quite a lot of them and are easy to find), but you can do it simpler and be cheaper: use machine oil or regular oil.
The characteristics of the separator greatly influence the quality of the stone surface, but in the case where stencils are used for the path, this is not important, since the lubricant will not get on the “face” of the stone and remains only on its side.