The lack of water in the house or constant interruptions in the supply of the central water supply is a reason to think about your own well on the site. This will allow you to receive water in a private home around the clock, uninterruptedly and in sufficient quantities, without experiencing any more restrictions in its supply. You can build a well yourself. The process is labor-intensive and costly, but in the future all costs and efforts will be justified. Water will flow to all buildings; it can be used for domestic purposes, watering the garden and cooking.
Types of wells
A borehole is a special structure (a working or cavity in the bowels of the earth) of a cylindrical shape, with a length significantly greater than its diameter.
Devices are divided according to depth and method of penetration. The depth of the well is determined by the location of the aquifers and the required fluid quality. Based on the terrain, aquifers are located in the earth's crust in different ways.
If the landscape is flat, then there is a high probability that water lies along the entire perimeter. If there are hills, it is recommended to drill in lowlands. The classification of structures contains several varieties.
Making a decision
Living outside the city, whether permanently or in the summer, the main problem is almost always a source of clean drinking water . Of course, in some localities it is possible to connect to a centralized water supply and forget about the problem. But for many this is impossible due to the lack of the latter, and the incoming water does not always meet the requirements.
In this case, you can build a well, or even better, a well for your home . To carry out the work, certain activities will be required:
- preliminary calculations, diagram or design of the planned water supply system;
- choosing a location on the site, for which it is better to contact a specialized company;
- direct drilling;
- water analysis;
- selection and purchase of the necessary equipment;
- installation of the water supply system itself.
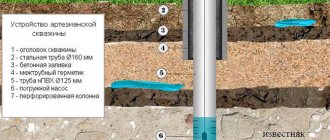
Abyssinian well
It was first implemented by the British engineer Norton in the 19th century. The maximum depth reaches 10-15m. The design consists of a set of pipes with a diameter of up to 60 mm, which are assembled together with a threaded connection. At the end of the last link there is a “wellpoint”.
This is a sharp tip that performs several functions: it pierces the soil when installing a well and purifies water from large fractions and polluting particles. Installation of the Abyssinian consists of raising the pipe using a tripod and driving it into the ground.
The advantages include compact size, the ability to be placed in any free area, ease of maintenance and low financial costs.
The liquid rises forcibly, in the classic way - with a hand pump. Photos of the Abyssinian driving well are shown below.
Installation of water supply from a source under the house
It is quite possible to organize a well under a building, but difficulties arise due to the large dimensions of the drilling equipment. In this case, you will have to use a small-sized mobile unit (MGBU). This device has a collapsible design, so you can carry it inside the house in parts.
There is another option to get water into a private home easier and cheaper. It is suitable for buildings that have not yet been built. The well is drilled in advance, at the stage of constructing the foundation. A conventional drilling rig is suitable for this option.
This method is cheaper, and you won’t need:
- build a caisson;
- dig a trench;
- lay pipelines;
- isolate them.
The construction of a well becomes cheaper due to the fact that the water source will be located in a warm place - the basement of the building. Savings can be up to 30 thousand rubles. True, there is a significant drawback - the pumping equipment and hydraulic accumulator may not fit in the basement.
Well on sand
The structure is deepened to 15-40m. The trunk is formed by a pipe with a cross section of 100-180mm. At its end there is a stainless filter element welded to the first link of the drill string. The average service life of the product with constant use is 15 years.
When the well becomes silted or contaminated, it is washed out. If the process does not lead to the desired result, then it will be necessary to drill a new shaft located near the previous one.
Among the positive aspects, one can highlight a reasonable price compared to an artesian well, and a lower content of dissolved iron.
Installation of a pipeline inside a house, how to route pipes to different rooms
Before starting work, it is necessary to draw up a detailed plan for the placement of consumers and premises inside the house. This will help you create an accurate estimate and determine in advance the required amount of material.
To install a pipeline in a house, you can use a manifold or tee circuit.
Collector sema:
It is also important how the water supply system will be installed. If the house has already been built and repairs have been completed, then external installation is carried out. If work is carried out during the construction stage, then internal ones are more often used.
Do not use metal-plastic pipes for internal installation.
Today, soldered or polypropylene pipes are more often used for installation. They are reliable, inexpensive and anyone can handle the installation of PP pipes. More information about soldering polypropylene pipes can be found in the article “Soldering polypropylene pipes: temperature table, installation instructions + top best PP systems”
Tee diagram:
The order of work with a tee scheme:
- The connection begins by connecting the pipe to the accumulator;
- Using a tee, the water is connected to the water purification system;
- Next, the pipe is laid to all consumers, who are also connected through a tee;
- All consumers are connected through a shut-off valve;
- The hot water installation also goes through the tee after the cleaning system, we connect cold water to the boiler;
- We bring the hot water pipe to the consumers and connect it through a tee.
The hot water pipe must be placed higher than the cold one, and for external installation, brackets must be used more often.
Artesian well (for limestone)
Structurally, it resembles a sand well. The main difference is the absence of a filter mesh in the lower section of the pipes and the depth of the source. Water from such structures comes from aquifers located in the limestone layer. Thanks to this, it turns out clean, with a small degree of mineralization.
Advantages:
- Performance. Capable of providing consumers with liquid in volumes from 1 to 3 m3/hour.
- Continuous water supply. Water output is not affected by pump operating time. In five-minute or two-hour mode, the flow rate is the same.
- Bacteriological purity. Artesian layers are practically not subject to pollution from the upper layer of soil and sewage runoff.
- Long service life. Operation of a well with one pipe occurs for 20-30 years. When using 2 pipes (a plastic one is inserted into an iron one), it functions for up to 50 years.
There is only one significant drawback - the high price.
Main specifics
The list of equipment for a water well that will be required for installation is well known to drilling specialists. But if you decide to carry out the work on your own, then you need to know the basics of well construction. In short, the main work will be drilling a mine and installing the necessary equipment.
A water well must be equipped with:
- Caisson;
- Pumping station;
- Power source (electric motor);
- Well head.
Layout diagram relative to the house and water layers
Installation of the necessary equipment
Arrangement activities provide:
- Supply of clean water;
- Protection from negative environmental influences (frost, rain erosion, etc.);
- Ability to properly maintain all devices.
Places for installing all equipment must be provided in advance, at the very beginning of work. Installation can be done both inside the house and directly near the well. The installation option at the well says that it will be necessary to build a special room to accommodate all the necessary devices.
The construction of an additional building is more convenient from the point of view of convenient placement of all elements of the pumping unit necessary for the operation of the well. You can also place water outlet and electrical equipment there.
Auxiliary devices:
- Water filtration system;
- Pressure control system;
- Pressure control system;
- Automatic control system.
If the well is located near the house, this will save on drilling work, as well as on the purchase of pipes. This arrangement also reduces the power consumption of the pump for transporting water.
All drilling work also has its own nuances. The equipment used depends on many factors, such as the composition of the soil, the location of the well on the site, and the water supply scheme.
Machine drill
Instructions for constructing a well
- Determine the drilling location.
- Prepare the tools: drill (auger, bailer), winch, rods, pump, shovel and pipes for casing. Creating a deep well is impossible without a drilling rig. Its height is chosen slightly greater than the total length of the rod.
- Dig a pit 1.5x1.5x2m. Protect the walls of such a recess with boards or plywood. The hole is necessary to prevent shedding of the surface layers of the soil during the drilling process.
- The assembled drilling tool is installed vertically and immersed in the ground. Every 50cm. the drill is removed from the ground using a winch and cleaned. Drilling continues until the aquifer is reached.
- Once water is detected, casing pipes are installed and a caisson is made. A caisson is a chamber for housing a pump. Common materials for its construction are plastic, brick, concrete or metal.
- Pumping equipment is connected.
New Year in the yard: how to beautifully decorate the yard with your own hands!- How to make a modern landscape design with your own hands?
Microgreens at home
Getting started is not very difficult. The drill easily digs into the soil. But with each new dive, drilling becomes more difficult. If the drill gets stuck and does not rise to the surface, it is recommended to turn it counterclockwise and try to get it out.
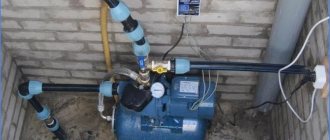
Selection and installation of equipment for water supply
Water supply equipment differs in type and installation location. The main elements are:
- a pump that is lowered into the well or placed on the surface;
- automation that ensures turning the pump on and off, protection against overloads;
- hydraulic accumulator - a container for storing water.
The hydraulic accumulator is of open and closed type. The open one is installed at the highest point of the building. A closed (membrane) hydraulic accumulator that maintains constant pressure in the water supply is preferable.
Surface pump for shallow well
Surface equipment is easy to install and is cheaper than submersible equipment. The scope of application is limited by the depth of the water level. If it exceeds 8 m, it is difficult for the pump to capture water. The maximum depth is 10 m , but in this case the equipment operates with minimal productivity and takes a long time to start up.
The most rational solution is to install a pumping station, equipped, in addition to the pump, with a membrane tank and automation. Buying a three-in-one set is cheaper than purchasing individual components.
Surface pump.
The station is placed on the surface, the hose from it is lowered into the well. This simplifies installation and maintenance. The water intake pipe is small in diameter, which allows the station to be used in an Abyssinian well.
Submersible pump for deep well
From a depth of more than 10 m, water can only be raised with a submersible pump. Some products are equipped with automatic control, protection against voltage surges, and dry running.
Mandatory elements of water supply equipment for a private home are a hydraulic storage tank and automation. The deep pump ensures that water rises to a great height, so there are no restrictions on the choice of location for the membrane accumulator. It and the automation can be placed at a great distance from the source of water intake - this has little effect on productivity. An excellent choice of location would be a utility room, where it is dry and clean.
The deep pump is mounted by lowering it into the well to a level below the water level along with other devices:
- cable for supplying power to the electric motor;
- plastic pipe;
- stainless steel safety rope.
Fastening is carried out to the well head.
Impact-rope drilling method
The method is based on the principle of destruction of a rock layer through the force of the fall of a tool called a downhole glass. To carry out drilling using this method, the tools are selected in accordance with the task at hand. You need to start with the tower tripod. To make it, steel pipes are needed; they can be replaced with logs. The design parameters must correspond to the dimensions of the downhole nozzle.
The principle of its operation is as follows: it falls down, destroys the soil, captures it, rises up with it and is freed from it. The unit is a pipe made of durable steel, at the base of which a tool is attached that crushes hard layers of rock. Its cutting element is similar to half a turn from an auger. It acts on the soil layer, destroying it. Half a meter from the end of the pipe there is a hole from which the rock raised up is removed. Descent and ascent are carried out by means of a cable attached to the glass. The driving glass is cleared of waste material at intervals of half a meter.