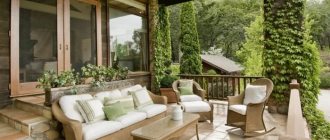
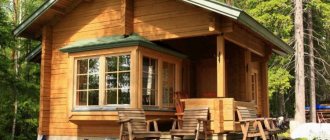
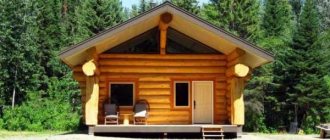
It is difficult to imagine a country house without a terrace. Households willingly gather here, and there is no better place for gatherings with guests. How to create and how to decorate this “territory of comfort”?
We will start the story about building a terrace with the basics. Literally. Obviously, you can’t lay the flooring directly on the ground. A foundation or foundation is needed, and the durability of the structure as a whole will directly depend on how well it is constructed. Let's look at the most common options, moving from simple to complex.
Gravel-sand cushion
The simplest, fastest and, most importantly, cheapest foundation is a cushion of sand and crushed stone. To create such a foundation, you need to remove the soil over the entire area of the future terrace to a depth of about 30 cm. The bottom of the resulting pit is covered with a drainage membrane (with an overlap of about 10 cm). It will serve for drainage.
The next stage of work is filling in a 10-15 cm layer of clean coarse sand. It is spilled with water and compacted thoroughly (it is advisable to use a vibrating plate). Next comes a cushion of fine crushed stone or gravel 10-15 cm thick, and this should also be compacted.
Paving slabs are placed on the compacted gravel, which will serve as a support for the logs, and the surface is leveled, filling the gaps between the squares with gravel.
This simple technology does not require either expensive materials or highly qualified craftsmen. A team of two people can complete the job in a couple of days. It would seem, why want more? But experts consider the gravel-sand cushion to be “a thing of the past”
, and there are reasons for this.
Firstly, rainwater inevitably collects in the pit. As a result, the soil will sag, which will inevitably lead to warping of the flooring. To avoid this, it will be necessary to lay drainage pipes, which means saving on the foundation will lose its meaning.
Secondly, the decking is subject to an uneven load. Due to the fact that one area is constantly walked on, and garden furniture is placed on another, the joists begin to move apart, and this also leads to warping of the flooring.
To prevent the tiles on the bulk foundation from creeping, the logs must be attached to them using clamps made of perforated metal tape and dowels
So, a gravel-sand cushion is a rather risky foundation for a terrace. Theoretically, such a foundation can serve for years, but the likelihood that it will “float” after a couple of rainy seasons is quite high.
Auxiliary structures
Auxiliary structures include everything that allows you to make the arrangement of a terrace at your dacha more comfortable. This could be a roof, railings or fences, pergolas for flowers, or even a swing. It is the additional elements that make the terraces at the dacha beautiful, unlike similar buildings in the neighbors.
Roofing options
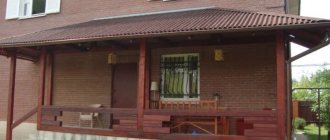
The most popular of the additional elements remains the roof. It provides protection from natural factors to both people and the flooring. If a terrace is attached to a dacha, then most often the same roofing covering is installed as on the main building.
Covered with the same material as the main building, the terrace becomes a harmonious extension of the house
Polycarbonate roofs are no less popular. They do not require a solid base. It is enough to cement support pillars made of timber or asbestos at the corners of the structure.
Green roofing is more complex. It is erected to create an additional landscape effect by planting plants and thinking through their composition. But keep in mind that for normal growth of plantings it is necessary to fill a high level of soil, create a layer of drainage and waterproofing, and this requires strong support. Otherwise, at one moment the heavy roof will collapse on the heads of its owners. In such terraces, four pillars are not enough. You will have to install supports around the perimeter of the structure and reinforce the sheathing.
If the structure is used mainly in the summer, then a removable roof can be made. It is a fabric canopy (awning), which is sold ready-made. The awning extends and retracts under the roof of the house manually or automatically. And if the terrace is separate, it is fixed using metal racks. The fabric in the canopies is acrylic, reinforced with Teflon coating. She is not afraid of precipitation or scorching rays.
Fabric canopies (awnings) can be pulled out and retracted manually or automatically
Some owners use folding umbrellas to decorate their terraces without bothering with installing the roof. In principle, this option is more than enough to create shade on a summer day, especially if you rest there only occasionally.
If the terrace is located between buildings, then you can get by with a folding umbrella, because there is already enough shade
Columnar foundation
Pillars are more expensive than a gravel-sand foundation, but they also last much longer. The classic version of supports is reinforced concrete piles. They are strong, reliable and stable, but they are rarely made today. The reason is the excessive labor intensity and duration of the process.
It is much easier and faster to install a terrace on screw piles. These are hollow metal cylinders equipped with a blade. They are simply screwed into the ground and then filled with concrete. Typically, such work takes no more than two working days.
It is worth noting that ease of installation is not the only advantage of screw piles. They can be screwed in to different depths, bringing the tops to the same level. This helps solve problems with uneven terrain of the site.
The step between columnar supports should not exceed 2 m. If this rule is neglected, the flooring boards will inevitably bend
The final stage of creating a columnar foundation is creating a frame on which the logs will lie. The material for it, as a rule, is metal pipes with a cross-section of 80×80 mm. The cell size is 80x80 cm. An alternative option is 50x100 mm timber. In this case, the cell should be smaller - 50x50 cm.
Important!
The wooden frame must be thoroughly impregnated with antiseptics or covered with protective paint, otherwise the structure will not last long.
Stage four. Roof arrangement
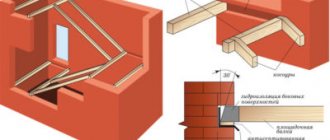
- Attach a horizontal beam (purlin) to the wall of the house near which the terrace is located. Use anchor bolts for fixation.
- After this, lay the rafters, fixing one side to the purlin and the other to the top trim.
- Mount continuous or sparse sheathing on the rafters. The first is necessary when using rolled roofing and tiles, the second when using sheet roofing (for example, Ondulina).
- Install roofing material according to the manufacturer's instructions.
To finish the terrace, you can use any paint and varnish materials - from water-based glaze impregnations to tinted alkyd paints.
Another option for an open terrace is presented in the following video:
Screed
The most reliable and durable foundation for a terrace is a reinforced cement screed 70-100 mm thick, poured over a gravel-sand cushion. Such a foundation will serve for decades. To avoid the logs getting wet, they can be laid on rubber pads. They will allow you to create a gap of about 5 mm, sufficient for water drainage. However, there is a better option - adjustable screw supports that will raise the logs to the desired height and allow you to install them absolutely horizontally
Construction of a reliable foundation
Construction of a veranda for a house with your own hands begins with the construction of a foundation and connecting it to the base of the main building.
Useful: Linen insulation: natural and environmentally friendly
Depending on the characteristics of the soil and the massiveness of the extension, choose the type of foundation:
- columnar - suitable for stable soil;
- tape - recommended for loose, wet soil or massive closed verandas.
Concrete blocks are used for a columnar foundation. The entire process of arranging the foundation can be divided into the following stages:
- Marking and digging holes 0.6-1 m deep.
- Filling the bottom with crushed stone and sand.
- Pouring a concrete pad for leveling.
- Installation of support pillars.
- Waterproofing with bitumen mastic or roofing felt.
The technology for constructing a strip foundation for adding a veranda to a house is as follows:
- Marking around the perimeter.
- Digging a trench: depth – 0.6 m, width – about 30 cm.
- Installation of formwork.
- Filling the bottom of the trench with crushed stone and sand.
- Installation of the reinforcing frame.
- Preparation and pouring of concrete mortar.
- After hardening, stripping and waterproofing of the tape.
Lags
When the foundation is prepared, it is time to install the logs, for which, as a rule, bars with a section of 50x55 or boards of 50x100 mm are used.
They can serve for quite a long time, however, provided that they are impregnated with an antiseptic or paint with protective properties. If you leave the wood in its original form, it will not last even a couple of seasons.
A more durable option is wood-polymer composite
, consisting of sawdust and a polymer binder. It has many advantages. Unlike wood, WPC does not support combustion well. In addition, he is much less “afraid” of water. The only disadvantage of such logs is that they are hollow, so water can collect inside. Typically, composite logs are used in conjunction with boards made of the same material.
Well, the most durable and strong are aluminum logs.
. They do not rust, do not burn and are not destroyed by moisture. There is essentially only one drawback - the relatively high cost.
Wooden logs
WPC logs
Aluminum joists
Whatever the logs are made of, they should be securely fixed to the foundation with stainless steel screws. The fastening pitch depends on the material - 50 cm for wooden/composite slats and 80 cm for metal ones.
Important!
You cannot embed logs in concrete and glue them together - this will inevitably lead to deformation of the flooring. And so that long slats do not interfere with the flow of water from the reinforced concrete base, they are attached one after another, not end-to-end, but with a gap of at least 2 cm.
As a rule, the distance between rows of joists when installing decking boards is 30–40 cm.
Design features of the terrace
A resting place on a personal plot can be made in the form of a closed veranda, a separate gazebo or an open terrace. Each building has certain characteristics. A terrace attached to a house is an open area without walls . Even the presence of a roof and fences is not necessary.
Design features of terraces:
- foundation - common with the house or separate, but connected to the main building;
- possible location near one wall or along the perimeter of the entire house ;
- The site is quite spacious and can be divided into several zones.
Construction of a terrace near the house provides the following advantages:
- adding useful space - the area is used as a dining room, summer living room, playground , place for sunbathing;
- the use of decorative elements - decorating a terrace can significantly transform the appearance of the house.
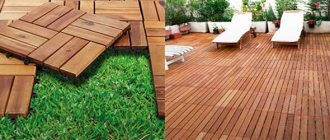
What material to choose for finishing the flooring?
Larch decking board
For a long time, the “queen” of terraces was the larch board
. And this is understandable. This breed has a very valuable quality - due to its high resin content, it is practically not susceptible to moisture. That is why larch is actively used in shipbuilding. It does not rot, and its strength is 96 MPa - higher than that of oak (94 MPa). Moreover, over time, the wood becomes harder and harder. However, larch cannot be called completely invulnerable. It needs protection, or rather, impregnation with an antiseptic. This significantly extends its lifespan.
Recently, wood has been replaced by the wood-polymer composite mentioned above.
More than half of it consists of sawdust, which is mixed with a synthetic binder with various modifying additives. Externally, such a board resembles a wooden one (only without the grain pattern). But its properties are closer to plastic.
WPC does not rot, does not cause appetite to wood-boring beetles, and burns very poorly. It does not need any protective impregnation. Its only drawback is the relatively high price. But if you consider that the average life of such a floorboard is about 50 years, the costs are justified
Another popular material for decking is the so-called thermal board. We are talking about lumber treated with hot steam under high pressure. As a result of this “bath procedure”, the wood is dried to an optimal 4% humidity. But what is more important is that during the processing process, wood sugar burns out, which serves as food for insects and harmful microorganisms. As a result of heat and steam treatment, a hard, durable, practically impervious to moisture material is obtained that is difficult to burn. All other things being equal, a thermal board lasts three times longer than a regular one. This material has two disadvantages - high price and difficulty in machining. In the oven, the board dries out quite strongly, losing up to 12% in volume. And dense material tends to split. To avoid the formation of cracks, fasteners should be installed in such a floorboard only after pre-drilling the holes.
Burning the board using a gas burner
And finally, the fourth option is burnt wood. If you walk over a board made of resinous rocks with a gas burner, you will get a moisture-resistant and, oddly enough, fire-resistant floorboard. The melted resin will close its pores, which means it will be difficult for woodworms and other small pests to penetrate inside. Surface firing not only protects the wood, but also decorates it. The board darkens, acquires a noble gray or chocolate shade, and the grain pattern appears. Well, the main advantage of this technology is that it costs practically nothing. To get strong and durable floorboards, all you need to do is purchase or borrow a gas burner.
Planning an outdoor terrace
Before you start designing an open terrace for your house, you need to decide on its location and type of construction.
Choosing a location for future construction
When planning the arrangement of a terrace, you should consider the following parameters:
- illumination of the sides of the house;
- features of the site's topography and soil type;
- view from the site;
- landscape of the territory - the extension should be combined with the design of the yard and the design style of the house.
An interesting solution for houses located on a slope is a multi-level terrace. Such an extension simultaneously serves as steps.
Accommodation options:
- Terrace to the house. This is the most popular solution, as it can be implemented in almost every building. The design requires a reliable foundation . It can be made from different materials: brick, wood, metal.
- Detached extension. Accommodation on a free plot of territory. The recreation area can be built on a raised block foundation or a monolithic foundation .
- "Ring" terrace. The extension needs a solid foundation and proper calculation. It is possible to combine the open part of the terrace and the closed veranda .
Which material is better to choose
Wood is most often used to build an open area. This is the optimal solution if you plan to build a terrace with your own hands.
Useful: Quick house construction: secrets and traps
Advantages of wooden buildings:
- ease of processing lumber;
- lightness of the material and the possibility of constructing a “lightweight” base;
- attractive appearance - wood creates a special atmosphere of comfort and coziness ;
- versatility - a wooden terrace looks organically with houses made of different materials.
Cons of wood:
- risk of fire - it is better not to set up a barbecue area ;
- the need to treat wood with protective compounds to prevent rotting and damage by insects.
A brick terrace is a durable structure that is easy to maintain. However, its construction requires significant financial costs . In addition, such an extension is not suitable for frame and wooden houses.
Development and approval of the project
Having decided on the type of terrace, its placement and material of manufacture, it is necessary to draw up a sketch of the future extension.
The project plan should show:
- the exact configuration, area and dimensions of the extension;
- foundation type;
- weight of the structure;
- type of flooring, roof structure and fencing option.
The size of the terrace should be commensurate with the dimensions of the house . Tiny extensions adjacent to a spacious building look ridiculous.
Layout tips:
- the terrace should not be less than 4 square meters. m - it is very difficult to make such an area comfortable;
- it is better to give preference to a rectangular extension - there should be a visual correspondence between the main part of the house and the configuration of the terrace;
- if you plan to install a fireplace or stove, then it is necessary to strengthen the foundation and consider the water supply to the site.
The project must be agreed upon and approved. Without obtaining permits, the terrace will be considered a self-construction , which will complicate the sale, rental or other real estate transactions in the future.
Fastening the racks and lower trim
After the foundation is poured, it is given the opportunity to gain at least 50 percent strength. Generally, concrete or cement mortar is used in either case. After this, you can begin installing the frame. At least a couple of layers of waterproofing should be laid on top of the foundation. Roofing felt or roofing felt, folded in half, is used as waterproofing. It is acceptable to use other, more modern waterproofing materials, including in liquid form.
After this you can do this:
- First, the racks are secured, after which the harness is formed.
- First of all, the strapping is done, and then the racks are attached.
In the case of the first option, when pouring the foundation, special fasteners are poured in the places where the racks are installed. In the photo below you can see what these fastening elements are. It can also be a metal plate in the shape of the letter “P”; in this case, it is poured upside down, and it is better to weld a rod at the bottom of the plate. A stand is inserted inside this letter “P” and secured with screws or self-tapping screws. Naturally, before installing it, all holes for fasteners must be drilled, and the dimensions of the plate must correspond to the cross-sectional dimensions of the racks. It is permissible to fasten with ordinary nails, which will not affect the reliability of the entire structure.
How to attach posts to the foundation
After installing and fastening all the racks, the strapping bars are attached between them.
If another option is used, the strapping beam is first installed. If, at the stage of pouring concrete, the studs are bricked up at a certain step, the task is greatly simplified. In the places where the beam is attached, it is enough to drill holes, after which the beam is placed on the studs and securely tightened with nuts to the base. After this, they begin to install the racks, armed with one of the methods presented in the image below.
Options for attaching racks to strapping beams
In any case, it is better to use metal corners, which will make the structure stronger and more reliable, especially since these racks are loaded with the roof, and this is very important.
Gallery of verandas
When the construction of the house is completed, it is necessary to build a blind area around the building. In this article we tell you what is best to make a blind area from, how to choose the right paving slabs, and describe the entire process of creating a blind area from paving slabs...
Glazing
The design may initially be conceived as open, but later use may require glazing.
Even a large veranda can be glazed efficiently and beautifully, but for this work it is better to call a specialist from a construction company. He will make all the necessary measurements and calculations, offer several options to choose from, the owner will only have to choose the most suitable one.
When choosing a specific glazing design, you need to take into account the expected strength. Because in unguarded areas there may well be intruders who want to get into someone else’s house. To stop burglary attempts, the door to the house must be reliable, preferably metal. The entrance to the veranda can be equipped with a simple door.