Almost all city dwellers have a dacha outside the city, where they go for a weekend getaway with family or friends. To make the time spent on it as comfortable as possible, it is necessary to build all important buildings on the site, such as a bathroom and an outdoor shower. It is best to make a heated shower so that taking water procedures even on cool summer evenings will be pleasant.
Design features of a heated summer shower
A heated summer shower is a unique design when, in warm weather, the water in the tank is heated by the sun, and in cold weather, an electric heating element is turned on. It is quite easy and simple to build such a building on a personal plot with your own hands. The main thing is to know the sequence of all the work being carried out, to have at hand a well-designed plan indicating all the features and nuances of the construction.
Attention: in order for the water to heat up independently under the sun in warm weather, the structure should not be placed in the shade or under spreading trees. Please also take into account that electricity must be supplied nearby for the heating element to operate.
Any outdoor heated shower consists of the following elements:
- foundation;
- plum;
- shower cabin (it includes a frame, a water tank with an electric heating element, a watering can with a ball valve, a tray and casing).
Attention : in order for the water to warm up better under the sun, you should choose a dark (black) color for the tank.
Laying the foundation
Even if the load is small, it is not recommended to install an outdoor shower without a foundation at all. Hurricane winds, a common occurrence in many regions of our country, easily overturn anything that is not securely fastened.
The foundation is made of concrete blocks or poured in the form of piles in the ground. The easiest and fastest way to lay the foundation for a small summer shower:
- drill or dig wells 60-80 cm deep;
- add crushed stone to the bottom;
- install frame racks;
- fix the supports vertically;
- fill the holes with concrete.
Metal supports must be pre-treated against corrosion, and wooden supports must be pre-treated against rotting.
It is better to lay a strip foundation under a brick building. Pour a layer of crushed stone or broken brick into a trench 30-40 cm deep and 20 cm wide, install formwork, lay reinforcement, and fill with concrete. After 3-4 days you can lay the walls.
Types of warm showers for a summer residence
According to the types of showers for the dacha, they are divided into:
- with or without doors (this option is used only in the spring and summer, when curtains are hung instead of doors);
- with a locker room;
- heated.
A simple structure intended only for use in the summer (usually country houses) is made of metal, polycarbonate, or an awning.
If we are talking about a standard-class cabin, then you should pay attention to structures with a changing room made from more durable materials.
Please note : changing rooms are twice the size of regular ones.
Screen
Screen shower
As a temporary solution, you can make a simple shower: fix a metal or plastic tank, preferably dark in color, with a tap and mixer on some elevation, and make a screen. Everything will take a minimum amount of materials, time and labor, so such a structure can be erected in a few minutes.
Heating selection
When thinking about heating water at the dacha for a shower, you need to decide in advance on its water heating system, which can be:
- portable . That is, water is poured into a special shopping bag, which is hung on a rack. Water with such a system can be filled with either warm or cold (in this case, you will have to wait until it warms up under the sun's rays). The advantages of such a system include: cost-effectiveness (there is no need to use special equipment to heat water). But, the usual volume of a portable bag is only 20 liters, which allows only one person to shower;
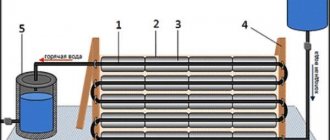
- sunny _ In this case we are talking about a tank in which water is heated under the sun's rays. If the tank is dark in color, the water in it will warm up faster. It is also recommended to make a roof with a mirror surface to quickly heat water. This heating method is most common, as it is convenient and economical;
- titanium _ The water is heated not by solar energy, but by coal or wood-burning titanium. In this case, the water in the tank will always be warm, regardless of the weather conditions outside. The only thing when installing titanium is to remember that this equipment is fire hazardous. Therefore, its installation should be carried out by specialists in this field. It is also recommended to purchase a high-quality boiler so that it strictly complies with all safety regulations and standards;
- electrical _ Involves the installation of an electric heating element. The only drawback of this option is the high energy consumption and additional load on the network. But, this is a completely safe and easy-to-use method of heating water in a tank;
- solar (implies the installation of solar panels). This is the most modern method of heating water, which is characterized by high cost. But after spending once, you will no longer have to pay large electricity bills. Consequently, this system will quickly pay for itself. To set up the system, you will need to buy solar panels that are mounted on the roof. They accumulate solar energy and heat the liquid in the tank.
Attention : when installing an electric heating element, all sockets and switches in the shower will need to be protected from moisture and grounded.
Which water heating option to choose is up to each owner of an outdoor shower to decide for himself, based on personal preferences, construction features and financial capabilities.
Size and Design
Before construction of the facility begins, you will need to draw a drawing. It is better to make the cabin spacious, at least 1.5x1.5 m. Its minimum acceptable size is 1x1 m. It is necessary to provide a locker room, 1.5x0.6 m is enough for this. In the area for the shower, you will need to mark the dimensions of the future structures, including the width of timber and boards. Pipes are installed in the corners. It is easier to assemble the upper part of the structure on the ground and then attach it to the side gratings. All axes must match. Strength and reliable fastening are important for the final design; the load from a 150-200-liter container must be taken into account. Bevels are made between the pillars. They should be placed in the thickness of the wall. It is preferable to install a pallet for the floor, a large selection of which is available in hardware stores. It is placed on a raised sand and crushed stone platform. Slots are required in the floor for drainage. Taking these nuances into account, the foundation should have a height of 20-30 cm. If there is no such foundation, the water will make a depression over time.
Choosing an installation location
A warm shower in a country house should be placed correctly so that it is comfortable and functional. Particular attention is paid to the method of heating water:
- if we are talking about solar energy, then the booth is located in a well-lit area;
- if the water is heated by a solid fuel boiler using firewood or coal, or using an electric water heater, then the location of the cabin does not matter much. But again, it will be much more comfortable to get out of the shower into the pleasant rays of the sun than in a cool and shady place.
It is also advisable to choose a place for the shower in the backyard so that the outbuilding does not spoil the neat appearance of the garden plot. Although some craftsmen come up with original booth designs that harmoniously fit into the surrounding landscape designs.
Attention : the shower should not be placed in a drafty place. Even in the summer heat, after taking water procedures with hot water, you can easily catch a cold from a slight breeze.
Drain arrangement
At a distance of no less than 3 m from the shower, you should dig a drainage hole about 2 m deep. It should be taken into account that the distance between it and the house or other building should be at least 5 m.
If the soil at the construction site does not absorb water well, you need to drill a well at the bottom of the drainage hole, whose base would reach a layer with good water absorption.
You need to install a polymer pipe into the finished well, so that about a meter section of it is outside.
Several holes should be drilled in the walls of the pipe at the upper end.
After which, the entire perforation, together with the end hole, is wrapped with geotextile.
There is a type of geotextile that resembles black isospan. In this case, it should not be used, since this material does not allow water to pass through well.
At the bottom of the pit and well, a backfill of crushed stone is made. Then a plastic barrel without a bottom or several used tires is placed in it. A hole should be made in the wall of this tank to which the pipe coming from the shower will be connected.
Next, you need to backfill the excavation, after which the pit is covered with boards or a plastic shield. The “lid” should have a vent with a short pipe and a cone-shaped guard.
Dacha owners still use their plots to a greater extent for growing vegetables and fruits rather than for recreation. On hot days after hard work you really want to freshen up, so a shower is a must. Do-it-yourself outdoor shower - let's look at how to build a frame structure.
Read how to organize a drainage pit from tires here. How durable is this system, what are its pros and cons.
On hot summer days at the dacha, it’s quite possible to take a cool shower, but if the weather suddenly turns bad or just gets cold in the evening, it’s not so pleasant to swim under ice-cold water. In this article https://aquacomm.ru/vodosnabzenie/zagorodnyie-doma-v/bak-dlya-letnego-dusha-s-podogrevom.html how to equip your shower with warm water using a heating tank.
What you will need for work
A heated outdoor shower can be built with your own hands in a fairly short time, if you have all the consumables and tools at hand. To make the booth you will need the following materials:
- timber, profile pipes, and a special profile are used to construct the frame;
- any sheet materials are suitable for covering the frame (moisture-resistant plywood, corrugated sheets, polycarbonate);
- for arranging the foundation (if necessary): cement, sand, crushed stone;
- for organizing drainage: roofing felt, PVC film, concrete with the addition of PVA glue;
- Pallets are perfect for arranging the floor. It can also be made of either concrete or plank;
- to arrange the drain you will need PVC pipes;
- Various materials are used for roof installation. The main thing is that they can withstand the entire water tank itself.
When building a shower, special attention is paid to the choice of tank. It should be roomy if several people live at the dacha. On average, one person uses from 20 to 40 liters of water. That is, if 5 people live in a country house, you should choose a tank of at least 100 liters.
Also, the tank must be made of durable materials that do not corrode. The best option is stainless steel or plastic. If we are talking about purchased products, then the tanks supplied for sale are mainly plastic. They have a comfortable flat shape, which helps to better warm the liquid inside. It is also worth considering that the tank must be equipped with a lid to prevent dirt and various debris from getting into it.
Tools in the workflow you will need:
- Bulgarian;
- sander;
- drill or screwdriver;
- concrete mixer (for arranging the foundation);
- building level;
- hammer.
“Cake” of 8 layers
I leveled the surface of the slab at the base of the future shower tray by filling it with a self-leveling floor mixture, after which I secured sheets of insulation—extruded polystyrene foam—on it with tile adhesive. The thickness of all layers was selected in accordance with the design of the drain: its grate should ultimately be 1-2 mm below the surface of the pan.
Finally, I adjusted the drain of the shower tray to the level and laid a plaster mesh over the insulation, securing it with self-tapping screws. I installed the beacons and poured the cement screed (photo 2). After the cement had gained strength (after 3 days at a temperature of +20 °C), I once again coated all the corners and joints of the planes with fiber rubber for additional waterproofing, and after it had dried, I filled it with tile adhesive. At the exit from the shower stall, I installed a water barrier made of sand-lime bricks and plastered it with moisture-resistant cement plaster over the reinforcing mesh.
To make taking a shower truly comfortable, and to make splashes of water dry faster, I decided to make a heated tray. To do this, on top of its surface and throughout the entire area of the bathroom, I laid the electrical cable of the heated floor (photo 3) according to the diagram (its total power was about 1.5 kW) and filled it with a coarse self-leveling mixture (3). It is better to use a special leveler for heated floors - it has a higher thermal capacity and is less susceptible to thermal expansion.
Self-construction procedure
Building a shower with your own hands begins with:
- Site preparation. All debris is removed from it and the site is leveled. As noted earlier, the construction site should be located in a sunny and wind-free place.
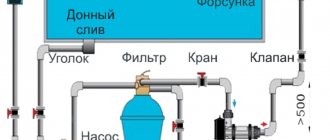
- Next is the draining. Experts recommend making it several times larger than the volume of the water tank. The easiest way to drain is by laying an inclined pipe from the cabin. And install a septic tank and drainage next to the drain.
- After this, you can begin installing the pallet. To do this, a small trench is dug, which is first covered with roofing felt and covered with crushed stone on top.
- Next, the frame is constructed. It should be installed very carefully and firmly, since a rather heavy tank of water will rest on it. The selected material for the frame is attached using self-tapping screws (if we are talking about timber). And if a profile pipe is used as it, it is better to use a welding machine. Although some home craftsmen fasten metal pipes with bolts.
- The next step is covering the frame with any materials (polycarbonate, wood, metal). Here it is important to consider how important the aesthetics of the building is (if it is in the front yard, then its design should match the design of the house and other buildings).
- Next, the roof is mounted, and a heated tank is installed on it. Some summer residents do not install roofing materials on buildings if the area of the tank completely covers the roof of the building.
- The final stage is the installation of doors and interior finishing work. The booth has shelves for shampoos, masks, scrubs, hooks for towels and clothes.
Attention : it is recommended to use natural and environmentally friendly materials that are easy to care for as finishing in the shower room.
That's the whole simple workflow for building a simple heated summer shower. The only thing is, if you plan to use the room in the cold season, you need to know how to insulate a summer shower. For this, various materials are used: mineral wool, polystyrene foam, expanded polystyrene.
Filling the tank
To supply water, hoses are usually used connected to a water supply system or a well with a pump. When the valve on the pipe is open, the tank is filled; to stop the supply, the tap is closed.
This system is imperfect. When overfilled, the water begins to overflow. To prevent this from happening, you can make a float with your own hands. It does not shut off the water like automatic valves, but clearly shows the water level.
A movable rod is fixed inside the tank, to which a piece of foam plastic or other lightweight material is screwed. A thin rod, for example a wire or 2 electrodes welded together, is vertically inserted into this “float”.
In order for the system to function freely, a hole is drilled for the rod in the top of the tank, or the lid is left slightly open. When filled, the “float” rises, pushing out the rod.
You need to attach a bright object to its end - a tennis ball, a piece of fabric. Using such a device, you can control the water level and turn off its supply in time.
Rules for using a warm shower
Despite the fact that a country shower is mainly used in the summer, it is recommended to adhere to the following rules for its operation:
- protect yourself as much as possible from drafts;
- if the tank is installed on the roof without a heating element, the cabin is located in such a way that direct sunlight falls on the tank;
- If the cabin does not have a cesspool, it is equipped with a well-designed drain. Just keep in mind that if several people use the shower, then flushing alone will not be enough, since the water simply will not have time to dry out in such a short period of time;
- the cesspool is located at a certain distance from residential buildings and recreation areas.
As can be seen from all of the above, it is quite possible to build a warm country shower with heated water with your own hands. With a little effort and diligence, you will have a practical, durable and easy-to-use place for taking water treatments at any time of the year.
Construction of the frame
Grillage beams should be laid on the foundation piles, which will simultaneously play the role of the lower frame. Next, using corners and self-tapping screws, racks are attached to them, the upper ends of which are connected by beams of the upper frame.
If the frame is assembled from wood, all elements must be treated twice with a water-polymer composition, then with biocides. The last stage of preparation is treating the wood with hot bitumen.
Wood frame
It should be borne in mind that even with such precautions, increased humidity will soon lead to the appearance of fungus on the wood. To delay this moment, the wooden shower should be raised above the ground by 200 - 250 mm. The frame is sheathed with moisture-resistant plywood or plastic, then the walls are covered with foam plastic, on top of which colored polycarbonate is fixed
At the top of one of the walls in the locker room and shower there should be an opening covered with transparent material
The frame is sheathed with moisture-resistant plywood or plastic, then the walls are covered with foam plastic, on top of which colored polycarbonate is fixed. At the top of one of the walls in the locker room and shower there should be an opening covered with transparent material.
It will be better if such a window in the shower stall is opening - this will make it possible to quickly dry it after water procedures.
Blueprints
Soul drawing
Photo drawing
Summer option
Well shower diagram
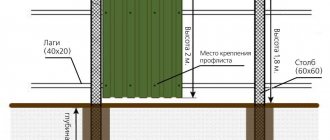
Scheme using a profile pipe
Country shower design
Summer design diagram
How to arrange water heating with solar panels
Connecting a plastic barrel in the diagram
Option for making a portable summer shower
Did the article help you?
Photo
Summer made of wood
Beautiful summer option
Made from bamboo
In the country
Tiled
With pallet
With curtains
From corrugated sheets
As an extension to the house
With a pitched roof
With flat barrel
Homemade shower