Your own comfortable house, garden, bathhouse, next to which there is a magnificent swimming pool - the dream of a city dweller, who especially prefers wellness treatments in a Russian bathhouse. The introduction of the latest technologies in the production of materials and technical capabilities have made plans to build swimming pools for people of all levels of financial capabilities real. But to simplify the process of arranging a pool, you need to study the sequence of actions in detail so that the construction is practical and aesthetic.
Deck board
Now you can proceed directly to laying the deck boards on the surface of the terrace, as well as sheathing the steps. Under no circumstances should the board be installed without gaps. When the boards swell from moisture, they will increase in volume, and if there is no gap between them, they will float on top of each other. It's like if you lay laminate flooring close to the walls, leaving no gap or room for expansion.
Installation diagram for decking boards
Boards can be fastened with screws or nails, depending on how convenient it is for you and what tools are available. If you are planning to nail a deck board, an automatic nail gun will make this task easier. They will work much faster, and most importantly, your fingers will remain safe and sound.
Do-it-yourself deck board installation
When laying deck boards, it is not necessary to measure each one to the nearest inch. Along the edge of the terrace, the board may overhang a little, just after the entire terrace is covered, you will need to go with a saw along the contour and cut off the excess. The result of laying the deck board is shown in Figure 9.
Figure 9. Terrace cladding
The same deck board as on the terrace is laid on the surface of the steps. You can also cover the steps with vertical boards so that the internal frame is not visible. Such steps are called closed type, and these are the ones made in this project (Figure 10).
Figure 10. Step cladding
Care
Pool maintenance can be done in several basic ways. Leaves and other small debris on the surface of the water are usually removed using a net, and deeper cleaning of the liquid is carried out using special chemicals that must be poured into the pool. They not only disinfect it, but also destroy dirt that is not subject to cleaning filters, and also prevent the appearance of algae.
Read how to use small architectural forms in landscape design.
As for the space next to the pool, the easiest way is to remove tiled, wooden or concrete coverings , but if crushed stone was used as decoration, then the fallen leaves from the bushes will have to be collected manually, which is not always convenient. Once every few months, you can carry out a general cleaning of the pool, cleaning the paths with the help of special chemicals. This is especially true in cases where tiles were used for paving.
Preparatory stage of construction
To begin with, it is best to make a sketch of the structure that will need to be built. The plan will help calculate the amount of materials, visualize the final material and take into account various important details of the construction.
The first illustration shows a sketch of the pool around which the wooden deck will be built. Since in this particular case the pool is not immersed in the ground, but is located above the surface of the earth, the platform around it will be quite high, and there will be steps leading to the terrace. Fencing structures will be installed along the entire perimeter of the wooden terrace:
- railings (they are shown in green in Figure 1);
- the fence, or Privacy Screen, is what this structure is called in the west (shown in red in Figure 1). The purpose of this element is to create a closed recreation area from prying eyes.
Figure 1. Plan of the terrace around the pool
Privacy Screen - Curly carved wood panels
Consider the direction of the boards.
Planting around the pool
Vegetation on a site is never superfluous; the main thing is to observe moderation in everything and not to overdo it with planting flowering or climbing specimens. Tropical palm trees, beloved by many, are unlikely to successfully take root in most of Russia, but besides them there are many worthy candidates for placement next to a body of water.
Important! You should not plant trees and deciduous shrubs in close proximity to water. Fallen leaves and other debris from their crowns will certainly end up in it.
Brightly flowering shrubs, evergreen varieties, or even climbing plants look good in such places, especially if their growth is directed horizontally. Low-growing trees will help to dilute the lush bushes, which will at the same time provide shelter from the scorching summer sun. A win-win option for planting at the very edge of an artificial reservoir would be a lawn : it quickly absorbs water and always remains soft, so it is very pleasant to step on it when leaving the pool.
Supports
We are considering a terrace project on supports, each of which needs an individual foundation.
Consider the option of arranging concrete supports with a diameter of 12 inches each.
| Feet | Centimeters | Inches | Centimeters |
| 1 | 30,48 | 1 | 2,54 |
| 2 | 60,96 | 2 | 5,08 |
| 3 | 60,96 | 3 | 7,62 |
| 3,5 | 106,68 | 3,5 | 8,89 |
| 4 | 121,92 | 4 | 10,16 |
| 5 | 152,4 | 5 | 12,7 |
| 10 | 304,8 | 12,7 | 32,258 |
| 11 | 335,28 | 11 | 27,94 |
| 12 | 365,76 | 12 | 30,48 |
| 15 | 457,2 | 15 | 38,1 |
| 20 | 609,6 | 20 | 50,8 |
- According to the project, holes are dug of the appropriate diameter and a depth of about 4 feet.
The holes should be the same depth when preparing - 4 feet or approximately 123 cm - Afterwards, so-called “sleeves” made of roofing material secured with adhesive tape are inserted into these holes. They should protrude approximately 1 foot above the ground surface.
Roofing felt is installed and a frame of three reinforcing rods connected with wire is placed inside - Concrete is poured into these “sleeves”, and metal connectors are installed on top, to which wooden supports will be attached.
The solution is transported by wheelbarrow and poured into the formwork with a shovel, compacting or piercing the mixture with an in-depth vibrator
An example of attaching timber to concrete supports
To avoid digging holes again, make a sketch with dimensions that will show the coordinates of each support. It’s better, of course, to do this on a site plan, especially if there are plants in the construction area or there are communications, then you won’t have to uproot a tree or repair the water supply.
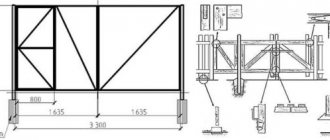
Figure 2 shows the location of concrete supports (Footings), as well as their coordinates. If the support ends up on a water pipe, or if there is a tree growing nearby, simply move the support slightly to the side. It is better to calculate everything and draw it on paper rather than face unpleasant surprises during the construction process.
Figure 2. Location of supports
Having marked the location of the supports on the site, dig holes for them and concrete them. Don't forget to install post connectors into the wet concrete supports. After the concrete has hardened, secure the vertical supports in metal connectors. Use 4" x 4" cross-section posts for supports since the deck is less than 6 feet high. If the height exceeds 6 feet, posts with a cross section of 6x6 inches should be used for supports. Metal connectors should be installed in the appropriate size.
The third picture shows a diagram of the concrete supports used in this project.
Figure 3. Scheme of concrete supports
Installing the bowl
The installation begins with a cushion, which ensures the distribution of the load over the entire area of the pool, the quality of the filling or the subsequent installation of a bowl made of polymer materials. The first layer of sand 25-30 cm thick is poured. Having compacted it, you need to move on to filling it with crushed stone. The thickness of the second should be at least 20 cm. Then the concrete base is poured, which is 15 cm. For this, ready-made concrete is used. It is delivered on a special concrete mixer, which is equipped with a mixer for mixing concrete. A layer of waterproofing is laid on top. The following are widely used as waterproofing materials:
- roofing felt;
- liquid rubber;
- PVC membrane.
The layer thickness should be 20-30 cm.
Next comes the process of reinforcement and arrangement of formwork. A frame of steel rods is laid on top of the waterproofing coating. The recommended thickness of the rod is from 8 to 15 cm. Reinforcement is in two tiers, and the gaps are filled with broken bricks. To construct the frame, the reinforcement is tied with 3 mm wire.
Note!
Welding should not be used as it burns carbon, so the seams can cause corrosion.
After manufacturing, the frame is treated with polymer paints, and the bottom is again filled with concrete, compacted, and then the reinforcement of the walls begins, which is not much different from the bottom equipment. Before pouring concrete, the walls need formwork. Moisture-resistant or laminated plywood is suitable for this.
To build a polymer structure you need:
- dig a pit 40 cm deeper and longer than the bowl itself;
- the soil is compacted, and a 20 cm layer of crushed stone is poured on top of it, which also needs to be compacted.
After this, a polymer bowl is installed and the embedded parts are mounted. All other additions are recorded at this stage of work. The distance between the bowl and the walls of the pit is covered with sand mixed with crushed stone. Then you can begin to arrange the area around the pool.
Some people think that equipping a pool with your own hands will be cheaper than hiring a crew. But if a person has not previously had experience installing such structures, then it is unlikely that it will be possible to do everything quickly and efficiently the first time.
How to arrange a children's and sports ground at the dacha
If you have a sports family, then allocate space on the plan for sports activities, depending on the sport that interests you most. The features of a particular type will dictate to you the size of the sports ground in the garden and its equipment. It’s also a good idea to think about how to hide the area; it should not be visible from the entrance, from the windows of the house, etc.
The playground in the garden for children is located closer to the house, ensuring constant supervision over the children. You should not locate the children's area near the garage or gate, but it is quite possible to place it near a solid fence, equipping it appropriately, for example, with rope ladders or drawing boards. Teenagers do not need constant care, so their sports and play area can be located further from home.
As can be seen in the photo, playgrounds in small dachas may not have clear demarcations to allow children to run freely. When designing a playground in a country house with a large area, it is worthwhile to provide a fence that will give children a sense of privacy, while they remain in plain sight and under control. A low hedge up to 1m high or a fence is perfect for this purpose. Plan your garden so that children can play without fear of crushing flower beds or trampling vegetable beds, fence off the vegetable garden and flower beds, or the area itself for children’s play.
steps
The next step in building a wooden deck is to install the frame for the steps. The basis is the stringers, which are located at a distance of 16 inches from each other.
To calculate the size of the steps, you can use our calculator with instructions.
Scheme of stringers
To make them, use a board with a cross section of 2x10. In order for all the steps to be the same in length and height, you first need to make a pattern for one step, and then sequentially mark the steps on the blank for the stringer.
Stair stringer is a sawtooth-shaped wooden board or beam with rectangular teeth
For the convenience of ascending and descending the steps, the dimensions of each step, firstly, must be the same, and secondly, in terms of the height and depth of the step, they must be within certain limits. For height, it measures 6 to 8 inches, and for depth, it measures 12 to 16 inches.
There are, of course, non-standard sizes of steps, but most often they are made within the limits given above.
At the bottom, all stringers are connected by one board for stability of the structure. Figure 7 shows the frame of the terrace and steps.
Figure 7. Frame of the terrace and future steps
Where to place
“If your site has an area with clay soil, then you don’t need to look for a better place to install a pool in your country house.”
It’s not enough to equip a pool; you’ll have to take care of it in the future, so start making this task easier for yourself at the preparatory stage. When planning the location of your reservoir, you need to consider the following points:
1. If your site has an area with clay soil, then you don’t need to look for a better place to install a pool in your country house. Clay will save you in case of waterproofing failure and will be able to stop water leakage.
Clay soils are ideal for installing a swimming pool
2. The soil where it is planned to set up a mini-water park should have a natural slope. In this case, it will be easier for you to dig a pit and select an area to install a drainage system.
3. You should not locate your pool in the shade of tall trees. Such a neighborhood is fraught with big problems. Plants, sensing moisture, will pull their roots towards it and will definitely damage the waterproofing. The list of the most “aggressive” ones includes willow, poplar and chestnut.
The pool must be installed in an open space, away from trees
4. The situation will not be any better in the vicinity of low-growing tree species. Leaves falling from them will constantly litter the water area.
5. Make a wind rose for your summer cottage and find out which direction is a priority. Position the pool in your dacha so that the air moves along its bowl. In this case, all the dirt will collect under one side, along the edge of which it would be reasonable to organize a drainage system.
6. Having a water supply nearby the pool will make it easier to fill the tank.
Filling methods
According to the type of filling, pools are:
– overflow;
- skimmers.
For overflow options, a special grate is installed around the perimeter of the tank, through which the water that overflows over the side is sent to the storage tank. The presence of such a system allows you to visually increase the size of a pool built in a country house, and also allows you to fill it to the very brim.
Overflow pool at the dacha
You can't fill skimmer pools like that. The water level should not reach the sides by at least 15 centimeters. Such tanks do not have storage tanks, so you should not simply spill the contents. The water supplied to the tank is purified through a skimmer. The option is inexpensive, therefore in demand in the private sectors.
Skimmer pools do not have overflow protection
Finishing methods
A country pool can be finished:
– PVC film,
– polypropylene,
– tiles,
– mosaic.
The film is produced in rolls and has a wide variety of colors. The most popular shades are turquoise, blue, white, and light blue. This type of finishing has a dual role: aesthetic and waterproofing.
Finishing the pool with PVC film
Polypropylene is a high-strength polymer characterized by good weldability and resistance to aggressive environments. Excellent characteristics have made polypropylene a popular finish. Most often, to decorate a swimming pool at the dacha, they purchase material in blue colors.
Blue-blue polypropylene in the finishing of the pool
As for mosaics and tiles, materials with a low percentage of water absorption are used to decorate the pool. Basically, ceramics are used to decorate public swimming pools, but mosaics will also be desirable in a suburban landscape. It will allow the pond to harmoniously fit into the environment and give it a new aesthetic sound. The water will sparkle with colors, and the tank itself will seem deeper.
Finishing the pool with mosaics will bring any of your design ideas to life
Modern Design Styles
Most often he uses four directions for decorating a pool:
- Classical. Typically, materials such as paint and decorative plaster are used.
- Art Deco. Colored mosaics and reflective surfaces are actively used.
- Ethno. The space is designed based on the traditions of a particular people.
- Country style. Natural materials are used: natural stone, wood, living plants.
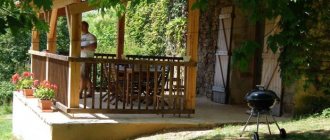
You can put a TV and sun loungers near the pool
A swimming pool in the yard will save you from the heat
See alsoKnitted items for home decoration
Stationary
When you have found the ideal place for the structure, you need to remove debris from the area, fill it with sand and soil, and compact it well.
Provided that you already have a project ready, you mark the territory, and then dig a pit
Please ensure that its walls are at a slope of 20-25 degrees, which will prevent the soil from collapsing. Then you need to level and compact the walls and bottom of the pit
The next step is laying communications with which you will drain and pour water. Next we have to build the bowl itself. You determine its capacity in advance, because it is for it that you dug the pit. After this, finish the inside of the pool. Well, the last stage is the installation of filters, heating, pumps and other devices at your discretion.
You can use decorative tiles or mosaics. Such a pool can be equipped with a tower, massage devices, and a roof installed on top.
Acrylic pools are also gaining popularity. For such a pool, a foundation pit with a concrete coating is also prepared. Its advantages include light weight, which facilitates transportation, strength, corrosion resistance, and aesthetic appearance.
Frame
These pools can be either dug in or simply installed on a prepared site.
It is important that it is level. It is enough to dig a hole of twenty centimeters
Sand is poured into the bottom and compacted well. A special material, the so-called geotextile, can be laid at the bottom. It protects against bugs, worms and sprouting grass. We install a frame pool on this base.
Made
If you do not plan to leave the pool permanently and plan to remove it in the fall, you can install a prefabricated frame option.
These are simply stands on which the film liner is hung. But under the structure it is still necessary to make an insulated flooring. Otherwise, the water will be cold, and even under the sun it will not warm up quickly enough.
You can make a wooden platform, it will be more convenient and cleaner. Inflatable pools are also installed on the same bases.
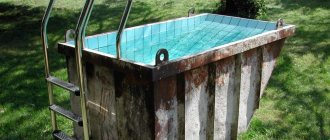
Some people install homemade pools from a wide variety of materials.
Many summer residents use plastic containers for their needs. It turns out that you can also make a pool out of it. Its walls are made of plastic bottles laid on cement mortar, and you will need a lot of them. But the strength and tightness of the structure is ensured.
You can even use an old banner. In the dug pit we straighten the banner well, you can put two. We pour a little earth under the edges of the film, reinforce it with bricks, lower the hose and pour water. This, of course, is not a super pool, but you can take a dip on a hot day and get a boost of freshness.