In the warm season, especially during the conservation period, the presence of a summer kitchen greatly simplifies the cooking process and makes it more enjoyable. It is not necessary to hire specialists for construction - all stages can be completed independently. If you choose the right materials, a summer kitchen will not cost too much, which is of great importance for a budget-conscious owner.
DIY summer kitchen
Choosing a type
Closed
All types of summer kitchens can be classified into two categories:
- open;
- closed.
Open with barbecue
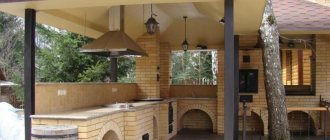
Closed kitchens resemble a small structure, similar to a house, which often does not have much insulation. The advantage of this solution will be protection from insects, better protection from bad weather, as well as from wind. An open kitchen option on one or more sides can be protected with a fabric, wooden or other wall. The advantage of such a solution will be greater unity with nature. Among the open types of buildings there are options:
- With barbecue. In this case, you have the advantage of cooking your favorite dish over an open fire. Barbecue will be available in any weather. If you additionally install an oven, then you can please your friends with pizza.
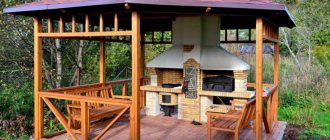
- With a gazebo or pergola. It's nice to sit among the greenery. This is exactly the solution in which the entire structure will eventually be shrouded in grapes, ivy or other climbing plants.
- Shed adjacent to the house. The easiest way to build. Requires the least investment. But there is a negative point. When cooking, all the steam and smoke will go towards the house. This can lead to damage to walls or other finishing materials.
Planning construction on a personal plot
If open gazebos with barbecues do not require a special choice of location, since the maximum that is needed for them is the supply of one branch of electricity, then closed insulated ones require detailed planning of the location.
Here are some placement options relative to the main building:
- An extension connected to the dacha through a glazed terrace or having a common partition. In this case, you will have to make two exit groups - the front door and through the kitchen.
- Under one roof with another building - a bathhouse, a barn, a garage. From an economic point of view, this is beneficial, especially if the premises are supposed to be heated. It turns out one economic block.
- A separate project is somewhat more expensive, but you can plan the location of the building the way you like.
Let's give a few more recommendations for placement:
- The following should not be located in the immediate vicinity: septic tanks or a cesspool, an outdoor toilet, or a pen for keeping livestock.
- If there is a source of open fire (stove, brazier, barbecue), there should be no flammable objects or buildings nearby.
- It’s good if there are trees with a dense crown nearby - they will provide shade and coolness.
- Think in advance how easy it will be to install utility networks.
- Consider the most frequent wind direction so that smoke from the stove does not spoil the rest in the dining area.
Now you can start designing and planning the interior.
To select a suitable expert for documentary support of the construction of a house, we recommend using the company search in the Building Companion catalog. The profile of each contractor contains the necessary information, portfolio, reviews, and you can place a request for an estimate of the cost of the service. Find a documentary support expert »
Preparation stages
From foam blocks
After you have chosen one of the possible options, it's time to create a small project.
- We choose a location. It’s good when it is possible to place the kitchen in a cozy garden, where a pleasant atmosphere of tranquility reigns. At this stage, it is necessary to take into account the proximity of various communications. They will definitely be needed. Electrical appliances will require wiring. When preparing food, you cannot do without water and you need to put it somewhere afterwards. Do not place the structure close to driveways and roads. Then your meal will not be spoiled by unpleasant odors. If there is a toilet outside, it is better to leave it as far away as possible.
- We dwell on the material for construction. If you are planning an enclosed kitchen, then you can approach it as a frame building, in which case you will need wood. A good option would be a structure made of foam blocks or brick. The open one will most likely be made of wood, or one or two of its walls will be made of the material that was listed earlier.
- We decide on the roof. Soft tiles will look great on an open building, but this is a rather expensive solution, although it cannot be ruled out, because the roof area will be small. A good option would be metal tiles or corrugated sheets. Perhaps, while waiting your turn, you have sheets of slate or ondulin - they will also do.
- The project should also take into account what equipment you plan to purchase for the summer kitchen.
Made of brick
Garden furniture for the children's playground.
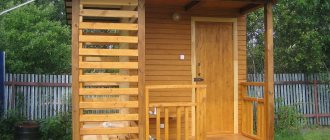
To make summer more fun for your kids, make a garden house for your children.
This house can be placed in the garden or even used as a bed for your baby.
If the house is planned to be used as a bed, then its width should correspond to the width of the mattress.
Foundation
A summer kitchen is usually designed as a lightweight structure. This means that the foundation can immediately act as a floor, and perhaps no pouring will be required at all.
- First you need to clear the selected area of all debris and vegetation.
- A small layer of top soil is removed.
- One of the corners of the future building is marked with a wooden peg or metal rod. Next, three more elements are installed. To position them correctly, it is necessary to measure the diagonals for identity. A fishing line or strong twine is stretched between them, which will serve as a guide.
We bide our time
After the formwork is strengthened with reinforcement rods connected with wire, concrete can be poured. At the end of the pouring, which must be carried out in a single process, the surface is carefully leveled.
Afterwards, the foundation must be allowed to settle for at least a month and only then proceed with the installation of the remaining structures.
Open kitchen
Laying an open summer kitchen
This option can be erected most quickly. We have already laid the foundation and support for the supports. If you plan to have the kitchen closed on one or both sides by walls made of brick or other material, then the first thing you need to do is start building these partitions.
- At the corners of the future walls, we dig a metal square pipe or profile measuring 50x50 mm into the ground. We set it according to level. We do this so that the planks are close to the masonry. They will serve as our guide.
- We stretch the fishing line between them. We raise it to the height of the first row of bricks that will be laid. We set it according to level.
- Prepare a cement-sand mortar in a ratio of 1:3. This will be quite sufficient for our purposes.
- We carry out the laying, focusing on the stretched fishing line, and also periodically double-check ourselves with the level.
- As soon as the first row is completed, we raise the line for the next one and so on until the very end.
- To make the structure more stable, reinforcing mesh can be placed in the seams.
An example of a summer kitchen project made from timber
If you do not plan to have walls of this nature, then the process will be much easier.
- We screw a beam that will serve as a support to the metal plates that we laid during the manufacture of the foundation. When the entire structure is of great length, then it is necessary to foresee in advance the need to install 3-4 pillars on one side. Their length should be equal to the height of our building, and the dimensions of the sides should be 15x15 cm or 15x10 cm.
- We level them so that they are strictly vertical. The beams of one wall must be longer so that we can organize the roof slope.
- We immediately strengthen our posts using the top strapping. It can be made from the same logs. We fix it using metal corners.
- To give greater stability to the entire structure, you can install two jibs near each post. They can be secured to the support using self-tapping screws, and to the base with an anchor bolt.
- We are installing beams for our future roof. In order for them to hold better in the places where they adjoin the harness, it is better to make cuts. We fix it with metal corners.
- We make the sheathing for the flooring, as recommended by the manufacturer. We lay the roofing material.
- To create more comfort, one side (or more) can be sewn up using wooden lining or a house block. On the other, make a wooden lattice. You can arrange supports for climbing green plants.
If you plan to build a pergola, after laying the ceiling beams, nothing else needs to be done. They can be coated with stain or varnish. Then the plants will do their job themselves, creating shade when they are fully grown.
Closed kitchen
Closed frame summer kitchen
At the design stage, it may have been decided to build walls from foam block or brick, then this can be done according to the principle of installing vertical landmarks, which was mentioned above. The thickness of the walls may not be too large. In some cases, laying half a brick is allowed. But always consider the weight of the future roof. In the future, the outside of the building can be covered with siding or a block house. For interior decoration, a house block, lining or other material that will be resistant to frost is also suitable, because it is unlikely that anyone will deliberately constantly heat the room in winter.
We build walls
The construction of walls can be carried out using materials such as timber, stone, brick, foam concrete in blocks. In any case, the support posts and additional supports between them are first erected.
It is important to provide entry spaces and window openings. It is advisable to treat the walls with a composition that protects them from the spread of mold and fungus formation.
Finish line
Take care of the presence of a sink and cabinets
Even if our kitchen is planned to have a barbecue or stove, this does not exclude the presence of a gas or electric stove, which are much more convenient to use. It is necessary to take care of the installation of the sink, faucet, as well as a stand for dishes on which they will dry. It would be good if there was a cabinet in which you could hide cutlery and pots. You need to take care of the dining table, as well as comfortable furniture on which you can relax. For greater comfort, it is better to provide basic and decorative lighting.
For an open kitchen project, it is best to ensure that all lighting fixtures are preferably IP68 rated. In this case, you won’t have to worry about any elements being damaged by rainwater.
Don't approach your outdoor kitchen project in a casual way. Let it, in some sense, be a design decision. After all, it will serve not only as a place to eat, but also as a recreation area with family and friends.
Garden furniture original designs.
For those with larger scales, you can make such a covered bench near the barbecue.
This is something between a gazebo and a bench.
If there is not enough space at the table for a large company, make an additional shelf at the end of the table.
It is attached to the bench.
And it makes it possible to hang additional containers on hooks.
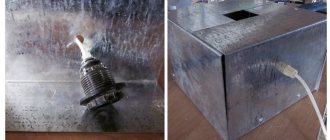
Have a party coming up and urgently need a garden shed? Let's do it quickly and simply.
We assemble the frame from PVC pipes as shown in the figure. We concrete the supports in buckets. We pull up the awning. And the canopy is ready.
Photo
Summer kitchen on the veranda
Closed kitchen with panoramic glazing
With outdoor fireplace
With bar counter
Spacious functional kitchen
Open octagonal design
Miniature version
Under the canopy pergola
Summer kitchen without a roof
How to make a wooden table.
For fans of more traditional options, we offer a wooden table project.
This table will look good both in the garden and in the house or gazebo.
First, we assemble the two side supports of the table, as shown in the diagram.
Then we make a tabletop from the boards. To prevent the boards from warping over time, we decorate the side edges of the tabletop with perpendicular wooden planks. We make the bottom shelf and fasten the tabletop with the side supports.
From wooden boards you can make a bar counter with chairs for your dacha.
For structural rigidity, the frame is reinforced with metal pipes.
Schemes and drawings
If you decide to make a summer kitchen at your dacha yourself, then perhaps you will find the drawings and diagrams of this structure useful:
Drawing of a small summer kitchen
Kitchen drawing with barbecue
Drawing of a rectangular kitchen
Detailed design
Summer kitchen Albatross
Summer kitchen layout
Bathhouse project with summer kitchen
Design
Frame structure diagram
Scheme of a summer kitchen with a garage
Scheme with a terrace
Terrace and barbecue
Did this article help you?
Transformable garden bench.
If you only need a table in the garden when guests are visiting, then you can make a transformable bench that, if necessary, turns into a table.
At first glance, this is an ordinary bench.
The bench consists of two halves - upper and lower, which are connected to each other on hinges.