Planting strawberries in open ground in spring: when and how to plant garden strawberries correctly, as well as the timing, rules and diagrams will be given in this article.
To reap a rich harvest of strawberries, you must initially plant the berry bushes correctly. Next, we will talk in detail about how to plant strawberries correctly in the spring , what method and scheme to use for this, so that the bushes quickly adapt to a new place and begin to develop, and further caring for strawberries does not cause problems.
Choosing a landing site
When it comes to placing a pumpkin, you have to think carefully, since in a common area among other vegetables it will offend its neighbors, whom it will certainly drown out with its powerful lashes. Although it is often planted among potatoes, which experience almost no oppression. But since a pumpkin, like cucumbers, with the help of its tendrils is able to climb neighboring plants and low structures, gardeners with little land take advantage of this, for example, letting its lashes climb over fences.
A wide variety of supports are invented for growing pumpkins.
When there is nothing suitable for this in the garden, then directly above the holes a flooring on stakes is made of two or three poles or slabs - 1-1.5 m in height. As the vines begin to grow, they are directed onto the flooring, and separate supports are placed under the hanging fruits. In this form, the pumpkin is not an obstacle for many low-growing vegetables, at a height above which it will grow.
The next question is how to create suitable soil conditions for pumpkins. The difficulty here is not so great, since one pumpkin bush will require a hole area of no more than 1 m2. If you consider that for an average family you need to plant 3-4 bushes, then you can find a place for this anywhere and provide the pumpkin with a nutritious soil mixture on it.
How to plant a tree correctly
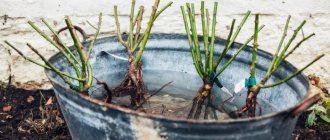
When replanting a tree from a container, follow these rules:
- Remove the seedling from the container.
- Find the root collar (it may be buried) and release it so that it is on the surface of the earthen ball. If there are roots above it, they must be removed.
- Cut the bottom of the lump so that the ring roots can be straightened. This is stress for the seedling, but you cannot leave the roots unstraightened, because in the future this can lead to the death of the tree.
- Place the lump in the planting hole and cover it with soil. Do not forget that the root collar should be slightly above ground level.
If the roots of the tree were in a net and wrapped in burlap, then first you need to free the seedling at the top from the burlap and net and find the root collar. If there are ring or adventitious roots above it, they also need to be trimmed: the root collar must be free. Then plant the tree in the prepared hole.
What kind of soil is needed for planting pumpkins?
Pumpkin grows well on structurally fertile, light dark-colored sandy loam soils. In areas well fertilized with manure, the fruits reach enormous sizes.
The basic tillage of soil for pumpkin is no different from tillage of soil for vegetable crops: in the fall, the bed is dug up with fertilizers using a shovel, and in the spring it is leveled with a rake. The soil for this vegetable should have an acidity close to neutral, the optimal pH being 6.5. You should not plant pumpkins where any pumpkin crops (cucumbers, zucchini, squash) grew last year.
Fertilizers for pumpkin when planting
In terms of pumpkin's requirements for the content of nutrients in the soil, it is very similar to cucumbers. Pumpkin feels great on a pile of finished compost, where various waste was dumped last season, as well as in those places where manure used to lie.
You can grow pumpkins in specially prepared trenches, filled with chopped branches, green or dry grass, manure, and various household waste, which are mixed with soil and a layer of fertile soil is poured on top. The depth and width of the trench is up to half a meter.
The greatest effect is obtained with the combined use of organo-mineral fertilizers per 1 m2: for digging 4–5 kg of manure and for feeding (when 5–6 leaves appear) 20 g of ammonium nitrate, 30 g of superphosphate and 15 g of potassium chloride. Nitrogen fertilizers (saltpeter, urea) can also be applied when loosening the beds in spring.
Landing dates
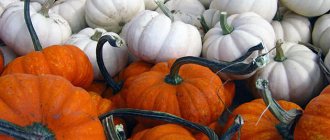
In central Russia, mainly large-fruited and hard-bark pumpkins are cultivated, in the south - nutmeg. Types of pumpkin differ quite significantly from each other. In hard-barked pumpkin, the bark of mature fruits is woody, while in other types it is soft. This pumpkin is characterized by the greatest early ripening. Large-fruited pumpkin is the most cold-resistant and productive. The hard-barked pumpkin is also quite resistant to low temperatures; the most demanding of heat and also late-ripening is the nutmeg pumpkin.
Thus, it turns out that in the middle zone, without growing seedlings, you can only be guaranteed to get a harvest of hard-barked pumpkin, while nutmeg may not grow even using the seedling method. In the southern half of the country, any pumpkin can be grown, but nutmeg varieties, even in the south, are sometimes grown through seedlings.
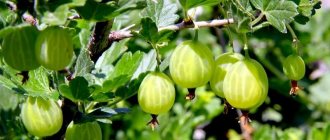
Butternut squash is the most delicious, but also the most capricious
Pumpkin seeds germinate in soil heated to 13–14 °C, and its seedlings are very sensitive and die at 1–2 degrees below zero. The best temperature for normal growth and development of plants is 20–25 oC. If you sow it in the ground with the onset of heat, you may not wait for ripe fruits, which require from 115 to 130 summer days. Therefore, you often have to start growing pumpkin from seedlings. To do this, pumpkin seeds are sown in peat pots at the end of April. The pots must be large, at least a liter in volume.
The time for planting seedlings in the garden is approximately the same as for tomato seedlings. In the regions of central Russia this is usually the end of spring (depending on the actual weather), and in the north it can be mid-June.
When pumpkin is grown by directly sowing seeds in a garden bed, they are sown in mid-May and it is better if holes are made for this so that they can be covered with glass. It has been noticed that slugs react very early to the emergence of pumpkin seedlings by gnawing their stems. To catch slugs, pieces of boards are laid out next to the seedlings and checked every morning.
Choosing a cherry seedling: what to look for
Before you go to a specialized nursery or store, it doesn’t hurt to do your homework: Google and make a list of suitable varieties for yourself.
We are looking for varieties that are zoned for cultivation in your region, resistant to fungal diseases (especially coccomycosis) and, of course, tasty. We would also pay attention to self-fertility and early ripening, but to each his own. With the list, we go to the store and choose the best one among the seedlings of the varieties we like. First of all, we inspect and evaluate the appearance. A good seedling has a straight trunk, without damage, cracks or sunburn. The branches are elastic, not dry. The bark should not peel off. And it is desirable that there are no leaves on the seedling - only dormant buds. The normal height for a cherry seedling is from 70 to 150 centimeters.
If you have the opportunity to inspect the roots, make sure that they are healthy (there are no growths or signs of rot) and developed (there is a main root and several side roots 20-25 centimeters long).
The seedling in the container must be well rooted. We look at the soil in the pot. If there are small weeds and moss that have not been replanted for a long time, you can buy them. We shake the tree by the trunk. If it sits tightly in the pot, everything is fine. If it comes out of the pot together with an earthen lump riddled with roots, everything is fine. But when a seedling is easily pulled out of the ground, the soil is loose and crumbles, which means that the plant was recently transplanted into a pot, there is no point in buying it.
We definitely ask the seller about the age of the seedling, because the older it is, the worse it takes root when transplanted. For cherries, one-year and two-year-old seedlings are considered optimal. We also specify whether the seedling is grafted or self-rooted. It is important.
Self-rooted seedlings are more hardy and are less likely to freeze. Such a tree can grow in one place for 40-60 years, renewing the ground part due to shoots. In addition, shoots from the root of such a cherry in the future can also become a full-fledged fruit-bearing plant.
Grafted cherry seedlings begin to bear fruit faster. Such trees usually do not take up much space and are easy to harvest. Grafted cherries live from 10 to 20 years. But the growth from them is wild, which is not suitable for subsequent reproduction. The shoots will have to be cut out.
It’s not bad when there are both the first and the second on the site.
Planting pumpkins in seedlings
The best way to prepare seeds for sowing is by germination, in which case they lose their taste and, as a result, are less damaged by pests. Before this, they are disinfected for 20–30 minutes in a dark solution of potassium permanganate.
The pots are filled with nutritious garden mixture. 2-3 seeds are sown in one pot, burying them 3-4 cm, but after germination one best plant is left, the rest are removed. Before planting, the seedlings are kept in a greenhouse, they try to give as much sunlight as possible, remembering that pumpkin seedlings are sensitive to lack of lighting and stretch out very quickly. In an apartment, seedlings are kept on a lighted windowsill, where during the day the temperature on clear days is 25–27 °C and above, and at night it does not drop below 12 °C.
For pumpkin seedlings, select the largest pots
The period for growing seedlings in a greenhouse or at home is about a month. You should not keep it longer - the roots will not have enough volume of the pot for full growth: they will fill it very closely.
The holes for planting seedlings are prepared in a place where in the future the vines can be easily transferred to any supports. To create a better thermal and air regime, the sides of the holes are laid out from any rotting organic material or from turf, boards or slabs with an elevation of 25–30 cm above the soil. Fertilized soil in the amount of 2–3 buckets is poured inside the hole. In order to avoid moisture loss during the spring-summer period, the hole is covered with a film of any color, and its edges are sprinkled with soil.
Before planting the seedlings, a hole is cut in the film in the appropriate place. First, one or two buckets of water heated in the sun are poured into it, and then the seedlings are planted. The overgrown and elongated one is lowered into the hole deeper than usual - up to the cotyledons. The planted seedlings are covered with a piece of glass using a box made of boards. This measure is necessary to better warm the soil, reduce moisture evaporation and protect against birds.
Ready pumpkin seedlings are a completely viable plant
Watering is carried out every other day until the seedlings become stronger and begin to grow. Adult plants are watered as needed, which they themselves signal by wilting leaves.
Video: planting pumpkin seedlings in open ground
Tall seedlings with a wide crown and a small lump of earth
After planting, such plants can be knocked down by wind or snow. Even if the weather is good today, it is easier and more reliable to secure them immediately. is NOT needed here . It should keep the plant in its new location for the first year. The ideal option is a piece of picket fence driven into the soil at an angle, wrapped at the point of contact with the trunk with a piece of fabric. You need to tie the trunk (also at the point of contact) with the same fabric. After this, the trunk must be STRONGLY tied to the support with twine, electrical tape or a strip of fabric. The barrel should NOT rub against the support - it should be tied!
This whole simple design meets two important requirements: 1 – constrictions do not form on the trunk (in a year the fabric, twine or electrical tape will age in the sun) 2 – the design is NOT aesthetically pleasing. You will delete it after a year. If the trunk of the seedling is evenly covered with branches, and it is inconvenient to lean the support, you can do otherwise. You need to drive three pegs around the perimeter of the crown and secure the trunk with guy ropes made of strong twine.
Planting schemes
The root system of all types of pumpkins is well developed, penetrating to a depth of 1.5 m. However, it requires a lot of space: the pumpkin spreads roots not only deep into the ground, but also to the sides, and the growing lashes reach a length of several meters.
Recent Entries
Chainsaw or electric saw - what to choose for the garden? 4 mistakes when growing tomatoes in pots that almost all housewives make Secrets of growing seedlings from the Japanese, who are very sensitive to the soil
The feeding area for pumpkins is perhaps the largest among known garden dwellers. The following planting schemes are recommended: 2 x 1 m, one plant per hole, or 3 x 2 m, two plants per nest.
If there is space, you can plant pumpkins along the path, and lay out the whips in directions from it
Installation of supports
The choice of support type is extremely important for grapes. This is due to the fact that all the compounds that make up the bush are produced due to the good illumination of the leaves by the sun. Therefore, if the wrong type of support is chosen, then not only will there not be abundant fruiting, but the bush itself may die.
The design may be different, you need to choose a specific one taking into account the following factors:
- planting scheme;
- plant variety;
- bush formation method.
Experienced winegrowers begin arranging a vineyard with the installation of a stationary structure. This approach will allow you to harvest the first harvest already 3 years after planting the seedlings. The use of temporary supports, based on observations, does not bring such a result. But, if there is no other way out, you can use this option. Temporary supports are organized as follows:
- The stakes are driven in next to the seedlings.
- Wire or synthetic ropes are stretched between the posts - along them the plant will curl upward.
On a note!
Instead of wire or rope, you can use nylon thread cords or another option. The main thing is that the material is not afraid of moisture, temperature changes and is durable.
There are several types of grape supports. Trellis, pergolas, canopies, arches, trellises, stands, trellises are made for the plant. All these types can be combined. It is worth choosing a specific type of stationary structure taking into account exactly what results you want to achieve.
Ways to plant pumpkins
In addition to the usual planting of pumpkins in a pre-prepared bed (on a flat surface or slightly raised), gardeners often come up with some tricks to save space in the country and make caring for plants easier.
Planting on a compost heap
Any plant residues, including those that rot slowly, are placed in compost. And if grass compost matures by the next season and can be used as fertilizer for any vegetables, then large residues like cabbage stalks, tree branches or raspberries can be processed within 2-3 years. To avoid wasting space, you can plant a pumpkin in this pile, which is not yet ready as fertilizer.
Partially rotted remains will already be a nutrient medium for the plant, and those that will continue to rot will not hinder it in any way. The pumpkin roots will quickly take up all the free space in this pile: after all, it is quite loose. Since the pumpkin leaves are large, they will shield the future compost from the rays of the sun; it will be better for it to rot rather than dry out. True, you shouldn’t hope that such a pile of pumpkins will have enough nutrients; you’ll have to add a little mineral fertilizer. To make caring for the pumpkin easier, the pile should be fenced on the sides with boards, giving it a convenient shape and height. But on top of the plant residues you need to pour a layer of soil of 10–15 centimeters.
Both the pumpkin and the compost pile mutually help each other.
Such a bed, in fact, is a greenhouse: the rotting of large fragments warms the soil, and the pumpkin itself helps this. For growing on compost, it is more convenient to use varieties with not very long vines; it is better to plant seedlings in such a bed, placing the plants no more often than 80 cm from each other. But early ripening varieties can also be planted with seeds, temporarily covering the compost heap with spunbond. Caring for pumpkins planted in compost is very easy. Firstly, you have to bend over less. Secondly, such a bed does not require loosening, and often no weeding. But the heap needs to be watered no less often than a regular garden bed, and even more often.
Planting in bags
In order to save space in the garden, you can plant pumpkins in ordinary garbage bags made of thick plastic film, but it is advisable that their capacity be at least 100 liters. After all, the bags can be placed anywhere, even on the asphalt, as long as they are not completely in the shade. In the fall, a mixture of soil and compost or even just compost is poured into bags, and in the spring one pumpkin is planted. You can do this either with seeds or seedlings, depending on the situation.
It is best to place bags of pumpkins next to the fence, so as not to have to come up with additional support: the stems will climb up, and the growing fruits can be placed in nets, which are also tied to the fence. Pumpkins in bags are easy to care for, if only because the plants are at a very convenient height. It is also easy to regulate the humidity: irrigation water will not leak through the polyethylene, and if, on the contrary, the climate of the area is too humid, then excess moisture can be released through several drainage holes.
A variety of vegetables are planted in bags, including all pumpkin crops
Using barrels
Metal barrels can be used instead of plastic bags. Of course, this pleasure is not so cheap, but for this you can also take a barrel that is no longer suitable for its intended use.
In order for the soil inside the barrel to be better warmed by the sun, it is advisable to paint the outside of the barrel a dark color.
Of course, it is a pity to spend a new barrel for such purposes, but if it is clearly unnecessary, you will have to drill several drainage holes in its lower part. It is advisable to put a cut irrigation hose on the upper rim for easy care of plants.
In the fall, various plant waste is placed at the bottom of the barrel: branches from pruning trees, leaves from under trees and bushes, tops from collected root crops and other plants. Garden soil is poured on top. In the spring, water the soil in the barrel generously to speed up the decomposition of the waste poured into it. Since the contents of the barrel will have settled significantly by summer, humus will need to be added by the time the pumpkin is planted.
At the very beginning of summer, pumpkin seedlings are planted in a barrel. Sometimes two plants are planted, but it is better to limit yourself to just one. At first, the pumpkin is watered very often: both the seedlings need to take root and the biomass continues to decompose. Rotting causes heating, and the pumpkin in the barrel is very comfortable. Additional fertilizing is not required for this planting.
The fruits of short-stemmed pumpkin can even be left on a barrel
The vines hang freely from the barrel; over time, flowers appear on them and fruits begin to appear. If they have reached the ground, you can leave them there, placing a small plank under each one. If you are left hanging in the air, you will have to come up with additional support.
Planting pumpkin on nettles
One of the most popular natural fertilizers in the garden is an infusion of mowed grass and pulled out weeds. It smells very unpleasant, but contains many nutrients necessary for plants, and therefore is very often used for fertilizing. One of the leaders in nutrient content is common nettle. In this regard, it is used not only as a liquid fertilizer: various garden crops are often planted in nettles. Unlike manure, this eliminates the introduction of pathogenic bacteria, larvae of harmful insects and other pests.
The highest quality nettles are spring ones, collected in May. Make a large hole, right up to a bucket, and fill it with chopped nettle leaves (along with the stems; you can cut or tear them in any convenient way and not very finely). Mix nettles with soil approximately 1:1 and water well. It is better to water with an infusion of the same nettle, obtained by pouring a bucket of nettle with water and letting it sit for 5–7 days.
The top of the hole is sprinkled with clean soil, after a few days the pumpkin seedlings are planted and watered with clean water. After 3–4 days, the seedlings begin to grow.
Is it possible to plant pumpkins in a greenhouse?
It is impossible to grow nutmeg pumpkins in harsh climatic conditions, but even with ordinary large-fruited ones there can be a problem due to the lack of warm summer days. In this case, you can plant a pumpkin in a greenhouse. True, space in the greenhouse is precious, and the pumpkin grows in the form of a huge plant, occupying a large area, so you have to be a little cunning. In modern polycarbonate greenhouses it is difficult to implement such a trick, but in ordinary film greenhouses it is easy.
Often they plant a pumpkin next to cucumbers, giving it a place somewhere in the very corner. Planting holes are made in the same way as in open ground, they are filled with fertilizers, seedlings are either planted in the holes or seeds are sown. But by the time the stems grow to about half a meter, summer weather has already set in in the fresh air. They bend the edge of the film from which the walls of the greenhouse are made and release the pumpkin outside. This is how it grows all summer: the roots are in the greenhouse, and the fruits are in the open air.
A pumpkin is planted in a greenhouse, but is released outside to live.
Preparing the planting hole
It is recommended to prepare the hole for autumn planting of an apple tree no later than 3-4 weeks before the procedure. Spring planting also means preparing the hole in the fall. This process consists of several steps:
- formation of a hole 60-70 cm deep and the same diameter;
- combining the soil removed during digging with fertilizers and placing it at the bottom of the hole.
Important! To obtain a fertile composition, the soil from one hole is mixed in equal parts with peat and humus, and 1/2 a bucket of wood ash and 300 g of superphosphate are added.
Features of planting in different types of soil
Since sandstones do not hold water and are not rich in nutrients, it is recommended to create pits as large as possible in this type of soil. In the future, the planted apple trees will need frequent feeding.
To plant apple trees in clay soils, you need holes the same size as for sandstones. In this case, the diameter should be about 150 cm, and the depth should be approximately 70 cm. The resulting hole is lined with a drainage layer: expanded clay, broken brick or crushed stone. To prepare the nutrient mixture, up to 25% of coarse-grained river sand is added to the usual recipe; this solution will provide the soil with a looser structure.
Sequence of planting apple tree seedlings in rocky soil :
- Preparing a hole with a depth of 60-70 cm and the same diameter (a larger size is acceptable).
- Formation of two trenches perpendicular to each other with a length and depth of up to 40 cm, passing through the center of the pit.
- Place the nutrient mixture into the well.
- Production of vertical fascines from rods with a length of 40 cm and a diameter of 3 cm.
- Installation of fascines along 4 trench arms so that the distance between them and the center of the pit is at least 60 cm.
- Planting a seedling.
Features and timing of pumpkin planting in different regions
Not only what varieties of pumpkin can be planted depends on the climatic conditions of the region, but also how and when to do it. If in the middle zone it is difficult to grow only the most heat-loving and late-ripening nutmeg pumpkins, then in Siberia or the Urals problems may arise with more cold-resistant varieties. But usually preliminary preparation of seedlings solves these problems. In the middle zone, they prefer to grow mid-season varieties with seedlings, and early ones are sown in the garden with seeds. Sowing seeds is possible in the last days of May, and planting seedlings without film covers is closer to June 10.
The climate of Belarus is similar to that of the Moscow region, and the approaches to growing pumpkins there are approximately the same. The State Register of Belarus includes about twenty varieties of pumpkins, and almost all of them are widely known in the central regions of Russia. The timing of planting seedlings or sowing seeds here is the same as in the central zone of our country; neither the planting rules nor subsequent care are any different.
In the Urals and most of Siberia, night frosts are possible even in June, so the time frame for growing pumpkins is very tight. Here they almost never risk sowing seeds directly into the ground, preferring to grow seedlings. It is transferred to the garden bed no earlier than mid-June. And even in this case, they monitor the weather, perhaps covering the plantings with non-woven materials for the first time. However, Siberia is large: in the south, as well as in the Southern Urals, summers are sunny and sometimes even dry: in these areas you can grow almost any variety of pumpkin, including direct sowing of seeds in a garden bed.
In the south of the European part of Russia there is no need to grow seedlings. Here the pumpkin grows without problems, huge fields are allocated for it, it is illuminated by the hot southern sun and grows large and tasty. All available varieties have time to ripen by sowing seeds directly in the field, which, depending on the weather, is possible either in early May or even earlier.