Country life attracts people with the opportunity to enjoy fresh air and unity with nature. Outside the city everything is fine, except for difficulties with hygiene procedures. Agree, would it be nice to make a heated summer shower with your own hands to solve this problem?
This option will help increase the comfort of staying at the dacha, but will not greatly affect the family budget. We will show you how to realize this idea.
The article examines in detail the best design solutions and technologies for constructing booths. Helpful advice on choosing the materials required in construction, arranging drainage, and simply and quickly heating water will provide effective assistance. The information presented is supported by photo and video applications.
Features of an outdoor shower for a heated cottage
The need for a shower in a country house with heated water arises mainly due to the lack of a full bathroom in a country estate. There are a number of other reasons why owners of summer cottages install such a structure with a warm water supply:
- the shower room is located outside the house - it does not have a heating system, thick walls and a roof;
- the need for water procedures not only in summer, but also in spring and autumn;
- There is no centralized water supply with hot water supply, so the container is located above the pressure cabin, and the heaters are directly in the shower room, and not in the house.
Another important point is the lack of a central sewerage system. For this reason, you have to equip a drain or septic tank when installing a heated garden summer shower for your dacha.
It is these features that distinguish a heated shower in a country house from a conventional bathroom and from an ordinary summer shower. Depending on the number of people in the country, the frequency of the need for water procedures, the availability of electricity, a septic tank, and the climatic conditions of the region, they choose which heated shower to install.
General concept of solar collectors
For a makeshift solar collector, you can use any pipes, hoses, used or unnecessary radiators with internal cavities, and even sections of heating batteries.
The advantage of a homemade product is that it is extremely weakly susceptible to breakdowns, nothing burns out in it, all the parts can be collected even from landfills.
What is a solar collector
Solar collectors are sections with a system of tubes, sections heated by the sun, accumulating its thermal energy and transferring it to water. Factory devices of this type can be complex - special vacuum tubes or flat vacuum blocks filled with a special liquid - a coolant.
At the top (tips) are copper flasks, heat exchangers, the specified heated substance rises from the cavity of the tubes/sections in them, concentrating heat there. These elements are united by a part (strictly speaking, a collector) into which the water being treated flows, it washes them, and heat is transferred to it. The section can be covered on top with a material (typical of flat models) that helps attract and concentrate sunlight, or the tubes can remain uncovered (the properties of their material are sufficient).
Not only will a solar collector provide a summer shower, it will also be suitable for an everyday, well-warm shower.
Factory products, of course, are more complex, but all such systems are based on a similar principle: circulation of water through a solar absorber or its heat exchanger.
There are simpler designs: water moves in a system of tubes (coil) in a section covered with material that attracts the sun's rays. Black material is usually installed inside; a mirror coating (foil) is often used - the rays will be reflected and once again heat the interior space. Such a block has a certain degree of tightness - in addition to the fact that the tubes heat up, heat is concentrated in the environment itself (like in an oven).
In its most basic form, a solar collector is a horizontal flat spiral of black rubber hose, covered with a dark transparent matte cloth that attracts the sun. Often a small pump and filter are added. There can be many modifications: a system of PVC tubes, small plastic/rubber sections - but the principle is the same.
It is necessary to distinguish between 2 systems: a shower with a solar collector and a solar-powered one. These are different heating equipment. The solar panel is designed to collect heat, which is transferred to special units (inverters, generators) that convert it into electricity, accumulated by the battery and then used for various needs, including heating water with heating elements. Solar collectors are originally intended for heating; they are self-sufficient modules that directly prepare the liquid that flows through their coils, through sections with heat exchangers; they cannot be used for any other purpose.
The principle of operation of a homemade solar collector with a shower
Circulation is based on natural convection: the warmer substance inside the collector coil, expanding, acquiring a lower density, rises and enters the upper part of the storage tank through the outlet pipe. The colder layer at the bottom is displaced, moves through another pipe to the lower segment of the coil, heats up, and rises again.
While the sun is shining, the liquid constantly moves along the described contour, and with each cycle it enters the coil, which is no longer completely cold, thus becoming more and more heated. The tank is raised above the solar absorber, so the circulation of the coolant does not tip over during night cooling - the cold layer simply accumulates at the lowest point of the circuit (the bottom of the collector), and the warm layer remains in the barrel.
On average, collectors produce +50...+60 ° C, especially successful designs - +70, high-quality metal products in the southern regions (a copper absorber is discussed below) can provide a boiling point.
How the pipes are located, the need for a pump
Pipe location:
- the hot pipe from the collector is connected to the top of the tank, the cold discharge into it is at the bottom;
- the supply pipe in case the barrel is filled with a pump, yard or home tap - on the opposite side at the top;
- Inside the tank for supply to the shower head, a vertical section of pipe is installed; the upper end ends at the beginning of the upper third of the tank to collect the incoming hot water, which is on the upper layers. You can replace it with a more efficient flexible hose with a float. Adjust it so that the end is always submerged, but the hose itself is near the surface - this way, when the liquid level drops, it will always take it away.
A small, low-power pump can be added to the system; it is required if the elements are located in such a way that they do not provide natural circulation. If there is a pump, then the barrel and the collector can be placed at any height in relation to each other.
Types of warm showers for a summer residence
There are many ways to create a shower in a suburban area. You can get by with a simple device, but there are also serious, solid structures with utility networks and wiring. The principle of a heated shower is the same - a flow of warm water comes from a container that is located above the person’s head. This design can be mobile or stationary according to the wishes and capabilities of the summer resident.
Portable shower for a summer cottage with heating
Mobile devices for showering in the country are adapted for easy installation and are as easy to use as possible. The main difference that affects the cost of a portable shower is the principle of heating the water.
Mobile shower with naturally heated water
Naturally heated shower - the container is filled with water, which is heated by the rays of the sun. Using the trigger mechanism, the water supply is turned on and you can use a portable shower anywhere in the garden. Portable shower devices are not connected to water supply systems and electricity. All you need to take a shower is a sunny area to naturally heat the liquid. There are different models based on the principle of water supply:
- Portable shower of the “Camp Shower” type. As a rule, a soft tank filled with water is attached to any structure made of metal, plastic or wood above a person's head using a hanger or rope. In order to take a shower, you just need to turn on the water supply with a simple movement of your hand. Standard models usually come with a 20-liter black tank, which, due to its color, heats up faster in the sun.
- Pocket device of the “Toptun” type. This is a lightweight, compact foot module that consists of a rubber mat with two diaphragms, tubes and a mount. One tube is lowered into any container (bucket, basin) with water heated in the sun or fire. By alternately pressing your feet on the mat (stomping), the liquid flows through another tube into the shower head.
Mobile shower with forced water heating
Such devices are convenient to use in cool or cloudy weather, when it is not possible to heat water naturally.
A mobile heated shower for a summer cottage is connected to the network, the water heating module is placed in a container of water. As a rule, in 10-15 minutes standard water heaters with a power of 1.9-2 kW heat water to a temperature of 45-50 degrees. Usually the heater is easy to fix in a bucket or barrel with a hook.
By turning on the pump, water flows through the hose. Many models of heated mobile showers have a temperature regulator and a convenient shower head with a pressure lock.
Advice! If the electricity is often cut off at your dacha, then you should take care of purchasing an adapter for a heated shower that can work from a car cigarette lighter.
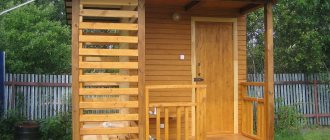
Stationary garden shower for a summer cottage with heating
Typically, the stationary design of a heated summer shower in a dacha consists of a water tank and a cabin, the size of which depends on the size and number of people visiting the dacha.
On the roof of the shower house there is a tank - a metal or plastic container. The water in the tank is heated by sunlight or electricity using a heating element built inside. A pipe is built into the bottom of the water tank, to which a shower head and tap are attached. When the valve is opened, water flows downwards under its own weight, providing good pressure. Through holes in the floor of the shower, the used water goes into the septic tank or into the ground if the flow rate is small. Modern models of heated shower cabins are presented in different variations in design, material, size, sections, and price.
The most popular models are plastic heated showers for summer cottages.
As you can see in the photo, the designs are quite simple, so making a heated shower in the country with your own hands will not be difficult.
Little tricks
A few little secrets and the drainage hole will serve for many years.
In order to extend the cleaning period of the structure, you can apply some nuances. For example, divide the plum. In this case, you will get a main drainage hole and another smaller one. What will it give? Liquid without solid particles will be drained into one structure, for example, a smaller one. This approach will make it possible to quickly absorb water into the ground, and mucus will not form on its walls.
The second option is to use biologically based products . The advantage of this product is bacteria that are able to process waste. The result is that water seeps into the ground faster and easier.
We must not forget about drainage and septic tanks. Their location should be close to the drainage pit, since if water gets on them it will lead to the appearance of:
- unpleasant odor;
- soil destruction;
- may lead to destruction of the foundation.
To avoid problems with runoff, it is better to place the structure on a hill .
Recent Entries
Chainsaw or electric saw - what to choose for the garden? 4 mistakes when growing tomatoes in pots that almost all housewives make Secrets of growing seedlings from the Japanese, who are very sensitive to the soil
Before you start building a shower with your own hands, you should familiarize yourself with heating options. In conventional buildings, as a rule, tubular electric heaters are used. There is only one disadvantage of such heaters - it is necessary to constantly monitor the heating process. When the water in the shower reaches a certain temperature, the electric heater must be turned off.
What is a warm shower for a heated cottage made from?
When building a shower room in a country house, practical and simple materials are chosen, so building a heated shower can be quite a budget-friendly endeavor. The walls of the structure can be made of different materials.
Brick is solid masonry that will last a long time (you can use bricks left over from building a house). Wood is a completely environmentally friendly basis. High-quality ventilation is necessary to preserve the material and its treatment with a fire retardant due to the proximity of the heating device. Polycarbonate is a lightweight and durable material that does not deform from natural precipitation. It is easy to cut and install.
Sheet plastic is another moisture-resistant resource. You need to choose durable, non-toxic varieties that do not emit harmful substances when heated. Some use corrugated sheeting - a durable material that does not corrode. Its advantages are ease of installation and design.
Sheet materials are used to form the side walls of the shower; the frame is made of profiles, metal pipes or wood blocks. Regardless of the wall cladding, the top layer on which the tank filled with water will stand must be strong and firmly supported by the vertical bases of the frame. Lightweight shower options in the country are left on stilts, while heavy massive structures require a poured foundation.
The size of the tank is selected based on the number of visitors who will use the heated shower in the country house. The volume recommended for a family of 3-4 people is 100 liters.
For heated shower tanks, plastic or steel tanks are used. From steel tanks choose:
- metal;
- made of galvanized steel;
- made of stainless steel.
Recently, steel tanks have faded into the background due to their heaviness, which implies a more solid frame. Containers for country showers made of plastic have become increasingly popular due to their lightness, quick heating and the ability to withstand temperature changes from +60 to -60 degrees.
There are tanks that are already equipped with a heating element with the function of adjusting and maintaining the required temperature.
Preparation for construction
Next, we will consider the process of constructing an all-weather shower, as the most in demand throughout most of our country.
Choice of frame material
Before starting construction, you need to select the frame material. As was said, plastic pipes are no longer needed due to insufficient strength, so you have two options to choose from: wood or rolled metal.
Wood
Positive sides:
- low cost;
- ease of processing.
The disadvantage is a short service life due to susceptibility to rotting and drying out.
Beams of a certain cross-section are suitable for the frame
Specifically you will need the following lumber:
- for the bottom trim: insulated shower - timber with a section of 150x150 mm, lightweight - from 60x60 mm (optimal - 100x100 mm);
- for racks, oblique connections and top trim: board with a section of 100x40 mm.
How to build a warm shower in the country with your own hands
Construction of a heated shower in a country house with your own hands begins with choosing a location. The optimal location would be a sunny hill at the edge of the site or along the fence. They clear the land 2 by 1.5 m - this space will be quite enough for a shower with a locker room. To make it easier to perceive the future booth and calculate the required material, it is worth sketching out a drawing on paper.
When developing a project, you need to take into account the free space inside the shower stall - it should be enough so that you can freely bend over and move your arms while bathing. The minimum dimensions included in the drawing are 1 by 1 m. They also think about a place for a locker room where dry towels and clothes hang. For comfortable storage of personal belongings, leave 0.5 square meters. m. The optimal design is 1.5 by 2 m with a height of 2.2 m.
Used water should flow freely and not accumulate on the floor to avoid dampening the entire structure. To do this, form a concrete base with a slope. Dig out the top layer of soil 20-25 cm, cover it with gravel and fill it with solution. A comfortable covering for the feet is formed on top.
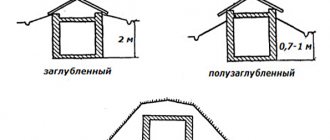
If the booth will be used by more than 2-3 people, then make a drainage hole. To do this, dig a small ditch and lay a drain pipe into it, which goes directly into the pit. The pit into which the water will flow is made 1.5-2 m deep at a distance of 2-3 m from the cabin itself to avoid subsidence of the structure. The drainage pit is made sealed (tires, plastic tank) to isolate soapy water from fertile soil. The top of the drainage ditch is covered with boards or metal sheets for safety. In order for the water to flow directly into the pit, a solid tray is placed on the floor of the shower stall, and an adapter into the drain pipe is attached to the drain hole.
After forming the base of the shower and the drainage area, they begin to build the frame. They make the bottom trim around the perimeter with a 100 by 100 mm beam, fastening it with anchors.
Vertical posts are attached to the base with steel corners and long self-tapping screws with additional fixation with diagonal boards.
The top trim is formed from the same timber, fastened with nails or self-tapping screws.
Important! All wooden components are treated with fire protection and coated with a water-repellent preparation.
Boards are stuffed along the top frame or moisture-resistant plywood with a hole for the pipe is placed. The upper part of the frame must be reinforced with strong sheets due to the heavy load of the water container. Install the tank on the cabin.
They fix it, install the outlet and install a faucet with a shower head.
To fill the shower tank for a heated cottage with water, install a pump.
If the tank is no more than 100 liters, then you can choose a low power device. In order to avoid overfilling the container, install a valve that shuts off the flow when filling.
The walls are covered with the selected material: polycarbonate, siding or boards.
To delimit the space between the dressing room and the shower stall, hang a waterproof bath curtain or install a polycarbonate partition. The outer door should close tightly to keep cold air out, but to avoid deformation from moisture in the future, it is better to leave a gap. This distance is covered with a seal that is attached around the perimeter of the doorway. After covering the walls and installing the tank, they move on to the interior arrangement of the shower in the country. Shelves for hygiene items and hooks for clothes are attached to the walls, and a rug is placed on the floor.
Preparatory stage: project drawings, dimensions
Any summer shower needs to be thought through and developed before construction. Doing this kind of work is easier than it might seem. The height of the structure must be at least 2.5 m so that a person is not cramped during the shower procedure.
Approximate drawing of the future design
It is also necessary to provide free space inside the cabin, sufficient to allow you to bend over while bathing without bumping into the walls with your elbows. The minimum dimensions of the room are 1 x 1 m. At the same time, you should think about where to store towels and personal items so that they do not get wet. For a “locker room” an area of 0.5 m² is sufficient. In reality, the most comfortable design will be 1.4 x 1.9 m.
Advice: the small area of the constructed shower will subsequently cause its destruction. To ensure the stability of the structure, it is recommended to place the cabin on a pile foundation.
Heating selection
You can provide heating by purchasing an electric heater, but this is expensive and therefore unprofitable, because the country shower is used only periodically.
You can heat water with a blowtorch, but the pipes must be made of metal. Here's how such a structure is mounted:
- The pipe supplying water to the tank should be led outside the perimeter of the shower room. Outside the booth, a shelf is fixed to the wall on which the heat exchanger should be installed.
- The last unit is made of a thin tube, twisted into a spiral, and then fixed in a casing. Such a “coil” is easy to make - just wind a thin pipe around a thick pipe. To obtain warm water, 4 turns are enough, but a hot shower will be achieved if you make at least 8 such turns.
- After this, take a large saucepan. Its size should allow the coil to fit, as well as the blowtorch.
- The free ends of the “coil” must be connected to the water supply pipeline. If you make the connection using couplings, then you can remove it for the winter.
There is another way - to build a small greenhouse above the tank. For this purpose, the frame is covered with film. Such a design will increase the water temperature by 10 degrees, and the wind will not be able to cool it.
Advice: we recommend covering the greenhouse from the north with reflective material. The presence of a mirror plane will allow you to get warm water faster.
Required materials and tools
To build a shower stall you will need some tools:
- hammer;
- roulette;
- level;
- corner;
- bolts;
- nails;
- tank and pipes;
- a pair of taps;
- shovel;
- shower head.
And also the following materials:
- boards;
- slats;
- brick;
- plastic sheets;
- a frame that would be more conveniently made from pipes;
- cement and sand (to organize the foundation and lay the brick);
- insulation, plaster, any paint (for finishing).
How to insulate a shower at the dacha
To make taking a shower in a heated dacha comfortable in any weather, the walls and roof are insulated to prevent cold from entering from the street. To do this, choose mineral wool or polystyrene foam. Sheathing a heated shower in a dacha with thermal insulation material is no different from the procedure for insulating other rooms - the material is fixed to the frame and walls with suitable fasteners (if the thickness of the material allows, with a construction stapler to wooden parts). When insulation occurs from the outside of the shower, the fixation is performed in the usual way. If the material is placed inside the booth, then care must be taken to protect it from water splashes. It is best to cover the insulation with thick cellophane film and foil on top of it.
Comment! It is important to insulate not only the shower walls, but also the ceiling. Warm air will instantly evaporate if the ceiling is not insulated.
Purchasing the necessary materials
In addition to making or purchasing a heating tank, you must purchase plastic water pipes D 50 mm. It is convenient to use a flexible silicone hose to supply water.
To set up a system of materials you will also need:
To make a foundation pour when constructing a cesspool, you will need cement marked M150 and higher. The drain can be covered with waterproofing roll materials or hydroglass insulation.
To make a wooden floor in the shower, it is best to use a tongue-and-groove board, treated with a water-polymer emulsion or oil white.
To erect the structure you will need the following tools:
To pre-mark the area, you also need to stock up on a skein of twine and wooden pegs.
Heating water for a shower in the country
Heating water in the tank can be done in two ways:
- Naturally, the tank along with the water is heated by the heat of the sun. To do this, install a flat black tank. On sunny days, the water usually warms up to a comfortable temperature by lunchtime.
- By forced method - the water in the container is heated using a heating element. This electrically heated garden shower allows you to bathe in warm water in any weather conditions.
Many modern shower tanks are already equipped with heating elements, which significantly simplifies, but also increases the cost of providing warm water. Anyone can install such a structure on their own if you use the heating system for a shower in the country.
A heating element with a power of 2 kW or more is installed in the lower part of the tank, fixing it with rubber gaskets in a pre-drilled hole. A thermometer is installed on the container, which indicates when the heating device can be turned off, or an automatic thermostat. A prerequisite for self-assembly of a tank with a heating element is the installation of a device that shows the water level. This is an important point, because the heating elements react to the lack of water and fail.
Warning! To avoid short circuits, the wire from the network to the shower stall is laid in one piece.
Installation of the barrel
A tank with an electric heater and thermostat can be installed on top of the cabin.
Such products are sold today in a wide range. But this option has significant disadvantages:
- A significant part of the heat is spent on “street heating”.
- All household members, regardless of preferences, will have to wash with water at the same temperature or wait until the water reaches a comfortable temperature after the previous user.
A more practical option is to attach an inexpensive boiler to the wall outside the shower, protecting it with a canopy. An ordinary barrel is placed on top, from which water is supplied through a tee to the mixer and to the boiler. The outlet from the boiler is connected to the second pipe of the mixer.
Before you start building a shower room in a country house, you need to study a lot of nuances, because when dealing with water, you need to be able to prevent possible leaks and damage to the foundation in advance. Do-it-yourself shower in a private house - recommendations on the order of construction work.
You will find tips on making a shower tray with your own hands in this article.
Useful tips
Installing a heated summer shower at your dacha with your own hands is a completely feasible process for any summer resident. There are several clever tips that will make organizing your work easier and save you from problems during operation in the future.
- To enhance heating by the sun's rays, a polycarbonate roof is placed over the tank or a film is stretched to give a greenhouse effect and retain the heat of the water.
- The volume of the drainage pit must be at least 2.5 times larger than the water tank.
- The farther the septic tank is from the shower stall, the less the risk of an unpleasant stagnant odor.
- When forming windows in a summer shower room, cracks and joints are sealed to prevent drafts.
- If there is not enough space on the site, the minimum size of the booth can be 1 by 1 m. Hooks for clothes and towels can be placed on the outside of the structure to prevent moisture from getting on the fabric.