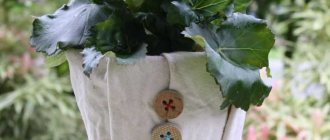
Birds from bottles
Lawns are often decorated with homemade products. As you can see in the photo, the birds with their own hands complement the style composition and favorably emphasize the advantages of the place.
Manufacturing does not take much time, all family members can do it. Turn this process into a celebration, during collective creativity. This way you can spend time with your family and have fun with your children.
In order to make a peacock with a painted tail, you will need five-liter eggplants and a lot of 1.5-2 liter plastic bottles. Prepare garbage bags, tape, and foil. The tools you will need are scissors and a stapler. To decorate a decorative piece, take a brush and acrylic paints. Varnish is used as a fixative.
After preparing all the materials and equipment, you can begin the main work. First of all, plastic containers should be treated. The inside should be clean, without any adhesive or liquid. Worst case scenario, you'll get dirty and slow down your work.
One of the most complex components is the bird's tail. The middle part of the bottle is cut into three long tongues. The bottom and neck of the bottle should be cut off first.
Round one end until it turns into a feather, and make very small cuts along the edges. A blue oval is attached to the rounded ends; for this you will need plastic bags and a circle of foil. Using a stapler, you need to fasten these elements of the product.
Note! In order for the bird’s tail to be voluminous and fluffy, you should prepare many of these homemade preparations.
The last step is to paint the bird and seal it with varnish.
What size should the nests be?
The size of the nest is chosen depending on the breed of chickens. The bird must have enough space, otherwise it may never learn to fly inside.
For example, for a laying hen, a nest 25 cm wide and 35 cm deep and high is sufficient, while for a meat and egg breed the dimensions increase by an average of 5 cm.
The threshold of the nest is not made lower than 50 cm. It is necessary to place a shelf in front of it for take-off. It is made from a strip with a cross section of 50*20 mm, and placed at a distance of 10 cm from the entrance.
Standard sizes of chicken nest
The upper tier of the nests must have a pitched roof at an angle of 45 degrees, which will prevent the bird from flying onto it and sitting there. The nests must be installed before the chickens are released into the house so that they do not have to get used to the room again.
Before construction, a drawing must be developed on which the position of nests and drinking bowls with perches must be indicated.
Photos of nests
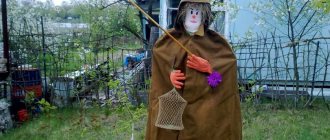
Bird for the garden
In order to learn how to make a bird with your own hands, you should use the following recommendations.
Prepare a five-liter eggplant. The neck should be cut off; the bottom is also not required. Next, cut a semicircle from the middle part. Feathers will then be attached to it using a stapler.
Then they begin to manufacture the base - the body of the product. Cut off the neck of 5 l and 2 l, fasten these two elements with wide tape.
The bird's head is made as follows:
- cut the neck, twist to create a beak;
- connect it with the cut off large neck. To do this, use tape;
- fasten the part to the base.
The advantage of such products is their long service life. Plastic material, as well as polyethylene, do not deteriorate due to bad weather, in particular, this applies to snow and rain.
Cut strips from garbage bags, then attach them in rows to the body of the bird. Gradually move from the top to the bottom of the bird's body.
You can fasten the base and tail of the peacock using a rope. Before doing this, you should make a hole in the place where the fastening will go.
To fix it directly on the lawn or in the garden, attach a stick to the bottom. Using acrylic paints, paint eyes, beak, and other elements as desired. Then secure the result of decorating with paints.
Note! For additional decoration, use a crown made of foil. You should pour a little sand inside so that it is heavy and does not blow off the bird’s head.
Rules for nesting
In order for the bird to fly in the nest you have assembled, you must follow the following rules:
- Choose a shaded place that is not exposed to direct sunlight.
- It should be dry and warm. To do this, straw or sawdust is spread there. Farmers choose sawdust because it is more difficult for chickens to push out of the nest. The layer of sawdust should be below the level of the edge of the nest, otherwise the eggs may fall out of them.
- The bottom of the nest can be made of mesh so that its contents are properly ventilated and dry. This will make it possible to pay less attention to the condition of the litter.
The bottom of the nest is lined with straw - To prevent sawdust from spilling out of the nests through the cells, the holes must be very small. Straw will not fall even on a mesh with large holes.
- The structure should not be at the entrance to the poultry house or on the ground. These places have low temperatures and high humidity. The chickens will not want to lay eggs here and will look for other places.
- You need to think about good protection from predators. If chickens feel threatened, they will choose quiet places to lay eggs.
- The nest must be a separate structure, not attached to the walls of the house. Otherwise, proximity to the street will lead to freezing of the nest. It will be used in warm weather. The walls can be insulated.
- During construction, you need to ensure that there are no sharp chips, chips, or protruding screws and nails. The bird can get hurt from all this.
- The number of nests is calculated based on the total number of birds - there should be one nest for every 5 laying hens.
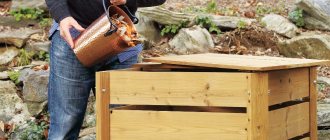
Strong nests for 10 chickens made of plastic boxes
Bird for children
A product for a kindergarten is easier to make than a large bird. If you have such an opportunity, you can complicate the process using a metal mesh frame. This will be the base along with the foam that will make the bird.
Using acrylic paints, the product is painted and varnished. Car tires are often used to make the product.
When to hang titmice
Houses for tits should be hung up at the end of March. The distance from the house to the ground is 3-5 meters. It is advisable to fix the house on a tall tree. The birds will be calmer there. The entrance to the house should be oriented to the west.
If the pole on which you secured the titmouse is wrapped in tin for a couple of meters, then the cats will not be able to reach the chicks.
If you want titmice to live in a pipe (diameter 8-12 cm), then dig a pipe 1-1.5 m long into the ground. Pour crushed stone into the bottom to ground level, and throw sawdust on top.
Place a low roof over the top of the chimney. The bird will build a nest at ground level, and to make it easier for it to climb up, insert several thin long chips or twigs into the rubble.
Remember, tits are nervous people, so you shouldn’t disturb them often. Mother tit, seeing excessive attention to her nesting site, may even abandon her brood.
Manufacturing techniques
There are many manufacturing techniques and materials available. The French weaving technique is often used. To do this, you need to choose the right fittings. Real creations are made from wires.
The kanzashi technique is considered to be quite common among needlewomen. In addition to hairpins and flowers made using this technique, you can make other crafts.
To make a bird, they use a wire frame, then wrap it with threads. A semicircle cut out of cardboard serves as the basis for the tail.
Another manufacturing method is from threads. You can make a pink chicken, for example. Manufacturing will not take you much time.
Make paired blanks from cardboard. Wind the threads until the hole is completely filled. Cut from the outer edge, thread the thread, tie a knot. Thus, fluffy balls are made to decorate other products.
Types of birdhouses and titmouses
There are different designs - with a gable roof, a shed roof, a rhombus, a nest, etc. This is probably more a matter of aesthetics.
According to our observations, birds populate everything approximately equally, without giving preference to any in particular; size is more important here.
Of course, making a nest box for the first time is quite difficult. And it's more time consuming. We recommend choosing a plank design.
Choose only good materials for birdhouses; not everything can be made from. But more on that below.
In our experience, the appearance of the building does not bother the birds at all. Apparently, practicality is more important to birds and they do not brag to each other about their cottages.
You can make the appearance of the house more fun. For example, the other day I took a look at the birdhouses we hung in our city park—maybe you’ll like something or inspire your own idea (click to expand the image).
conclusions
Birds are popular among DIY enthusiasts. Various materials and manufacturing techniques are used. These can be plastic bottles, colored paper, threads, and other improvised means. Manufacturing techniques vary in complexity, you can choose the one that suits you.
With the help of such art you can have a good time with your children and have fun. At the same time, the decoration will please the eye for a long time.
Peculiarities
In nature, tits most often settle in tree hollows. Artificial houses must correspond in their conditions to natural ones and be fundamentally different from a birdhouse. For example, a titmouse is never made from smooth boards, materials such as chipboard or fiberboard. They don’t do this not only because they are saturated with chemical elements and harmful resins, but also for the reason that the tit simply will not settle in such a house.
She will choose a titmouse, which is made of unplaned boards, with bark and knots. Natural croaker is best.
DIY bird photo
Accommodation
Now you need to correctly position the titmouse on the tree, observing some rules and features.
The house for the tit is hung at a height of no less than three meters from the ground, hidden among the branches and foliage of trees. Do not give in to the temptation and hang it in an open area to observe the life of tits. Most likely, such a home will remain without new residents.
It should be located on the south or southwest side, away from noise and roads, on the leeward side.
The best time to hang a titmouse is the beginning of winter. During the cold season, various birds, including titmice, will hide there. And in the spring, this structure, no longer frightening with its novelty, will definitely attract a pair of tits to create a nest.
In a small garden, the distance between houses should be at least 20 meters. A closer residence will be uncomfortable for the birds, since they feed where they live. While protecting their nest, tits are jealous of their territory, so an apartment building is a bad option for them.
It is worth assessing all the dangers and inconveniences: there should be no drafts or strong sun.
Protect your titmouse from cats and other predators: high placement between tree branches will help create a safe environment. If possible, it would not be superfluous to protect the tree trunks with tin sheets, then even the smartest cat will not be able to get to the chicks.
It is necessary to secure the titmouse to the tree in an inclined position; this will not only help the grown chicks fly free, but will also make it easier to clean the house and remove snow and moisture from the roof surface.
How many nests do you need to make?
It depends on you, but it is advisable to do 2-3 of them, no more. You don't want to attract too many birds to your yard, otherwise they may often disturb you with their singing when you want to be completely alone.
- Flowerbed made from bottles - a master class in making original flowerbeds. 120 photos of decorating a flower bed using plastic
- Garden furniture - tips on selection, use and care. Rules for placement and nuances of choosing material (105 photos)
- Sun loungers for the garden - the best models and options for their use. 110 photos of the best models of the 2019-2020 season
Although, it’s up to everyone’s discretion: for some it’s suitable, for others it’s not. Remember, comfort is the most important thing in such places.
How to insulate a dovecote for the winter
There are many methods for insulating a poultry house. Some of them relate only to a certain part of the building, so the best effect will be given in total.
- Cardboard for packaging. This is the simplest and most economical way: the entire room just needs to be covered with cardboard.
- Spray foam can be used to fill small gaps or cracks.
- A poultry house built of brick must be insulated with foam plastic and plastered. The inside of the building can be finished with plywood and insulating film.
- The roof is often insulated with mineral wool.
- Clay insulation is considered one of the more convenient and reliable. It can be used to treat the entire internal surface of the building.
- Floors, walls and roofs can be insulated with foil insulation.
Did you know? The fastest pigeon in Europe, named Bolt, also turned out to be the most expensive homing pigeon in history. A Chinese millionaire bought him for £300,000, hoping for numerous offspring with the best qualities of a champion.
Types of designs
Both perches and nests for chickens can be made independently.
- In the form of a booth - the chickens come inside through the entrance opening, they are calm and safe, the bustle of the poultry house does not distract or irritate them. To accustom them to such a nest, they are placed there and closed in the morning.
- In the form of a box. This is the simplest design, there is no roof, an open entrance that has a small side.
- From baskets, buckets, boxes, lined with straw, available on the farm. They are used in small farms or at the initial stage of farming, when the chicken coop is not yet fully equipped.
- With sloping floor and egg collector. This complicates the design, but makes it easier to collect eggs and prevents them from being spoiled by laying hens.
Some tips
You can place a mesh box filled with cotton wool, straw, and sawdust among the trees. The tit, which will build its nest in the house, will definitely take advantage of the carefully left reserves of material.
- You should not disturb the mother tit, approach the nesting area, or make noise, otherwise the bird will become nervous and may even leave the nest and its offspring.
- Be sure to make feeders for the winter, and don’t forget to replenish bird food. The tit and other small birds get used to finding food in the same place and therefore live nearby. On harsh winter days, a freezing bird may not have time to fly to different places and remain hungry.
- It’s not scary if other small birds, for example, sparrows or wagtails, settle in the titmouse. They also need shelter and care.
- For all birds, without exception, frost is not as terrible as hunger. A hungry bird may die. It is known that out of ten birds only three survive the harsh winter.
- Making a haven for birds and feeding them is hard work even for a child. Birds will thank you not only with their chirping and trills, but also with pest control in the garden plot. Agree, it is much more pleasant and does not require much effort.
- By taking care of birds, you will teach your children the most important thing - love and care. Prepare interesting feeder cones with them. You will need pine cones of various shapes prepared in the fall, ropes or bows, unsalted fat, and any small food. The cones can be collected using a rope into garlands or hung like Christmas balls on trees.
- Thoroughly lubricate the holes between the scales of the cone, then dip it in food or seeds.
- A beautiful, tasty and healthy treat is ready!
Craft options
In fact, you can come up with many variations on the theme of nesting for birds.
This could be a small Easter gift or a large nest that you want to build in order to attract storks to your house.
On the Internet you can find a wide variety of descriptions, step-by-step instructions with photos on how to properly weave a nest for birds.
Moreover, the size and shape of the craft will depend on what goals are pursued by its creators.
For example, children's photographs of newborns sitting in nests woven from branches are very popular, that is, you can independently create the surroundings for a baby's photo shoot.
Or it will be a decorative small nest with chicks for interior decoration, woven from tufts of grass or straw. Or the child’s imagination wanted to create a nest for the fabulous Firebird.
Additional requirements
Now we will discuss additional requirements for the placement of birds. The following should not be located near the bird house:
- electrical lines;
- cesspools;
- neighbors' poultry houses, chicken coops, pigsties, etc.
As a rule, it is impossible to avoid electric lines, because now they are present everywhere in villages and villages, but do not worry, over time the pigeons will learn to bypass this air obstacle.
Breeding pigeons in urban environments requires special attention to the health of the birds
Now about cesspools and the homes of neighboring birds and animals. All of these structures are a source of infectious diseases. Pigeons are especially susceptible to them, so placing a dovecote near the above-mentioned places is strictly prohibited.
Pigeons are birds that cannot stand loneliness. Breeders recommend purchasing pigeons in flocks and pairs. Do you want to know more about the features of keeping pigeons and which breed is better to choose? Read our article.
Dovecote: 10 drawings of different models
Making a dovecote is not just a matter of principle, it is closer to the art of architecture. Practice without theory is not applicable in constructing anything, even a doghouse. The drawings will be the theory. To start practicing, you should remember that “the eyes are afraid, but the hands do.”
Hanging dovecote. As the name suggests, it should be hung; As a rule, the mounted model is small, and therefore easy to manufacture and intended for a small family.
Frame model. Much more than two pigeons can fit here.
Tower model. It’s difficult to build something like this, but in the company of experienced people nothing is impossible.
Scheme for building a dovecote for a very large family.
An option for comfortable living of pigeons in the country.
Ridge dovecote - for those who want to keep pigeons in the attic.
Three types of nests for pigeons. If you wish, you can build it yourself. However, not necessarily in one day. It is recommended to choose the style of nests you like, make a plan and follow it correctly, without haste. If you hurry, you will make the pigeons laugh.
Shelves for pigeons.
Dovecote with aviary. The most convenient and at the same time compact option.
A simple diagram for an ordinary dovecote.
Read in full (link)
Tips for using titmouse
- On a plot of 4-5 trees, one such house is enough.
- Do not point the entrance to the leeward side (where the wind often blows from). Point it south, southwest. Hang the titmouses at a height of 3-5 meters.
- During the winter it is necessary to constantly feed the birds until spring. Otherwise, they will die without finding food in their usual place.
- Feeders can be made from food boxes or bottles that need to be washed thoroughly. Cover the neck with a lid, cut an entrance in the bottom and hang it horizontally.
- In winter, feeding from such a feeder, the birds look for a home nearby. Tits do not forget where they were fed in the summer and willingly settle on the site.
Nest care
Caring for nests for laying hens is much easier if they are made with an egg collector. They are much cleaner, there are no remnants of accidentally crushed or pecked eggs. This means that there is no need to regularly clean the bottom grate from dried protein-yolk residues and shells.
This place should be a comfortable place, which means cozy, clean, dry. Caring for it consists of daily replacement of the bedding and cleaning of the tray.
Disinfection and ventilation of the bottom should be done at least once a week. At the same time, you need to clean and ventilate all surfaces and fastenings.
To combat parasites, it is recommended to periodically fumigate the entire room with special bombs for caring for the poultry house.
Parts of the structure and its fastenings should be inspected for damage, strength and rigidity.
On the eve of the onset of cold weather, it is necessary to check and, if necessary, replace all insulation, and in the future strictly control the temperature of the laying hens; it should not fall lower than +15°C.
Basic requirements for keeping pigeons
Most of the requirements are to create the right conditions in the dovecote and to observe the rules of hygiene:
- for 1 bird you need to allocate 0.5 sq. m of floor area and about 1 cu. m of air space;
- the pigeon coop must be durable and inaccessible to other animals such as cats, dogs and rodents;
- 1 group should consist of no more than 25 individuals;
- the dovecote must be equipped with perches;
- the poultry house must be dry, draft-free, tidy, and have enough light;
- It is necessary to regularly disinfect all devices with which pigeons come into contact (drinkers, feeders), as well as the room itself.