Car enthusiasts come up with a lot of things to store a car in the courtyard of the estate, from remodeling a barn to arranging a frame garage, although the solution to the problem clearly lies on the surface - it’s easier and cheaper to build a wooden carport. Today this is the safest and most affordable way to store equipment. A wooden carport can be as good as, and in some ways even superior to, a “warm” box.
Pros and cons of wooden carports
It is clear that in terms of strength and durability, a wooden structure is inferior to metal or brickwork, and this is the most significant drawback of such solutions. But it is easy to fix and mostly compensated for if modern protection technologies are used. Therefore, the right choice of design and special processing can make wooden carports no less durable.
If we list the positive aspects, there will be many more of them:
- A carport made of wood will cost less than a metal one, even taking into account the costs of additional wood processing, the total construction estimate will be 30-35% of the cost of the welded structure;
- Most of the work can be done on your own. Wooden parts are easier to process and install on a frame, cut, cut, drill, and assemble into a finished structure;
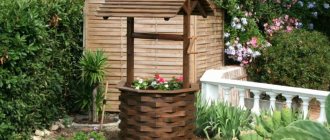
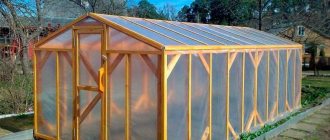
- There is a real opportunity to make a carport made of wood beautiful, warm and comfortable.
Even if this is a building for a summer house or a country house, the appearance of a beautiful canopy will certainly improve the appearance of the estate.
For your information! If you believe the statistics, most motorists prefer wooden carports. They are lighter than steel, do not require such a massive base for the foundation and do not create rain from condensation drops on an early autumn morning.
It is quite possible to convert a wooden carport for storing a car into a place for temporary storage of things and agricultural equipment, or you can simply use it for evening gatherings in the country.
Varieties
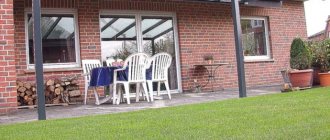
It is generally accepted that attached-type wooden carports are erected very quickly and easily, which is due to the presence of a ready-made part in the structure, represented by the wall of a household or other building.
However, proper independent construction of such a building requires mandatory consideration of the basic technical and operational characteristics, as well as calculation of the optimal and maximum load on the installed support pillars.
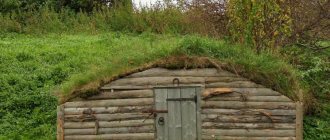
Wood structures are distinguished by their environmental friendliness and, as a rule, fit perfectly stylistically with wooden housing construction and traditional outbuildings.
The roofing part of a wooden carport is most often:
- simple lean-to based on a rafter system;
- gable or hip, multifunctional type;
- attractive arched type.
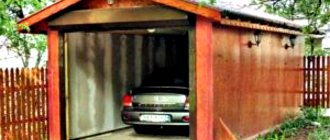
Free-standing varieties, with proper development of the sketch and drawing up competent drawings, have sufficient stability indicators and high reliability. The load-bearing base, in this case, is most often concreted.
Carport
The number of parking spaces under the canopy may vary, but if necessary, you can increase the size of the structure quite easily and quickly. Crushed stone, concrete, artificial or natural stone, as well as paving slabs are most often used as a covering for a parking space.
Sheds, which are relatively small architectural structures, consist of supports, a roofing part and directly a place to park a vehicle, and the reliability and durability of such a structure directly depend on the correct development of the sketch and the correct choice of variety.
Types of wooden carports
It is clear that every car owner prefers to choose the type and design of carport that, in his opinion, is most convenient for everyday use and does not require a radical redevelopment of the area in front of the house.
Requirements for a carport
But still, the correct selection of a protective structure for the machine and its location on the site remains the main problem of construction. Choosing a wooden carport for a country house should take into account additional factors. After all, this is not a gazebo or a covered terrace for relaxation, and the conditions for storing a car differ from those required for a comfortable pastime.
The design of a wooden carport must satisfy three main conditions:
- The site for the protective canopy should be built with a slight drainage slope, with gutters to drain water. There should be no puddles left under the machine, even after the heaviest rains, and the draining water should not fall on the wooden posts of the canopy;
- Drops of water flowing from the slopes must not fall on the machine. The slopes of the canopy must be large enough so that the wind does not blow moisture from the roof under the roof and onto the lining of the car;
- The wooden canopy should be positioned on the site in such a way that the space under the roof is constantly blown by a slight breeze.
The last requirement is the most important for ensuring the safety of the machine, therefore wooden sheds cannot be built in the blind corners of the site, surrounded by bushes or, even worse, lined with transparent plastic, meshes and slatted grilles.
For your information! Sometimes car owners install carports on wooden structures with a polycarbonate roof. In this case, you can only use honeycomb stamps with an ultraviolet protection function, otherwise the wood, like the rubber parts of a car, will quickly fail.
The techniques that are used to equip gazebos and terraces are not used in carports. For storing a car, it is important that there is no moisture under the roof, dryness and good ventilation, which also affects the durability of the wooden roof structure. The better the wood of the carport frame is blown and ventilated, the more durable the building will be.
Types of carports
Traditionally, the selection of a suitable option begins with an assessment of already implemented wooden carport projects. This way, you can get useful ideas from designing the frame for your car, which is easier than planning and designing the layout from scratch.
Several types of hanging structures are best suited for storing the machine:
- Classic gable version with metal, wood or stone supports;
- Arched arc roofs made of transparent polycarbonate on wooden posts, reinforced with cross beams;
- Flat canopies on monoposts, such schemes are used as extensions to a house or utility block on the site.
In each specific case, you have to understand and analyze the design in order to understand why this or that option for storing the machine is interesting.
Installing drainage
It will be plastic.
Important note! Plastic is subject to thermal expansion. To compensate for deformations, a movable joint must be made every 8 m of the pipe length
If you are going to secure the drain using sealant adhesive, make a connection with a rubber seal every 8 m. This will be enough to compensate for temperature deformations.
Drainage system
We will install the system so that the receiving hole is located at the bottom of the roof slope of our canopy. We select the side of the roof, focusing on the location of the ditch for receiving wastewater.
First step. We attach the hook holders. We install the gutter with a slope in the direction of the water inlet. To ensure the required slope of the gutter, we use holder hooks. We install them with a minimum 0.5-centimeter slope for each meter of the length of the drainage structure. Markings for installing hooks are carried out as follows:
- We find the lower or upper point of the storm drain for mounting the extreme bracket. The extreme brackets are installed at a distance of 100 mm from the edges of the water intake;
- knowing the required length of the system, we retreat from the extreme point a distance equal to 0.5 mm multiplied by the total length of the gutter in meters. Mark the second point;
- we stretch the rope between the two marks and fasten the hooks, focusing on it;
- We install hooks in half-meter increments.
Installation of roof drains
Second step. We adjust the length of the pipe. Cut off the excess using a hacksaw. Clean off the shavings with a sharp knife. We saw off so that the geometry of the pipe cross-section is not disturbed during the cutting process.
Third step. We install the pipe on the hooks. If we use plastic hooks, we first insert the back edge of our gutter into the recess on the fastener, and then lower the front edge of the pipe and press. As a result, the gutter will snap into place and simply lock into place.
Drainage system design
When installing on metal fasteners, first lay the gutter on the fasteners and bend the flexible petals so that they cover the pipe.
Fourth step. We install the funnel. We cut a hole in the desired place in the gutter and attach a funnel to it from below. We will fix it using glue. To do this, we first clean the surfaces, liberally apply the adhesive composition to the joining elements, wait for the mixture to dry, and then coat the additional seam.
Installation of a drainInstallation of a gutterInstallation of a gutter
Fifth step. We assemble pipes and elbows into a single drainage system. With the help of elbows we can set the desired direction of our pipe. At the joints of pipes and elbows we install an additional fastening clamp.
Gutter installation
The direct connection of pipes and elbows is made using glue. The procedure for its use was discussed above. We install pipe holders in 2 m increments.
Gutter installation
In conclusion, all we have to do is cover the gables of the canopy roof with siding, clapboard or other material of our choice. If desired, we can attach crossbars to the vertical supports and sheathe the entire canopy - this point is left at the discretion of the owner.
The canopy is ready. We can accept it for permanent use.
CarportMassive wooden carportCarport
Good luck!
Photos of wooden carports (select photos)
The main advantage of using wood is its versatility. It doesn’t matter what project is chosen for the canopy, thanks to the wooden frame it will always look very presentable.
You can build a flat roof on a wooden mono-support, it will turn out unusual and interesting, although it is not very convenient for a car.
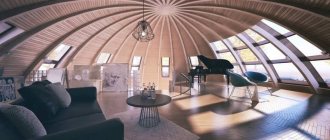
For lovers of unusual design, it is quite possible to create a roof on wooden curved beams with arc struts.
A parking space for a car with a wooden chalet-style canopy looks good.
For lovers of the classics, parking under arched polycarbonate roofs on wooden arches is suitable. Despite its apparent simplicity, building this type of canopy is not easy, but it protects the car perfectly.
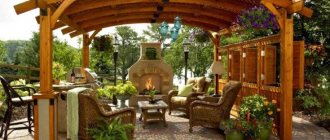
One of the most successful can be considered a carport project in the style of a wooden Italian gazebo with a polycarbonate roof.
The car is protected from rain, snow and gusts of wind, and its favorable location on the site will ensure reliable travel even in large snowdrifts.
Wooden carport project
The roof hanging over the car must be strong, since it will have to withstand a fairly massive layer of snow, and at the same time reliable. The risk of vehicle damage is not as serious as the threat to the health of the driver and passengers. Therefore, the best option would be to order a ready-made drawing of a gable carport made of wood from specialists, or use the dimensions and materials shown in the diagrams and photos below.
The project uses a gable roof on eleven pairs of rafters covered with ondulin or metal tiles. Unlike flat and single-slope wooden carports, this gable version is not afraid of gusts of wind and heavy snowfalls, which means that the carport can be located in a place convenient for a car to enter.
In addition, the powerful rafter system and the presence of struts supporting the upper frame of the racks make the wooden frame so rigid that tools for servicing and washing the machine can be stored on the floor beams.
Preparing to build a wooden carport
To build a protective carport, you can use almost any part of the local area, but it is best to choose a place on the leeward side of the house. Thus, exhaust fumes and odors from the car will not disturb residents and guests.
The second important condition will be planning for rainwater drainage. It is clear that you can lay asphalt or paving slabs, but most often for storing a car in a country house they use gravel on the surface, and there will be less dirt and there will be no puddles under a wooden canopy.
To make a wooden roof frame you will need:
- Beam with a section of 100x100 mm for the manufacture of wooden supports and lashing of load-bearing roof beams;
- Board - fifty for making rafters of struts;
- Plywood or OSB, if the roof gables will be sewn up using a “blind” method.
Thin-sheet plywood - a dozen - will need to be used to construct a continuous roof sheathing. In addition, you will need a garden auger, a saw, a hammer, nails and a marking tool.
Since a wooden frame is built from timber and slats, the materials will need to be purchased ahead of time, dried and treated with protective impregnations.
Laying the foundation
To prepare, the first step is to cut off the turf and fertile soil layer to a depth of at least 20 cm. Subsequently, upon completion of the work, the heels of the wooden canopy posts are treated with tar, the bottom of the site is covered with geotextiles and covered with a layer of sand and gravel.
After cleaning, you will need to mark and punch holes for concreting wooden beams under the canopy posts. To correctly mark the installation points of the timber, use a device called a bench or cast-off, as in the diagram.
Using the marking cords, the locations for the racks are determined and holes are drilled to a depth of at least 80-90 cm. The installed wooden supports are temporarily strengthened with struts and concreted.
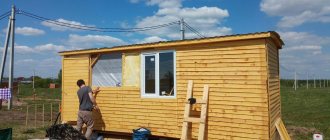
Construction of a wooden frame
The assembly of the frame begins with trimming the heads of the wooden supports, the horizontal roof framing beams are laid on the ends of the wooden posts and the struts from the fifty-fifty board are sewn on.
Next, pairs of rafters are assembled; it is best to do this on a template made of metal or remnants of wooden slats. As a rule, the height of the canopy over the car is chosen so that there is at least 40 cm between the roof and the horizontal beam.
Assembling the roof frame will require a couple of ladders and maybe even a couple of dismountable scaffolding. Therefore, it would be right to bring all the necessary tools to the dacha by car ahead of time, since it is impossible to leave the wooden canopy in a half-assembled state.
Roof installation
The roof covering is laid from a ladder. After assembling the rafters, plywood is sewn onto the beams, and the covering can be laid. If the wooden canopy is covered with asphalt shingles, then the plywood will need to be impregnated with primer and laid with an underlay carpet.
Metal slates or metal tiles must be laid on a sheathing lined with waterproofing, otherwise the car will regularly flood with condensate.
How to prepare a place
The car is not simply parked on the ground; filling it with gravel is not an option either; the wheels on it slip, and over time the flat surface becomes deformed and holes form. The best option is to make a shallow screed and fill it with concrete. This will allow you to easily wash your car without worrying about water drainage.
Step by step steps:
- Mark the boundaries of the structure using pegs and rope.
- Cut the turf.
- Remove the top part of the soil, deepening it by 15-20 cm.
- Make a “pillow” of crushed stone, sand, compact everything well.
- The screed is made with a slight slope away from the house (buildings, beds, etc.), or drainage pipes are laid around the perimeter.
If the machine is heavy, then reinforced mesh and reinforcement must be used.
Afterwards, temporary formwork is made from “inch” boards, at least 25 cm wide. The first level of concrete mixture is poured, leveled, and reinforcement or reinforced mesh is laid. 2 portions of concrete mixture are poured on top.
The area for the car will be ready in 1.5 - 2.5 months, it all depends on weather conditions. To prevent the concrete from cracking, it is periodically moistened; it can be protected from precipitation and debris by covering it with film.
Tips and tricks
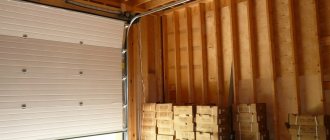
When installing a wooden structure with a carport, the roof gables can be completely enclosed. Typically, this solution is resorted to in order to avoid rainwater from pouring through the pediment. Everything seems to be correct, but in this case, under a wooden canopy, when the car engine is running, a cloud of exhaust gases forms.
Over time, the under-roof surface begins to rust, and wooden parts may crack due to condensation. To avoid stagnation, you can install vents and ventilation windows on the roof.
Materials for production
The wood used to build a carport should not be too wet or of poor quality. Wooden beams must be pre-treated with special antiseptic compounds.
There are a number of requirements for the choice of material, so the following recommendations must be taken into account:
- racks, crossbars and ridge beam supports - made of lumber measuring 15x15 cm;
- sheathing - made of lumber measuring 4.0x15.0 cm;
- struts - made of lumber measuring 10.0x6.0 cm;
- sand - for arranging wastewater disposal;
- PVC insulation or special steel cover.
Drilled holes at least half a meter deep with installed support pillars must be concreted.
Strong and durable monolithic plastic sheets, as well as profiled decking, which is environmentally and fire safe, are most often used as roofing material for carports.