Many owners of suburban areas are thinking about running a personal subsidiary plot (LPH). Some people plant vegetables and herbs in greenhouses, others want to organize a mini-farm and raise some kind of animal. For example, rabbits or chickens. It is believed that this is both profitable and useful. There will always be dietary meat and eggs on the table, and the surplus can be sold. As a rule, most people, to test their strength, start with chicken farming and build chicken coops with their own hands. To make your task easier, we offer our readers three options for chicken coops to suit every taste and budget.
Construction site
You can purchase ready-made chicken coops, but it would be best to build one yourself. Before you start building a chicken coop at your dacha, you need to properly prepare for the process.
The first step is to select a place for installation where your poultry will be as comfortable as possible. The egg production of your chickens in the future depends on where the chicken coop will be located, because this is the main condition of keeping.
If you build a chicken coop in the sun, then in the summer heat the chickens will be too hot and they will not delight you with eggs.
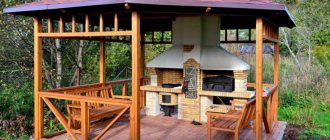
The best location is the shade under a tree, but it should not be permanent. To do this, the chicken coop is placed on the southeast side of the tree. In this position, in the morning the rays of the sun will warm and dry the chicken coop, and in the heat a shadow will fall on it.
Organize the space away from the garden or vegetable garden so that chemicals do not reach your birds during processing.
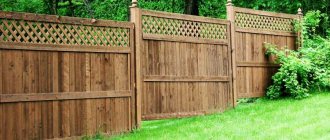
Make a special place where the chickens can roam freely; in cramped conditions they will not be able to lay eggs. You can fence off the walking area with fine-mesh mesh or a hedge to prevent the wind from blowing in there.
DIY mobile chicken coop
If you wish, you can make a homemade chicken coop “on wheels”. It has many advantages over the stationary one and only a few disadvantages. The most important of them is the small number of chickens that can be housed there.
The structure created is almost identical to a regular chicken coop, but much smaller in size and without the use of heavy materials:
- First, a drawing of a mobile chicken coop is drawn up. If you start creating it right away, you can miss key details, and the structure will collapse at the first load.
- Formation of the chicken coop:
- 2 triangular frames are created from timber with a section of 2 x 4 cm;
- connected using hewn boards (with handles for moving the structure);
- the side walls are made of slats with a section of 1.3 x 3 cm;
- a mesh is stretched between the walls;
- the overlap between the tiers can be arranged with plywood (a hole is created in it for the chickens, where the stairs will be connected);
- one of the side walls must be removable (entrance to the chicken coop);
- the second wall is created from clapboard.
- The lower tier is divided. A third of the entire area is equipped for perches, and the rest is space for birds to rest.
- Making the roof. It is made from plywood sheets so that at high temperatures the lid can be lifted for ventilation.
A small part of the roof must be completely removable. This will allow you to easily clean the chicken coop if necessary.
- Final processing. The outer part of the structure is treated with varnish. Thanks to its use, it will be possible to protect the wood from insects and excess moisture.
- Interior decoration. In a mobile chicken coop, the most important thing, in addition to perches and nests, is to organize lighting and ventilation. Access to sunlight can be provided through windows or using lamps, and for ventilation a regular window will do.
All other parts and devices are created completely identical to the previously mentioned scheme.
- Base. Due to the constant movement of the structure, there is no need to worry about the foundation; a simple but strong wooden floor will be enough.
Under it, however, you can arrange metal beams and attach wheels. This will eliminate the need to move the structure by hand.
If you take the creation of a chicken coop extremely responsibly and use high-quality materials, then the chickens will feel comfortable, the main thing is to choose the best option. And this will be reflected in good egg production and other advantages.
0
0
Copy link
Laying the foundation
After the preparatory stage has been completed, you can begin the process of building a chicken coop for laying hens. The first thing that will be built will be the base of the chicken coop - the foundation.
If you want to raise just a few chickens, then you won’t need a foundation; a very small portable chicken coop will be enough.
But if the chicken coop is planned to be large, then you can choose a base option from three possible ones:
Columnar - this option involves the installation of pillars on which the chicken coop itself is gradually erected using frame technology.
Pile foundation - this option is suitable for uneven and complex soil. Piles are also suitable for installing a building on a hill. They are driven into the soil, and after that the construction of the frame structure begins.
- Summer shower at a summer cottage: review of designs, materials, and schemes for self-construction
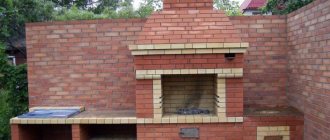
Do-it-yourself tandoor - a traditional oriental stove in a summer cottage, photos of completed projects
A polycarbonate greenhouse is a joy for a gardener, let’s understand the structures step by step (photo + video)
The strip foundation is familiar to everyone; it is an ordinary concrete foundation. First, a ditch is dug for it, then special shields are installed and the base is poured with concrete mortar. This option is the most reliable.
Interior decoration
When raising meat breeds (broilers), the internal arrangement is not as important as for laying hens. Providing daylight, insulation and well-made perches are the key goals of the chicken coop for the latter.
Lighting
Agronomists recommend maintaining normal lighting in the chicken coop for at least 8-10 hours a day. If daylight hours for chickens are provided for 11-12 hours, the number of eggs laid can be increased up to 25-30%.
It is most important to use additional lighting from November to March.
To save on electricity in winter, you need to provide normal windows with shutters that can be closed from the outside.
To illuminate the chicken coop, it is permissible to use various good lamps:
- fluorescent (40 W);
- electric incandescent lamps (40-60 W);
- energy saving (15 W);
- LED (various powers, depending on needs).
One 60 W incandescent lamp can illuminate 6 square meters. m chicken coop (when placed at a height of 2 m from the floor). Thus, a good level of illumination (20 lux) is achieved.
Keep warm
The temperature inside the chicken coop should never be below +15 degrees. If this requirement is not met, the chickens will begin to consume twice as much feed, and the ability to lay eggs will drop sharply.
The stated condition applies to all common breeds of chickens. However, some can exist relatively comfortably at lower temperatures (for example, Cochin or Brahma due to their thick, lush plumage).
To maintain adequate temperature in the chicken coop, the following conditions must be met:
- main walls with a thickness of at least 15-20 cm (for winter chicken coops);
- external wall insulation;
- roof insulation;
- insulation of floors (concrete) or the use of wooden floors;
- take care of the absence of holes, cracks and rat passages;
- seal the chicken coop with absolute protection from drafts (for ventilation during the day, you should take care of the opening windows);
- have equipment for heating the room during frosts.
To ensure additional insulation, you can follow these recommendations:
- Place small ovens in the chicken coop with the chimney vented outside. Far from the safest, but still an effective option.
- Heat the room with fan heaters or electric radiators. The latter should be turned on during severe frosts or at night. The rest of the time they should be turned off (saving energy and increasing the service life of devices).
- You can also heat it with a stove with a water boiler and a heating element (tubular electric heater). During frosts, the stove is heated with wood. The heated water from the stove is supplied to heating radiators, which are located along the walls of the structure. Additionally, water can be heated by the mentioned heating element (up to 1.5 kW). Thus, during the day the stove runs on wood, and at night the heating element is turned on.
- You can also heat the chicken coop using infrared lamps. They emit a soft and not too bright light, which will be comfortable for chickens.
An important condition is to install the lamps so that they are out of reach of birds. A fire in a small and wooden structure is dangerous not only for chickens, but also for people.
Arrangement of perches
The perches are the most important place in the entire chicken coop. The chicken will spend the most time on them. Chickens sleep and rest on roosts, so the quality of these places must be impeccable:
- for 1 individual, 25 cm is provided from the entire beam (if there are more than 20 individuals, then the total length of the perches should not be less than 5 m);
- perches are installed with a ladder or completely horizontally (but in no case on top of each other: the upper ones will dirty the lower ones);
- you should decide on a place in the chicken coop - where it will be easiest to clean up, there should be perches, because the bulk of the droppings will accumulate under them;
- the width of the beam should be 3-5 cm;
- All edges are processed with a plane to make the chickens comfortable and safe.
Arrangement of nests
The chicken coop must have nests where the chickens will hatch their eggs. Nests can be inexpensive: from an old basin covered with straw. But if you create a chicken coop with your own hands from scratch, then it is important to take care of the nests as responsibly as the entire structure as a whole:
- for 4 laying hens, 1 nest is required (at least), that is, for 20 individuals, 5 nests or more are made;
- a high threshold is set at the exit from the nest: hens are not the most graceful animals and can easily roll the egg out of the nest;
- nests can be installed above perches so that laying hens can get there through them (flying up is not required);
- when installing nests separately from perches (at least 40-50 cm from the floor), it is worth taking care of the poles that provide the chickens with a comfortable approach;
- lamps must be turned away from the nests - chickens like to lay eggs in a dark and quiet place;
- Separate feeders and water should be installed for laying hens hatching eggs near the nests.
If the area of the chicken coop allows, you can install a small ash bath next to the nests. Chickens will use it to clean their feathers and get rid of parasites, which, in turn, will increase their comfort and egg production.
Power supplies
It is better to organize the arrangement of feeders and drinkers around the perimeter of the chicken coop so that there is more space for walking. Using regular bowls is also not advisable.
It would be wiser to make wooden feeders or install a regular pipe with holes through which the chickens will peck food. Drinking bowls can be made from plastic bottles, drainpipes (using the same principle as with feeders), plastic buckets, etc.
If you can come up with many options with feeders, then with drinkers it is more difficult. This video shows a way to make a semi-automatic waterer for chickens from a regular pipe:
Floor construction
The next thing after the foundation is the subfloor, and then the main floor. The first thing to do is frame the beams; for this, the strengthened foundation is covered with roofing felt for waterproofing.
We place 4 beams on top of the roofing material, using them to form the box of the chicken coop, and at the corners we connect the beams to each other, attaching metal corners to them.
Now you need to lay the logs and fill the distance between them with expanded clay.
A mesh with small cells is laid on top, leaving half a meter of it on the walls on each side. This solution will protect the bird house from the invasion of rodent pests.
Next, a rough board is laid, and the insulation and final coating are laid only after the walls are erected.
Be sure to remember that all wood must be treated with a fungus repellent, water repellent and pest stain.
In direction, it is better to make the floor with a slope towards the doorway, this will make it easier to clean the waste of your birds. In the photo of the chicken coop inside, all this is clearly visible.
We make it ourselves
Surely most of the necessary materials are already available on your farm, but you will still have to buy some things. Thanks to a detailed description of the steps, you can make a chicken coop with your own hands without much difficulty. Our version is made in the form of a box with a mesh bottom and minor modifications. You can see other projects in the photo and video from the Grankin Family channel - a simple version of a summer chicken coop.
Tools and materials
To build a chicken house you will need:
- wooden beam;
- plywood or OSB board;
- mesh with a cell no more than 0.5 cm;
- self-tapping screws;
- saw;
- screwdriver;
- construction stapler;
- cable and cartridge.
Step-by-step instruction
By following our tips, you will quickly make a chick box. It will be completely ready to receive new residents and will become a good home for them.
- First of all, we assemble the frame. It will be the base of the cell, so all connections must be strong. We make two rectangles from the timber, 120 cm wide and 250 cm long. Every 50 cm we fasten transverse sections.
- We make racks. We cut the timber into 60 cm segments and connect the previously prepared rectangles. The finished structure will look like a rectangle with edges.
- We cover the side walls with plywood or OSB. We make them solid without any holes. This will help conserve heat inside the box.
- We attach the mesh to the bottom of the cross beams using a stapler. If it is a solid piece, that’s good, but if there are joints, the edges of the mesh need to be covered with something to protect the bird’s legs from injury. Thanks to the mesh floor, the chicken coop will always be clean and dry.
- To preserve heat, we cover the top with plywood or OSB board. To feed the chicks and properly care for them, you need to make two open sections. A removable top is made above them, which can easily be made from a sheet of the same plywood, secured with hinges. It is under the opening sections that the feeder and drinker are installed, and in the opposite part of the box a lamp is mounted for lighting and additional heating.
- To make caring for birds easier, a tray is installed under the mesh floor to collect droppings. It can be made from a sheet of plywood and covered with plastic film. This way, the droppings will not saturate the tray and emit an unpleasant odor into the room.
Building such a chicken coop will not take a lot of effort and money, but will allow you to raise good livestock that will fully meet your expectations.
Loading …
Making walls
It is necessary to begin the construction of the walls of the chicken coop with the side posts, which will further support the entire frame.
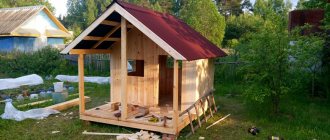
In order to make a pitched roof, the front pillars must be slightly lower than the rear ones. A roof with two or more slopes provides an even ratio of the height of the racks, but this type is rarely used for a chicken coop.
It is necessary to make the roof slope on the outside side of the place where your chickens roam, so that it does not flood when it rains.
Next, you will need to make the top frame of the structure from boards, securing them to the posts with nails. After this, you can begin to make the strapping, but it is laid in accordance with the dimensions of the insulation.
The insulation layers are laid in the distances that are formed between the supports. Where there will be doors and windows, it will be necessary to make transverse guides, so it is best to outline these places in advance.
Once the frame is ready, you can sheathe the ceiling and floor with edged boards. But first, thermal insulation and moisture protection are laid on the floor.
What is a chicken coop and what is it for?
A chicken coop can be called a kind of intermediate link between a brooder and a chicken coop. Due to its small size, it can maintain a certain temperature regime, which is precisely the determining factor for the normal condition of the chickens. A homemade crate must be strong and reliable enough to provide protection for babies. In addition, given the rapid growth of young animals, the size of the chicken coop should be made with a margin so that the bird does not feel constrained. You can learn how to make a good chicken coop with your own hands from the video at the end of the article, as well as in the photo.
The final stage is the roof
In order to cover the roof, you will need to lay the upper rafters in the form of a board laid on edge.
To understand how long the boards should be, measure the distance at an angle from the front to the back and add another 30 centimeters. This is necessary to form the slopes of the roof so that it protrudes slightly beyond the walls on both sides.
As for the spaces between the rafters, they should be equal to the width of the insulation. All that remains is to cover the rafters with film, make lathing and cover the roof with the selected material.
Roofing is always chosen cheaper, and it is better to use the remnants of roofing material from the roof of the house, if any.
The outer wall cladding is constructed after the roof has been completely laid. Sheathing can be done with any pre-selected material. You should also arrange lining from the inside of the chicken coop, while the ventilation holes of the chicken coop are left unsewn.
Features of the chicken coop
There are no special quirks when building small enclosures for chickens. There are simply some differences from a chicken coop, where an adult individual lives, and a chicken coop is intended for newly hatched chicks. Also, babies have more limited freedom of movement, and it is not particularly important in the first months of life. The main thing is that the birds are safe and easily accessible to the owner, so that you can reach them with your own hands. Such structures are needed for rearing until a certain age, and then the birds are transferred to a larger chicken coop.
Popular articles Flower pot decor
Habitations should be built in a dry and warm place. If it’s winter, then indoors, and in summer, in the fresh air and in as dark a space as possible. You should always monitor the temperature of the habitat to prevent overheating or freezing of living creatures. You can control the temperature with a regular thermometer.
The building for the chicks should be as protected as possible from other inhabitants of the yard and unwanted guests, such as rats. Therefore, before building a poultry house, be sure to consider its shape and safety.
What is a chicken coop and what is it for?
A chicken coop can be called a kind of intermediate link between a brooder and a chicken coop. Due to its small size, it can maintain a certain temperature regime, which is precisely the determining factor for the normal condition of the chickens. A homemade crate must be strong and reliable enough to provide protection for babies. In addition, given the rapid growth of young animals, the size of the chicken coop should be made with a margin so that the bird does not feel constrained. You can learn how to make a good chicken coop with your own hands from the video at the end of the article, as well as in the photo.
Cell lighting methods
As mentioned above, for lighting you can use incandescent lamps, which simultaneously provide heat. These cheap devices are definitely suitable for fully raising chicks.
Installing an incandescent lamp inside the cell is not difficult
In addition to incandescent lamps, with which you can kill two birds with one stone, there is another way to illuminate cells, which can be rationally used in conjunction with an electric or stove heating system. We are talking about diode lamps, which in summer are placed over several cells or the entire tier. It is very convenient to use these lamps; they illuminate every corner of the cage, have little power and consume a minimum of electricity. Save and enjoy.
Let's start tinkering
When you have read all the recommendations and, taking them into account, have drawn up a drawing, you can begin making a broiler cage with your own hands. Let's get started? For this:
- make 6 racks, the dimensions of which should be as follows: height 7x2 cm, width 7x2 cm, length 165 cm;
- connect with slats (two pieces 5x2 cm, six pieces 3x2 cm, three pieces 10x2 cm) to form a frame;
- Make 9 side walls from plywood. Dimensions – 30.5x57.5 cm;
- To be able to collect waste, it is necessary to make metal pallets from sheets. The pallet must meet the following parameters: 20 cm height, 66 cm width, 30 cm length;
- make a roof (70x140 cm), either from plywood or from the same sheet of metal;
- complete the open part of the broiler cage. For this you just need a mesh. The chickens will have the opportunity to eat the feed.
Broiler cage drawing
Important advice! If you want to achieve maximum convenience for yourself, make cages with wheels by attaching them to the base. You can easily move them around for easier cleaning and more.
Construction requirements
To prevent bird breeding from turning into an unprofitable business, you need to take into account some features from the very beginning in the process of erecting a chicken coop:
- Ensure complete safety from various predators (small and large) who are not averse to feasting on not only the eggs, but also the inhabitants themselves;
- There should be no drafts inside the chicken coop;
- Organize reliable thermal insulation (in some cases even heating), capable of maintaining optimal temperature and humidity during the cold season;
- Make sure there is good ventilation;
- Properly organize lighting (backlighting), which affects the desire of chickens to lay eggs.
After thinking about all of the above, we move on to design. We decide on the place where the poultry yard will be located, its size and design.
Types of poultry houses
Portable structures can be divided into several categories according to the following criteria:
- transfer method;
- size;
- type of construction.
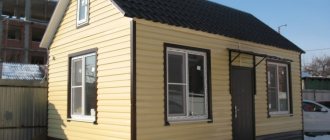
According to the method of transfer, they are divided into structures on wheels and poultry houses that can be moved by hand. In the presented photos you can see such products.
The fence allows you not to monitor the birds while walking. Thanks to this, there is no need to further equip the area in which the chicken coop is located.
By size, the described structures can be divided into poultry houses, which are used for several birds, and into products designed for more than 20 birds. The first option is more convenient, but is not suitable for everyone.