A greenhouse at the dacha has long become not only a help in growing vegetables, but also an opportunity to realize one’s creative ambitions. Among all the innovative solutions, the geodesic dome, the brainchild of modern architecture, deserves special attention. The interest in the original design is explained simply - even an inexperienced craftsman can install such a greenhouse on his site - the hemisphere is easily assembled from simple parts, and the productivity of its beds is not inferior to the yields from standard structures.
Geodesic dome - beautiful, practical and simple
Why is this design better than others?
The spherical shape of the geodome helps to harmonize the space, which is saturated with positive energy. Being in a spacious and incredibly cozy round room is good for your health. It’s not for nothing that domed buildings are classified as environmental structures. The advantages of lightweight geodetic structures include:
- no need for a solid foundation, which greatly simplifies and speeds up the installation of the facility;
- no need to use construction equipment, which significantly reduces noise during work.
The construction of geodomes is based on frame-panel technology, which makes it possible to quickly erect a number of structures for various purposes on a dacha or suburban area, for example:
- bath or sauna;
- home or summer kitchen;
- garage or shed;
- gazebo or children's playhouse;
- year-round swimming pool;
- greenhouse or greenhouse, etc.
Necessary materials
Before construction, it is necessary to prepare absolutely all materials and devices, so as not to delay the construction in the future by searching for them.
Kit for constructing a hemisphere with your own hands: 1. Wooden beam. 2. Galvanized steel sheet. 3. Screwdrivers, screws and fasteners (screws, nails, etc.). 4. Foam for installation. 5. Roofing material. 6. Roofing scissors. 7. Corner and building level. 8. Hammer. 9. Roulette. 10. Hacksaw. 11. Electric jigsaw and drill. 12. Bulgarian. 13. Wood processing machine. 14. Brushes. 15. Protective gloves.
Dome building project
The dome housing project can be found on the Internet or ordered. The presence of drawings is mandatory, without them it is almost impossible to build a structure in the shape of a sphere with your own hands.
A selection of drawings for a dome house is presented in the pictures below.
Main types of geodetic structures
The designs of geodomes differ from each other in the frequency of dividing the surface of the sphere into triangles. The splitting frequency is usually denoted by the letter V. The number next to V indicates the number of different structural elements (ribs) used to construct the frame. The greater the number of ribs used, the stronger the geodome.
There are six types of geodomes, of which only five are actively used in the construction of objects:
- 2V dome (the height of the structure is equal to half the sphere);
- 3V dome (the height of the structure is 5/8 of the sphere);
- 4V dome (the height of the structure is equal to half the sphere);
- 5V dome (the height of the structure is 5/8 of the sphere);
- 6V dome (the height of the structure is equal to half the sphere).
It is easy to notice that the hemispherical shape of the object is achieved only with an even splitting frequency.
Diagram of a 2V geodesic dome frame for creating small structures. Ribs of different lengths are highlighted in color and indicated by letters
For small country houses, a 2V dome design is usually chosen. The frame is assembled from two types of ribs, indicated on the diagrams for convenience by the Latin letters A and B, and also highlighted in additional blue and red. The blanks are also color-coded to simplify the process of assembling the frame structure. To connect individual edges of the geodesic dome frame, special nodes called connectors are used. When installing a 2V dome structure, three types of connectors are used:
- 4-terminal;
- 5-terminal;
- 6-terminal.
To calculate the length of the ribs and the number of connectors, online calculators are used, into which the initial data of the object is entered: radius of the base, frequency of splitting, desired height of the dome.
Three types of connectors used to connect dome frame ribs that converge at one point (the vertex of the polygon)
Large hemispherical objects, the base diameter of which exceeds 14 meters, are built using 3V and 4V domes. With a lower frequency of splitting, the ribs are too long, which complicates their preparation and installation. When building a 3V dome, the length of the ribs is almost three meters. Assembling a frame from such long materials is quite problematic.
By choosing a different type of dome (4V), the length of the ribs is reduced to 2.27 meters, which greatly simplifies the assembly of the dome structure. Reducing the length of structural elements leads to an increase in their number. If a 3V dome with a height of 5/8 of a sphere has 165 ribs and 61 connectors, then a 6V dome with the same height of ribs already has 555 pieces and 196 connectors.
A pile foundation for the installation of large dome structures allows the structure to provide the necessary strength and stability
House sphere - an architect's whim or a hint from nature?
Let's start with the fact that man borrowed many outstanding inventions from nature, observing the life of animals. Let's pay attention to the “technologies” used by birds in the construction of their homes. It is easy to notice that there are no right angles anywhere here. Hemispheres, balls, circles - these are the only forms nature recognizes. It turns out that our beloved living “box” is not at all the crown of creation.
Paying attention to this natural phenomenon, engineers studied the mechanical properties of spherical and dome structures. It turned out that they not only have excellent aerodynamics, but are also much stronger than rectangular ones.
The energetically spherical surface is flawless. With a maximum internal volume, it has a minimum area. Therefore, in a domed structure, heat loss to the external environment is several times less than in a regular house. It’s not for nothing that the Eskimos, inhabitants of the Arctic, have been building spherical “igloos” out of snow for centuries. Practical experience told them what a wind-resistant and energy-efficient design should be.
Nowadays, spherical houses have moved from the realm of theory to the category of practical technologies for environmental construction. Thousands of people around the world have managed to appreciate their advantages and do not regret their choice.
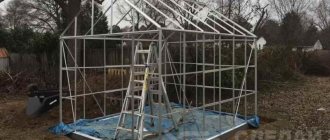
An example of the construction of a domed greenhouse
Before construction begins, the base area of the future greenhouse, as well as its height, are determined. The size of the base area depends on the radius of the circle into which the regular polygon fits or is described. If we assume that the radius of the base is 3 meters and the height of the hemisphere is one and a half meters, then to assemble a 2V dome you will need:
- 35 ribs, the linear size of which is 0.93 m;
- 30 ribs 0.82 m long;
- 6 five-point connectors;
- 10 four-pin connectors;
- 10 six-pin connectors.
Selection of materials
As frame ribs, you can use bars, a fence board, a profile pipe, as well as special double struts. When preparing the ribs, their width is taken into account. If you choose a fence board, you will have to cut it into several equal parts using a jigsaw.
Leveling the site
Having prepared all the structural elements of the future dome, they begin to level the site for the construction of the structure. In this case, it is necessary to arm yourself with a building level, since the site must be perfectly level. The leveled area is covered with a layer of crushed stone, which is thoroughly compacted.
Recent Entries
Lilac perennials that are beautiful, compact and do not crowd out other plants Why when buying seedlings you should not take the sellers’ word for it and how to determine the age of the plant using 3 signs Tomato seedlings have turned purple or whitish: why the color has changed and how to save the plants
Construction of the base and assembly of the dome frame
Next, they begin to build the base of the greenhouse, the height of which, together with the height of the dome, will make the room comfortable for use. After constructing the base, they begin to assemble the frame from the ribs according to the diagram, which shows the sequence of connections. The result should be a polyhedron.
The frame of a one and a half meter hemisphere for arranging a greenhouse at the dacha is made of wooden blocks connected by a connector method to each other according to a diagram
You can make assembly easier by painting ribs of different lengths in different colors. This color highlighting of individual structural elements will avoid confusion. Isosceles triangles, assembled from bars or pieces of profile pipe, are fastened together with connectors (special devices). Although small structures can be fastened with self-tapping screws and ordinary mounting tape.
Fastening polycarbonate sheets
Polycarbonate sheets cut in the form of triangles are screwed to the frame. During installation, special screws are used. The seams between adjacent polycarbonate sheets are decorated, and at the same time insulated, with slats.
Interior arrangement
Beds are made along the perimeter of the greenhouse, and their height should be equal to the height of the base of the frame. When finishing fences, various materials are used. Natural stone goes better and more elegantly with plants grown in a greenhouse. For convenience, the path in the greenhouse is made as wide as possible. Be sure to arrange a place to relax, from which you can admire the beauty of strange plants and flowers.
The frame of this domed greenhouse is made of profile pipe. The edges of the polygon are made of polycarbonate sheets that transmit light and block ultraviolet rays
To rationally use the internal space, polypropylene pipes are used, which are attached to the edges of the frame. Pots with hanging plants are hung on these pipes. Low-growing plants are planted along the edges of the greenhouse, and tall plants are planted closer to the center. To maintain a sufficient level of humidity inside the dome, a water tank is installed in the northern part of the structure. The greenhouse effect inside the greenhouse can be enhanced by a reflective film, which is attached to the frame structure located above the water tank.
You can also create a mini-pond from a tire, read about it:
The interior arrangement of the domed greenhouse is carried out with maximum use of the available space. The height of the plants affects the choice of planting location in a greenhouse of such an unusual shape.
Advantages and disadvantages
No one will argue with the fact that domed houses look unusual. If you want to have a house or dacha “not like everyone else” and have nothing against frame house construction, take a closer look at this technology. The solution is truly non-standard. In addition, they say it is economical. The cost per square meter starts from $200. But as you understand, this is the minimum price. This is an economical option.
This is also a domed house
Pros of domed houses
In addition to the unusual appearance, the advantages of spherical houses are as follows:
- Optimal use of space. The rooms are obtained with a maximum floor area and a much smaller ceiling area. That is, there is less unused head space.
- Smaller external wall surface compared to standard rectangular structures.
- Smaller surface means less heat is dissipated in winter and less heat is absorbed in summer. That is, the maintenance of such houses is more economical.
Precipitation does not accumulate in large quantities - it falls or runs off - On dome structures, precipitation is retained in very small quantities - it simply rolls off.
- The structure is lightweight; a lightweight foundation is required for it. Usually - strip, but pile and pile-grillage are also good. On unstable soils, it is possible to use a slab foundation.
- Any number of windows can be built into the dome. This will not affect the stability of the structure.
- The small house does not have load-bearing walls inside, so the cost of building materials is minimal. Domed houses with a large area must have either load-bearing walls or support columns. But they can be placed almost anywhere, which allows you to correlate them with the desired layout.
- The structure of the dome allows for optimal placement of solar panels.
- In dome-type buildings it is convenient to install a ventilation, heating and air conditioning system. The point is the rounded shape of the roof, which promotes natural mixing of air.
Based on the totality of their characteristics, domed houses look very attractive. In addition, many say that construction requires much less money - due to the smaller surface of the walls, material is saved. According to mathematical calculations, the area of the walls is almost a third less. But if there are any savings, they will not be that big - the construction is specific, using specific components that increase the cost of construction. In fact, the cost per square meter is approximately the same as when constructing a frame of a regular shape.
Minuses
There are also disadvantages and they are also quite serious. In any case, it is worth knowing about them and taking them into account.
- It is difficult to calculate domed houses yourself. The calculation takes place not in two, but in three planes, and this is not at all easy.
- The technology appeared not so long ago; there is no exact description or instructions.
- It is advisable to order such a project and construction from organizations that already have experience in the construction of spherical buildings, and there are not many of them.
The internal layout of domed houses is very specific - There is more waste of construction materials left as they are sold mainly in rectangular blocks/sheets. This reduces the economic feasibility that arises due to the smaller wall area.
- Geodesic domes have unusually shaped doors and windows. They are made to order, which costs more. The good news is that more and more companies can take on such orders, and this leads to lower prices.
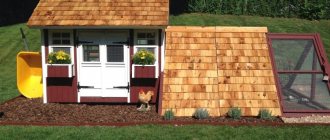
- Limited selection of materials for exterior finishing. Only two options are ideal for roofing - soft tiles or wooden shingles. Other materials are inconvenient due to their shape or rigidity. For exterior wall decoration, you can use the same material, but add plaster and painting. There are projects in which the walls and “roof” are made of the same material. So the division is conditional.
The decoration of a domed house has its own characteristics - Due to the presence of rounded walls, the choice of finishing materials for indoor walls is also limited. So, large-format ceramic tiles cannot be used in the bathroom and kitchen, but mosaics are ideal, but they are much more expensive. When finishing with clapboard, the wall area is divided into sections of small width, which are delimited by vertical slats. You should do roughly the same thing when covering walls with wallpaper, but it doesn’t look as colorful as with lining. Decorative plaster and wall painting are no problem for finishing residential and “dry” technical premises.
There is also an unusual layout, but it cannot be definitely classified as a disadvantage. I like domed houses precisely because of their originality. So the non-standard shape of the premises is, rather, a feature that must be taken into account when selecting/ordering furniture and choosing finishing materials.
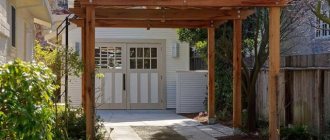
Gazebo in the form of a semi-open hemisphere
A gazebo, made in the form of a semi-open hemisphere, will become the most attractive place on your summer cottage. This air structure is assembled within one working day. The frame is installed from a profile pipe. The diameter of the dome should be 6 meters, and the height of the object should be 2.5 meters. With such dimensions it is possible to obtain 28 square meters of usable area, sufficient to accommodate friends and relatives. Calculation of the structural elements of the 3V dome is also carried out using online calculators. As a result of automatic calculation, it turns out that to build a gazebo you will need:
- 30 pieces of ribs, 107.5 cm each;
- 40 pieces of ribs 124 cm each;
- 50 pieces of ribs, 126.7 cm each.
The ends of the ribs, cut from a profile pipe, are flattened, drilled and bent by 11 degrees. For ease of assembly, the geodome lattice is marked according to the diagram with ribs of equal length in the same color. The result will be three groups of elements that are attached to each other according to the diagram using washers, bolts and nuts. Having completed the installation of the frame, a covering material is laid, which can be considered:
- plywood sheets;
- colored polycarbonate sheets;
- lining;
- soft tiles, etc.
If you close only the upper part of the frame, you will get an original semi-open gazebo. Using curtains, you can decorate the remaining free space on the sides of the gazebo. Your imagination will allow you to achieve an extraordinary design for the dome structure.
You can learn about what to look for when choosing curtains for a garden gazebo from the material:
The collapsible metal frame can be dismantled at any time. If necessary, the disassembled structure is transported to nature, where it is quickly assembled and covered with a cover made of water-repellent fabric.
Preparatory work
At the preparatory stage, the following must be done:
1. Project selection. The following points should be displayed in the project drawings: - the shape of the building; - square; - number of rafter elements; — cell parameters; — number of connectors, etc. 2. Selecting a location. At the chosen location for building the dome, markings should be made in accordance with the dimensions of the future building. 3. Manufacturing of necessary products for construction. Based on the drawings, you need to make your own connectors, rafters and plywood elements. 4. Materials processing. Wood naturally needs to be treated with an antiseptic; if metal connectors are used, they are treated with anti-corrosion substances.
Construction instruction
Making a ring for installing a dome on the roof
The question arose: how to firmly and securely fasten the dome to the roof so that it does not swing? I remembered how a decanter is plugged with a stopper, and decided to do something similar.
Firstly: I made the appropriate holes in the roof.
Secondly: I made a horizontal ring on the drum that will press the drum to the surface of the roof: - First, I cut out a ring from corrugated cardboard and glued it to the drum. — I plugged the gaps between the ring and the drum with small pieces of toilet paper and cotton wool coated with PVA glue. — Just like all other parts of the model, the ring was covered with putty and sanded several times.
Read also: When your feet are warm: do-it-yourself bathhouse floor
And here's what the ring looks like after grinding:
And these are the mini-domes for the chapel and bell tower in the process of being painted. There is a matchbox nearby for size comparison.
Spherical house using Japanese technology
For the construction of domed houses using Japanese technology, 35-density polystyrene foam of varying thickness is used (much depends on the main task and climatic zone; the thickness of the outer walls of the sphere varies from 8 to 19 cm).
The assembly type kit includes several sections, the design of which already initially has openings for windows and door panels.
The sphere can be installed either on a standard strip foundation or on a wooden frame or platform made of OSB boards and sandwich panels.
Depending on the base, different fastenings are used: the sphere is attached to the concrete with anchors.
Communications in a domed building are installed in internal partitions, along the floor and in ceilings, if there are several floors.
To finish such buildings, you can use simple plaster followed by painting, and also protect the coatings with polymer materials or liquid rubber.