A veranda is an extension to a house that shares a common wall with it. Building a veranda is a great opportunity to expand the living space in a dacha or country house without carrying out full-scale construction. In terms of design, it can be absolutely anything, the main thing is that it is in harmony with the main building, is comfortable, functionally corresponds to the tasks assigned to it, is liked by the owners of the cottage and arouses the envy of the neighbors.
Before use, the material for constructing a gazebo must be treated with special insulating solutions that will make the structure resistant to environmental influences.
Construction of an extension to a house made of foam blocks
Let's consider one of the popular technologies for building an extension to a house with your own hands - walls made of foam blocks on a strip foundation.
- We check the upper part of the foundation “ribbon” for compliance with the horizontal level. If there was a deviation along the horizon when laying the foundation, do not despair - everything can be corrected, although additional “movements” will be required.
Note! If the deviation is less than 2 cm, then we will cancel it by changing the thickness of the horizontal seam when laying the first row of blocks. If there is a discrepancy with the horizontal level of more than 2 cm, we make a screed along the top of the concrete. We install waterproofing on the surface of the foundation. It’s up to you to choose the type of insulation; we can only recommend roll insulation, proven by time and generations of developers – roofing felt. A positive feature of this material is that you don’t have to wait for it to dry and set. It is enough to spread the roofing material along the foundation strip, press it down with bricks so that it does not blow away, and you can begin work. We begin laying the wall by arranging the corners. How can you not explain
One thing is important - the angle must be strictly vertical and maintain 90 ° at the base. It will not be difficult for anyone who has an understanding of “brick” masonry with its dressing, grooves, pokes and spoons to arrange a corner
For a person who is far from all this, but is ready to make an extension to the house with his own hands, it is advisable to get advice from a specialist. For a small extension, there is no need to raise the corners to their full height - it is enough to arrange 3-4 rows of each, then lay a gap between them, evenly distributing the load on the foundation. First, even before installing the corners, lay out the blocks on the foundation “dry”, calculate their number in a row - this will eliminate the need to lay halves or even smaller pieces of blocks in the most inappropriate places for this in the wall structure - under door and window lintels, at corners . Otherwise, the dressing may be damaged, resulting in weakening of the entire structure. We lay the first row on cement mortar, all subsequent rows on a special adhesive mixture. The advantage of the adhesive mixture is that its plasticity allows you to obtain a horizontal seam less than 1 cm thick. The cement mortar is not so plastic, but it is perfectly suited for leveling the first row. We repeat the process of laying blocks until the required height is reached. To further strengthen the structure, we insert reinforcement into the masonry every 4-5 nearby. To do this, we make a longitudinal groove along the entire row, including the corners, place a reinforcing rod in it, and cover it with the next row of blocks. Now the reinforcement is inside the masonry, connects the entire structure, and gives additional strength. Along the last row of the entire perimeter we install a monolithic reinforced concrete belt. For detached buildings made of foam blocks, the installation of a belt, in some cases more than one, is a prerequisite. For a small extension, provided there is a high-quality foundation, the installation of a monolithic belt is not necessary, but is desirable.
Necessary tool
To start building our light veranda, we need to stock up on the following tools and building materials:
- -metal pipes from which the supports will be made,
- -ingredients for the concrete mixture: gravel, sand and cement,
- -fasteners: metal corner, self-tapping screws and nails,
- -removable anchor bolts,
- -boards 15 centimeters wide and 5 centimeters thick, we will put them on the logs,
- -well-processed board for finishing the veranda floor,
- -50 mm block for fencing the veranda,
Tools: glasses and protective gloves, circular saw, screwdriver, hammer, building level, concrete mixer.
Basic design of a veranda for a country house
Let's consider the most popular and simplest version of the veranda - the extension is located along one wall, has a columnar (in this case, pile-screw) foundation and is made of wood.
For a structure measuring 6x3 m (dimensions in centimeters on the sketch) you will need:
- screw piles of the appropriate diameter, the number corresponds to the number of racks;
- five or six supports along the long side (depending on the planned load). The pitch will be 1.5 m or 1.2 m, respectively. The total number of piles is 10 or 12;
- timber for tying piles (grillage) – 6+6+3+3 = 18 m with a cross-section of at least 100x100 mm, preferably 100x150 or 150x200 mm;
- a beam of similar cross-section for racks. Their number coincides with the number of supports, the height corresponds to the planned height of the veranda along the front edge and along the rear edge (taking into account the angle of the canopy slope). In the sketch version - 2.5 and 2.7 m, respectively. The total amount of timber for the racks is (2.5x5)+(2.7x5)=26 m for a structure with five piles and (2.5x6)+(2.7x6)=31.2 m for a version with six piles on the long side;
- timber section 50x100 mm (options available) for canopy trusses. Each rack requires one element, the length of which is equal to the width of the veranda plus the roof overhang (about 50...60 cm to prevent flooding of the veranda and protect the base), that is, 3.5 m. The second element is the hypotenuse of a right triangle, in which one side is the difference in height between the front edge (taking into account the roof overhang) and the rear, and the second is the horizontal beam of the truss. Accordingly, the sides are 0.2 and 3.5 m, then the hypotenuse is 3.51 m. You can increase this number slightly, since trimming the outer edge of the rafter will be required. For five racks you will need (3.5+3.55)x5=36 m of timber, for six - (3.5+3.52)x6=43.2 m;
- beams/joists for flooring. They can be mounted along the veranda (the flooring or terrace board then lies across), or vice versa. The number and cross-section of the logs are selected based on the thickness of the floorboard and the planned load;
- if you plan to build the canopy from lightweight materials, you can do without lathing. If heavy materials are used as roofing, it is necessary to arrange the sheathing, either continuous or in increments of at least 15...20 cm. The amount of edged or (in rare cases) unedged boards is calculated accordingly;
- the roofing deck is calculated by area - with a veranda size of 3x6 m and taking into account the roof overhang, the required amount will be 3.5x7 = 24.5 sq. m. (overhang is also performed on the end sides);
- the amount of materials for fencing is calculated separately, depending on the design of the veranda.
The sketch shows the struts (crosses) connecting the piles. This element is not necessary and is used without fail only on subsiding soils, with a high groundwater level and complex soil composition on the site.
Table 1.1. Load-bearing capacity of screw piles for different types of soil.
Table 1.2. The choice of diameter and length of piles depending on the specific load.
This is interesting: Technology of foundation insulation with penoplex: a look from all sides
Recommendations for choosing a project and photo gallery
The traditional opinion that only a permanent veranda should be attached to a permanent house, and that lightweight structures should be left for frame and wooden houses is not the only possible way of thinking. More important for choosing a specific project will be the design style of the building.
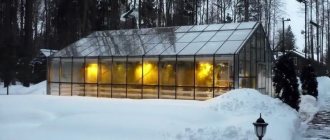
Thus, for houses in a strict modern style, laconic verandas on a frame base with a roof made of polycarbonate or glass are suitable.
Buildings in which the traditional solid roof is replaced by a lattice roof look very harmonious. Of course, they do not provide protection from rain and snow, but they provide shade quite well.
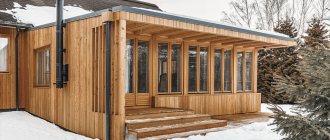
Those who prefer an ethnic style can choose spectacular buildings made from intentionally rough-hewn or untreated wood.
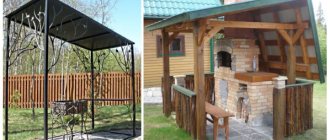
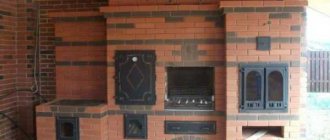
If you need not only a place for relaxation, but also a suitable area for setting up a barbecue and barbecue, a veranda is also suitable. But serious brick barbecues and complex ovens will require a solid foundation.
You also don’t have to limit yourself to just a rectangular shape. The veranda can go around the corner/corners of the house (L-shaped or U-shaped), have the form of a trapezoid or a polygon, even a segment of a circle.
As you can see from the photos presented, the design of a veranda in a private house can be very different. The main thing is to find the best option for yourself and implement it!
Types of foundation for building a veranda
Most often, verandas are built on columnar or strip type foundations; let’s look at how to do both options yourself.
Columnar foundation
This option is the simplest and least expensive; its essence is to install separate supports that are dug into the ground.
Stages of work:
Before starting work, carry out preliminary markings, then you can prepare holes for supports, their depth can reach up to one meter, but be guided by the quality of the soil and the weight of the structure itself; fill the bottom of the holes with sand and crushed stone, pour concrete mortar on top;
the veranda should rest evenly on the foundation; for this it is important to place all the supports at the same level; to protect them from moisture, use bitumen mastic and roll waterproofing.
Photo source: www.besedkibest.ru/verandu/veranda-svoimi-rukami-iz-dereva-poshagovo.html
Strip foundation
This option is suitable for heavier structures, for example, made of bricks or building blocks. It is more labor-intensive, and in addition, it will require more effort and skill from you, because in case of an error, the tape may be damaged, which will certainly affect the entire structure.
Manufacturing process:
- Having completed the necessary markings, dig a trench and level its walls and bottom;
- place the formwork from boards based on the height of the future concrete support;
- fill the bottom of the trench with a layer of crushed stone and sand and compact it thoroughly;
- lay the reinforcing mesh; for maximum strength, it is recommended to use cells measuring 10x10 cm;
- pour concrete made from a mixture of sand, cement, water and crushed stone, then level the pour well and leave until dry. Do not forget that concrete, especially in hot weather, must be moistened with water to avoid cracks.
Photo source: www.besedkibest.ru/verandu/veranda-svoimi-rukami-iz-dereva-poshagovo.html
Preparatory work
When planning to modify a domestic building, it is important not to lose sight of a large number of features. The extension is always organized from the door side, since it is its characteristics that determine the length of the selected structure
The width is determined directly by the owner, and depends on personal preferences, as well as available materials.
Drawing and site preparation
The layout of the base directly depends on the option of the extension and its approximate appearance, so you first need to decide on these parameters and sketch out ideas on a piece of paper. The next step will be to transfer all the preferences into a computer program for creating drawings - there are quite a lot of them, they are easy to use, so this stage will not take too much time. However, it is quite important because it helps to arrange all the components symmetrically and rationally in relation to each other.
A fairly simple way that does not involve a lot of time is to search for ready-made drawings on the Internet - often they are all for standard extensions, but you can also find quite unusual ones.
If you are not confident in your abilities, you can choose the simplest, but at the same time the most expensive option - contact a construction company. There, in a short time, you can get a finished project that is absolutely correct in all respects, without worrying that the site being built will collapse.
Find out whether the veranda and terrace are considered the area of the house according to SNiP.
When the sketch is ready, you can begin preparing the site. First of all, it is necessary to clear the desired area of land from weeds, debris, dry leaves, etc. Then arm yourself with a building level, wooden pegs and rope - with the help of these materials you will be able to trace the extreme points of the future structure. Next, the area for the extension must be cleared of the top layer of soil (20 cm), covered with crushed stone and sand so that each layer is 10 cm, plus small layer-by-layer compactors.
When done correctly, a square or rectangle will have equal diagonals. If the digital values of the segments do not coincide, under no circumstances should the structural elements be left in this form.
Required materials and tools
Regardless of the type of building, you will need the following building materials:
- wooden boards for making sheathing 25 mm thick;
- beams 50×50 and 100×100 mm;
- reinforcement, rods or mesh;
- flooring boards 3 cm thick;
- roofing sheets that match the material from which the trailer roof is made;
- any desired windows (if veranda);
- fencing and partitions (for terraces);
- ready-made railings and jibs or beams for their manufacture;
- control supports - 4 units (necessary if the area where you live has high humidity and the soil is prone to subsidence).
Important! Since the building is temporary, it is recommended to insulate it with inexpensive materials such as polystyrene foam or glass wool.
The amount of materials is taken from the calculation of schematic data. Screws, nails, straight and oblique metal corners, as well as self-tapping screws are used as fasteners.
Required tools:
- hand or chainsaw;
- drill;
- Bulgarian;
- screwdriver;
- electric planer, etc.
Floor: wood or concrete
A concrete or wooden floor is installed on a strip foundation. The base on pillars is obviously designed for arranging a wooden floor. Let's look at both technologies.
- Concrete.
Inside the foundation, soil is selected to a depth of 35 cm. A sand cushion is arranged and compacted well. Then you can fill it with crushed stone, but expanded clay is used to insulate the screed. A 20 cm layer is enough. A reinforcement grid is laid on top. Using a level, beacons are set, along which the cement screed is subsequently poured. Lay tiles or wooden flooring on top. Arranging a wooden floor - The wooden floor is laid on floor beams, which are laid on the base on top of the waterproofing. The beam is connected to the foundation using through fasteners, anchors or self-tapping screws. In the corners they are connected with a straight lock and additionally fixed with corners. Next, the logs are installed, insulation is laid and the flooring is laid.
Site marking
To mark post installation locations, draw external marking lines using cords. To prevent settling, the posts should be placed 2 to 3 meters apart in the center of the floor tiles. These posts support horizontal crossbars along which the fastening is made. The roof is easier to install with two people.
Construction of a reliable foundation for an extension to a house
High-quality construction of additional premises requires competent organization of the foundation for the structure. The type of foundation depends on the weight of the extension and the functions assigned to the structure.
To attach structures, select one of the base types:
- pile-screw field. Steel screw supports do not require excavation work or the use of special equipment. Depending on the type of soil, bury the elements perpendicularly into the ground at a distance of 0.7-1 m. Install racks in the corners of the extension and in increments of 1.5-2 m under the walls. Distribute the piles evenly around the perimeter. Check the geometry of the position with a building level. Trim the excess pins so that their tops are in the same plane. Attach headbands to each element. Place a grillage or metal channel, rail, or timber on top. Make a harness that will secure the grillage crown. Walls on top of a pile-screw field can be erected on a frame, from a log, a wooden block;
- strip foundation. Dig a trench 30-40 cm wide and 25-40 cm deep along the intended perimeter of the future structure. Place a layer of sand and gravel 15-20 cm high at the bottom of the ditch. Install formwork from boards or fiberboard along the edges. Build the formwork structure 20-40 cm high above the ground surface. Prepare a concrete solution mixed from sand, water, cement grade M200-M250. Fill the formwork space, distributing the concrete mass evenly. To strengthen the base, immerse fragments of brick, concrete, iron reinforcement, and stones into the solution. Depending on weather conditions, the concrete strip base dries completely within 14-21 days. Start construction only after hardening. Walls made of logs, timber, bricks, and foam blocks can be erected on a concrete strip;
- monolith. Dig a hole with a level base 30-40 cm deep. Make a frame along the earthen walls in the form of formwork. The formwork top should protrude 20-40 cm above the ground surface. Fill the bottom of the pit with sand and gravel in a layer 15-25 cm high. Lay the reinforcement. Fill the space with a concrete mass obtained from M200-M250 cement, sifted sand and water. A monolithic foundation hardens in 21-30 days in warm weather, and 35-45 days in cold weather. Cover the base with plastic to prevent precipitation. On top of monolithic concrete, you can build a log house from timber, logs, bricks, reinforced concrete panels, foam blocks;
- blocks. Reinforced concrete blocks are laid along the perimeter of the structure being built with a step of 1.5 m between elements. It is required that the fundamental level be in the same plane as the base of the residential building. Install each support in a recess with a sand and gravel cushion 10-15 cm high. Check the position geometry with a construction laser level. On top of the block field, you can build walls made of logs, timber, frame OSB panels with insulation.
Important! Register the extension with the foundation in BTI. A structure on a strong foundation is a capital structure that requires documented registration due to changes in the architecture of the building. Light buildings - verandas, terraces can be built without organizing a foundation
A well-built foundation is a condition for the durability of the extension. If you are planning to build a full-fledged room (kitchen, room, bathroom), garage, bathhouse - choose a reliable fundamental type made of concrete, blocks or screw piles
Lightweight buildings - verandas, terraces can be built without organizing a foundation. A well-built foundation is a condition for the durability of the extension. If you are planning to build a full-fledged room (kitchen, room, bathroom), garage, bathhouse - choose a reliable fundamental type made of concrete, blocks or screw piles.
Installing the base
The veranda can be made in any shape; often a standard shape or a hexagon is chosen. The veranda can be placed close to the house, and also make a warm transition.
2d39ab57989bde9fe9e0156448b3bcfb.jpe 462ec53fac34beec1de25f04c6002809.jpeWe would recommend building buildings close to each other, because the soil under the foundation will settle differently.
Often in such transitions, the doorway begins to warp, cracks appear, which will undoubtedly lead to a large loss of heat.
You can make a simple base like this:
Clear the area where the veranda will be located, then dig the area 1.5-2 meters deep. The easiest way to do this is with an excavator, but you can also do it yourself simply by calling your partners for help.
If you choose a hexagon shape, you will need 6 pillars for the base. They need to be slightly deeper into the ground, then we fill in a cushion of sand and gravel, then a waterproofing layer is laid.
Soil is poured on top; remove excess soil from the site so that it does not interfere with further work.
Foundation for the veranda
columnar foundation
Before making a foundation, you need to refer to the house construction documents, which indicate what soil it stands on, from this you can choose the type of foundation for the extension
Parameters to pay attention to:
- What is the soil's ability to absorb moisture?
- What is the composition of the soil at the site where the veranda is being built?
- To what depth does the soil freeze in the region where you live?
- How close to the surface is groundwater?
- General provisions for soil stability.
When choosing the type of foundation for the veranda, we pay attention to the foundation of the main building, its design, and the condition of the load-bearing walls. After selecting the foundation, markings are made on the soil for further work.
Advice! A small wooden veranda will sit quite well on a columnar foundation at the corners of the extension. For wide and long verandas, the installation of pillars is used at intervals of 600 millimeters along the length and width of the extension.
Columnar foundation, how to make it?
The foundation (foundation) for an extension is just as important as for the main house; it must be made of high-quality material. Work order:
- We dig holes for the pillars to a depth of at least 100 centimeters; its depth cannot be less than the depth of the foundation under the main building. The level of soil freezing is taken into account; the hole should be deeper than this level.
- At the bottom of the dug holes we make a cushion, this is a mixture of sand and crushed stone. The pillow can be made in layers, sand, crushed stone.
- Fill the pillow with concrete.
- We lay out support columns from brick when the main house is brick. If the main house is wooden, wooden beams are used as columns. Metal supports or asbestos pipes are used in columnar foundations for a frame veranda.
The veranda looks beautiful when it is located on the 2nd floor of the house. In this case, the ground part of the extension support is laid out at the level of the main foundation under the house. When a house with a high base is recommended, the veranda should be built according to its level.
Making a strip foundation
It is used if a heavy veranda with glazing is planned. To equip it, a trench is dug along the perimeter of the future veranda and formwork is installed. It is placed a little higher than it is planned to fill the foundation with concrete.
After pouring the foundation with concrete, it is periodically moistened with water until it is completely formed; this is necessary for uniform hardening of the foundation.
Distinctive features
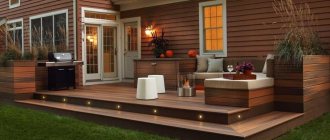
Terrace is an open or semi-open area adjacent to a building. On the terrace you can relax in any weather: both in pouring rain and in hot weather you will feel comfort and coziness there. Typically, access to the terrace is assumed from the kitchen or dining room. Unlike a veranda, the terrace is not mechanically connected to the main building. Unlike a free-standing gazebo, the terrace organically connects the home and the natural landscape into a single architectural ensemble.
Create a cozy terrace for your home
Wooden structure with a lean-to canopy
Such a terrace attached to the house can be connected to any type of building - frame, log, brick/block, monolithic.
Primary requirements:
- the possibility of installing supports at least for the front racks (the rear ones are attached to the main wall of the building) or, with light construction, for all racks;
- convenient connection of racks and canopy to the building wall. The junction of the wall and the canopy must be waterproofed;
- sufficient strength and reliability of the main building structures, allowing you to “hang” additional load on them from the terrace frame.
Necessary materials:
- ready-made concrete of at least M200 grade for concreting supports or dry components for preparing the mixture. The amount of concrete depends on the number of supports to be concreted and the depth of placement. It is necessary to deepen the rack into the concrete by at least 1/8...1/5 of the total height, while the concrete cup has a diameter of 3...5 diameters (maximum section size) of the rack and a depth of 1.2...1.5 of the depth of the rack embedding;
- timber or metal profile (square, rectangular or round pipe) for the frame. The dimensions of the wooden frame elements (in centimeters) are indicated in the drawing above; for metal it is necessary to recalculate for reasons of strength. However, on average, the cross-section of the rack should not be less than 40x40 mm, trim and rafters - 20x40 mm, spacers - 20x20 mm;
- roofing material - boards with a protective coating, as shown in the diagram, or cellular/monolithic polycarbonate;
- fasteners. The basic layout provides for assembly with self-tapping screws or confirmations; they can be replaced with dowels (dowels) or a tongue-and-groove connection system;
- impregnation/varnish/paint to protect wood from external influences.
How to build a terrace step by step
- We carry out markings taking into account the slope of the site (near the house they try to make a reverse slope so that water does not accumulate near the walls and does not flood the foundation).
- We dig holes for the posts, pour concrete and install them at the level of the posts. For timber/round timber, waterproofing of the lower part is required - coated and/or rolled, otherwise the wood will quickly begin to rot.
- After the concrete reaches 50% or more of the design strength, you can begin assembling the frame. First, the frame beams are installed, and the rear posts are attached to the wall of the building.
- Next, the canopy frame and, if necessary, fencing are assembled.
- The last stage is laying the roof.
To strengthen the connections of posts and beams, it is advisable to use overhead metal elements - plates and corners.
If polycarbonate is used as a roofing material, it is necessary to use special screws with wide heads (or washers) and connecting profiles so as not to damage the relatively fragile polymer.
Here is a diagram of the flooring and fences.
Water flow
If the veranda is attached to the wall, it is necessary to install the roof at an angle of at least 5 degrees. This angle represents a slope of approximately 10-12 cm for every linear meter on the ground. If heavy snowfall is expected in winter, we recommend providing a steeper slope. When constructing a flat roof, the final step is to install a drain pipe at the edge.
Walls of a house extension: choice of material
Wall of an extension to a house
Let's consider the most popular building materials for an extension, let's simplify the solution to the question of how to make an extension to a house with your own hands?
- Brick.
Thanks to such qualities as strength and durability, brick is still in demand in the building materials market. Brick is a cold material, so additional insulation is necessary. The large weight of brick walls requires a reliable and durable foundation. Another “disadvantage” of using brick for the walls of an extension is the high cost of the material and work. Working with brickwork requires a professional approach. Small sizes require more time spent than building walls made of foam concrete or cinder block. - Blocks
of various types - cinder block, foam block and aerated concrete blocks. In the southern regions, natural porous material from sedimentary rocks - shell rock - is used for construction. All block-type materials are united by affordable cost and short construction period. Due to its porous structure, the material has high thermal insulation characteristics and is much lighter in weight compared to brick. A building made of blocks does not require a powerful reinforced foundation. “Minus” - the surface of block walls is not resistant to negative environmental influences, so their external finishing is necessary. - Beam.
All timber – glued, planed and rounded – has high environmental and thermal insulation characteristics. Affordable cost involves the use of wooden beams in the construction of extensions for various purposes. Wooden beams are widely used in frame construction, which stands out from the general background due to its fast pace and simple technology. Despite all the advantages of an extension to a house made of timber, the fragility of the structure remains in the shade, although with proper construction and proper care it can last for quite a long time. - Plywood, chipboard and OSB
are used for constructing walls in frame construction; they have an affordable price and good noise and heat insulation properties. Residential extensions require additional insulation.
To all the materials and technologies considered, monolithic construction of the extension should be added
Many people do not take into account monolithic technology, considering concrete to be a very heavy and cold material. What is overlooked is that instead of crushed stone, porous, and therefore lightweight materials, such as expanded clay and slag, can serve as a filler for concrete
The process of monolithic construction of an extension is quite labor-intensive, but economical owners will be pleased with its availability of materials and cost.
What is overlooked is that instead of crushed stone, porous, and therefore lightweight materials, such as expanded clay and slag, can serve as filler for concrete. The process of monolithic construction of an extension is quite labor-intensive, but economical owners will be pleased with its availability of materials and cost.
Location
First of all, you need to develop a construction project, and for this you need to clearly understand why you need it, what kind of veranda you want, what kind of view you will see from it. The veranda can be used as a hall, dining room, children's playroom, or made into a winter garden or living room.
Next, you need to decide where you want to place it:
- on the corner;
- from the end;
- from the front of the house.
gazebo
Important! Do not place the entrance to the veranda opposite the entrance to the house - because of this, there will always be a draft on the veranda.
The recommended width is from 2.5 to 3 m; it will be difficult to place furniture on a smaller veranda. It is advisable to design wider extensions near large two-story houses.
The most common shape for such an extension is rectangular, but it can also be in the form of a polygon or circle.
The veranda can be open (without walls) or closed. If you install sliding panels, a closed building can easily turn into an open one if necessary.
The construction and operation of a greenhouse or hotbed can significantly save money and enrich the table with fresh vegetables; all that remains is to decide on the construction option - Bread Box, Butterfly, Snowdrop, Nurse, simple design, Mittlaider greenhouse, made of polypropylene or plastic pipes, with a thermal drive, made of polycarbonate, tree.
Completing the construction of a terrace at the dacha with your own hands
Upon completion of the work, the base of the terrace should be completely covered with decking. The pattern of laying the boards will determine the location of the supporting structures, so it should be chosen in advance, at the design stage.
The width of the decking boards should not exceed 150 mm, as wider boards tend to warp. When laying flooring, leave 3 mm gaps between the boards to allow rainwater to drain and prevent warping.
When laying boards, do not try to carefully adjust their ends. It is better that they hang on the sides beyond the boundaries of the structure. You can then easily saw them to the desired length in place. This creates an even end of the flooring, and chamfering the edges will give it an attractive appearance. Place the joints of spliced flooring boards offset on the joists.
When laying deck boards, use only galvanized nails or screws, since the deck is outdoors and exposed to all kinds of precipitation. Even better, if the fasteners are made of stainless steel, this will increase the service life of the decking.
After the flooring is ready, you should start fencing the terrace. Railings and bars underneath are the best way to provide comfort and privacy. The filling of the grid can be anything, but the railing must be reliable so that the person leaning on it can be confident in his safety. You can put a board up to 100 mm wide on the handrails - it will be an excellent support for a vase of flowers and bottles of drinks.
Upon completion of the carpentry work, all wooden parts should be treated with an antiseptic, and then, in accordance with the plan, with drying oil, stain, varnish or paint. A painted deck requires less maintenance than a deck that is stained or has no finish at all.
How to build a country terrace with your own hands is shown in the photo below:
Ventilated facades made of WPC Terradeck and Twinson
Ventilated facade made of WPC Twinson O Wall. Ventilated facades Twinson
Presentation film about the DECEUNINCK concern (Belgium)
Construction of turnkey terraces. Twinson WPC decking on an existing roof
Ventilated facades are an open system for finishing external walls, working on the “exhaust pipe” principle. Rising air currents circulate between the WPC facing panels and the insulation. As a result, the air flow dries the insulation layer if moisture gets on it, and the air gap formed between the facade and the wall reduces the overall heat transfer of the building, acting as a temperature buffer. Go to the VENTILATED FACADES section »
Types of verandas
Any construction should begin on paper. First of all, you will need to make a polycarbonate veranda project, and you have the power to give the structure any shape. It is not at all necessary to limit yourself to the usual geometry - make the extension oval, round, wave-like or any other shape - polycarbonate opens up new horizons for DIY construction. With it, anyone can become an architect and designer.
There are built-in and attached verandas. The former are often built simultaneously with the house on the same foundation and often under the same roof. In the second case, a separate foundation will be required for the veranda. Among attached verandas, terraces are very popular. Often these are open-type structures that visually increase the area of the house and perform useful functions. Thus, the terrace is at the same time a place for relaxation, a porch, and protection of the walls and foundations of the house from precipitation. Polycarbonate is ideal for constructing an open veranda. It makes the space even lighter and airier. For the roof, more durable cellular polycarbonate is used - this is a sheet inside of which there are ventilation gutters that give strength and prevent condensation from forming.
If you live in a cold climate zone, it is better to give preference to a closed veranda, making the walls from the same cellular polycarbonate. In addition to protection from rain and wind, it will help keep the room warm thanks to its air layer inside.
Advantages and disadvantages of the material
To summarize all the information presented above, we propose to outline the advantages and disadvantages of an attached polycarbonate veranda. First and most importantly, construction from this material is much cheaper than from any other. This results not only in the price of polycarbonate, but also in the installation method and the low load on the foundation. For very small and light verandas, some do not even build a “real” foundation at all, but simply place a regular fence or concrete road slab on a drainage pad in the ground, on which I mount the frame.
Even if you choose almost transparent light polycarbonate, in summer it will not be very hot on such a veranda, because the material scatters most of the rays. And to ensure the flow of fresh air into a closed room, several ventilation hatches can be made in the polycarbonate ceiling. Use blinds to create dense, cool shade. In the case of polycarbonate, even the most ordinary plastic models will look harmonious.
To heat such a veranda in winter, it is enough to use infrared films. During the daytime, they will help you save a lot on heating costs. In other words, making the microclimate in a polycarbonate veranda comfortable is not so difficult or expensive.
One of the disadvantages of such buildings is the fact that in winter, the polycarbonate for the veranda roof needs to be regularly cleared of snow, and this must be done very carefully. Do not use iron scoops, brushes or shovels to avoid scratching the surface.
Otherwise, the material will lose its previous light transmittance and protective characteristics. You can wash the walls of the veranda only with delicate products that do not contain alkalis or caustic acids.
Polycarbonate verandas have many more advantages than disadvantages, so cast aside all doubts and start construction.
Brief description of the process
We will try to briefly and clearly present to your attention step-by-step instructions for making an open-type veranda.
The subsequent algorithm will be as follows:
- install the lower trim of the terrace;
- lay the floor on the joists using tongue and groove boards;
- install vertical supports of the structure, those that are in contact with the house, fasten them to it using anchors and self-tapping screws;
- mount the upper trim of the terrace;
- erect a rafter system;
- fasten the frame of the rafter system to the elements of the upper trim using metal corners;
- build side fences of the building;
- start creating a roof - lay waterproofing material on the rafters, then make a lathing and attach it to
- OSB boards;
- lay roofing material;
- complete the final finishing of the veranda.
The terrace can become an additional room in your home, serve as a room for outdoor games (if you make a children's veranda), or become a favorite place for reading books or intimate conversations over a mug of tea.
It is possible to make an extension with your own hands; to do this, you just need to go a little deeper into the process of creating a terrace and find out as much information as possible about the upcoming work.