A comfortable terrace has already been created, it is filled with the aromas of flowers and the blooming garden, there is hot herbal tea on the table, but the gaze is directed to the free space in the yard, what should be placed there? There is clearly not enough moisture here on a too hot summer day.
This is a good place to build a fountain with your own hands, since it fits into the design of the dacha, and the work process will be an excellent opportunity to test personal capabilities, acquire new skills and relieve boredom.
But it’s not critical if specialists do it. It doesn’t matter who will provide beautiful movement and murmur of water. Although a do-it-yourself fountain at home is not such a difficult undertaking as to invite people from the outside.
Especially if you have a lot of free time. For a successful construction, you only need to delve into some details and buy the necessary materials and tools. If there is such a desire, then the author relies on step-by-step instructions.
Types of fountains
The appearance of the fountain is influenced by the number of nozzles, their location, and the pressure of the water supply. The jets can splash to the sides, hit straight up, and smoothly flow down the walls of the structure. Depending on the method of water supply, all fountains are divided into several types.
Table. Types of fountains
| Type of design | Main characteristics |
| Bell | The most common option in summer cottages. The water is supplied under low pressure, so the stream rises low, and the nozzle distributes it evenly around the circumference. Thanks to this, a hemisphere of water film is formed, in which the sun's rays are beautifully refracted. |
| In such a fountain, the water supply pressure is much stronger, the jets are thrown upward or to the sides (this depends on the location of the nozzle). By adjusting the pressure force, you can change the height of the jets within a fairly wide range. |
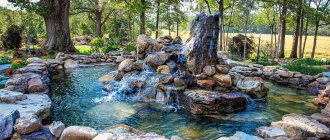
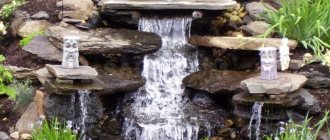
| The most spectacular option: the design consists of several containers located at different levels, and the water flows down to form a stepped mini-waterfall. |
| A complex design in which the cascade version is combined with a geyser or bell fountain. It looks very impressive, but it also requires more effort to construct. |
When choosing the type of fountain, you need to take into account not only its decorative qualities, but also the complexity of installation, the cost of all components, as well as the overall design of the site and the size of the reservoir. For example, for a very small pond, a bell fountain is best suited; for a larger one, a geyser or a combined option. If a garden with a pond is decorated in an oriental style, a cascade fountain would be the ideal choice.
This fountain will not take up much space
Combined fountain in a modern style
Compact bell fountain
Why does water flow
“All rivers flow into the sea, but it does not overflow.” This is what it says in the most ancient book of humanity. We see confirmation of these words every day when snow or rain falls from the sky to the ground. The Great Designer launched the water cycle in nature. Imitating him, experienced craftsmen created with their own hands a decorative indoor fountain that pleases the heart all year round. How does this system work?
The design is based on a unique water cycle in a closed system. It is started using a pump connected to electrical power. It lifts the liquid upward, after which it flows gracefully into the collection bowl.
There are decorative fountains that use several identical containers. They are lined up at different heights, connected by tubes. By pouring liquid into the vessel located at the top, the system starts. Ordinary physics plus a creative approach and golden hands. The result is an exotic corner with the quiet murmur of water that calms the nerves.
Choosing a place for a fountain
The correct location of the fountain not only ensures maximum decorativeness of the structure, but also makes it easier to care for during operation. If the fountain is located in a completely open area, which is actively heated by the sun, the water will evaporate and bloom faster.
You cannot build a pond with a fountain next to trees and deciduous shrubs. Firstly, this will lead to damage to the pond bowl by the roots, and secondly, leaves, small twigs and other debris will get into the water. In such conditions, filters quickly become clogged and fail, and the water becomes cloudy and acquires a putrid odor.
Choosing a location for a fountain is of great importance
The fountain should be located on the leeward side and no closer than half a meter from buildings and garden furniture. Due to splashes and water spray, the surfaces will always be wet, which will lead to the development of fungus and the gradual destruction of materials. But you shouldn’t place the fountain too far from the house either. Electricity is required to connect the pump, and a cable that is too long causes additional inconvenience and expense. A backlit fountain looks very impressive, and for this it is also necessary that the energy source be at the optimal distance from the reservoir.
The illuminated fountain looks very impressive
And last but not least, the fountain must have a decorative background and be clearly visible from different corners of the site. It makes no sense to install such a structure if there is no opportunity to admire it and show it to guests.
A decorative fountain should be located in a visible place
Tags
only the fountain with your own This fountain is made The construction of the fountain with your own hands was with your own hands. with your own hands with your own hands with your own hands. with your own hands you can with your own hands with your own hands without your own hands with your own hands like reservoirs and the size of the reservoir and Topiary with your own hands fountain with your own hands stones with your own weight fountain with your own hands fountain with your own hands Make with your own hands fountain with your own hands fountain with your own hands with your own dogs with your own hands at home with your own hands
photo articlesgardenmasterspebblesideasclassroomsfilterslightstabletop
Necessary equipment
There are three ways to ensure water supply in the fountain:
- connection to the central water supply;
- due to the water pressure in the tank;
- using a pump.
The first option is the most expensive, since you will not only have to pay large bills for water, but also plan how to use such a volume of liquid that will be constantly replenished.
Connecting the fountain to the water supply
As for the second method, an additional container is needed, which is installed above the nozzle. This ensures sufficient pressure to supply water, although the pressure will be low. The disadvantage of this option is that the water quickly becomes cloudy, and you need to constantly monitor the water level in the tank.
The pressure is provided by the water pressure in the tank
Supplying water with a pump makes it possible to regulate the pressure and ensure constant circulation of water. This method is the most optimal, and therefore occurs most often.
Fountain with pump
To construct a fountain, two types of pumps are used - submersible and surface, and each type has its own advantages.
- Submersible pump. It is installed at the bottom of the pond bowl and is therefore practically invisible. It is equipped with a pipeline and a nozzle that affects the shape of the water jets. Since the pump is located under the water column, the noise from its operation is minimal, which increases comfort while relaxing by the fountain. Installing the equipment does not require much effort, and, moreover, submersible models have a budget price.
Submersible pump - Surface pump. Installed on a hill near a pond, it requires camouflage elements in the form of garden sculptures, stone compositions, ceramics, and flowerpots with plants. It makes noise during operation, which is quite annoying for some people. Such fountains are better suited for large reservoirs and complex shaped structures.
Surface pump
An important element of the fountain is the water container. There are plastic bowls on sale in all shapes and sizes, which do not require additional waterproofing, and therefore greatly simplify the arrangement of the fountain. For a large reservoir, you will have to dig a pit and, accordingly, make reliable waterproofing. You will definitely need to buy a filter for the pump, since the water in the bowl cannot remain clean for a long time. The presence of small debris, silt, and sand in it will cause the pump to clog and completely fail.
Choosing a fountain pump
Shapes and sizes
Although the fountain can have any size and shape, when choosing them it is recommended to use common sense and remember that it will be somewhat more difficult to care for an installation with a more intricate shape and large dimensions.
The bowl of the fountain can have a symmetrical or non-standard asymmetrical shape. For example, it can be made in the form of an oval, square, circle, triangle, as well as any other geometric shapes, including those that follow the contours of the silhouette of an animal or a person.
Also, fountains can be complex multi-level or made of several interconnected containers. In this case, each element can be equipped with its own nozzle, being an integral part of a more complex installation.
Making a fountain with your own hands
There are a lot of options for homemade fountains - from the simplest and most compact to complex multi-level designs with lighting and figured interlacing of jets. Let's consider one of the available methods, which does not require large expenses and at the same time looks very decorative.
Preparing the bowl
First, you need to think about the shape and size of the future reservoir and select a suitable site for it on the site. Next, you should clear the area and make markings, marking the contours of the bowl on the ground.
Step 1. The soil is excavated inside the marking. The optimal depth is 40-50 cm, but everyone selects this parameter depending on their preferences.
Excavation according to markings
Step 2. It is recommended to carefully align the walls and bottom of the pit so that the waterproofing lies more evenly.
The bottom and walls of the pit must be smooth
Step 3. A sand cushion with a thickness of at least 5 cm is poured onto the bottom. The sand must be leveled and compacted well.
The bottom is covered with a layer of sand
Step 4. High-density polyethylene film is laid on top of the sand. The edges of the film should extend beyond the contours of the pit so that the walls are completely covered. If a solid piece of polyethylene is not enough, several strips are used, which are laid with an overlap of about 15 cm. It is better to lay a thin film in several layers for a more reliable sealing of the reservoir. The waterproofing material is temporarily pressed to the ground with stones along the edges and along the walls.
Pit waterproofing device
Step 5. On top of the film you need to pour a layer of fine crushed stone or gravel, which must be clean, that is, without any admixtures of clay or earth. Otherwise, the water will have to be changed several times to achieve transparency of the reservoir. There is no need to sprinkle film on the area where the fountain is installed.
Backfilling the base with crushed stone
Step 6. An ordinary plastic bucket with a capacity of 10 liters can be used as a water collector and base for the pump. To do this, you need to drill holes in its walls along the entire circumference with a feather drill.
You need to drill holes in the bucket
Step 7. The prepared bucket is placed on the film and leveled horizontally. If the base for the pump is skewed, this will negatively affect the decorative effect of the fountain, because the jets will also be directed at an angle.
The bucket is leveled
Step 8. It is recommended to lay large stones around the perimeter of the bowl of the future reservoir. This will give the pond a more picturesque look.
Laying stones around the perimeter of the bowl
Important! Before laying, the stones should be washed thoroughly to remove adhering soil, clay and small debris. Otherwise, all this will fall into the water, and the pond will turn into a big puddle.
Step 9. The second row of stones is laid on top, and the film protruding from under them is carefully trimmed. Gaps between large boulders should be filled with smaller stones.
The film should not be visible from under the stones
Step 10. The remaining medium-sized stones can be placed in random order on the bottom of the future pond. They will look attractive in clear water.
Decorating the bottom of the pond with stones
Fountain device
The preparation of the bowl is completed; decoration can begin only after installing the fountain. Installation of the equipment is quite simple.
Step 1. To increase the stability of a homemade water collector, you need to pour a little crushed stone inside to create a layer 5-7 cm thick.
For stability, crushed stone is poured into the bucket
Step 2. The pump is lowered inside the bucket. It should turn easily in the container, and not enter with force, otherwise its maintenance will be difficult.
Installing a pump in a bucket
Step 3. The end of the wire from the pump must be taken out of the pond, while the wire itself must pass freely along the bottom, without tension.
The wire is led outside the pond
Important! The wire must have high-quality insulation, since it will constantly be under water. Before laying, you should carefully inspect it along its entire length and make sure there is no damage.
Step 4. The water collector with the pump is laid on the outside with stones so that only the nozzle remains on the surface.
The drainage basin is completely filled with stones
Step 5. Now all that remains is to connect the pump. It is necessary to dig a trench under the cable from the building where the distribution panel is located to the reservoir. There is no need to dig deep - the main thing is to hide the wire so that it does not interfere with walking. It is advisable to thread the cable through the corrugation and only then install it.
Pump connection
Connection diagram of the pump to the network
Step 6. You can start filling the bowl with water. To prevent the stream from washing away small pebbles at the bottom, it is recommended to direct the water supply hose to the water collector.
Filling the pond with water
After filling the reservoir, you can check the operation of the fountain. Many additionally install lighting, which gives the pond a cozy look at night. In our case, a lantern is mounted on the shore of the pond, and the cable from it is laid together with the cable from the pump in the same trench.
Ready pond with fountain
If it is necessary to adjust or replace the pump, it is enough to disassemble the top row of stones covering the bucket. You can change the appearance of the fountain using various nozzles, which are now available in a wide range.
Fountain nozzles
Pump installation
If you are making a tabletop fountain, then first you need to find a hose to work with, through which a stream of water will come out. To do this, cut 10 cm from a regular aquarium hose and insert it into the pump. Immediately check whether your system is in working condition, so as not to return to this issue later. We install the pump to the bottom of the container and fill it with expanded clay. Do not forget to level the surface after filling.
In the photo there is an indoor fountain
Construction of a fountain without a pond
If it is not possible to create a pond, or you simply don’t want to take care of it, the fountain can be installed without it. Properly selected design will allow such a fountain to become a real decoration of the site. All work can be completed in a day; it does not require any special skills.
Diagram of a fountain without a pond
To make a fountain you will need a plastic bowl, a submersible pump, a filter, a thick film, a metal mesh with small cells, as well as sand and stones for decorating the structure.
Table. Making a fountain with your own hands
| Illustration | Description of work |
| A circle is marked on the selected site with a diameter twice the diameter of the bowl. Soil is selected to a depth of 10 cm, and then a hole the size of a plastic container is dug in the center of the circle. |
| In the hole you need to make a sand cushion on which the bowl is installed so that its edges rise above the surface by about 5 cm. Be sure to control the horizontal position of the container during installation. After this, water should be poured into the bowl, without adding 4-5 cm to the edges. |
| A submersible pump is inserted into a bowl of water, a nozzle is put on it and the water supply is checked. It is very important to adjust the pressure so that all the water falls back into the container and does not splash around. |
| A circle is cut out of the film along the diameter of the entire recess, cuts are made in the center so that the edges of the film fall into the bowl and completely cover its edges. |
| Several metal rods are placed on the film at some distance from each other, and a mesh with a slot for the nozzle is placed on the rods. |
| The fountain is decorated: large and small stones, pebbles, and shells are laid out on the mesh. The stones should completely hide the mesh. Plants can be planted around the perimeter. |
The wire from the pump is laid in a trench and also covered with pebbles or gravel on top. With the onset of cold weather, the water from the tank must be drained, the pump disconnected from the cable and put away for the winter. It is also recommended to cover the area with film or other material to prevent debris from accumulating between the stones.
To make a fountain, you can use any containers: barrels, flowerpots, old unnecessary bathtubs, and so on. This offers ample opportunities to show your imagination and creative approach.
A barrel fountain is an excellent solution for a rustic garden
Successful use of an old bathtub
Small fountain in a concrete bowl
Decor
Decorating your fountain will further highlight how unique it is. You can put natural stones next to the pond, you can even put them in different colors, display indoor plants, put various figures of toys or animals, etc.
Illumination of the structure can amaze your guests with its originality. This is done using special equipment. Lamps are placed around the perimeter of the structure, and lighting is installed at the bottom.
Plants and decor for the fountain
Aquatic plants can be placed at the bottom of the reservoir, and shrubs can be planted around it.