Many owners of dachas and country houses build a terrace next to their residential building: this is an extension in the form of an open area, used for relaxation. However, on a hot summer day it is not very comfortable to stay there - the scorching sun interferes with a pleasant pastime and can cause heat stroke. To create shade, it makes sense to build a canopy over the terrace. There are a huge number of such designs, differing in materials, sizes, configurations and prices. It is advisable to design the canopy already at the stage of calculating the size and cost of the recreation area itself.
Attaching canopies to the wall of a house: types of canopies and materials
What is a canopy?
This is a lightweight structure that consists of a frame installed on a foundation or dug into the ground, and a roof. Additional roofing is the main reason for installing a curtain wall. Most often, a canopy is made in the form of an extension to a house, so attaching a canopy to the wall of a house is an important issue that faces the owner of a mansion. A modest canopy attached to a wooden house will give the appearance of a cozy house
What are awnings for? These additional architectural structures protect households or their household items from the negative influence of the external environment:
- protection from snow and rain. A canopy installed above the porch will protect the entrance to the house from snow drifts;
- protection from rain. A car hidden under the roof will always be clean; here you can also keep various household items and tools;
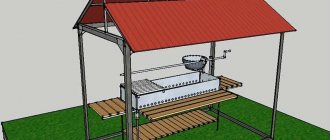
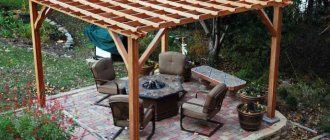
- from the sun. It’s nice to relax in the shade near the house, and also store some supplies. A summer kitchen and barbecue area are installed under the canopy.
Error correction
Errors made during the installation of canopies must be corrected immediately. Polycarbonate, bent under the influence of heat, can break at any moment. To eliminate the shortcomings, you need to:
- Remove the sheet.
- Remove fasteners.
- Attach the sheet, adjusting the angles of the structures if necessary.
- Make the bending radius no less than the permissible one specified by the manufacturer.
A canopy over the porch, made independently according to the instructions above, will decorate the house.
Classification of canopies attached to the house
Canopies near the house usually serve as protection from precipitation. They are used to cover terraces, verandas, patios or as a covered parking space for a car. Depending on the functional load, their area may be sufficient to accommodate garden furniture or even a barbecue.
An original multi-level polycarbonate canopy attached to the house; in the photo there is a multi-dome structure protecting the summer area of the cafe
Veranda canopy
It is an extension that protects the entrance to the house from bad weather. It can be placed either on the front of the house or adjacent to the rear of the building, opening onto the garden. In this case, the area of the canopy can be increased, and the veranda itself can be used as a recreation area.
A canopy for a house made of polycarbonate, in the photo there is a structure with wooden load-bearing beams and rafters
Terrace canopy
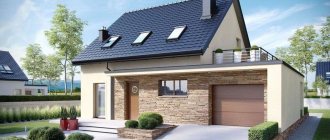
Terraces usually have a larger area than verandas and can be located on the upper floors of a building or on the terrain. There are gable buildings; they have the same roof as the house. Usually equipped with several support posts. Single-pitch structures are the most common, as they are quite cheap and easy to construct. Attaching such a canopy to a house made of metal profiles with your own hands is quite within the capabilities of even a less experienced craftsman. Often terraces are corner or encircle the entire house. In this case, the canopy can only cover part of the extension.
Massive terrace canopies attached to the house, photo of a recreation area with a decorative fireplace
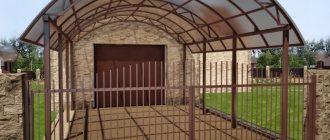
Carport
The leaders among protective structures for cars are polycarbonate carports attached to the house. Such products are most often produced in factories and sold in the form of ready-made kits, which you can assemble yourself.
Polycarbonate canopy attached to the house, photo of a standard design with a metal frame
The shape of the wall canopy and the material from which it will be made should be selected based on the following criteria:
- The feasibility and functional load carried by the structure - is the structure needed at all and, if so, what will it be used for;
- Stylistic parameters - will the extension have a common style with the house and be a harmoniously integrated component of it, or will it stand out as a design accent to the exterior of the building;
- The price of materials and construction work for the construction of the structure.
Awnings
These structures are also sheds attached to the house. In turn, the following types of products are distinguished:
- Retractable – with manual or electric drive. Some manufacturers offer a special case where the folded awning will be stored safely during a long absence of the owners.
- Basket - the fabric is stretched over a semicircular or rectangular frame with folding stiffeners.
- Awnings with poles – thanks to the additional support point, they can withstand significant loads. Used to protect large areas.
An awning attached to the wall is used as car parking
Preparation
Before you start building a timber canopy, you need to decide where it will be located. Finding a place on the site for such a structure is not difficult if the area has a sufficient amount of free space. For small areas, experts advise choosing a drawing of a small-sized canopy. To build such a structure, wooden beams and boards are used.
Types of canopies
The canopy can be free-standing or attached to the wall of a house, garage or any other building. They can be divided according to the type of materials from which the frame is made:
- Metal carcass. Assembled from metal profiles of various shapes.
- Wood. The base of the structure is made of timber.
- Combined. The racks can be made of wood, the roof of metal, and vice versa. Concrete pillars or made of brick are also used as racks.
According to the type of roof, canopies are:
- single-pitched;
- gable;
- rounded and others.
How to hang kitchen cabinets on drywall or foam block?
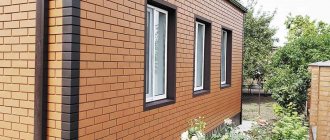
An empty plasterboard wall will not support the weight of the kitchen module. You need to attach the strip to the metal frame of the plasterboard wall, or fasten it with studs to the main wall if it is under a layer of plasterboard.
To attach the slats to the foam block, long screws are needed. For cellular concrete, construction stores offer special anchors.
Installing cabinets yourself is not difficult. But it’s better to have an assistant to hand you the tools, hold the modules, and look with you to see if the furniture is installed level. You'll see, you'll succeed!
Order a new kitchen from Shara Furniture - we will install it according to all the rules. All you have to do is use it and enjoy delicious dishes!
How to build a canopy out of wood
Agree, working with a welding machine is a serious problem for about half of the people, and metal profiles are expensive nowadays. It’s much easier to collect all the available lumber in the barn, buy what’s missing, and attach a simple but quite practical wooden canopy to the house. Under such a canopy you can rest no worse than under a structure with a metal frame, and maybe even better.
The first thing you need to do is generate an idea and sketch a sketch. We think that after reading the first paragraph of this publication, there will be no problems with ideas. And everyone can also draw a sketch, even if it is not a very beautiful drawing, the main thing is that it is understandable. But problems may arise with the drawing; not everyone will do it correctly. However, a wooden canopy for a private house is quite simple in design and you can do without a drawing at all, the main thing is to calculate everything correctly and paint the material.
We prepare everything you need
Having drawn a sketch and put down all the necessary dimensions of the building, you can begin to calculate the material. We expect to make a wooden canopy with our own hands, 2 m wide, 6 m long and 2.4 m high, and for it we will need the following material.
- Beam 150x150 mm, 2.4 meters long – 4 pieces, which will go to the vertical supports.
- Two long (6 m) boards 150x50 mm, which we decided to use as longitudinal beams.
- Boards 150x50 mm, length 2.5 m – 7 pcs. to the rafters.
- Six-meter boards 100x25 mm - 7 pieces will be used for the sheathing.
- Metal mounting bracket and long screws and bolts. With their help we will fasten the load-bearing elements of the structure.
- 3 six-meter sheets of corrugated sheeting 0.9 mm, width 1000 mm.
- 4 thrust bearings for anchors of vertical supports, mounting width 150 mm.
- Bolts with washers and nuts for thrust bearings, special self-tapping screws for corrugated sheets.
- Primer for wood processing.
- Cement 4 bags, sand 3 bags, crushed stone 1 bag.
- A piece of roofing felt 2x1.5 meters.
Preparing the base
The easiest way to make polycarbonate canopies yourself is to use the wall and foundation of a finished building as the base. There is no need to create anything additional here, and the base trusses are attached to anchor bolts - a hole is drilled, a stand is attached, leveled and fixed. But this is not always possible, and preparing the foundation is the longest stage:
- We dig holes 30x30 cm about half a meter deep at the points where the supports will stand
- We fill the holes with crushed stone or arrange a frame of reinforcement in them
- Prepare a cement-sand mixture in a ratio of 3 to 1 and fill the base
- We wait the allotted time until it completely hardens and gains strength (up to 2 weeks)
After this, you can drill holes for the anchors. Of course, you can immediately embed the racks into the foundation, but this method will not work a priori if you decide to build a polycarbonate canopy with your own hands using wooden supports. Plus, shrinkage of concrete can “pull” the truss to the side, violating the intended geometry, which is especially bad if there is a house wall nearby - straightening the shape and level only with crossbars will be almost impossible.
Canopy Covering
The materials for covering visors are also striking in their diversity. Most often they are selected under the roof of the house, but it is not necessary to adhere to this rule.
A lightweight and durable material suitable for almost any coating is polycarbonate. From this material you can easily make a canopy over the porch with your own hands. It is flexible and plastic, which allows you to make canopies for the veranda of any shape, even arched.
Canopies over the porch made of polycarbonate have a wide range of colors, which allows you to implement any design design
Coverings made from corrugated sheets (corrugated sheets) look very practical and beautiful. This is a sheet of galvanized steel, profiled for greater rigidity. It is used for external coatings. Canopies over porches made of metal tiles have similar qualities. But since this roofing material is quite heavy, structures made from it are made mainly of supporting ones, one or two slopes.
Advice: when making a canopy over a porch made of metal tiles, take into account the pressure of the roofing material when making the frame.
Profiled sheet, canopy over the porch, photo
Before making a canopy over the porch, you need to decide what size the future canopy over the front door will be and make a detailed sketch indicating all dimensions.
Frame for visor
This will allow you to visually see what the future porch with a canopy will look like, calculate the required amount of materials, and select the appropriate decorative elements. You can make a small canopy that will only protect the top of the doors from rain.
Small visor made of cellular polycarbonate
Or you can make a large canopy, moving 1.5 - 2.5 m away from the house. This will already be a full-fledged and large canopy that will protect not only the door, but also the area near the entrance doors and steps from snow in winter, and from rain in summer and autumn and fallen leaves.
Advice: if the width of the canopy is more than one meter, then it is advisable to install columns. If the canopy width is more than 1.5 meters, they must be installed. This is due to two factors:
- With such dimensions, the entire structure weighs a lot and the anchor connection cannot fully guarantee reliable fastening to the wall of the house;
- In winter, a lot of snow can accumulate on the canopy, which will further increase the weight of the canopy.
You also need to choose what material the frame will be made of and what it will be covered with. There are many materials from which you can make a canopy frame. It all depends on your imagination and the amount of money you are willing to spend on the frame
Fasteners used
There are several options for fasteners that can be used to attach an awning to the wall of your home. When choosing, you need to take into account the weight of the structure and the material of the wall on which you plan to attach the canopy.
If the wall is wooden, it is convenient to use self-tapping screws with a hex head. In builders' slang, such a self-tapping screw is usually called a wood grouse. For concrete walls, it is optimal to use different types of anchors. For walls made of porous material (aerated blocks, foam concrete), chemical anchors are chosen or through-fastening is performed using studs and bolts.
Wedge anchors
Designed for fastening heavy structures to a concrete or brick base.
Using such an anchor, you can attach a guide rail or perforated fasteners (metal corner, fastening for timber) to the wall. For installation, a hole corresponding to the diameter of the anchor is required.
Anchors with tension nut
Another type of anchor fastener for mounting heavy structures to concrete or brick foundations is an anchor bolt with a nut.
In terms of characteristics and installation principle, it is practically no different from the previous fastener.
Dowel-nails
The most versatile, inexpensive and popular fastener for medium-heavy structures. Using dowel nails, you can secure the guide of a wooden canopy to a base made of brick, concrete, or aerated concrete.
When choosing the size of dowel-nails, it is necessary to take into account that they are mounted through the end-to-end method. This means you need to sum up the planned seating depth of the dowel with the thickness of the part being fastened. For example, you need to attach a 5 cm thick canopy track to a concrete wall. Concrete is a durable material. In order for the dowel to be securely held, it is enough to deepen it by 6-7 cm. It turns out that for fastening you will need dowel-nails with a length of at least 110 mm. For materials with a porous structure, the use of such fasteners is not recommended. But if there are no other options, to obtain maximum fastening strength, it is necessary to install the fasteners to the maximum possible depth.
"Capercaillie"
The self-tapping screw is used for reliable fastening to a wooden base. It requires pre-drilling. The diameter of the drill should be 2-3 mm less than the nominal value of the self-tapping screw.
Such fasteners, unlike classic self-tapping screws or wood screws, have a hexagonal head and a much larger diameter. The force with which the “grouse” presses the fastened parts to the base is significantly higher.
Materials for building sheds and their features
The canopy at the dacha is made of slate, ondulin, plastic, wood. Choose based on practicality and attractiveness.
A canopy for a porch or veranda consists of a frame and cladding. The material for the base must have sufficient strength characteristics, so there is less choice here: metal and wood. The cladding must be resistant to water and sun, so there are more possibilities here.
Corrugated sheeting and metal tiles
The simplest option is to use standard and lightweight roofing materials. Since we are talking about an extension, they prefer to use metal sheets, as they are easy to install and weigh little. The most famous include corrugated sheets and metal tiles.
Profiled sheet is a stamped sheet of galvanized iron with a thickness of 0.45 to 0.7 mm. The leaf forms a kind of relief - a profile. This is not an aesthetic, but a practical solution: the bends form recesses through which water and snow flow from the roof. A canopy made of corrugated sheets is painted with standard enamels, which increases its resistance to corrosion.
The sheet is attached with an overlap to the canopy to the house or veranda made of metal profiles. A wooden frame is not suitable.
Metal tiles are a close, but more elegant solution. The complex and thoughtful relief creates the impression of a tiled roof. Sheets are produced with different zinc layer thicknesses and different coatings. The paint ensures the material's resistance to ultraviolet radiation.
Installation of metal tiles is simpler and more reliable: a special joint mechanism allows you to lay the sheets very accurately.
Polycarbonate
The most effective solution for a visor. A canopy made of a profile pipe or wood is lined with polycarbonate. You can use both cellular and monolithic versions, but the second is much more durable. They produce colorless and tinted material.
Useful tips
When planning the construction of a bathhouse with a terrace, certain rules must be taken into account:
- Regardless of whether the bathhouse is large or small, it must have separate rooms for a changing room, shower and steam room.
- For a terrace it is better to arrange a pile foundation. This will give the entire object additional stability.
- When designing a terrace, it can be made under the same roof as the bathhouse, covered with the same roofing material. However, it is more practical to use polycarbonate for the canopy. A blind canopy can serve as an obstacle to light entering the bathhouse windows. And then you will have to turn on the lights ahead of time. If polycarbonate is used, there is no need to build a reinforced base, and the translucent roof will not hang over your head.
- If the terrace floor is finished with paving slabs, you need to prepare a small slab foundation for it. The slabs are first covered with insulation, and then the tiles are laid. It is better not to neglect this order of work so that the coating lasts longer than one season.
- If the floor in an open area is made of a special composite board, you will not have to worry about periodically painting the coating, since outdoor paint on a regular floor quickly fades and crumbles. Composite coating will last for decades.
- You should carefully approach the issue of installing a stove in a bathhouse. It is necessary to position it so that it can warm all the rooms adjacent to the steam room. But if the bathhouse will operate in winter, it is necessary to provide individual heating in the guest rooms, since one stove cannot warm all the rooms.
- Even at the design stage, for a bathhouse used at any time of the year, it is necessary to provide a vestibule that will prevent cold from entering the building. Thanks to this, your stay in it will be more comfortable and fuel consumption will decrease.
- The stove itself can be not only wood-burning, but also coal or gas. The choice of heating method depends on the budget of the bathhouse owner and his preferences.
For an overview of the bathhouse with a terrace, see the following video.
Instructions for making a canopy over the porch with your own hands
Installing a canopy over the porch can not only be an interesting architectural solution, but also help protect against precipitation and snow falling off the main roof. Its design is not that complicated. You just need to stock up on the necessary tools, and the skills to work with them and instructions for making a canopy over the porch will help you do all the work yourself.
general information
The canopy over the porch performs not only a practical function, but also a decorative one . Its design can be divided into two main parts: the frame and the covering. The frame is a frame that can be made from various materials. It is installed to the wall of the house and the covering is attached.
According to the method of fastening, canopies are divided into supporting and suspended . In the first case, the main weight of the canopy falls on specially installed support pillars, and in the second, it is attached to the wall. Hanging canopies are best made from lightweight materials in such a way that it is convenient to remove snow. Support canopies can support much more weight due to the fact that they redistribute the load. In addition, you can install fences or railings for them for greater protection.
The shape of the canopies can be:
- single-pitched. In this case, the slope is placed away from the wall of the house so that snow deposits do not form. For this form of canopy, a gutter, pipe or slot is usually installed to drain water and snow;
- gable. This form is perhaps the most common due to its convenience and simplicity of design. The slopes are located on the sides of the porch;
- arched Performed in the form of a semicircle in such a way as to protect the porch. This design looks quite interesting, but can be difficult for metal canopies;
- tent The canopy is round or sectional and covers the porch on all sides.
Canopy requirements
- The width of the canopy is usually made equal to 1.5 times the width of the door leaf. This will protect the front door and porch deck from precipitation.
- Durability and wind resistance are indispensable characteristics for a visor.
- The snow load should not destroy the structure, so the slope of the slopes is taken to be at least 20 degrees.
- Exterior. The canopy is made in the same style as the whole house.
The choice of material directly depends on the design of the canopy . So, when covering with profiled metal, rafters are used that have the length of the slopes and sheathing in increments of 30 centimeters. When using flexible tiles, the sheathing must be made continuous.
Wooden canopy
This option is suitable for houses made of wood or brick, but with a wooden roof, so as not to disturb the overall composition.
The approximate cost of such a product is about two thousand rubles. This is a completely acceptable amount for any owner of a private home. And the external performance is sometimes not inferior to forged analogues.
To make a wooden canopy with your own hands, you need to purchase:
- wooden beam with a cross section of 5x5 centimeters with a total length of 15 meters;
- boards with a cross section of 2x1.5 centimeters with a total length of about 50 meters.
INSTALLING THE AWNING
To install the awning, you can use the services of a professional installation team, contact us, or install the awning yourself. Because installing an ALEKO ® is not difficult. Considering that the awning is heavy, you will definitely need an assistant.
Installation of the awning is possible on any type of building. Only the options for attaching the awning differ, depending on the wall material. In this article we will tell you the nuances of attaching an awning to walls made of different materials and give detailed step-by-step instructions for installing an awning. But the purpose of this article is not to replace the factory instructions, but to give our customers the most complete idea on the issue of installing an awning.
The wall on which installation is carried out is not always smooth and has no protrusions. But this is not an insurmountable obstacle. Therefore, when installing an awning, various options for additional brackets can be used, which are selected individually for each case. An example of such an installation is shown in Figure 1.
In this example, standard brackets are attached to additional brown ones. Using additional brackets of various designs, you can always solve the problem of installing an awning even on a wall with a complex profile.
Figure 1 shows that the size of the awning exceeds the length of the wall before connecting the logs in the log house. We specifically provide this example to show that such a situation is neither an obstacle nor a reason for using more expensive custom solutions.
The main point when installing an awning is to securely fasten the wall brackets to the wall . Therefore, below are general notes that must be taken into account when attaching brackets to any type of wall:
- After installation, make sure that the brackets are securely fastened to the wall, so that they cannot be pulled out when the awning is installed;
- Do not attempt to secure the brackets to soft wall stones or other surfaces that are not completely solid;
- The installed brackets must fit tightly to the surface on which they are attached;
- Use a wooden hammer to avoid damaging the anchor bolts.
- If the anchor bolts need to be driven in with a hammer, it is recommended to tighten the nut slightly so as not to damage the threads of the bolts.
- Tighten the bolts securely with a 19mm hex wrench. It is better to use an overhead wrench rather than an open-end wrench.
Below we will consider various mounting options depending on the wall material.
Installing an awning on a brick or concrete wall.
Figure 2. Fastening to concrete.
For fastening to a concrete wall or brick, anchor bolts are used that come with the awning. Figure 2 shows the installation of wall brackets using anchor bolts.
- The depth of the holes for the anchor bolts should be 9 cm.
- For drilling, use a 16mm Victory bit.
- Do not drill holes into the joint of bricks or blocks. This will not ensure secure fastening of the awning.
Installation of an awning on a wall made of wooden beams.
Figure 3. Attaching to wood.
The awning can be installed on a frame made of logs, simple or laminated veneer lumber, if the wall thickness is sufficient to support its weight. Be sure to make sure that the brackets are securely fastened to the wooden wall. When mounting to a wooden wall, it is important to consider the following points:
- The anchor bolts included in the kit are not intended for attaching the awning to a wooden base. Instead, it is necessary to use a special wood grouse screw with dimensions of at least 12x90.
- To secure the capercaillie, it is necessary to first drill a hole with a depth of approximately 10 mm longer than the capercaillie and with a diameter
Installing an awning on the wall of a frame house.
It is also possible to attach the awning to the wall of a frame house. Taking into account the design features of frame houses, the awning is attached to the walls either directly to the supporting beams of the frame, or to additional auxiliary elements attached to the frame.
5 STEPS TO INSTALL AN AWNING.
Choosing an installation location
Having chosen the location for installing the awning, you need to think in advance about the height of the lowering of the awning awning, see the figure below. The angle of reduction of the awning set at the factory is 10°-13° depending on the model.
If you plan to install an awning above the door, the minimum distance from the main profile to the door frame should be at least 20 cm.
Installing Wall Brackets
Installation of brackets is the most crucial moment on which the reliability and correctness of installation depends. Place of attachment. It is necessary to draw a horizontal line on the installation surface, marking the places where the brackets are attached. For a cassette awning, these places are marked on the body of the awning itself with arrows. On other types of awnings, the brackets are installed on the main profile as shown in Fig. 1. in the article “ALEKO AWNINGS. WHAT IS THE DIFFERENCE BETWEEN A-6000 and A-1000? .
Drilling holes
For an elbow awning you need to use a 16mm and for a cassette awning a 14mm Pobedite drill. The depth of the holes must be at least 9cm. Importantly, the holes must be drilled through solid brick or concrete. Drilling holes at the joints will not ensure secure fastening of the brackets.
When installing on wooden houses, it is necessary to use screws of suitable length and diameter. Anchor bolts are not intended for fastening to wooden bases.
Attaching brackets to the wall.
If you are using anchor bolts, use a wooden hammer. A metal hammer can damage them. To avoid damaging the threads of the bolts, you can first screw the nut onto them a few turns. It is important that after installation the brackets must fit snugly against the wall and the nuts must be securely tightened. Be sure to make sure that the brackets are securely fastened before installing the awning.
Installation of the awning.
At this stage it is necessary to secure the awning in the brackets. For an elbow awning, you need to carefully move the awning to the right and left to ensure that the supporting beam fits into the brackets; you may need to loosen the fastening of the brackets to the wall so that they can move slightly. Insert the safety bolts into the front side of the brackets and tighten the nuts. Make sure the safety bolts and wall brackets are securely fastened.
Alternative to metal frame
It is not necessary to make the frame for the awning metal.
As in the case of a simple awning at the dacha, you can decorate it from strong deciduous wood. A timber will do if it is pre-treated with a good antiseptic. And to add visual aesthetics, the wood is painted or coated with ship's varnish. True, such a frame is not as durable as steel or aluminum, because it is still susceptible to negative moisture effects, and insects will tend to damage it. In addition, a wooden frame can dry out in direct sunlight, crack, etc.
If someone is not confident in their own abilities, it is better not to take on a mechanized awning, but to make a simple canopy adjacent to the wall of the house on a fixed frame. It would be more correct to choose a simple option and cope with it perfectly, rather than take on a complex design and translate the material in vain, wasting time and effort. And if you really want to design something truly unusual, bright, stylish, you should use the services of professionals.
Location
The construction of a summer kitchen in the country begins with finding a place where it will be installed.
This site must meet the following requirements:
- Convenient connection of utility networks. There must be a possibility of supplying water supply, sewerage and electricity.
- Distance from utility and domestic buildings. Pets, country toilets and compote heaps emit an unpleasant odor that is inappropriate in the kitchen. Therefore, it is advisable to make sure that it is removed from the economic zone of the dacha as far as possible.
- Availability of a cellar. It’s good when the plan for a summer kitchen at the dacha includes the presence of a cellar under it or nearby. This ensures access to products during cooking and the ability to quickly store homemade preparations.
Note! If, before building a permanent house for housing, you use country houses from block containers, the place to build the kitchen must be chosen so that it can subsequently be freely and conveniently accessed.
Project of a bathhouse with a kitchen: advantages, photos. Examples of bathhouse projects with a summer kitchen
Baths can be different. Some people make a simple small bathhouse, while others build a large building with many rooms. If a steam room, a washing room and a rest room (vestibule) are mandatory in any bathhouse, then other rooms are at the discretion of the owner.
Among the additional amenities in the bathhouse that can take your relaxation to a new level is a kitchen.
Bathhouse projects with a kitchen and a room are popular, because at low costs they make it possible to get a full-fledged place to relax, where you can relax in the fresh air, go to the bathhouse and have a picnic.
In conclusion
Now you know how to build a canopy for the yard yourself, and you can implement the proposed option. The attached video will show other options for canopies, and if any questions remain unclear, contact me in the comments. Good luck, comrades!
Did you like the article? Subscribe to our Yandex.Zen channel
January 13, 2022
House, Roof
If you want to express gratitude, add a clarification or objection, or ask the author something, add a comment or say thank you!