Useful tips
To make a bird feeder, you need to have a few simple items and tools.
You can make a feeding trough with your children, but keep in mind that you need to watch every step, since during the construction process sharp things are used - scissors, knives, screwdrivers and even, sometimes, a saw.
There are many options for feeders - made from plywood, plastic bottles, tin cans or cardboard.
Here are the most interesting, popular and original ideas for creating a feeder:
Feeder made from a plastic bottle. Option 1.
You will need:
- any plastic bottle
- tape, thread or fishing line
- an awl or drill (for making holes in the bottle and plastic cap)
- bolt and nut
- stationery or simple knife (if necessary)
- deep plastic plate.
1. Prepare a plastic bottle. Remove the label from it, wash it well and dry it.
2. Make a hole in the middle of the lid and plastic plate.
3. Attach the lid to the plate using a bolt and nut.
4. Make a hole in the bottom of the bottle (bottom).
5. Make several holes on the side (4-5), near the neck of the bottle, so that the food can spill out when you turn the bottle over. Holes can be made with a stationery knife if the bottle is not too thick.
6. Take the ribbon, fold it in half, and tie the ends in a knot. Thread the ribbon through the hole at the bottom of the bottle.
Now you can pour food into the bottle, screw on the cap and turn it over. The ribbon will allow you to hang the feeder on a branch.
What materials are easy to make a feeder from?
The technology for making a bird feeder is very simple; for this you can use a huge variety of ideas and materials:
- plastic containers of various sizes and volumes, tetrapacks for juices and milk, glass bottles;
- cardboard boxes and food packaging, cans and plastic materials;
- natural wood and lumber, leftover building materials, linoleum and laminate, plastic;
- improvised means and waste materials, cups and plates, containers of various sizes and wooden spoons;
- containers for bulk products, tubes of napkins and toilet paper, natural vegetables and even fruits.
Interesting and original ideas will help you create the best bird feeders, which can be used for many years to feed birds and decorate the area.
Original polymer clay feeder
You will need:
- polymer clay
- rope
- thick wire or piece of aluminum
- a baking bowl or any other dish that can be placed in the oven
- a small piece of fabric.
1. First roll out the clay on a flat surface until it is about 6mm thick.
2. Carefully place the rolled out clay inside the baking bowl. Trim off any excess pieces so that the clay lies flat. Make 3 large holes in the clay for the rope.
3. Place the bowl of clay in the oven. Read the clay instructions carefully to know how long it takes for the clay to harden in the oven.
4. When the clay has hardened, carefully remove it from the bowl, tie three pieces of rope to it - tie a knot at one end of each rope, and insert the other end into the hole of the clay plate.
5. Tie all ends of the rope and secure them with wire.
6. It is advisable to place a small piece of fabric inside the plate so that the birds do not accidentally peck the clay along with the food.
Original do-it-yourself pumpkin feeder
You will need:
- small pumpkin
- wooden crossbars (even branches can be used)
- thin wire.
1. You need to cut off the top of the pumpkin.
2. Using a knife or screwdriver, make 4 holes in the pumpkin to insert branches or wooden slats into. Make 2 opposite holes at the same height and two other opposite ones slightly lower - this way you will have one branch slightly higher than the other.
3. Take a thin wire and wrap it around each end of the branches so that the feeder can be hung on the tree. Connect all the ends of the wire so that the feeder can hang evenly. Twist them into a hook.
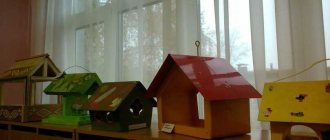
Plywood feeders
They are made in the same way as from wood. But if you don’t know how to make a feeder with your own hands, then you can buy ready-made cut-out plywood kits in stores.
The parts of such sets are cut out on special machines. Having assembled such a craft, you can additionally color it to your taste.
Original DIY bird feeder idea
This feeder is suitable for sub-zero temperatures.
You will need:
- large plastic bottle
- small plastic bottle or small plastic container
- knife
- scissors
- coniferous branches
- berries (optional)
- seeds
- water.
1. Cut off the bottom of a large and small plastic bottle. First you can make a hole with a knife and then cut with scissors. You will have the base of the feeder.
2. Place spruce branches, berries and seeds in a circle in the cut-out bottom of a large bottle.
3. Place the bottom of a small bottle or small plastic container in the center of the base.
4. Pour earth, sand or pebbles into a small container.
5. Tie strong threads or fishing line to the feeder so it can be hung.
6. If you put the feeder in the freezer overnight, and then take out and remove the plastic parts, you will get an ice feeder.
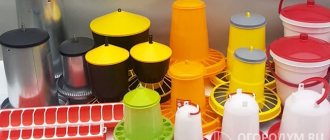
Poultry feeders
Obviously, the above types of bird canteens are not suitable for domestic bird species. For example, a do-it-yourself chicken feeder is made in three types.
A tray feeder is a regular flat container with sides. This type is convenient for feeding small chickens.
DIY polymer clay jewelry: master classes with photosDIY decorative candles: master classes with photos
Decorating a vase: ideas and master classes on how to make a vase with your own hands (80+ photos)
Trough feeder. A regular tray is supplemented with a removable lid or grid; the inside of the container is often divided into several sections to accommodate different types of food.
The bunker feeder is a very popular trend today. This type of feeder is suitable for using bulk feed; it is good not only for chickens, but also for ordinary wild feathered friends.
The bunker allows you to pour a large amount of grain in reserve. Feed is progressively poured into the tray as needed, and the closed design of the container keeps the food supply clean and dry.
This type of feeder is made from any available materials; it can be a structure made of wood, a plastic bottle, or even a bucket.
How to make a feeder with your own hands using a bottle
You will need:
- a small glass or plastic bottle (preferably with a lid)
- a small saucer or the bottom of a plastic bottle
- plywood
- wire
- saw (if necessary)
- half-ring screw (hook).
1. Using screws, connect two small pieces of plywood. In this example, the dimensions of the plywood are 11 x 15 cm and 31 x 15 cm.
2. Using the bottle that you will later attach to the stand, mark the places where you will need to attach two pieces of wire - one at the neck, the other at the bottom of the bottle.
3. The neck of the bottle should be approximately 3-4 cm above the base.
4. Drill holes for the wire, insert your wire through the bottom, wrap it around the bottle and secure it to the back of the plywood (you can twist the wire or secure it with a stapler).
5. Fill the bottle with seeds, screw the lid on so as not to spill the seeds, turn it over and insert the bottle between the wires, place a saucer under it and remove the lid.
6. Screw a half-ring screw into the top of the plywood to hang the feeder.
Original DIY bird feeder
You will need:
- tin can (preferably with a lid)
- sisal rope (sisal rope) or thick rope
- a piece of thin plywood, a branch or any small metal part
- hot glue.
1. If you have a jar with a lid, then the lid needs to be bent in half.
2. Take a small branch, piece of plywood, or other small piece that birds can perch on and glue it to the jar.
3. Insert the bent lid as shown in the image (slightly inside the jar and over the metal part) and secure it with glue.
4. Take a thick rope or rope about 80 cm long and start wrapping the can so that the long ends of this rope (30 cm) remain at the beginning and at the end. Use glue to secure the rope to the can.
5. Cut the rope, tie the ends in a knot and secure with glue.
Requirements for a bird feeder
Let's say you found a suitable photo of a homemade feeder and decided on your choice. However, this is not enough.
Over time, birds can get used to easy food prey, and if your craft turns out to be fragile, then your feathered comrades may lose food overnight. And in the cold season this can threaten their death.
There are a number of nuances, the observance of which is very important when creating a poultry canteen.
- The platform on which the feed will be poured must have sides.
- There should be no sharp edges on the feeder to prevent the birds from getting hurt in the future.
- A good roof will protect the food from getting wet and spoiling.
- Openings to access food should be wide, as most birds are afraid of closed spaces.
- It is desirable that the product is resistant to moisture, so it will last much longer.
- If the craft is accessible to cats, then birds are unlikely to fly up to it.
How to make a bird feeder from a plastic bottle
You will need:
- plastic bottle (1.5 l or 5 l) or canister
- sharp scissors or stationery knife
- rope
- scotch
- sand.
1. Cut a large side hole in the bottle, preferably through. It is better to first draw a marker where the hole will be.
2. To make it more comfortable for the birds to hold on, it is better to cover the edges of the bottle with tape.
3. Place sand on the bottom of the feeder to prevent it from swaying too much.
4. Tie a rope to hang the feeder.
You can decorate the bottle to your taste.
Here are other similar feeders: