In professional and amateur poultry farming, one of the necessary elements of equipping a brooder or chicken coop is a chicken feeder, which ensures convenient and safe distribution of feed, protecting it as much as possible from scattering and contamination. The design must meet the needs of the livestock being raised, taking into account the characteristics of the breed of chickens and the age of the young animals. The high activity of chicks, especially during feeding, the natural need to rake and scatter everything around with their paws, constant defecation, including in their own food, require a thoughtful and balanced approach from the farmer when choosing this device.
The photo shows various types of factory-made devices designed for feeding chickens
Types of drinking bowls
Today you can find many ready-made solutions on the market for poultry farming products, but they may not suit your needs one way or another (for example, if the flock is too large). Therefore, we offer several original ideas with photos, according to which you can make a drinking bowl for chickens with your own hands.
From a plastic bottle
Plastic bottles are available in abundance in households, so they can be usefully used to create drinking bowls.
The first option for making a sippy cup is the most affordable, fastest and most effective, but is more suitable for older chickens and young animals than for newborn babies. All you need is a 1.5 or 2 liter bottle, a sharp knife and a support. You need to mark several holes on the side of the bottle and cut them out. Then the bottle needs to be securely fixed in a horizontal position, as in the photo:
A simple version of a drinking bowl made from a plastic bottle.
To secure the vessel, you can use wire, which can be used to conveniently attach the bottle to the cage or wall of the poultry house.
Despite the simplicity and cheapness of such a device, it has some disadvantages, for example, debris getting into the water, increased evaporation, etc.
Therefore, we recommend that you pay attention to the following models of homemade sippy cups:
Video: drinking bowl from a plastic bottle.
The operating principle of vacuum drinkers is based on the difference in atmospheric pressure. Thanks to it, water from the open part of the drinker does not spill out of the container, but the amount of water is constantly maintained at the required level. You can make a vacuum drinker for small birds from any available containers, including glass jars and plastic containers.
Homemade vacuum drinker from a jar and saucer.
General design diagram of a vacuum drinker:
- A reservoir of water (in the photo there is a glass jar, in reality it can be any suitable container).
- Water level in the tank.
- Drinking vessel.
- Stands for water tank (holes in the tank can be used to supply water).
Let's look at how to make a vacuum drinker for chickens from a plastic bottle with your own hands. The only materials you need are a bottle (the volume of the container depends on the number of chickens) and a vessel with a diameter 5 cm wider, directly from which the chickens will drink.
Making a sippy cup is as simple as possible - you need to make a hole with a diameter of 5-8 mm on the side of the plastic container (closer to the bottom). The exact height of the hole depends on the height of the second vessel.
Option for a vacuum drinker made from a bottle and a tray.
Next, you need to secure the eggplant with wire to the wall of the cage and add water inside as needed.
The next photo shows another option on how to make a vacuum-type drinker. The water reservoir is made of plastic containers with a screw-on lid in which holes are made. Next, the vessel is filled with water and placed upside down in a tray on small stands.
Drinkers made from plastic containers.
How to temporarily replace the brooder?
If the chickens are already on hand, and it takes some time to make a “house” for them, the breeder has to decide the issue of their temporary placement. To do this, you can use a box from household appliances, which will only need to be slightly modified:
- Insulate the bottom so that it is non-slip. To do this, it can be covered with 2-3 layers of gauze or a sheet of corrugated cardboard.
- Cut a viewing window in the wall of the box at a convenient height, and then tighten it with transparent plastic film. This will allow you to look at the chicks at any time without opening the box or disturbing them.
- Create a heating and lighting system in the box. To do this, you can use a liter jar with a screw-on metal lid. On its inner surface, you need to fix a small metal socket with bolts and screw in the light bulb. It is advisable to install a non-flammable gasket, for example, textolite, between the cover and the cartridge. To ensure air exchange inside the jar, the lid should be pierced several times. Next, fill the container 1/3 with fine sand, and wrap the bottom with a cloth or put a thick sock on it, otherwise the chickens may get burned.
You can buy a brooder in a store for 6,000-10,000 rubles, or you can make it yourself using ready-made drawings and available materials. After assembly, it will need to be equipped with an incandescent lamp, feeders and drinkers. If you have a large flock to raise, you can build multi-tiered chicken cages.
Original feeders
The following types of feeders, some of which are made from scrap materials, will certainly appeal to the reader:
Feeder based on cutting board
To make this device you will need:
- cutting board;
- plastic cup;
- funnel (it’s better if it’s also plastic);
- hose with transparent walls;
- silicone sealant.
You need to act in the following sequence:
- The wide part of the watering can is placed on the cutting board and outlined with a pencil.
- Within the drawn circle, many holes are drilled in random order using a drill.
- Next, using sealant, the watering can is glued to the board in exactly the position in which it was held when circling the wide part. Both items need to be held together for a while until the sealant sets.
- A hole is drilled in the cup near the bottom with such a diameter that a hose can be threaded into it, but at the same time the latter fits tightly enough.
- Now you can start assembling the feeder. One end of the hose is put on the spout of the watering can and fixed to it with a clamp; the second one is inserted into the cup through a hole made in it. If the hose in the cup does not hold very tightly, you need to use sealant as a seal.
The feeder is ready. The grain poured into the watering can will flow through the tube into the cup.
Hopper bucket feeder
Any container can act as a feeder hopper. You can make such a feeder very cheaply from a plastic bucket in which some kind of construction mixture was packed. In addition to it, you should prepare the bottom of the same, but larger bucket, or a sectional bowl for pets, or a plastic container for seedlings. This part of the feeder should have a diameter 10–15 cm larger than that of the bucket.
Plastic bucket feeder
The manufacturing technology is extremely simple:
- Holes are cut in the side wall of the bucket near the bottom.
- Next, the bucket is installed in the center of the bowl or menagerie and screwed to it with a bolt and nut.
All that remains is to pour the food into the bucket and close it with a lid. Some of the food will spill through the holes into the bowl and while the birds eat it, it will spill out again and again.
PVC pipe feeder
A very affordable material are plastic parts for sewer assembly. Here's what you need to prepare:
- pipe with a diameter of 150 mm;
- a pair of plugs for it;
- tee.
DIY chicken feeders made from plastic pipes
Make a feeder like this:
- A) Three fragments are cut from the pipe: two are 10 and 20 cm long, the third is of arbitrary length (this will be a bunker).
- A long piece of pipe, acting as a hopper, is inserted into the tee on one side, and on the other - a piece 20 cm long. The free ends of these pieces are closed with plugs.
- A 10 cm long piece is connected to the outlet of the tee.
The structure is filled with grain or other dry food, after which it is installed with the long part up. And they fix it. A short piece attached to the tee outlet will act as a tray. You can also close it with a plug at night.
Hopper feeder made from 5-liter plastic bottles
This container, used for packaging purified water, is quite popular today. To make a feeder you will need two copies. Here's what to do with them:
- From one bottle you need to cut off the upper tapering part so that what remains is something like a glass with smooth walls.
- A window is cut into one of the side walls of this “glass”, wide enough for the chicken to stick its head through.
- The edges of the window should be covered with fabric electrical tape or adhesive tape so that they, being sharp and rigid enough, cannot injure the bird.
- You need to cut off the bottom of the second bottle.
- Near the lid itself, you need to make several holes in the wall of the 2nd bottle.
- Let's start assembling. We turn the 2nd bottle, that is, the one that we have deprived of the bottom, upside down and insert the 1st bottle into a glass-like bottle. In this case, the cap of the 2nd bottle should touch the bottom of the 1st.
The feeder is ready. Now you need to pour the grain into the inverted 2nd bottle and cover it with some kind of lid. This feeder works in the same way as all other bunker-type feeders.
Requirements
It is known that birds can scatter food from feeders when they eat. How successful they will be depends on the design of the devices.
The best option would be industrial feeders made specifically for this type of poultry.
They meet all ergonomic requirements, are easy to use and comfortable for the chickens themselves.
But for structures that are made independently, these requirements also apply:
- Feeders should be equipped with some kind of protective device, such as a net, spinner, bars or sides, which will prevent the bird from throwing food around.
- They should be ergonomic, comfortable, easy to clean and wash, and weigh little.
- Their volume should be sufficient to accommodate food for the entire chicken population at once, and the size should be such that all chickens can freely reach food without crowding.
For each chicken, you need to leave 10 cm of feeder space, for a young chicken - 5 cm, in circular trays, chickens only need 2.5 cm of space.
Simple types of feeders using improvised means
To make a simple and functional feeder for broilers with your own hands from materials available in any garden plot with a tool (grinder, hacksaw, or file), you will need:
- again, a piece of sewer plastic pipe of large diameter and sufficient length;
- several plugs;
- tee used in plumbing.
A plastic piece of sewer pipe approximately one meter long is cut transversely into shorter pieces: 10, 70 and 20 centimeters). A plug is mounted on one edge of the longest segment (70 cm). A tee is put on the other end, to which a piece of pipe 20 cm long is screwed. Its opposite edge should also be closed with a second plug. The shortest part of the sewer pipe (10 cm) is installed in the same tee. All that remains is to securely attach the homemade feeder to the wall of the barn.
This model is even easier to implement. Take two pieces of PVC pipe 0.3 and 0.5 m long, an elbow, a pair of plugs, an electric drill or a jigsaw. At the bottom of a long section of pipe, small holes are marked on both sides and drilled in a checkerboard pattern, which must subsequently be expanded to a diameter of about 7 centimeters so that the birds do not injure their heads when reaching for the grain. A plug is screwed onto one end, and a shorter piece is attached to the other through the knee with the second end tightly closed, through which feed will be poured from time to time. Such a design will take a minimum of time and will be no less functional than factory models.
There are devices for distributing food of a two-tier type made of wood. They are also easy to make with your own hands. They represent a lower compartment (box), with dimensions of 0.26x0.25 m, equipped with a flap that opens vertically upward along the guides. The second tier is also a cover for the lower one and a container for wet food. When feeding broilers, the lid is removed, approximately a week's supply of grain is placed in the lower section, and the valve is opened. The mash is placed in the upper compartment at a time.
The most simple hanging devices for distributing feed are made from large-volume plastic containers without a bottom. The walls of such vessels must be strong and thick in order to retain their original shape well under pressure from the inside. A ∩-shaped hole is cut on one of the walls with a jigsaw or knife, through which the broilers will gain access to the feed.
The most common, and perhaps the easiest to make, are box-shaped feeders. To prevent such a structure from being too bulky and heavy, it is better to use thin boards, plywood and slats for its manufacture. The bottom and lid of the box have dimensions of 0.4 m and 0.3 m, respectively. A planed board is better suited for the bottom, and the lid can be cut out of plywood for ease. The racks have a length of 0.3 m and are made of 2x2 cm beams. It has been verified that such a structure will best ensure the safety of food from contamination, spillage and various rodents.
Any craftsman can set up simple and functional devices for distributing feed to broilers, since the materials are always at hand in the garden. And drawings and descriptions of structures can always be found on the Internet.
Video “Cage feeder for broilers”
The video shows a homemade feeder for cage keeping broilers and tells how to make it.
To feed domestic chickens, farmers use special feeders, which can be purchased at the store or made independently.
Making a feeder with your own hands will help the poultry farmer save money and take into account the peculiarities of keeping birds on a particular farm.
Nests
The second required element in arranging a chicken coop is nests. They will lay on the floor, but the eggs will be dirty, and they may even peck. According to the norms, one nest is made for three hens. But in fact, it turns out that no matter how many of them you do, they choose one or two, maximum three, and stand in line. The rest are exactly the same, standing empty next to each other. From time to time their tastes change, they begin to rush to others... From all this it follows that you can safely count 5-6 heads per nest, half will still be empty.
It is better to place the nests so that it is convenient for you to pick up the eggs, i.e. hang on the wall. So that the bird can safely get there, they make ladders - an inclined board with perches/sticks nailed across it. The same ladders are made for perches. If the nests are placed close to the perches and at approximately the same level, they will move back and forth. Quite convenient.
You can make such civil nests
If possible, make sure that the back side of the nests faces the corridor, if there is one. A door is made on the back side. Then to pick up the eggs you don’t need to go into the pen - open the doors and collect them.
Nests with doors at the back
Chickens also love to rush in the dark, or at least in dim light. That’s why the entrance is made small, and so that they don’t sit inside for a long time, sleep and shit, the roof is made with a strong slope (in the photo).
You can simply arrange or hang the boxes along the wall, but organize the darkening by placing a partition in front of the nests. In general, it is difficult to predict their behavior. Sometimes the nests are simply ignored and are carried anywhere. Then a stencil or mock-up can help: cut out an egg from white paper and place it in the nest. It might help: they will start rushing there.
Several nests in different designs are shown in the photo below. These are all real chicken coops, you can use them.
In the nest you always use your hands with caution: you never know what the chickens laid there... It is much more convenient and safer when the eggs are rolled into a special compartment - the egg receptacle. The main catch in this device is to choose the angle of the floor and the flexible material so that the egg moves it away and stops before it reaches the wall. To soften the “landing”, sawdust is poured onto the bottom.
Design of a nest for chickens with an egg receptacle
Since the eggs roll up and the bird does not see them, they may refuse to lay eggs in such nests. In this case, you can make a dummy egg - from thick foam plastic in full size or cut out a stencil from paper - and glue it to the bottom. This almost always works.
Chicken cages
Sometimes the birds are kept in cages. But this is for industrial or semi-industrial maintenance. With this method of cultivation, a large number of birds live in a small area. A drawing of a cage for chickens with dimensions is posted below.
Broiler cage drawing with dimensions
All sizes are according to the standards, and there is no need to invent anything. This is the minimum that laying hens need. And what can come out of such cells is in the photo below.
Cages for laying hens
Watch the video to see how to make broiler cages from wood. Everything is described in great detail: what, for what, what sizes, how to assemble and what is needed for this. Really useful.
The most read on the LandshaftBlog.Ru website:
Brick barbecue Gazebo with barbecue Concrete paths Landscaping Choosing a brush cutter Geogrid Guzmania Ornamental grass Decorative flower beds Decorative fence Children's slide Garden design Firewood for the dacha Mesh fence Winter garden Ideas for the dacha Flower bed made of stones Flower beds of perennials Lianas for the garden Polycarbonate awnings Site lighting Greenhouse do-it-yourself sandbox Do-it-yourself area for a car Retaining wall Facade lighting Swing gates Garden arch Garden fountains Snow shovel Brick tandoor Topiary in the garden Thuja occidentalis Plot 15 acres Figures for the garden Coniferous plants
Diet features
There should always be food in the feeder. Moreover, it is better to place containers with food and water in a warm place. You can start feeding 15 hours after hatching. Previously, there is simply no point, because, while still inside the shell, the chickens eat the rest of the yolk. So the feeling of hunger does not come to one-day-old babies right away.
Attention! Until recently, hard-boiled egg yolk was considered the ideal first food for chicks. But experts recognized this product as too fatty for the chicks’ fragile stomachs. Therefore, it is now recommended to give boiled corn grits to the birds. After a few days, you can introduce an egg and some other products.
The first week you will have to feed the chickens once every 2 hours, even at night. Then the interval can be increased. It is important that not a single chick goes hungry. Therefore, it is necessary to check everyone's goiter. If there are individuals for whom it is not yet full, they must be fed separately.
Proper nutrition
When the kids are a little older, it will be time to offer them greens and crushed worms. There is no need to rush with the latter. Introducing them into the diet too early can lead to helminth infection. It is better to wait until the chickens become independent adults with a stronger immune system.
Making nipple drinkers with your own hands
The nipple drinker is designed in such a way that the chicks receive water through the nipple or nipple. All water spilled by the chick while drinking is collected in a separate tank with a special catcher.
The drinking bowls provide the chicks with fresh, clean water, it is always dry under it, they are durable, and it is easy to add vitamins to the water.
A do-it-yourself chicken drinker is much cheaper than a purchased counterpart; it is made from scrap materials, but is no less effective in use. Before choosing the type of structure to be manufactured, you should take into account the volume of the water tank on the basis that a chicken drinks about half a liter of liquid per day.
Drinkers made from plastic bottles and buckets
To make a drinking bowl for a small number of chickens you will need:
- plastic bottle with a capacity of one and a half or two liters;
- drill;
- nipple;
- electrical tape or Teflon tape.
The manufacturing process is not complicated: a hole is drilled in the bottle cap and a nipple is inserted into it. If the nipple is not inserted tightly, wrap it with electrical tape, after which water is poured into the bottle and the cap is screwed on. The drinking bowl is ready.
In the same way, you can make a drinking bowl from a large plastic bucket, in the bottom of which three to four holes are drilled for nipples. The bucket can be hung at any height, it is easy to fill with water and wash.
Pipe drinkers
For the first design option you will need:
- nipple 180 or 360;
- drill with a drill with a diameter of 9 mm;
- tank;
- hose;
- plastic or metal pipe one meter long;
- stub;
- tap;
- pipe adapter;
- hanging bracket;
- drip eliminators.
Manufacturing process: first, markings are made on the pipe at a distance of no more than thirty centimeters under the nipples, so that they fit the young animals. If the drinker is intended only for small chickens, the distance can be reduced and five nipples can be made. The holes are drilled with a drill, they are cleaned of burrs and irregularities, then a thread is cut into them with a tap to insert the nipple. At one end the pipe is closed with a muffler, at the other end a hose is attached using an adapter. All that remains is to make a hole at the bottom of the tank, cut the thread and screw on the second end of the hose.
The second type of chicken drinker is distinguished by the fact that the second end is connected to the water supply, this greatly facilitates the supply of water and its care.
With these methods, you can use any round or even a special square pipe with internal grooves into which nipples are inserted, then water will not leak. The main requirement is that the pipe must be clean and free of rust. Drinkers are attached to the wall using pipe clamps.
Chick Nipple Dimensions
Experts advise treating joints with FUM tape to avoid smudges.
Which are the best: top 3
Black Bullet Feeder
It has already been said that feeder bullet-missiles are perhaps the most popular among feederists today. The English company Preston Innovations has created a whole line of feeder gear; feeders with the Preston brand are doubly famous. In addition to the casting range, the model provides high resistance to side winds.
Carp+
Mesh metal structures are one of the best in their category. There are light-weight feeders for standing water, and there are specially adapted for catching bream at a distance of up to 40 m.
Several simple options for constructing a feeder from PVC pipes
Traditional chicken feeders turn out to be very ineffective and impractical in practice, since birds often climb into them, scatter food, litter and end up turning dishes upside down. Poultry farmers have to constantly monitor the condition of their feeders and spend a lot of time cleaning them. Special devices will help get rid of such problems - feeders made from PVC sewer pipes, which you can make yourself. How? Let's consider.
DIY chicken feeder made of PVC pipes
People who raise chickens in rural areas know very well how carelessly they treat the feed poured into open feeders; a quarter can simply be scattered around the yard and trampled into the dirt with their paws. Also, if the feeder is in the open air (on the street in the courtyard of the house), then migratory birds often fly up to eat)) Rodents do not disdain chicken feed, they mostly feed on the feeder in the quiet night time, while the chickens are sleeping on the roost) In general, food loss They are quite large, sometimes even half of them will go to nowhere. For this reason, the author decided to create an economical and very easy-to-make feeder from a plastic bucket and PVC pipes (corners).
The principle is as follows: we take a plastic bucket and drill holes in the side of it, where polypropylene corners are then inserted; they should be located at a distance of 2-3 cm from the bottom. That is, when the bucket is completely filled with food, it will slowly settle as it is consumed by his chickens, “Everything is as simple as daylight.” You can also optionally make a viewing window, so you can see the level of filling of the bucket with food when the lid is closed.
So, let's look at what exactly the author will need to create a chicken feeder from PVC pipes?
1. plastic bucket 10-15 l
2. polypropylene corners 70 mm
1. drill with 70 mm core drill
2. hot glue gun
4. sealant gun
5. stationery knife
Step-by-step instructions for making a chicken feeder from PVC pipes and a plastic bucket with your own hands.
As already mentioned above, the loading hopper is a regular plastic bucket, in this case 10 liters and three corners on the sides to get the chicken head inside the feeder) You can also use a larger container, for example a 20 liter bucket or a barrel. If you need a long-lasting feeder so that you can fill it with food once and forget it for a week, then it is rational to use a plastic barrel with a capacity of 40-50 liters.
In general, the idea can be developed further and improvements made.
And so, the first thing the author prepared was the following components: a 10 liter plastic bucket, 70 mm polypropylene corners and a sealant with a gun.
Next, you should try on the corner to the wall of the bucket and circle the circle with a marker. Attention Important! The corner should be located 2-3 cm from the bottom of the bucket, so that as the feed decreases, it is supplied to the feeding area
Then a hole is drilled using a drill and a 70 mm crown, a PVC corner is inserted into the hole made and fixed with hot glue, and for greater reliability, you can also apply sealant.
In order to visually control the level of feed in the feeder without opening the lid, you should make an inspection window in the wall of the bucket. Everything is done extremely simply, namely, using a ruler and a marker, markings are made in the form of a strip 2-3 cm wide, and then cut along the contour with a stationery knife. After which you will need transparent plastic, which can be taken from a regular plastic bottle, we also cut out a strip but in size it should be 1-1.5 cm larger in length and width. We apply it, drill holes and rivet it, go through the edges with hot glue, and then also with sealant.
Now the chicken feeder itself is ready, pour in the feed.
The author used a couple of bricks as a stand so that the feeder corresponded to the height of the chicken and she could freely come up and peck the grains.
As you can see, the feeder made from a plastic bucket and polypropylene corners turned out to be as closed as possible and the chickens will no longer scatter their food, grain losses will be sharply reduced. Birds will also stop feeding and feeding.
The materials for production are budget-friendly and publicly available, step-by-step instructions are provided to you, so let’s take it and do it. Be brave, friends!
Advantages: minimal feed loss, lightness and mobility, large bunker volume.
Disadvantages: when the feed is used up, the weight of the feeder will decrease and the chicken may turn it over; it is necessary to modify it and make a stable stand.
With dispenser
The ability in an automatic feeder to regulate the supply of bulk feed mixtures is an important function if it is necessary to operate the device for feeding poultry for a long time. The version of the feeder equipped with a dispenser allows you to provide different speeds of filling the tray with bulk feed
The version of the feeder equipped with a dispenser allows you to provide different speeds of filling the tray with bulk feed.
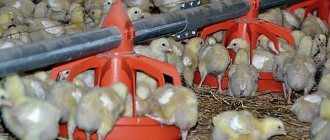
Today, both floor-standing models and structures suitable for hanging are produced.
The second option is installed at a height that corresponds to the dew of the bird, is very convenient to use, and also allows you to save the usable area of the chicken coop.
Most often, feeders equipped with a dispenser are made of high-quality and durable, modern plastics, represented by polyethylene and polypropylene, which ensures a hygienic design and low weight. A feeder of this type consists of several elements, presented:
- loading container for bulk feed mixtures;
- standard feed tray;
- connecting part with the dispenser.
By rotating the adjusting nut to positions from “1” to “7”, the width of the throughput channel in the feeder changes, which makes it easy to adjust the speed of feeding the feed mixture into the tray.
The bunker part has a sealed lid, through which the contents of the tank are completely protected from the negative effects of moisture and debris.
The presence of a special portable handle in the design makes it easy to transport the feeder for loading grain mixture and back to the place where birds are fed. The feed tray is divided into several sectors using thin partitions, so that the chickens are evenly distributed around the bowl of feed and do not dig up the grain mixture with their paws.
The use of an automatic feeder with a dispenser allows you to competently adjust the volume and diet of any farm poultry, depending on its age characteristics and purpose.
DIY chicken drinkers
DIY drinking bowl for goslings
Note! During the day, chickens drink almost twice as much as they eat. When creating a homemade drinking bowl, you need to take this factor into account and focus on capacity
Just as in the case of feeders, plastic bottles are widely popular as starting materials. But now the volume of 2 liters will not be enough. It is better to use five- and three-liter bottles.
Step-by-step instructions for assembling the structure:
- For containers with a larger diameter, the upper part is cut off, retreating approximately 5 cm from the lid. A bowl should form.
- A second, smaller container is attached to the first with screws, guiding the lid into the lid.
- Step back 5-8 cm from the neck of the second bottle and make small slits so that their height is not higher than the depth of the bowl.
- Using screws, the device must be attached to a wall, pole or other vertical object.
After this, you can safely pour water into the drinking bowl. It should be noted that there is no simpler method than this yet. It allows even a large number of chickens to be provided with sufficient water. Although there are also weaknesses. Such a device is not very stable and can tip over if a chicken gets into it. In addition, a bottle drinker quickly becomes dirty and is not easy to clean.
DIY chicken drinkers
In contrast to such an unreliable design, experienced poultry farmers came up with a more advanced system, which quickly became the most popular. We are talking about a nipple drinker. It works similar to drip irrigation. Stable, durable, easy to handle and durable. Ideal for broilers because... Meat breeds need plenty of fluids more than others. All you need to do is periodically add water to the tank. To assemble this model, you will need the following items:
- Nipples at 360.
- A bottle, bucket or barrel made of plastic.
- Plumbing Teflon thread.
- Drill with 9 mm drill bit.
- Tap and fasteners.
It is necessary to make holes in the container for each nipple and prepare the thread. Then install the nipples and treat the fastening with Teflon thread. After being fixed to a permanent place and disinfected, the drinker will be ready for use.
This method is considered the most profitable and requires a minimum of assembly time. But those who prefer a more practical design will definitely like a pipe drinker. You need to make grooves for the nipples on the plastic water pipe. The diameter of each hole is slightly less than a centimeter. Don't place them too close to each other. Otherwise, the chickens will crowd and disturb each other.
The optimal interval is 20 cm. The pipe on one side should be plugged. A hose supplying water is installed in the bottom of the water tank. If desired, you can connect directly to the water supply and sewer drain. This will greatly facilitate the process of cleaning and filling the drinking bowl. An approximate diagram of its implementation is shown in the figure below.
Drinking bowl diagram
Basic feeding rules
When keeping and raising chickens, you must adhere to the following feeding rules:
- Chicken feed should contain enough calcium. To do this, food includes mineral supplements (shells, chalk, meat and bone meal) and fermented milk products (whey, cottage cheese, kefir).
- Chickens should consume three types of food - dry, wet, combined.
- During the cold period and during molting, nutrition should be enhanced with vitamin and mineral supplements and sprouted grains should be given.
- Laying hens are fed 3-4 times a day.
- The main diet of poultry consists of grain crops (at least 60%). These are wheat, corn, millet, buckwheat and others. The rest of the diet consists of vegetables, green herbs, vitamin and mineral supplements.
- Follow feeding hygiene rules.
- The most convenient in terms of caring for chickens is commercial feed, but it is also the most expensive.
So, you can make a feeder for hens or chicks yourself. Many DIY projects do not require any special skills. By choosing the required type of feeder, you can achieve economical food consumption according to all standards and provide food to the inhabitants of the chicken coop in a timely manner.
The most read on the LandshaftBlog.Ru website:
Brick barbecue Gazebo with barbecue Concrete paths Landscaping Choosing a brush cutter Geogrid Guzmania Ornamental grass Decorative flower beds Decorative fence Children's slide Garden design Firewood for the dacha Mesh fence Winter garden Ideas for the dacha Flower bed made of stones Flower beds of perennials Lianas for the garden Polycarbonate awnings Site lighting Greenhouse do-it-yourself sandbox Do-it-yourself area for a car Retaining wall Facade lighting Swing gates Garden arch Garden fountains Snow shovel Brick tandoor Topiary in the garden Thuja occidentalis Plot 15 acres Figures for the garden Coniferous plants
Varieties
From drainpipes
DIY chicken feeder
There are also other feeders and drinkers for chickens made from improvised means. It all depends on what idea the owner’s imagination suggests. A brief overview of the options will help you decide:
- From drainpipes. This unit is convenient because it can be used to feed a large number of chickens, using a minimum of funds. All you need to do is make wide enough holes in the pipe and pour food into it. The chickens will be able to feed freely and not interfere with each other.
- Made of wood. As a rule, plywood is more often used in such work. You will need:
- 2 sheets for the sides, up to 20 cm high and 10 cm wide;
- 2 sheets for the front and back walls 80 cm long, 15 high and 10 wide;
- 1 piece of plywood for the base;
- crossbar;
- hammer and nails.
Connect the two side sheets to the base to form a right angle. Then attach the long walls. You should get an elongated box. Nail a crossbar to the top of the narrow walls. The feeder is ready. All that remains is to pour in the food and feed the chicks.
In addition to a container with food, there should always be a container of water in the chicken coop. Similar to the feeder, you can build an original drinking bowl.
Feeder options
There are a wide variety of chicken feeders on the market for agricultural implements, but you can save money and make a similar one with your own hands.
You can use almost all materials that are at hand (boxes, boards, pipes, plastic bottles, etc.). The main condition for the manufacture of structures for chicken feed is safety for the health of the birds. Next, we will consider possible options for feeders that can be installed on paddocks and in cages.
Bunker made from pieces of wood
The bunker feeder option for chickens is suitable for those who do not have the opportunity to frequently add feed to the container. The operating principle of this model is based on dosed distribution of food to the birds as they eat the previous portion. It is not difficult to make such a container with your own hands (Figure 4).
The beginning of the manufacturing process of such a structure is at the stage of preparing the necessary materials and equipment:
- Wood or a piece of strong, thick plywood.
- Electric drill, set of drills.
- Saw.
- Sandpaper.
- A couple of loops.
- Pencil.
- Screwdriver.
- Roulette.
Making a bunker feeder from wood begins with drawing up a working drawing.
After which the dimensions from the diagram are transferred to the wood and all the elements of the required dimensions are drawn:
- Bottom 29x17 cm.
- Two side walls are 40 cm high, with an upper edge of 24 and a lower edge of 29 centimeters.
- Top cover 26x29 cm.
- Two rectangles for the front wall 70x29 and 28x29 cm.
- Back wall 40x29cm.
All elements of a wooden feeder for laying hens can be assembled in the following sequence:
- After cutting out all the parts of the bunker feeder, we make holes for the screws in the required places using an electric drill.
- We sand all surfaces to make them smooth and safe for birds.
- We assemble all the elements into a single structure and fasten them with screws. If you need to achieve maximum density, then you can use a clamp. It is also worth fixing the front and back walls at an angle of 15 degrees.
- Using hinges, we mount the cover to the rear parts of the side walls.
Figure 4. Drawing and photo for making a bunker model.
At the final stage, you need to treat the product with an antiseptic. It is prohibited to use varnishes and paints on the surfaces of the feeder, as they can be toxic to chickens.
In the form of a trough
A trough-shaped feeder is the simplest option, which is suitable for owners of a large number of birds who have a canopy for walking in case of precipitation (Figure 5).
Making a chicken feeder in the form of a trough with your own hands begins with preparing the necessary elements according to a drawing drawn up in advance.
Next, you need to transfer the drawing to wood and cut out the following parts:
- Bottom – 15x100 cm;
- Two side walls - 8x100 cm;
- One beam – 2x3100 cm;
- Small end walls 15 cm wide and a height corresponding to the long side walls and the thickness of the bottom.
Figure 5. A simple trough model can be easily made from scrap materials
The assembly of the feeder parts should be carried out after cutting out all the necessary structural elements. All elements can be connected to each other using self-tapping screws or nails. It is recommended not to leave gaps, as food may spill out through them. The bottom of the feeder should be heavy and thick enough to prevent birds from knocking over the trough inside the cage or on the run.
Bunk
This type of feeder is most often filled with dry food, but you can also fill it with various mash. Due to the presence of a second tier, this option is suitable for a small poultry house, as it saves free space (Figure 6).
To manufacture the structure, the following materials and tools are required:
- Wooden bars.
- Boards.
- Self-tapping screws.
- Loops.
- Saw.
- Screwdriver.
- Pencil.
- Roulette.
Figure 6. A two-tier model helps save space in a poultry house
Making a two-tier wooden chicken feeder begins with preparing the necessary parts. The main element in this design will be the lower tier with a height of 25 cm and a width of 26 centimeters. The length of the container will depend on the number of birds. Next, you should make special grooves into which the damper will be inserted.
The second tier of the device will be a small volume trough with a side height of 10 cm. The second tier must be installed on the ends of the first, and then attached with hinges.
Detailed instructions for making a feeder from plastic pipes are given in the video.
Brands and manufacturers
In the modern pet food market, the following have a good reputation: Purina, Zoorost, Trouw Nutrition International, OLKAR, etc. They produce separate lines of premixes for laying hens and broilers. Let's take a closer look at them.
For laying hens
One of the brands popular in the CIS is the vitamin and mineral supplement “Ryabushka”. It contains a complex of necessary components without preservatives or growth hormones.
Complete nutrition for the hen is provided by 12 vitamins and 7 microelements, which are included in the composition of “Ryabushka”.
Excellent not only for laying hens, but also for other poultry. In addition to general nutrition of the body, the supplement protects against early molting, rickets, cannibalism, feather breaking, and also against dystrophy.
The products of the Kharkov “Laying Layer” also offer a rich set of components for feeding the hen: 11 vitamins (A, B2, B3, B4, B5, B6, B12, D3, K, E and H) and 7 microelements.
The supplement does not contain antibiotics or GMOs. The product is suitable for both adult chickens and young birds. You will be able to see the result of feeding after 1-1.5 weeks of use, and first of all this will be noticeable by an increase in egg production to 5-6 eggs per week.
For larger farms, the TechKorm premix, manufactured in Europe by Trouw Nutrition International, is perfect.
As a result of the use of this product, egg production and chick hatchability are improved, poultry digestion is normalized, and the taste and energy quality of the egg is improved.
The supplement contains 8 vitamins, biotin, niacin, choline, 6 trace elements, lysine, crude protein, phosphorus, methionine and calcium. Add fertilizing in the amount of 1% to chicken feed already prepared at large poultry farms.
The OLKAR company produces a premix for laying hens “Miracle”. The supplement includes a set of components that improve the poultry’s metabolism, increases its productivity and the level of general immunity.
Fertilizer is used to prevent hypovitaminosis and microelementosis. This is a very popular and inexpensive option, suitable for many households.
The premix “Ecovet” is also often found on sale, in many ways similar to the options described above.
The supplement includes vitamins A, B1, B2, B3, B4, B5, B6, B12, D3, E and K3, as well as 7 important microelements. In terms of its pharmacological action, “Ekovet” is close to “Miracle” and “Ryabushka”.
For broilers
The first representative among additives for broilers is the line, “Starter”, “Grower” and “Finisher”. This line is designed to provide the bird with the necessary elements at every stage of growth, from hatching to slaughter.
And with the same set of substances (vitamins A, D and E, as well as 7 microelements), the ratio of the components is different in order to most fully meet the requirements of the growing broiler organism.
Such a concentrate will be the best choice for those who have access to grain. Separately, we should highlight the premix for broilers “Miracle” from OLKAR.
It should not be confused with the additive of the same name for laying hens - this version is designed specifically for meat breeds of chickens.
In addition to a complex of vitamins, it includes cobalt, zinc, iodine, iron, selenium, trace elements and antioxidants.
In addition to providing the bird’s body with everything necessary, the supplement is recommended for the prevention of various diseases. This premix is also divided into separate brands, which are recommended to be used depending on the age of the bird.
In this case, there are only 2 types: start (1-4 weeks) and finish (5-8 weeks). The premix is similar in its properties to the additives described above: “Missy Start” (up to 21 days) and “Missy Growth” (from 21 days to slaughter) - this is a line of additives produced in Ukraine using European technologies.
It is widely available and a relatively inexpensive option. The “Rural Yard” premix was created based on the growth rate of broilers and the metabolic characteristics of these birds.
The feed contains an optimal set of substances to maintain chicken health, reduce feed consumption and accelerate weight gain.
With long-term use in broilers, the level of immunity increases and the digestibility of feed improves.
The Accelerate supplement is designed to accelerate the growth and gain of muscle mass in poultry.
At the same time, the broiler’s body is provided with a wide range of substances necessary for proper development. Among them are 10 amino acids, 9 macro- and microelements, 13 vitamins and crude protein.
This additive is suitable not only for broilers, but also for some other types of poultry.
The premix reduces the time required for a chicken to grow to the desired weight, strengthens its immunity, optimizes intestinal microflora and reduces feed consumption.
Automatic design from scrap materials
Constantly monitoring the feed level is tiring, especially if there are a lot of birds and you have other things to do. Therefore, some craftsmen have developed a design for an automatic feeder for chickens. It is suitable for both ordinary chicks and. The volume of food supplied is enough to satisfy their appetite. To make it, you don’t have to go to the store; you can safely use available materials.
Tools and materials
- hacksaw for metal;
- self-tapping screws;
- PVC pipe with a diameter of 110 and 50 mm;
- tee with a diameter of 50 mm;
- two half-bends 50 mm;
- adapter and plug.
Step-by-step instruction
- We connect the pipes through an adapter. The large pipe will serve as a bunker for storing feed; the grain volume will be replenished as necessary.
- Two half-branches are connected to the tee. Through them, the chicks will need access to food.
- We connect the two structures and fasten them to the wall using clamps and self-tapping screws.
- If there are a lot of chicks, then it is not necessary to make several such feeders. You can attach two pieces of pipe 30 cm long to the tee on both sides. Make several holes in the upper part for access to the grain. The ends must be closed with plugs.
Fixation methods
Regardless of the types of feeders and material, they are divided according to the method of installation. There are two main directions:
- floor-mounted – installed in any part of the poultry house, they can be easily moved to a new location;
- mounted - secured around the perimeter of the chicken coop with wire or brackets.
The main task of their installation is the cost-effective use of feed, preventing its clogging or scattering.
Advice from experienced poultry farmers
Those who have been raising chickens and other poultry on their property for many years already know some of the secrets of this difficult task.
Responsible owners try their best to disinfect all equipment in a timely manner and equip feeders and drinking bowls with separate cells. But even this does not guarantee success. Frequent processing of dishes makes them unusable, especially if they were inexpensive devices. Spending a large sum on poultry maintenance is expensive. Therefore, experienced poultry farmers recommend collecting poultry dishes with their own hands. On every farm there will always be a leaky bucket or other similar container that is no longer suitable for use on the farm. A few simple manipulations, and your unique do-it-yourself chicken feeder is ready. Simple, effective and saves the family budget.
When raising chickens at home, you need to provide them with all the necessary conditions. The most important thing is that chickens, especially growing chickens, are always fed. It is best to separate the young birds from the adult birds. Firstly, this way each individual will get plenty of food. Secondly, it will be easier to track who doesn’t have enough food, who is less active, etc.
It is ideal if the feeder and drinker are adapted to the needs and capabilities of poultry. Many poultry farmers note that there is no better option than a wooden tray with a crossbar. It is economical to assemble, convenient and practical to use.
0 0 votes
Article rating