Features of the material
It is very easy to work with gypsum: just mix it with water, pour it into a prepared mold, or sculpt crafts from plaster with your own hands. But we must take into account that the plaster sets quickly, so add as much solution as can be used within a few minutes.
Gypsum, thanks to the fine powder fraction, is able to accurately reproduce all the details of the form. Easy to process. The dry model is pliable to the cutter and chisels. Large sculptures, decors of columns and portals are cast from it, but it is also quite suitable for small products. Crafts made from plaster for home and garden, toys, panels, souvenirs, decorations - there is room for applying creative energy.
To decorate gypsum products, any paints are used; you just need to know the nuances of preparing the surface for this type of painting. With certain skills, you can even disguise the model as a completely different material.
Gypsum is environmentally friendly, relatively cheap and accessible to everyone.
Features of caring for garden plaster decorations
If the manufacturing and processing technology is followed, plaster figurines will last for many years, but proper care is integral to preserving the appearance of the products. Therefore, you should consider:
- when cold weather sets in and the air temperature drops to below zero, as well as during prolonged rains, you need to remove garden figurines from the garden for storage in a warm and dry room;
- It is best to place the figures on a base made of natural stone or concrete, which will prevent insects from being exposed to moisture near the base;
- The varnish on the figures should be renewed every 2 or 3 years, which will protect the color of the products.
Proper care is the key to maintaining the bright color of plaster figures
Flaws
However, with all its advantages, gypsum has a number of disadvantages:
- You need to work very quickly with the prepared solution. Depending on the type of plaster, it hardens in 7 to 30 minutes.
- Repeated stirring, the so-called “remelting”, is impossible.
- Special conditions are required to work with plaster because the process is wet and dusty.
- It is inconvenient to work with gloves, and without them the skin dries out very much.
- Gypsum crafts absorb water well, so they must be varnished. And even a protective coating does not always save you outdoors.
- The products, although rigid, break easily and do not withstand mechanical stress well.
How to restore plaster garden figures
Gypsum or alabaster are not strong enough materials; when impacted, from humidity and frost, they easily crack and lose color. In such cases, you can carry out the restoration yourself:
- Small chips can be eliminated by applying gypsum putty to the damaged area. After drying, this part is painted, varnished and decorated in the same way as the entire figure. You can repaint the entire craft;
- When the figure is broken in half, it is easy to glue it back together. If additional pieces were broken off, they are first fixed with waterproof glue, and then the halves of the figurine are fastened together. The joint is coated with putty, tinted, and varnished;
- Scratches on the figurine are removed with putty. After it has dried, the surface is re-tinted and varnished;
- The cracked varnish is carefully peeled off with fine sandpaper and a new layer is applied with a brush.
Multi-colored snails will easily complement a Japanese bonsai or flower bed
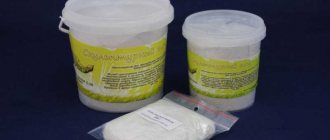
Where to buy plaster for crafts
The easiest way to buy plaster is at a hardware store. In order not to get confused in the variety of its types, you need to be able to read the labeling.
The numbers after the letter “G” indicate compressive and fracture strength and purpose:
- G2...7 – building gypsum (alabaster).
- G13…16 – high-strength molding
- G22…25 – super durable medical
G6...16 is best suited for crafts. Next are the letters indicating the setting time:
- A – quick-hardening, 2 – 15 min.
- B – normal hardening, 6 – 30 min.
- B - slow-hardening, 20 minutes - several hours or days.
Next is the grinding fineness in Arabic or Roman numerals:
- 1 – rough
- 2 – average
- 3 – thin
For example, G-7 A1: gypsum, withstands 70 kgf/cm2, sets quickly, has large particles.
Rules for purchasing gypsum
Beginning craftsmen often wonder: where to buy plaster for crafts? There are several options:
- Pharmacy.
- Hardware store.
- Construction goods store.
- Decorative art supply stores.
When purchasing a base powder, you should pay attention to the tightness of the packaging (after all, violating the integrity of the package will lead to the powder getting wet) and the expiration date.
After the shelf life expires or the rules for storing gypsum are violated, the material loses its basic properties, which affects the quality of the crafts.
How to dilute plaster for crafts
Depending on the task, the solution can be of different thicknesses:
- Liquid – 1 kg of gypsum per 0.7 liters of water.
- Normal - 1.5 kg per 1 liter of water.
- Thick – 2 kg per 1 liter of water.
To prepare the solution, you need to take a suitable container. Fill with water first - this will reduce dust. Then slowly add the powder, stirring constantly. It is convenient to mix large quantities with a drill and whisk. There should be no lumps in the solution.
Decorative openwork ball made of cement.
To work, we need a cement solution - mix a thick solution of 1 part sand, 1 part cement.
We immerse a rope in the solution, it can also be strips from an old T-shirt, etc. We inflate the balloon and prepare a stand for it where it will dry. This could be a regular bucket.
We wrap the ball with a rope in cement mortar.
After the solution has dried, use a needle to blow off the ball. All! Our garden art object is ready. Can be painted if desired.
Master class on plaster crafts
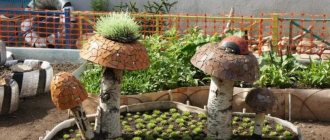
If you have no experience working with plaster, then it is better to start simple. For example, for a personal plot, cast an entire family of mushrooms. To do this you will need the following materials and devices:
- Gypsum
- Plastic bottles
- Plate
- Food film
- Acrylic paints
- Varnish
Making a mushroom stem:
- The bottom is cut off from a plastic bottle (perfect for milk). Place the bottle on the table with the lid down.
- First pour in a small portion of a solution of medium consistency.
- To facilitate the construction, foam or cardboard is inserted into the center of the bottle.
- Add plaster.
- After about an hour, when the solution is already solid and very warm, the plastic is cut and carefully torn off along the bias.
Now the hat:
- Take a plate that looks as much like a hemisphere as possible.
- The bottom is covered with cling film
- Pour in the solution.
- As soon as the plaster begins to set, insert the stem of the mushroom into the center of the plate to form a monolith.
- After drying, the product is removed and the film is removed.
Until the model is completely dry, it is very easy and convenient to remove sagging and burrs with a stationery knife or just with your hands. Small defects can be covered with plaster or putty. The dry product sands beautifully.
After a day, having made sure that the mushroom looks good enough, is white in color and rings when you click on it, you can start decorating. First you need to prime it. Construction primers or simply diluted PVA are suitable for this.
It is better to paint in 2-3 layers, because gypsum is very porous, and the paint will still dry out. The finished model is coated with varnish for exterior use.
By selecting bottles and plates of different sizes, you can cast different types of mushrooms.
Materials and tools for making crafts
To make a product of any shape and size from gypsum, you must first prepare the mixture itself.
To mix liquid and powder, it is better to use an old and unnecessary container, and be sure to follow the basic recommendations for working with the resulting mass:
- mixing is carried out once in the proportions indicated on the packaging; after drying, the gypsum cannot be reused;
- Dry powder is poured into the container first, it is necessary to make a recess in it and fill in the required amount of liquid;
- water can be poured in portions, which will help simplify the procedure of stirring and removing lumps of dry powder;
- When mixing, it is necessary to achieve maximum homogeneity of the resulting mass, for which you can use a construction mixer.
In order to create various plaster crafts, you may need molds and cuttings, additional material for creativity.
These can be silicone molds, homemade frames made of durable materials, mineral and natural materials that help recreate a certain texture.
Children's creativity
Young children enjoy working with plaster. There are many molds for sand, snow, and baked goods in which you can cast plaster crafts for kindergarten.
The technology is simple enough even for a child:
- The mold is first lubricated with a mixture of liquid soap, vegetable oil and water in a ratio of 2:1:5 to make it easier to remove the finished product.
- Pour in the solution. You can mix it with the addition of any color.
- Use a ruler or spatula to run along the edges of the mold, cutting off excess.
- If you plan to hang the toy, then stick a cocktail straw into the right place.
- If the figurine has two front sides, another identical one is cast, so that later they can be glued together with the back sides.
PVA glue, liquid nails, “Titan”, “Moment” are suitable. The joint area is sanded. If necessary, lubricate. Coloring is limited only by the child's imagination.
Options with mosaic
Garden sculptures decorated with mosaics look stylish and modern. For example, gypsum balls are very popular for garden decoration. Making them yourself is quite simple:
- As a form, you can take a regular children's plastic ball and cut it into two equal parts.
- Dilute the sculpture plaster with water according to the instructions.
- Prepare gauze in advance.
- Using a wide brush, spread a small layer of plaster into the prepared mold.
- The solution should dry a little, then cover it with gauze.
- Apply four layers one at a time, allowing each layer to dry thoroughly. Thus, you need to make two halves.
- While the material is drying, the brush should be in water.
- Remove the finished halves of the ball from the mold, cut off the gauze and connect them. After the seam has dried, carefully sand the ball.
- Then we decorate the product with mosaics.
You can make a mosaic yourself using colored glass or pieces of ceramic tiles. In the same way, you can decorate garden vases and other plaster products.
Simple and tasteful
A wonderful gift for women would be a plaster model in the shape of a hand on which you can hang jewelry. To do this, you will need a thick rubber glove - it holds its shape better:
- The bottom is cut off from a five-liter plastic bottle.
- The glove is inserted into the neck with the edges turned outward. The neck is wrapped with an elastic band so that the glove is securely fastened.
- The solution is poured into a hanging glove. Slowly so that the air has time to escape from the fingers.
- After pouring is finished, you need to shake the glove again by sticking your hand into the bottle through the bottom.
- After 1 - 2 hours, the model is removed, the rubber is cut off and cleaned.
- After complete drying, the hand is painted and decorated with decoupage.
- Having glued it to a suitable base, hang the beads, string rings, etc.
With a little practice, you can move on to more complex forms: sculptures, vases, piggy banks. But even without skills, New Year’s crafts from plaster or hearts for Valentine’s Day will be easy to come by. It all depends on the desire and imagination that everyone has.
Step-by-step process for making gypsum products
Before diluting the gypsum solution, you need to prepare everything for creating products.
Filling into the mold:
- Using a brush dipped in sunflower oil, water and soap solution (1:2:5), pass along the inner area of the mold.
- Slowly pour in the gypsum solution to avoid any air bubbles.
- Place foam or plastic balls in the middle to save plaster. They should not get close to the form, otherwise they will be noticeable on the frozen figure.
- Pour a layer of gypsum mortar on top of the balls.
- All actions are performed first with one half of the form, then with the other.
- Remove excess mortar from the edges with a spatula.
- Leave to dry for at least a day.
- After the plaster has completely hardened, remove the figure from the mold. If it is silicone, you need to bend the edges and gradually remove it from the product. When the mold is solid, you can turn it over on a flat surface, tap it lightly, and slowly lift it.
Most often, sculptures are created from two forms (one is poured for the front side, the second for the back). After pouring, they need to be fastened together:
- Sand the inner flat surface of the half with sandpaper to remove dust. This way the parts will be held together more firmly.
- Apply glue in dots in the middle, around the perimeter and in the remaining empty spaces.
- Connect the parts evenly, press them tightly together and fix in this position until dry.
The next important step will be coloring the product. This is a great way to show off your creativity and creativity. For decoration you will need:
- paints;
- brushes;
- varnish;
- PVA glue or construction primer.
Step by step steps:
- Cover the product completely with a solution of water and glue (proportion 1 to 1). As an alternative: apply 2-3 layers of heated drying oil.
- After the primer has dried, paint the sculpture with paints. If the figure is more than 0.5 m, you can use a spray can or spray gun for speed and convenience.
- After the paints have dried, decorate the product with available materials that will be appropriate. For example, buttons, beads, shells, pine cones, small stones, etc. They are attached with exterior adhesive (such as Titanium). Remove excess with a napkin.
- Coat the entire surface with a clear, non-water-based varnish. The packaging must be labeled “for outdoor use.”
- Leave the craft to dry until the smell of varnish has completely disappeared.
The product should be dried outdoors or in a well-ventilated room.
Photos of plaster crafts
Crafts for the garden plot
Plaster figures are great for garden decoration: you can place a beautiful craft on a children's playground, on a summer terrace or along a driveway.
If the craftsman desires, you can find molds of any size, and for the manufacture of absolutely any product: full-length animal figures, turrets for a toy castle, and the castle itself (for a playground).
We recommend reading:
Crafts flowers - 125 photos of the best ideas from craftswomen. Instructions on how to make it yourself from A to Z. Simple and complex options for crafts + video tutorial- DIY crafts: TOP-200 photos of the best ideas. Schemes, master classes, modern design, new products, instructions with descriptions
Crafts from nuts - 120 photos of the best ideas for beautiful crafts. Original design options + step-by-step instructions for beginners
Pink flamingo made from plastic bottles
Plastic bottles are the most economical option . Everyone has them, and you can create anything from them. One of the popular figures today is the pink flamingo. Such a garden sculpture, created with your own hands, will be a wonderful decoration for your site.
Materials and tools:
- large plastic bottles (3-4 pieces), one of them should have a lid;
- pink paint;
- hose;
- metal rods (3 pieces);
- brush;
- scissors or stationery knife.
First you need to make a flamingo body . To do this you need to take one large bottle. You need to make a hole in the lid. A metal rod is inserted into this hole. He will act as a neck. You need to make two holes at the bottom of the bottle; legs will be inserted into them.
Now you need to make plumage for the flamingo. The remaining bottles need to be coated with pink paint. Now you need to cut them into feathers.
Fabric gnomes
Making a gnome from fabric is not difficult if you have at least a little experience in sewing.
Source: www.liveinternet.ru
Step-by-step instruction:
- Find a suitable pattern.
- Transfer it to a piece of cardboard or a piece of fabric (for the head and palms - flesh-colored, for the body with a shirt - printed colorful chintz, for pants - striped or plain cloth, for a vest - fur or wool).
- Cut out the pieces, leaving a 0.5 cm allowance for the seams.
- Sew the back along the line previously marked with crosses.
- Sew the front darts and connect it to the back.
- inside out and stuff with padding polyester.
- Cut and sew pants, put on top.
- Make a belt from ribbon or ribbon.
- Connect the palms with the sleeves, stuff them with padding polyester and sew them to the body.
- Sew boots from leather or leatherette. Insert cardboard insoles for stability.
- Loosely stuff the shoes with synthetic padding, put them on your feet, and sew them invisibly with threads to match the fabric.
- Cut the head out of pink material and fill it with filler.
- For the nose, cut out a circle, fill with padding polyester, and make a ball.
- Draw a mouth or eyes with felt-tip pens or embroider.
- Sew on a headdress (for example, a cap made of chintz stuffed with filler). Decorate it with a pompom or bell, embroider it.
- Connect the head to the body.
- Sew a vest and put it on top.
When decorating the area with a rag gnome, you need to take into account that if precipitation falls, it will need to be brought into the house or covered. The fabric quickly fades in the sun, so it is better to place the figure in the shade or display it only on holidays (for example, Halloween or Christmas).
Preparing the form
The gypsum mass sets quickly. Therefore, you need to prepare a mold (mold with textures) in advance. To do this, you need to lubricate the inside with a special solution using a brush (so that the craft does not stick to the mold). Composition of the special solution:
- 2 parts liquid soap;
- 1 part vegetable oil;
- 5 parts plain water.
The gypsum mass is poured into the mold slowly so that voids do not appear in the figure. At the same time, place pieces of foam or plastic bulk objects so that they do not touch the walls of the mold.
Papier-mâché garden figures
Source: www.youtube.com/watch?v=DYDBuuiWG6Q
How to make a papier-mâché gnome step by step:
- Place the material (cells for eggs) in a container, fill it with boiling water to the brim and do not touch it for 24 hours.
- Drain the water and grind to a dough consistency. If the material is too liquid, it should be placed in a gauze cloth and hung for several hours to drain the remaining liquid.
- Add a little PVA glue to make it more flexible.
To make the body, take a plastic bottle filled with sand, and a ball for the head. Cover the structure with the prepared mass, applying it in thin layers, drying each one.
- Secure with wire or glue.
- Make the front part and beard. For the eyes, you can use a tennis ball cut into 2 parts or beads.
- Make a hat.
- Stepping back 1/3 from the bottom, make the hem of the shirt. It is desirable that it be wavy for greater effect.
- Make a vertical furrow through the remaining lower part. This will be the pants.
- The arms can be made directly on the figure or separately, only attached to the body at the end. To create the palms, use rubber gloves: pour polyurethane foam into them and wait for them to harden.
- The soles of the shoes are made of foam plastic, and the shoes are made of the base material.
- Dry the finished figure and sand it with sandpaper.
- Cover from precipitation with a moisture-resistant primer, putty and prime again.
- Paint the figure and coat it with yacht varnish.
To make it more attractive, you can place a solar-powered lantern in the gnome’s hand. In addition, it will be an additional source of lighting.
What is used as a form?
To make plaster castings, stores offer molds from various materials: metal, wood, plastic and silicone.
Silicone is preferred. It is convenient to use because it does not require lubrication before pouring the gypsum solution and, due to its elasticity, can be easily removed from the finished casting without damaging it. You can make a silicone mold yourself without much difficulty.
Crafts for home
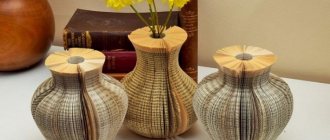
You can also make crafts from plaster to decorate your home. Miniature figurines on a book shelf, sets of fairy-tale or cartoon characters for children will complement the interior of the living room.
For lovers of indoor flowers, you can make original pots for small sedums, decorative dracaenas or a bright Christmas star.
Decorative gnomes in landscape design
Such decorations for the site look appropriate next to flower beds, wooden benches, stone paths, and wicker fences. The most important thing is that the gnome for the garden fits into the surrounding style:
- classic design - figures in one or more colors;
- romantic - pink or burgundy;
- country, Provence - wooden;
- modern - metal, marble, concrete, wood.
If you install figures that are inappropriate in style in the wrong place, they will ruin the whole look.
When designing a landscape design, you need to take into account that the gnomes must be made of the same material as the objects next to which they are located. Sculptures look especially attractive in the recreation area, next to a pond or fountain.