Andrey
19193 0 0
Andrey August 2, 2016Specialization: facade finishing, interior finishing, construction of dachas, garages. Experience of an amateur gardener and gardener. We also have experience in repairing cars and motorcycles. Hobbies: playing the guitar and many other things that I don’t have time for :)
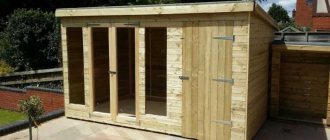
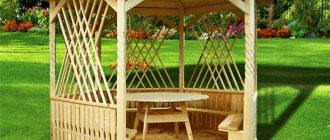
When setting up a summer cottage, summer residents usually have the issue of storing equipment, since it is extremely inconvenient to carry it with them. This problem can be solved by building a utility block. Building this structure is easier than it seems at first glance, and you can see this from this article, in which I will tell you how to build a utility block with a toilet and a firewood shed.
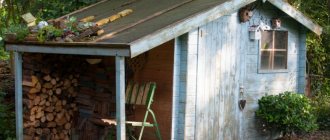
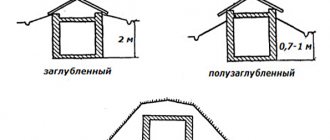
Utility block with shower and toilet
What is a utility block with a toilet?
A non-residential building for storing various equipment is a utility block.
As a rule, such a building is small in size and designed taking into account the tasks assigned to it. At the same time, the economic part of dacha buildings can be of a more expanded nature. In addition to the toilet, other buildings are quite acceptable here. How to build a utility block with a toilet? And what will he be like?
In the not-so-distant days of our country, when the treasured 4 acres began to be generously distributed by the state to intellectuals and workers, the ultimate dream was to have a metal booth with doors on your hacienda.
A large key and a barn lock indicated that a tool was stored inside, which the happy owner of the utility unit now does not need to carry with him every time.
Now the idea of making a utility unit out of metal is unlikely to occur to anyone. Most prefer not only quality, but also style. That is why it is better to make even utility rooms functional and beautiful.
Sometimes this building can even take on the role of a temporary house, in which you can find a place for short-term rest and meals. And if there is already a main house, a change house, a utility unit, a toilet, they simply must fit into the overall interior of the building.
Video: stages of construction of a country toilet with a shower under one roof
With little effort, you will build the necessary and convenient building with your own hands. Rest and living at the dacha will become much more comfortable. To take a swim after gardening on a hot day, you don’t need to heat water or waste electricity. Thanks to various external finishing materials, a toilet and shower combined in one building will not disturb the architectural ensemble of country buildings.
- Author: Andrey Sokolov
Rate this article:
- 5
- 4
- 3
- 2
- 1
(13 votes, average: 3.2 out of 5)
Share with your friends!
Installation of the main roof frame and rafters
For this type of work we use smaller beams than when assembling the base. At the very beginning, work is carried out to assemble the frame with the end. During this procedure, do not forget that there will be openings for windows in the walls.
The base posts must be well fixed, so metal corners and screws are used for fastening to the frame.
To securely fasten the beam in the reinforcement, you need to make a hole with a diameter of no more than one centimeter, on which the corner posts will be fixed.
An example of installing a utility unit corner post
All other elements must be installed using bolts. The frame is assembled, after which you can begin installing the front facade. Now we place two separate doorways and install partitions.
Also, during the assembly of the facade, it is necessary to take into account the location of the windows and install window crossbars, the location of which should be 80 centimeters higher from the lower frame. At the end, upper junctions two meters high are installed, using the smallest timber.
At the end, work is carried out on the internal and external cladding using lining. To cover roofs, various roofing materials are used, such as sheet iron, tiles or slate. Then the windows and doors are installed. Thus, having a little experience in construction work, you can easily assemble your own utility unit.
Tips and tricks
If the utility unit includes a shower, then care should be taken to ensure the availability of water. A barrel is great for this. It is connected to a tube with a watering can, which is installed in the shower. For this installation, a flat roof is the best option. This way, the installation of the barrel will take place without any problems. The main thing is not to forget about securing it.
The barrel can be installed not on the roof itself, but next to the structure ; it will be located on a special frame, which is made of metal corners. A large tray is suitable for this, the water in which will heat up quickly enough.
Don't forget about installing a seat in the toilet. First of all, this is important for hygiene and comfortable use.
If you plan to use the toilet also in the winter, then it is better to purchase a seat made of foam plastic. It will keep you warm in absolutely any weather. This fact is important for health.
Types of utility units
If we do not consider outbuildings made of brick or other building blocks, then all such buildings based on the material they are made of can be divided into two large groups - metal and wood.
Metal utility units can be divided into three categories:
- welded - made according to an individual project from sheet materials;
- converted shipping containers;
- ready-made block containers with factory configuration.
Welded utility blocks
To some extent, they can be compared with similar garages. The only difference is that a door is installed instead of a gate. The advantage of this manufacturing method is the freedom to choose sizes. Although this is possible if the “box” is made on site (for large structures there are transportation restrictions).
In this option, channels and corners are used as load-bearing elements of the frame. Additional stiffening elements can be made of metal tape, and the sheathing is sheet steel or corrugated sheets. Inserting doors and windows requires the installation of additional strength profiles.
Planed edged boards, OSB-3 or moisture-resistant plywood can be used as internal cladding. If the interior of the utility unit needs to be made warm, then insulation is carried out using expanded polystyrene or penoplex.
Converted containers
Even from a small container you can make a utility unit with one section. Large sea containers (20 or 40 feet) will produce a “wide-profile” cabin, where you can place not only a room for storing garden tools, but also equip a full-fledged sanitary compartment with a shower and toilet.
For a simple change house that is intended only for storage, using a container is the best option. There is no need for windows and the locking system is strong enough that all you need is a good lock.
For a multifunctional utility unit, the container needs to be modified:
- install partitions;
- cut in doors, and if necessary, windows;
- fail communications;
- cut passages for pipes, cables and ventilation;
- sheathe individual sections (insulate if necessary);
- make a roof so that the container does not heat up in the sun.
Ready-made block containers
This is the most expensive version of a metal utility unit, but the easiest to assemble and the fastest to install on site. If the owner of the dacha is not limited by budget, then there are quite a lot of offers on the Internet for the sale of ready-made sanitary containers, including those for domestic use.
Several projects of country utility blocks
The utility block is a serious structure that requires drawing up a project. On paper you need to draw a diagram indicating all the dimensions of the structure, the number of partitions and other important components.
To help the summer resident, for reference, we suggest considering several interesting projects of the utility block. Maybe you can build your own building based on one of them.
First project
The diagram shows a utility block measuring 2x4 m. The layout is very successful, since the toilet and shower are separated by a third room reserved for the pantry. Thanks to this, unpleasant odors from the toilet will not penetrate into the shower stall, but good ventilation must be provided in the pantry. Each compartment has its own door, and the pantry is additionally equipped with a window.
Second project
The second project similarly represents a utility unit with three compartments. The difference between the design is the presence of only entrance doors. There are windows on the front wall of the other two rooms. The rooms are connected to each other by internal passage doors. It is up to the owner to decide which room to use for the shower, shed and toilet. Although it is reasonable to make the middle compartment a shed, because it is inconvenient to enter the utility room through a shower or toilet.
Third project
This utility unit project is represented by a common box measuring 5x2.3 m. Each compartment has an entrance door. The layout of the rooms is done differently. The toilet is adjacent to the shower, and two small rooms are reserved for them. Most of the building is used as a barn.
Fourth project
The last of the presented projects is the most complex, but convenient. The layout is made in such a way that all three compartments are adjacent to each other. Most of the utility block is given over to a barn. Each room has its own door, located on different sides of the building.
Construction of a utility block - capital structure
Before you start building a universal utility unit, you need to ask yourself a few questions:
- Does it make sense to use inventory for housing if you already have a separate house?
- How often do you have to work on site?
- Will there be enough funds to implement the project?
If you have private housing, everything is obvious - major support is not needed. What to do when there is no housing or work. Is it then necessary to study different types of modern utility blocks that offer to live in comfort and coziness even in winter.
No, it’s not necessary, because you won’t have to work, which means you won’t have to spend money on the following elements:
- Complex foundation - strip, columnar, pile.
- Durable building materials - laminated veneer lumber, brick, foam concrete, etc. (although a capital utility block can be erected using a frame method);
- Gable roof with attic;
- Internal cladding - block house, lining or clinker;
- Thermal insulation layer – mineral wool or polystyrene foam;
- Interior partitions;
- Artificial lighting system - cable, wires, corrugations, switches, lamps, meter;
- Water supply system - plumbing, water tanks, water heater, pipes;
- Sewerage – plumbing, pipes, septic tank;
- Ventilation system – pipes for air inflow and outlet;
- Heating system – IF emitter, potbelly stove or electric fireplace;
- Furniture – bed, table, chairs, wardrobe.
Not a single photo of a utility block for a dacha will tell you how much money you have to spend on the corresponding list.
Moreover, the operation of individual products will require additional costs. For example, it is imperative to install a protective screen under a potbelly stove so that the nearest surfaces do not ignite due to high temperature.
And even if an alternative heater is used instead of a traditional fireplace, electricity or gas will require payment.
The question is, where to store pitchforks, shovels, rakes, bags of potatoes, a generator and other working tools and things? The answer is obvious - away from living rooms.
Therefore, the capital utility room should have a large area. If the summer resident agrees with all the above conditions, then he is a real enthusiast, a good guy or just a person without registration.
Design of a country outdoor shower
In fact, all summer showers have three main components - a water tank, a cabin and a drain. Let's look into every detail. The water container should be enough for the maximum number of showers, but the large volume should not negatively affect thermal comfort. For better heating, special flat tanks made of dark plastic or metal are suitable.
Outdoor country shower and toilet
The color and shape allow not only to receive more sunlight, but also to warm up all the water. If you use thick tanks and barrels, the lower layers of water may not warm up completely, but they are the first to pour out when the tap is opened.
To increase the efficiency, the container can be covered with a homemade greenhouse, similar to those made for seedlings. To do this, just knock down a wooden frame to the shape of the tank and cover it with transparent cellophane. The north side is trimmed with foil. Handles are attached to the top or sides of the greenhouse to make it easier to remove and place it when adding water.
Proper arrangement of the shower stall will make showering more comfortable
It is important to provide a vestibule for changing clothes and functional shelves and hooks for accessories. The simplest shower cabin design has three static walls made of polyester and one retractable curtain made of the same material.
The building is based on a square wooden pallet with a side of 1 m, the height of the walls is 2 m. A cabin often found in summer cottages is not exactly what a person living in a private house needs. Based on the shortcomings of this design, we will formulate several rules
The simplest shower cabin design has three static walls made of polyester and one retractable curtain made of the same material. The building is based on a square wooden pallet with a side of 1 m, the height of the walls is 2 m. A cabin often found in summer cottages is not exactly what a person living in a private house needs. Based on the shortcomings of this design, we will formulate several rules.
- Firstly, one room is not enough; it is worth at least making a small vestibule for changing clothes and storing bath accessories.
- Secondly, it is better to prevent possible drafts, even taking into account the high temperature of the summer air, since children can also take a shower.
- Thirdly, the material for the walls should be more durable.
Frame construction technology using a wooden or metal base can be called optimal in terms of lightness and strength. The outside of the walls can be finished with any material, but it is better to use the one that is used on the facade of the main building or other technical buildings.
There are many options for ready-made shower stalls on the market, which all you have to do is install them on the constructed drain. The main part is a plastic tank.
The installation of a shower drain includes not only drainage, but also affects the entire base. Since the cabin area is small and the height is about 2.5 m plus a heavy tank on top, it is preferable to organize a pile foundation. To do this, four holes 1-1.5 m deep are drilled in the ground, and metal pipes with a diameter of about 10 cm are immersed in them.
The length of their ground part should be about 25 cm. Subsequently, a 10 x 10 cm beam will be attached to the pipes. By the way, it is more convenient to start the dressing from the top and carry it out on the ground, using long and thick bolts. But let's return directly to the stock.
To collect water, the easiest way is to use a tray with a pipe connected to the drain, or a homemade reinforced concrete screed. Another method is to create a waterproof layer (laying hydroglass insulation or PVC film on an inclined embankment). In the latter case, a lattice wooden flooring is made under the feet.
The collected water can be discharged into a septic tank, and then to a filtration field. The latter is a plastic pipe buried in the ground with cuts that allow all the drained water to be distributed over a crushed stone base
It is important to consider the amount of water drained and whether the soils can handle it. Otherwise, the system will flood, spoiling the drainage material
Moisture-loving plants can partially help with water drainage. The cost of such a building directly depends on the materials used.
Accommodation options
There are two approaches to placing utility units:
- several rooms are combined together and a semblance of a single complex is created;
- outbuildings are located around the entire perimeter of the summer cottage in separate blocks.
Experts advise placing such buildings in shaded areas, for example, in areas not intended for a vegetable garden or recreation area.
An exception is the summer dining room or kitchen. The place for such purposes should be sunny, as for a recreation area.
The following types of materials can be used to make a utility unit:
First of all, their choice depends on the individual preferences of the person, as well as the purpose of the utility unit. As a rule, wood is used as a building material. It is especially relevant for summer cottages. It is worth noting that the choice of material directly depends on the budget, the expected duration of use of the structure, installation location and other factors.
Plastic models are the most affordable and light in weight. Wooden outbuildings are considered more environmentally friendly, durable and aesthetically pleasing. Most manufacturers coat the wood with a special impregnation that provides protection against rot and insects. Metal structures are installed as a garage, storage space, and are also used on construction sites.
Roof
The simplest option for a utility block is a pitched roof. There are two solutions:
- Pairs of front and rear pillars are made in two different fixed sizes, and the upper trim is mounted with the required slope. In this case, the rafters are attached directly to the frame itself.
- The racks are made identical, and the top trim is mounted strictly horizontally. The slope angle is formed by additional front (or rear) wall posts, on which another support beam is installed. The rafters are attached with one side to the frame, and the other side to this support beam.
To attach the rafter legs to the frame, use a groove cut in the frame beam. Another option is a support beam with a beveled end, nailed to the rafters and resting on the trim beam.
If corrugated sheets or metal tiles are used as roofing, then a waterproofing film is laid on top of the rafters. For slate, ondulin or bitumen shingles, waterproofing is needed only when the utility block is heated.
The next stage is the installation of the roof sheathing. The pitch of the sheathing depends on the angle of inclination and the nature of the roof. For example, for ondulin, at small roof angles (less than 10°), the sheathing is made continuous.
Selection of materials
Various materials are used to build a toilet with a shower. In our case, it will be a frame structure on a columnar foundation with a gable roof. A frame building does not require a deep foundation, since it is relatively light in weight. Thanks to the pillars, the structure will rise above the ground. This will protect the lower frame of the structure from dampness and fungus. Water will not linger under the base. A gable roof will allow you to equip a cold attic for household needs. Water drains from such a roof faster than from a pitched roof.
When purchasing beams and boards, you need to take into account their humidity, the degree of which should not exceed 22%. To determine this, use a needle moisture meter.
To build a country toilet with a shower, you need to prepare the following materials:
- For the lower and upper trim: four beams 2750 mm long and the same number 2000 mm long, all with a cross-section of 100x100 mm;
- For vertical supports, beams with a cross section of 50x100 mm are needed, in the amount of 24 pieces, each of which is 200 cm long;
- Wooden edged boards with a section of 10x100 mm, for sheathing;
- Beams with a cross section of 50x100 mm, length 200 cm, 12 pcs. – for the roof frame;
- For flooring (in the toilet), boards with a cross-section of 40x150 mm are required in an amount of (minimum) 20 pieces. OSB sheets are used as the finished floor;
- If the floors in the shower room are tiled, then the amount required is 2 m²;
- Plastic pipes and sewer drain;
- Concrete mixture (M-200) in the amount of one and a half cubic meters;
- Plywood sheets for making formwork;
- Sand and gravel;
- Metal tiles.
All wooden elements must be free from knots, cracks, mold and insect damage.
- Sheets of multilayer plywood, chipboard, fiberboard or OSB boards are used as a rough ceiling.
- To make it easier to fasten the beams, metal corners and plates are used.
Manufacturing materials
Household units with a shower and toilet for the dacha are erected as temporary or permanent buildings. Change houses are built during the construction of the main buildings (house, barn, bathhouse, etc.). Once completed they are demolished. To build a temporary shed and an outdoor toilet-shower for a summer residence, the following materials will be required:
- wooden beam 10*10 m for the base and frame;
- wooden beams 10*5 m for the construction of the roof truss system;
- roofing felt as a sealant;
- lining for cladding the frame;
- glass wool for insulating the frame;
- slate or other covering roofing material.
Attention! Often the choice of base material depends on the budget, purpose of the building, location and complexity of the project. Prefabricated metal structures are used for garages. Plastic lightweight change houses are used for storing equipment.
Capital structures require a lot of time and money. You will also need to fill the foundation and select durable and strong material. Summer residents prefer wood because it is an environmentally friendly, durable and cheap material. More capital buildings are erected from brick, cinder block or aerated concrete.
Attention! Modern impregnations and paints reliably protect wood from insects and rot, maintaining a beautiful appearance for many years.
For capital buildings you will need materials:
- wooden beam 10*10 m or 10*5 m for the roof;
- cement for mortar;
- pebbles or crushed stone for pouring the foundation;
- brick, cinder block or aerated concrete for building walls;
- metal rod to strengthen the foundation;
- metal mesh for screed;
- sand for mortar;
- facing material (plastic, lining, decorative plaster);
Tools:
- concrete mixer or drill attachment for mixing cement mortar;
- buckets;
- shovel;
- pliers;
- square level;
- screwdriver or drill;
- self-tapping screws;
- saw or jigsaw;
- pencil;
- wheelbarrow;
- roulette;
- screwdrivers;
- axe;
- putty knife;
- Master OK;
- rule;
- plane.
Construction rules, useful tips
Tips for building a utility block from foam blocks:
- First, a place is prepared for pouring the foundation.
- The strip base is poured or piles are driven.
- Waterproofing is being installed.
- Foam blocks are laid starting from the corners.
- A single-pitched or gable roof is installed.
- Windows, doors are inserted into the openings, and the floor is laid.
- Internal and external finishing is carried out.
Instead of outbuildings, metal containers are often placed at the dacha. They reliably protect gardening and construction equipment from theft.
Wooden structures must have strong walls. A massive building requires the installation of a concrete foundation that can support the weight of the barn.
Adviсe:
- A place where flowers and other crops are not grown is used.
- The location should be convenient so that heavy objects can be brought into the shed.
- Water during a spill can destroy walls and foundations, so you need to take precautions.
- Outbuildings are erected at a distance of at least 12 m from their own or neighboring residential premises.
You can install a toilet nearby so that the buildings are located in approximately the same place.
Other materials for construction:
- bricks;
- tree;
- edged board.
Constructions made from edged boards or other cheap materials can significantly save on construction costs.
Purpose of the utility unit on the farm
Buildings such as a utility block do not have any frames or restrictions in choosing the width, length and height of the building.
Detailed layout of a utility block 5x5 meters with a bathroom
Their appearance depends entirely on your desire and imagination. You have the right to turn your shed into either an ordinary shed or a fairy-tale house in which you will have a pleasant time. If you want to be at the peak of fashion, you can build a utility unit from several sections in a minimalist style. Such a compact structure will not take up much space in your summer cottage.
In addition, if you do not want to carry out all the work yourself, then there is the opportunity to purchase a ready-made structure, which you only have to assemble in literally half a day with your own hands.
Basically, such structures, which can be bought at most building materials stores, are a container with a modular frame structure. Such a “shed” is formed from the main material, a channel and a corner, and then covered with a wooden slab.
This is what a finished utility unit made of metal and wood looks like
There are several main advantages of this type of structure:
- The first is the ease of creating drawings.
- There is no need to spend a lot of time on the construction of a utility block.
- There is no need for pre-installation of the foundation.
- High mobility of the structure.
- You have the opportunity to disassemble or assemble the structure with your own hands many times.
- Absolutely any summer resident or owner of a private plot can buy such a utility block project.
Peculiarities
The building is a structure that combines several rooms necessary for comfortable use. Basically, a utility block for a dacha includes a toilet and shower. You can build several compartments that will be designed to store household items. It is possible that inside you can combine a place to relax with a garage.
The size of the building depends entirely on the individual preferences of the person, as well as the available space on the site.
The design can be completed by installing a corner shower stall. This device can be equipped with heating.
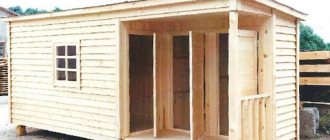
Step-by-step instructions for building a toilet and shower combined with a shed
First of all, you need to start with markings and a cesspool, then the floor, walls, and the roof and ceiling complete the construction. It is advisable to call helpers (for example, friends or relatives), especially those who understand construction. Since it will be difficult to build a utility unit alone, and it will also take longer. Now let's start construction:
- Select an area and mark it for the foundation and cesspool, be sure to level it.
- Dig a hole: depth up to two meters, width 1 meter, and length 1.5 meters.
- Concrete the bottom and reinforce the walls with bricks; you can use concrete.
- Make 20-centimeter holes in the area, up to 80 centimeters deep, for the foundation.
- Place sand on the bottom (10 centimeters is enough) and compact it thoroughly.
- Install formwork, reinforcement and pour concrete pillars.
- Wait a few days until it dries and remove the formwork.
- Install a drain pipe under the place where the shower will be.
- The bars are connected to wooden elements and attached to the concrete structure using studs.
- Make a channel frame over the cesspool.
- Install a frame based on beams in the corners, and place pillars on both sides in the place where the door will be.
- Make the top trim, attach it with screws and corners, then attach the ridge board to it.
- Make the rafters from boards, size 65 cm, then install the sheathing (it is desirable that the boards protrude by 20 cm).
- All that remains is to attach the wind boards and cover the roof with tiles or corrugated sheets.
- Make the floor from boards, at least 40 mm wide, fasten with self-tapping screws to the bottom trim.
- Sheathe the walls and ceiling with boards (do not sheathe the floor in the shower room), first, if necessary, insulate with foam plastic and seal the cracks with foam (ventilation must be done).
- Dig a ditch and lay a sewer pipe from the shower.
- Cover the floor in the shower with crushed stone and fill it with concrete; the floor should slope toward the drain hole.
- Once the concrete has dried, treat the surface with bitumen mastic.
- Lay a wooden floor on top of the concrete, treat the surface of the walls and floor with waterproofing agents.
- Treat the surface of the building with two layers of yacht varnish.
- Run water into the shower and check operation.
- Arrange the remaining premises for your own needs.
So in a week you can build a utility block with a toilet and shower for your dacha with your own hands. Moreover, you will have to wait several days for the concrete to dry. Inside the building, you can, at your own discretion, create partitions, additional rooms, install electricity, and beautifully decorate the toilet and shower room. The main thing is to turn on your imagination and pick up the instrument.
We are building a utility block
Design
Any construction always begins with design, and utility blocks with shower and toilet are no exception. At this stage it is necessary to solve the following tasks:
Main design tasks
You can take a construction project ready-made, for example, on our portal, or make a drawing yourself. The main thing is that it reflects the dimensions of the structure, main details and layout.
The walls of the utility block, as you can see in the diagram above, are based on vertical posts made of timber and horizontal lintels. The basis of the entire structure is the grillage of the columnar foundation.
Corner utility block with shower and toilet
A cellar can be made under the building. In this case, you should use a strip foundation.
During the design process, you should immediately decide on the location of the building. The fact is that at this stage you may have to adjust the dimensions of the structure.
Having a ready-made project and the exact dimensions of the structure, you should count the number of building materials , among which you will need:
- timber with a section of 50x50 mm;
- timber with a section of 100x100 or 100x150 mm;
- OSB boards for covering the frame (moisture-resistant plywood can be used);
- lining or any other material for finishing the facade;
- roofing covering (corrugated sheeting, slate or other suitable material).
Columnar foundation
Foundation
So, when all the above tasks have been solved and the materials have been prepared, you can begin construction, namely, preparing the site and building the foundation. This work is performed in the following sequence:
- First of all, we prepare the site - we clear it of debris, remove the top layer of soil with grass and carry out markings. Particular attention must be paid to markings. To do this, drive pegs into the corners of the building and pull ropes; To avoid mistakes, measure the diagonals - they should be the same.
- then you need to mark the locations of the columns. The distance between the pillars should be about one and a half meters.
- then in the designated places you should dig holes about 30 cm deep. Their diameter should be such that two concrete blocks fit;
- the bottom of the holes must be covered with a layer of sand about 15 cm deep, carefully leveled and compacted;
- then concrete blocks are laid on the bottom with your own hands and columns are erected. The blocks should be laid with dressings and each row should be secured with cement mortar. After this, work must be stopped for a while until the solution hardens;
- Next, you need to perform waterproofing - lay several sheets of roofing felt on the posts;
Example of column waterproofing
- After preparing the pillars, it is necessary to make a grillage from timber with a section of 100x150 mm. To do this, the timber is laid on the pillars. At this stage it is important to ensure that the beams are horizontal. If necessary, they need to be trimmed or, conversely, boards placed under them. The dressing can be done in the “floor of a tree” or in any other way. For reliability, the beams should additionally be fastened with metal corners;
- During the process of building the foundation, you can immediately dig a cesspool for the shower and toilet. As a rule, its main part is located behind the house. The walls of the pit can perform a load-bearing function. To do this, they need to be laid out with bricks or made concrete. If there is no load on the walls, you can even use car tires to seal the hole.
Before laying the grillage, the timber must be treated with an antiseptic compound to prevent rotting. This procedure is also necessary for all other wooden parts of the structure.
This completes the foundation construction process.
Household frame
Frame installation
After the foundation has been erected, the construction of the frame can begin. This procedure is performed as follows:
- first of all, you need to install vertical posts at the corners of the structure, made of 100x100 mm timber. To fix them, you can use metal corners and screws, as well as braces;
- The upper frame is attached to the vertical beams from above, which serves as the Mauerlat of the rafter system. It is performed on the same principle as the grillage. Metal corners and braces are also used to secure it;
- then intermediate posts are installed between the grillage and the Mauerlat. The posts should be located above each foundation pillar. They are installed according to the same principle as corner posts;
- further, to increase the strength of the structure, it is necessary to install cross members, which should be located between the posts in a checkerboard pattern. Boxes are installed at the locations of door and window openings;
The photo shows the roof frame
- Now that the frame is almost ready, you need to complete the rafter system. The easiest way is to make a pitched roof. To do this, one wall must be made higher than the other.
If you want to make a gable roof, you need to assemble trusses that form a triangle. The ridge unit of each truss, i.e. The junction of the rafters must be located strictly in the center of the building.
Scheme of fastening the rafters to the Mauerlat
To secure the lower part of the rafters to the mauerlat, you can use a support beam or make cuts, as shown in the diagram above.
During the installation of the roof frame, you must immediately provide for the location of the shower tank, especially if the roof has a steep slope. In this case, the tank can be placed in the attic, however, you can forget about natural heating of water.
This completes the construction of the frame.
Sheathing of a frame utility block
Sheathing
The final stage of construction is cladding. Instructions for doing this work look like this:
- It’s better to start covering from the roof. To do this, a waterproofing film is laid on the rafters with an overlap of at least 10 cm. To ensure better tightness, the joints of the sheets can be taped;
- on top of the film, lathing is nailed to the rafters - thin boards or slats with a pitch of about 300 mm;
- then the roofing material is attached to the sheathing. On our portal you can find detailed information on how to properly cover a roof;
- The next step is to lay the floor. To do this, you first need to install logs, which should be located at a distance of 40-50 cm from each other. The logs can be embedded into a grillage in the “wood floor”. Boards are laid on top of the logs, which can be used as a finishing or subfloor. During the process of installing the floor in the main room, you can immediately create a small fence made of boards for storing firewood;
- Now that the roof and floor are ready, you can start covering the walls. There's nothing complicated about it. You just need to correctly cut the sheets of material, and then fasten them with self-tapping screws to the frame.
The outside of the frame can be covered with clapboard, siding, corrugated sheeting or other suitable material.
OSB sheathed utility block
At this point, the country house block is almost ready, the only thing left is to equip the toilet and shower. In the toilet, there are no floors laid over the pit, but a toilet seat, essentially a box with a hole. You can attach the lid of a regular toilet to the top of the toilet seat.
As for shower equipment, special tanks with all the necessary fittings, a built-in heating element and a watering can are available for sale for these purposes. The cost of such a tank starts from 4,000 rubles.
Shower tank
That, in fact, is all I wanted to tell you about the construction of a much-needed element at the dacha.
Carrying out foundation installation work
- At the very beginning of the work, it is necessary to carry out the main stage, which will help mark out the territory of the future foundation. Supports or pillars should be in the center of the marking, as well as in the corners.
- The next stage is preliminary soil preparation. To do this, you need to remove a certain layer of soil to a depth of 20 centimeters. Afterwards, to strengthen the base of your future utility block, sand is poured onto the surface to a level of up to 10 centimeters, after which everything is thoroughly compacted.
- Next, work is carried out to prepare the pit for the pillars. Each of them should be about one meter deep.
- When preparing the foundation, it is worth taking into account the dimensions of your utility room, since the parameters of various nuances depend on them. Before installing the pillars, it is necessary to prepare a hole, make a solid base in it from sand or gravel, previously compacted.
- After this, the pillars are installed, their perpendicularity is checked, and at the end they are secured with sand poured into the hole. For greater strength and reliability, pipes can be filled with cement, which will create a more durable base and increase their service life.
- After carrying out this work, you will need to wait about two weeks until the solution completely hardens. To speed up this process, you need to protect it from direct sunlight and moisten the solution with water.
Features of design and operation
The main feature of the design of a toilet with a shower is a single building and a common dividing wall. Each room is equipped with a separate door.
The design of the toilet, separated from the shower room, is equipped with a container for storing and supplying water. Plastic tubes supplying water are connected to this tank. In the shower room, the tube is connected to a watering can. The water supply is adjusted using a tap. It enters the toilet room through tubes that are connected to the washbasin and toilet cistern. In the latter case, it is supplied when the appropriate plumbing is installed.
Such a structure saves the territory of the dacha
The cesspool should be located from the well or water well, no closer than 15 m. The most acceptable distance is 25 m. This is necessary to avoid the possibility of foreign impurities getting into the water used.
When choosing a location for the construction of this structure, you need to take into account the possibility of access for sewage trucks to pump out sewage. If the septic tank is deep and wide, it will take longer to fill. You must not forget to equip it with a hatch to drain the contents.
If the pit is located closer than 15 m from a well or water supply station, its walls and bottom must be carefully sealed.
Shower and toilet projects for a summer residence
Before planning a utility unit, study the rules of SNiP. Then select a site in accordance with the parameters:
- the cesspool is installed at a distance of 20 m from the well and at a distance of 5 m from the residential building; Important! This rule is neglected if a powder closet or dry closet is installed, since sewage does not have direct contact with the soil.
- 4 m from plantings;
- 1 m from outbuildings;
- 2 m to the fence;
- 10 m from the water supply.
In addition to SNiP, the possibility of supplying water and electricity is taken into account. The cabins must be illuminated so that it is possible to take a shower at night. A tank for water intake is installed on the roof of the shower, so the water supply must be thought through at the design stage.
The project of a utility block for a dacha can be arranged in several options. The first is a rectangular building 4 m long and 2 m wide. The room is divided into three compartments:
- toilet;
- pantry;
- shower with changing room.
Each compartment is equipped with a door, and the barn has a window. The dimensions of the toilet and shower are 1.05 m * 2 m, with a total area of 1.61 m2. The length of the pantry is 2 m, the width is 1.9 m, the total area is 3.23 m2.
The second option is a rectangular dacha cabin 2.5 m high, 5.8 m long, 2.3 m wide. The building is equipped with one entrance door and two windows. Upon entering the utility block, you find yourself in a corridor with two doors opposite each other. One leads to a bathroom equipped with a shower and toilet.
The third version of the project is a utility block with a toilet and shower, 2.3 m wide, 5 m long, 2.5 m high. The room is divided into three: a toilet, a shower with a dressing room, and a shed. Each compartment has its own door. The toilet is 2.3 m long and 1.1 m wide, with a total area of 2.53 m2. Shower length 2.3 m, width 1.8 m, total area 4.14 m2. The shower room is equipped with a dressing room and a bench. The storage room is 2.3 m long, 2.1 m wide, with a total area of 4.83 m2.
The next option, a project for a utility block with a gable roof, differs in that the entrance to the bathroom is on one side, and the pantry is on the opposite side. The total area of the building is 11.15 m2, width 3 m, length 4.5 m. The shower and toilet for the dacha have separate rooms, each of which is equipped with a door and a dormer window.
An interesting option is a corner utility block and shower with toilet for a summer house with a total area of 13.68 m2 and a length of 5 m. It has three compartments:
- toilet with a total area of 1.98 m2 with an entrance door and a dormer window;
- shower with dressing room, area 3.06 m2 with window and door;
- a room of 8.64 m2 with an entrance door and a window.
Preparatory activities
Before you start planning the outbuilding itself with a toilet and shower for your dacha, you need to choose a suitable location on your dacha plot. The building must fit harmoniously into the landscape of the site along with other buildings.
Recommended distance between buildings in the country
In addition, there are a number of other points to consider:
- Since the utility block will be equipped with a bathroom with a shower, it will also have a drainage hole that needs to be cleaned periodically. Therefore, such a structure must be placed near the fence.
- The drainage pit should be located at a distance of 15 meters from residential buildings.
- Large trees should not grow nearby, and there should be no underground communications.
- In addition, it is necessary to provide underground tanks into which sewage will be collected.
Distance to a pit toilet for 2022
For holiday villages, sanitary standards were adjusted taking into account the constant complaints and disputes of neighbors about the discomfort from neighboring toilets. According to SNiP 30-02-97 as amended in 2022 and SP 53.13330.2021, in the territory of dacha settlements, rural and urban settlements, toilets with cesspool type pits should be installed at a distance of 12 m instead of 8–10 m.
Their construction for a holiday village requires permission from the SES at the design stage. Instead of traditional houses over a pit, it is recommended to build septic tanks and install biotoilets with special compounds processing feces into odorless inorganic substances, as well as powder toilets with processing feces into dry matter.
If you have a home sewer system and the types of pits recommended by SNiP, you can place the toilet closer. The demarcation between a dry closet and a septic tank from a neighbor's house is allowed 6 m, for a powder closet - 8 m.
The distance from the toilet to the neighbor’s residential building should be measured at 12 m, the same as to your own. According to changes in SNiP, the permissible distance to the playground and cellar remains 8 meters.
Based on SanPiN 42-128-4690-88, for places where the size of the plots does not allow maintaining the distance to yard toilets and waste disposal pits, standards are established by a commission that includes representatives:
- Quarterly Committee.
- Regional architecture.
- SES - Sanitary and Epidemiological Station.
- Housing and maintenance department.
Based on the results of the site inspection, the commission draws up a report with recommendations on the layout of plots and changes in the minimum distances between residential buildings and toilets. Documents are submitted to the executive committee or village council for approval.
In rural areas or villages, in cities and towns, an outdoor public toilet should be located from public buildings, schools and shops at a distance of 20 to 100 m.
Required Tools
When building a country toilet with a shower, you will need the following tools:
- Bayonet and shovel shovels;
- Jigsaw or hacksaw;
- Concrete mixer;
- Electric welding machine;
- Large container with water;
- Buckets or wheelbarrow for carrying concrete mixture, gravel and sand;
- Pliers and wire cutters.
- Screwdriver or Phillips screwdriver.
- Axe.
- Hammer.
- Building level.
- Square.
- Yardstick.
- Cord.
- Self-tapping screws and nails.
- Plane.
- Pencil.
Walls
An uninsulated utility block can only be sheathed on the outside.
The walls of the insulated cabin look like this:
- outer skin;
- waterproofing film;
- insulation tightly laid between the studs;
- vapor-proof film;
- internal lining.
Note. When insulating with mineral wool, a ventilation gap is required between the waterproofing film and the top covering. It is set using an additional distance rod.
The technology of external and internal finishing depends solely on the options used. Even painting OSB is used as the most affordable method. But to improve adhesion to paint, you need to clean off the protective layer.
Video instructions in detail: