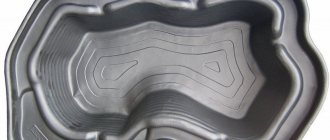
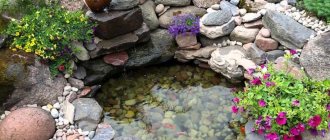
Most owners of personal plots would like to see a water corner in their garden - at least a small one, but still their own personal “lake”. In response to this request, ready-made structures for constructing express reservoirs made of polymer materials appeared on sale. The task of those who want to have a pond is to dig a suitable hole and install a plastic bowl of the selected configuration into it. But is it all that simple? How to choose the right container for a pond? What difficulties may arise during installation and operation? And, just as important, how to landscape such a pond so that it looks as natural as possible?
How to install and decorate a plastic pond in the garden. © Lyudmila Svetlitskaya
Choosing a pond bowl
Plastic pond size
When choosing the size of the future pond, first of all, they are guided by the size of the site, and also proceed from their personal ideas. After all, everyone has their own idea of what place in the garden will be allocated to the water surface.
For a small area, as a rule, it is not recommended to purchase a bowl that is too large, but in large areas you can place both one large and several small reservoirs, which will communicate with each other, or be located independently in different parts of the garden.
At first glance, it may seem that a small pond is easier to care for, but this is not entirely true. Over time, thanks to the vital activity of microorganisms, a balance is established in any body of water, and the larger the capacity, the more reliable this balance will be.
In this regard, it is worth abandoning bowls that are too small and giving preference to medium and large-sized containers. Of course, the water in an artificial pond will not become crystal clear, like in a mountain lake, but a container with enough water will not turn into a stinking puddle either.
Note! In a store window, any (even the smallest) body of water can seem huge. But after installing it in the garden, decorating the coastline and planting plants, the pond will look completely different and visually significantly decrease in size. Therefore, it is worth choosing a plastic bowl for a pond taking into account this optical illusion, because most of the structure will be buried in the ground.
Pond shape
Bowls for artificial reservoirs are very diverse in shape, and each gardener can choose a configuration to suit his taste. Such ponds can be more square or elongated, with minimal bends or an elaborate, rugged, almost zigzag coastline. It is better not to choose the last option.
Firstly, when decorating the edge with decorative stone, such ruggedness will be partially hidden, and secondly, such a pond is more difficult to landscape. It is best to give preference to teardrop-shaped reservoirs, with smooth gradual transitions.
Globally, all plastic ponds can be divided into two types: natural (free configuration, reminiscent of natural springs), and regular (round, oval, square, polygonal and others). And if the first ones will fit into almost any garden without any problems, then the second ones are intended to be placed in a regular part of the garden.
Bowl color for ponds
Plastic bowls for ponds are most often black or various shades of blue (blue, sea green, etc.). At first glance, it may seem that the second option is more preferable, since it imitates the surface of the water well. However, this is not at all true.
In nature, blue-blue color is more characteristic of sea water or mountain lakes, but the usual reservoirs of the middle zone, lakes and rivers, most often have dark water. Therefore, the bright blue pond in the garden looks deliberately artificial, and seems at least not organic.
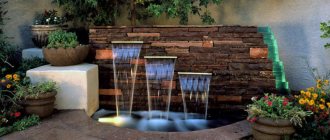
If your idea is to imitate a sea corner by placing goldfish there or to arrange a fountain in a regular part of the garden using a container of the correct shape, then blue ponds may well be suitable and will not hurt the eye. But for setting up a pond with water lilies, lined with coastal plants, black plastic bowls are best suited.
Before digging a pit, place the bowl in the chosen place, move some distance away and evaluate it. © Lyudmila Svetlitskaya
general information
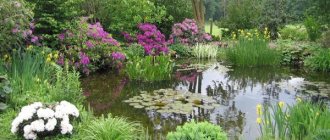
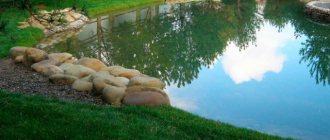
Even a small artificial pond made of plastic makes the cottage very cozy. You can set up a recreation area next to the pond.
Advantages:
- reasonable cost of plastic mold;
- easy preparation for container installation;
- shore strengthening and installation of terraces are not required;
- quick installation and dismantling of the reservoir;
- the ability to choose the shape and size of the plastic bowl;
- high decorativeness of the element;
- easy care;
- environmental friendliness;
- You can breed fish in an artificial reservoir based on a hard plastic bowl;
- carrying out the work does not require special skills.
Rigid base shape:
There are no negative aspects of high-quality plastic. There are features that you need to know about before purchasing a bowl and installing the container.
Consider the nuances:
- There is no need to dismantle the artificial reservoir for the winter. The correct choice of frame container will help prevent water from freezing. Minimum depth – 80 cm;
- Before buying a bowl, think about the shape and decor of the future reservoir. Select a rigid container strictly according to your plan;
- If necessary, you need to completely change the water.
Installing a plastic bowl for a pond
A properly prepared foundation pit guarantees maximum decorativeness and durability of an artificial pond, so this issue should be approached with all responsibility.
First of all, you need to make sure that the dug hole for the pond exactly repeats all the features of the bowl configuration. Small containers allow you to use a little trick in this regard. In this case, it is very easy to simply turn the bowl over and outline its outline with a shovel or iron rod. After this, 15-20 centimeters retreat from the boundaries of the outlined contour and begin digging a pit.
When installing large bowls, you will have to take measurements first and mark them using rope and pegs.
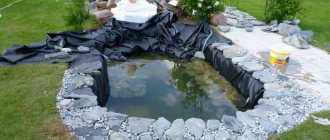
The bottom of the finished pit is covered with sand in a layer of 5-10 centimeters, which must be watered generously and compacted. When installing, it is important to ensure that the edges of the pond are level with the soil and in no case are lowered below ground level. This common mistake leads to the fact that when watering and during rain, soil from coastal areas flows into the pond, and in such a situation you will have to forget about more or less clear water.
It is much better when the edges of the bowl protrude even a few centimeters above the surface of the earth. Such a ledge can then be decorated with the help of stones and coastal plants.
After the bowl is placed in the pit, the most difficult and important stage begins - leveling the pond and filling the voids between the container and the walls of the pit.
Take your time and don’t rely on your perfect eye; it is important to level the bowl relative to the ground surface strictly, and in the process of filling the side voids you will have to periodically check whether the container is tilted to the side.
Important! Even a slight distortion of the pond can spoil the entire impression of the finished pond.
Indeed, in this case, you will never make the water surface perfectly smooth, and one of the plastic edges will stick out ugly, revealing the artificial origin of the source.
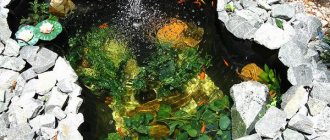
To ensure that the bowl moves less during further installation, the container is filled one-third with water. The voids on the sides of the pond tank are filled gradually. To do this, sand is poured in small portions, which is moistened with water and compacted. As backfilling proceeds, the water level in the pond also gradually increases so that the walls in the sand take their final place.
When the filling of sand between the walls of the pit and the container is completed, use a level to finally make sure that the bowl has not skewed anywhere.
You can begin decorating the coastal area 2-3 days after installing the container, when the bowl settles and takes its final place in the pit.
For stability, decorative stones are installed on flat flagstone. © Lyudmila Svetlitskaya
Do-it-yourself pond design at the dacha: features, photos
After all the manipulations, it is necessary to completely clear the pit.
Do-it-yourself pond design at the dacha, features:
- At the initial stage, the top layer of soil approximately 10 cm high is removed. This is necessary to plant plants that love moisture. Next, gradual deepening is carried out and the depth of the pit is increased.
- This is done in several stages, like steps. The maximum pond depth should be approximately 1.8 m if you do not intend to raise fish. If you plan to engage in breeding, then you need to dig a pit much deeper.
- It is imperative to remove all roots, sharp objects and stones. The next step is a mound of sand, a layer of about 15 cm. It is necessary to carefully compact the sand cushion so that the film lies evenly in the pit area.
Design
Design Design Design
Design Design Design
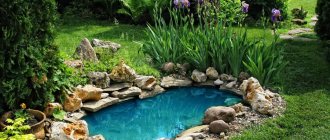
Decorating an artificial pond
The most long-awaited and pleasant moment comes after all technical work is completed, when you can give free rein to your imagination and begin decorating the banks of the bowl with decorative stones and planting plants.
The most difficult task that a gardener faces at this stage is to hide the unsightly plastic edge of the container protruding above the ground. Usually, two methods are used for this purpose: they cover the perimeter of the bowl with decorative stone or plant creeping carpet perennials, which, as they grow, cover the plastic with a living green carpet.
Sometimes both methods are used together. It is most natural when part of the shore is covered with plants, and the other part is decorated with stones, as is often the case in nature.
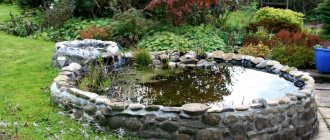
As for decorating the coastline with stone, for these purposes, most often, they use rocks that have a flat shape, for example, slate or flagstone. To hide the plastic edging of the pond, it is important to place the stones directly on it, but in this case they will stand unevenly and unstable (due to the fact that the edges of the pond usually rise above the soil).
To avoid this, you can make a concrete base-formwork around the pond, into which decorative stones are placed. But if your plans do not include a permanent design of the coastline, then you can even out the difference by placing pieces of slate, crushed stone or broken bricks under the stones. It looks very beautiful if some stones hang quite strongly over the surface of the water, while others slightly recede from the water and are covered with coastal vegetation.
Some summer residents use decorative pebbles glued to a mesh to decorate the edges of a plastic pond. You can buy similar “rugs” in large supermarkets in the bathroom tiles department. This option is quite acceptable, but before purchasing it is important to make sure that the manufacturer used waterproof glue.
Often the soil that remains after digging a hole for a pond is used to build high banks, on which something like an alpine slide is then built. Aesthetically, this technique looks good. But as soon as you start watering the newly planted plants, waterfalls of mud will flow straight into the pond. To avoid this, it is important to build slides away from the edge of the pond. In the future, the slopes are strengthened with the help of ground cover plants (for example, sedum), then this problem can be forgotten.
Helpful advice. To make caring for the pond easier, it is important to leave a passage to the water's edge on at least one side. It can be designed in the form of a paved path or platform. Otherwise, when changing water and caring for coastal plantings, the plants will be trampled.
Be sure to make a paved area near one of the banks to provide access to the water. © Lyudmila Svetlitskaya
Algae: how to get rid of them
Blue-green algae can be removed using the following methods:
- chemical;
- mechanical;
- limit growth by creating temperatures, light, and organic substances that are unsuitable for development.
Pollution of a reservoir is associated with a violation of waterproofing. The walls or bottom may crack, allowing soil to leak through the cracks. Cracks may appear due to soil subsidence or the use of poor quality mortar.
To eliminate problems, the pond is drained, any cracks found are cleaned and coated with two layers of sealant. If large defects are detected, they should first be covered with mastic, and a sealant should be laid as the next layer. This repair does not guarantee that the substrate will not crack again. The safest way to eliminate a leak is to lay a special plastic mold.
Landscaping of a decorative pond
Plants planted along the edges of a pond with a plastic base do not necessarily have to be moisture-loving and belong to the coastal group, because the water does not leave the bowl, and along the banks of such a pond it can be very dry without watering.
You can imitate coastal vegetation by selecting plants with a similar appearance. For example, the narrow linear leaves of reeds will resemble numerous grasses (sedge, pennisetum), daylilies and Siberian irises.
It is better to select coniferous plants near the pond with weeping forms (Inversa spruce, Horstman juniper) or creeping forms (horizontal juniper varieties). Most of all, near a pond, hemlock will like it, as it responds well to high air humidity.
But practice has shown that the creeping forms of drought-resistant species such as junipers grow very well, even if their spreading paws hang over the water and lightly touch the water surface. Nest-shaped dwarf fir trees (Nidiformis spruce, Waldbrunn spruce) will also fit organically into the coastal zone.
Nature itself dictates that willows must certainly be located near the water. For a small source, it is better to select dwarf or bush forms, whose growth can be further restrained by cutting. Among the abundance of species and varieties of willows, you can even find creeping forms, for example, creeping willow. And the lowest spherical bushes, suitable for small ponds, are formed by purple willow, “Globular dwarf” willow, and blueberry willow.
Among other species, weeping rowan, varietal dwarf birch and other low trees are recommended for landscaping a pond. When designing a pond, it is important that there are not too many tree species. It is better to plant just one weeping tree on the shore, around which plantings of perennials are formed.
In addition to perennials with linear leaves, the following plants will look harmonious near the pond: bathing suit, bergenia, hostas, buzulniki, brunners, astilbes and many others.
As for ground cover perennials designed to decorate the plastic edge of the bowl, then, first of all, you should look in the direction of creeping sedums (false, siebold, caustic, etc.). Dense mats are also formed by plants such as awl-shaped phlox, chrysanthemum, parsley, periwinkle, and others.
But the coin loosestrife can most successfully cope with this task. The element of this interesting plant is wet places, so rapidly growing, long stems will not only cover the coastline, but will also descend picturesquely to the surface of the water.
The only negative is that even literally floating in the water, the loosestrife will continue to grow, and subsequently it threatens to cover the water surface. Therefore, its size will have to be adjusted by cutting. For landscaping, you can plant the natural form of loosestrife with green foliage or purchase the varietal golden version “Aurea”.
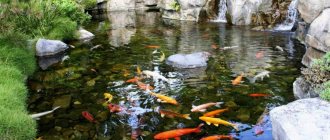
Directly in the water, such plants of water bodies of the middle zone as umbrella susak, plantain chastuha, three-leaved watchwort, and arrowhead will feel good. And such a small unusual plant floating on the surface of the water, like frog's watercolor - a miniature copy of water lilies. Well, and of course, the water lilies themselves. What gardener would refuse such a miracle?
Nymphaeas, as “water lilies” are scientifically called, can be grown in even the smallest plastic pond. To do this, you need to choose a variety from the “dwarf” (planting depth 10-25 centimeters) and “shallow” (planting depth 15-50 centimeters) nymphs.
The variety of divine nymphs is so great that few gardeners will be able to resist the temptation to buy several varieties at once. However, remember about the coverage area of the water surface, because for dwarf varieties it is 30-60 centimeters, and for small ones it can reach 1.2 meters. That is, for a small pond one copy will be quite enough.
Before you decide to purchase water lilies, think about whether you can provide these plants with wintering in a cool, frost-free room? And also whether these plants will receive enough light. A pond with nymphs should be exposed to sunlight for at least five hours a day.
Monkey loosestrife picturesquely descends into the water. © Lyudmila Svetlitskaya
Be sure to plant a swimsuit near the pond, which will delight you with delicate flowers in May. © Lyudmila Svetlitskaya
Daylily looks great on the shore of a pond, but it is important to choose non-garish, monochromatic colors. © Lyudmila Svetlitskaya
Shore cleaning devices
To care for the coastline you can use:
- Underwater rake. They are made according to the principle of garden tools, differing in the length and sharpness of the teeth. The tool must have a metal handle, which allows you to make the device heavier for more efficient work. With this tool you can easily deal with the underwater part of plants and remove plant roots from a reservoir without prior drainage.
- Trimmer. Facilitates the process of cleaning the coastal zone by getting rid of the above-ground part of the plant.
- Hand dredger. One of the most effective tools. With its help, you can erode the soil under the roots of plants, and then use the ejector attachment of the hydraulic ripper to mechanically remove the root system of the reeds.
It is very difficult to cope with such a complex and tenacious weed as reed. To do this, a wide variety of methods are used, ranging from physical impact to the use of aggressive chemicals.
Important! The reed thickets are home to many different rodents, which are carriers of diseases and infections transmitted to humans. Cattail brought into the house may contain the leptospira virus, a disease that is not fatal, but also has no cure.
In any case, it should be remembered that there are no quick ways to get rid of this weed. But by using proven methods and being patient, you can still achieve excellent results in the form of a clean, well-groomed pond.
Plastic pond care
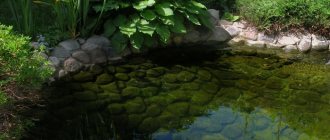
Some neat gardeners regularly clean the walls of the artificial pond from overgrown small algae and change the water almost daily. But such procedures cannot be called useful.
Of course, if the water is stagnant and smells unpleasant, then there is no other choice. But when the biological balance in the pond is more or less established, an unpleasant odor, although the water looks dark, does not appear. Growths on the walls are very desirable from a decorative point of view, because they hide the plastic essence of the reservoir, making it more like a natural one.
Even if soon after installing the container, the water in the pond acquires an unpleasant odor, it is better to endure it a little and change it not completely, but partially. The fact is that during this period, under the influence of bacteria, equilibrium is established in the reservoir.
In addition, to facilitate the establishment of biological balance, you can purchase special products with beneficial strains of bacteria, which are always on sale in aquarium stores. In order for the pond to be “alive”, it is important not to disturb this balance and change the water in the pond as rarely as possible, and also not to locate the reservoirs in places where it will stand under the scorching sun all day.
It was also noticed that the water practically does not bloom if nymphs are planted. To prevent decay processes, it is important to promptly remove leaves and dead insects that periodically appear on the surface of the water. Otherwise, over time, your pond will literally begin to be self-sufficient; cheerful frogs, swimming beetles, dragonfly larvae and many other inhabitants will definitely settle there, which will make the pond truly alive and interesting to observe.
In autumn, the pond requires the most care, as it is important to remove the foliage on time. © Lyudmila Svetlitskaya
Wintering a plastic pond
Often on the Internet you can find recommendations to dig up a plastic bowl every autumn so that during the winter it “does not get torn apart by frost.” However, the numerous experiences of gardeners, including the author of this article, indicate that in most cases a plastic pond can easily survive the winter in soil filled with water. In particular, our plastic lake has been wintering in its place without any complaints for the seventh year now.
To be on the safe side, it is often recommended to put plastic bottles half filled with water or sand in a bowl for the winter. In this case, when frozen water expands while turning into ice, the sand in the bottle will take some of the pressure. But, frankly speaking, in our bustle every year we forget to take these measures before the onset of winter. Fortunately, this did not affect the condition of the pond in any way.
The only serious problem that will certainly arise if the pond is left to overwinter in the soil is the death of frogs in winter. The fact is that in the fall these amphibians select ponds for wintering, and in gardens the choice of frogs falls on an artificial pond. But due to the fact that the water there completely freezes, the frogs die, and in the spring they have to do not the most pleasant thing - catching dead amphibians from the pond.
To prevent this from happening, in the fall, stretch a net with small cells over the pond, making sure that its edges are tightly pressed down with stones on all sides, blocking access to water.
Advantages and disadvantages of an artificial pond
And in conclusion, I want to talk about the main disadvantages and advantages of a plastic pond, which I can confirm from my own experience.
The main disadvantages of a plastic reservoir-bowl
- No matter how hard a gardener tries, plastic garden ponds will always look a little unnatural.
- In an artificial reservoir-bowl it is more difficult to create biological balance.
- Plastic ponds are not very durable and will require replacement over the years.
- Usually, the bowls do not have sufficient depth and exclude the possibility of wintering nymphs and fish.
- A ready-made basin-bowl eliminates the possibility of using a creative approach to shape.
We installed a plastic pond in the garden 7 years ago. © Lyudmila Svetlitskaya
Pros of a plastic pond
- Easy and quick installation of the finished bowl.
- Availability (can be easily purchased at any garden store or supermarket department).
- Wide selection of different configurations and sizes.
- The structure has steps on which coastal plants can be placed.
- Possibility of self-installation without the involvement of hired labor and unnecessary financial costs.
Dear readers! We hope this material will be of practical use to you. We would be grateful if you share your experience of creating a pond in the garden in the comments to the article or on our Forum.