During the ripening of various crops in dachas and gardens, it often happens that birds want to feast on them. And to combat this problem, a scarecrow is most often made, which should scare away birds from the crop. Today on Dacha-svoimi-rukami.com we will talk about making a scarecrow with your own hands.
So, to create a scarecrow in your garden, you don’t need to go shopping for specific materials, since everything you need is most likely on your site. You will also need a little imagination and some skills in creating crafts.
To create a scarecrow you need:
- Even sticks of different lengths, or, if available, shovel handles.
- A long nail, and therefore a hammer.
- Clothes, old, that no one wears anymore.
- A couple of buttons.
- A bag with straw inside.
DIY garden scarecrow: master class
Connect two cuttings, or sticks, depending on what you found, crosswise. You will need a long nail to attach the sticks. In general, this will be the basis for creating a garden scarecrow.
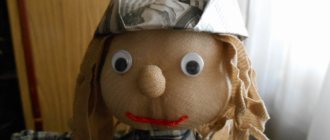
The second stage is creating the head, for this you need to take a plastic bag with straw inside. Next, pull old children's tights or a pillowcase over the bag. The end result is something that resembles a head, but you need to make a scarecrow with eyes, that's what the buttons are for. You also need a nose; here a piece of any rag will come in handy. And you can easily make lips from a terry flap.
Creepy and frightening photos (33 photos)
Next, the head should be fixed at the end of a long stick.
Next you need to find an old dress, jacket or even a skirt, which must be secured to a cross stick. To make the scarecrow look more believable, you can put a cap or a Panama hat, or a scarf on your head.
You can also involve children in the work of creating a scarecrow, and then your garden will be guarded by some fairy-tale character. To create it, you will need all the same materials, but the manufacturing process will change slightly.
Start with the head, make an even outline that will be the face of the stuffed animal. To do this, you need to take a strong piece of material, place a basin on top and trace it. Next, you need to cut out two such contours, one of which will be the face; there, with an ordinary pencil, you should mark the places of the eyes, mouth and nose.
The mouth can be embroidered with a thick thread, the eyes can be sewn on using a darker fabric, and the ears and nose should be made from the same fabric for believability. Next, the contours need to be sewn together, and the free space needs to be filled with padding polyester.
It is also recommended to attach hair to the head; a bunch of thick threads are suitable for this. You can put a hat on your head, or you can make one yourself, say, from a bag.
Next you need to make hands and a shirt, you don’t have to take an old and worn one, but make a new one from burlap, you can do the same with the pants.
And finally, all the manufactured elements of the scarecrow need to be secured to the cuttings.
Watch this useful video: Do-it-yourself scarecrow for the garden
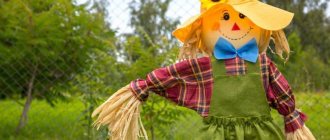
Garden scarecrow, photo:
Unusual garden scarecrow, photo
Do-it-yourself scarecrow for the garden, photo
DIY stuffed animal made from plastic bottles for the garden
Some summer residents began to make a scarecrow using ordinary plastic bottles. It must be said that the effect of such stuffed animals is much better, since they can make sounds in windy weather, and also shine, both day and night.
To create a scarecrow from plastic bottles you need to find:
- A certain number of plastic bottles, different sizes and colors.
- Rubber bands that need to be used to strengthen the structure.
- Bottle caps.
- Wire.
- Definitely Shiloh.
- Scissors and a knife, as well as a stapler, may come in handy.
To make legs you will need up to six bottles, rub for each one. For hands you need approximately the same number of bottles. In each of the containers you need to make holes through which the elastic will pass and secure your guard.
You can use an old water tank as a body. A five-liter bottle is also suitable for the head, to which it would be tedious to attach a face. In order for the stuffed animal to make a lot of sound, you need to make a skirt out of caps.
The process of creating a garden scarecrow will not take much time, but it will scare away birds from your garden harvest, thereby keeping it intact.
How to protect strawberries and cherries from birds, video
How to make a scarecrow
In order for your scarecrow for the garden to be as needed, you need to make it correctly. First of all, we take on the frame on which the entire structure will be supported.
The simplest type of frame for a scarecrow is a cross made of wood or metal, depending on what you have on your site.
After the frame is made, you need to make the scarecrow's arms, legs and body. To make this happen, use old, no longer needed clothes.
For the torso and arms you will need a shirt or tank top and gloves. Old trousers will do just fine, and you can add shoes if you want.
Creating a rock garden - features of application in landscape design. 145 photos of the most beautiful design elementsWe are building an artificial hill on a summer cottage - construction technology and features of application in landscape design (135 photos)
Fruit seedlings: how to choose a variety
Prepare in advance what your garden scarecrow will be stuffed with. Hay, synthetic padding polyester, fabric scraps and much more are suitable as such materials.
Gloves are put on the crosspiece along the edges of the horizontal bar. A shirt is pulled over the frame, its lower part and sleeves are tied with ropes and it is filled with hay.
Pants must be put on in the same way and padded. Here's how to make a stuffed animal from scrap materials.
Put birds on a diet using a garden scarecrow: making a scarecrow with your own hands
As soon as the first cherry trees on the site begin to turn red, all the local sparrows, starlings and crows flock to the feast. And if such a flock “sets its eye” on a tree they like, the harvest disappears within a day. Therefore, the owners try in every possible way to drive out uninvited guests and put up a cute garden scarecrow. The most interesting thing is that after just a couple of days, magpie godmothers can have peaceful conversations on this stuffed animal, sparrows can preen their feathers, and “they wanted to sneeze” at the guardian’s purpose.
Video ideas for garden scarecrow
Why were birds afraid of stuffed animals in the old days, but not today? It turns out that the first scarecrows did not appear for the purpose of scaring away birds. They were amulets that helped protect crops from evil spirits, and the family from outside witchcraft. Over time, the witchcraft purpose of garden dolls was forgotten, and the role of a guard remained, who must protect the berries from bird raids. And a scarecrow can really do an excellent job of this role if, when creating it, you take into account the objects that birds are especially afraid of and incorporate them into the design of the figure.
What are birds afraid of?
So, before we make a garden scarecrow, let’s decide what birds are afraid of:
In nature, the blue color is quite rare, so birds do not have time to get used to it and prefer to avoid places where this color is present.
The blue color in the scarecrow's clothing increases its effectiveness as a guard
- Noise, cod, loud sounds
For birds, noise and crackling mean danger. But if these are city “residents,” then they have already gotten used to the noise and do not react to moving cars or loud music, because they have managed to understand that this noise does not pose any threat to existence.
- Shiny and moving objects
Shiny objects frighten them with glare when they begin to move in the wind. The same applies to suspended strips of magnetic tape, film, etc. They are frightened not by the movement itself, but by the fact that the object that is moving is unfamiliar. For example, the owner may be moving around the garden, but they will continue the feast because they understand that the person is too low or far away, which means there is no threat to life.
A smiling scarecrow will greet you in the garden
- Birds of prey or their dead brothers
Ornithologists believe that of all the methods of control, the most effective will be the use of specially trained birds of prey, which drive “trifles” from the trees, and peck some of them. The second option is to hang the killed bird on a high stick so that it can be seen from all sides of the site. For birds, a killed relative is the clearest signal that there is no need to “pry your nose” here.
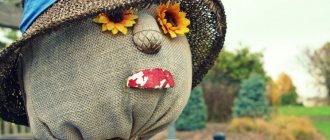
A cute miracle for the garden
Why do you need a scarecrow?
As mentioned earlier, a scarecrow is mainly required to protect the site from annoying birds that spoil the crop and pollute the site.
In addition, recently the improvement of the landscape has become an important function of the scarecrow. Thus, the scary doll, which was always dressed only in rags, turned into a completely neat garden decoration.
The scarecrow should be scary for birds and effectively drive them away from crops, fruit trees and flowers. For those around you, this object should remain beautiful and pleasant to look at, as well as unusual.
You can make an original scarecrow not only from some ready-made sketches, but you can also come up with a style for it yourself.
The most important thing about a scarecrow is its greatest resemblance to a person.
Birds are scared not so much by the appearance of the scarecrow itself, but by its similarity to people. That is why the scarecrow is required to match the height of a person. A bright, noticeable appearance is also required.
When and how to prune roses in autumn for winter: tips and step-by-step instructionsA decorative cart is a beautiful option for landscape decoration, see options and ideas on how to make a cart with your own hands (photos and videos)
- A beautiful decorative mill is a way to decorate your site in an original way without much effort, see how to make a mill with your own hands!
After these rules are taken into account, the decoration is installed in the place that requires protection or what it will complement. This is how a scarecrow on the site will not only help to disperse the feathered robbers, but will also complement the design.
Scarecrow Kuzya made of fabric
A bird on the shoulder, or better yet, on the head, will help the stuffed animal scare away birds
For Kuzi you will need:
- An old shirt and pants. Let at least one thing be blue.
- Hat/cap, gloves.
- A pole, about 2 meters high, and a shorter crossbar (about a meter).
- A cloth bag from which the head will be created.
- Nitron or straw for stuffing.
- Sewing pins or needle and thread.
- Markers.
- Leg-split.
- Two CDs.
- A stuffed bird, a dead crow, or a balloon.
- We create the frame of the future scarecrow: we nail a crossbar to a pole at a height of 1.7 m. It will serve as the basis for the shoulders and arms.
- We construct the head: we stuff nitron or straw into a white fabric bag (today they are used to pack shoes, spare parts for plumbing, etc.) to give the shape of the head. If you don’t have a bag, make one from an old pillowcase, sewing it together with stitches around the perimeter.
- Place the finished head on the top of the pole and pull the edge of the bag (they are sold with ropes). If the head is made of a pillowcase, tie the edge to the pole with twine.
- Create a face with markers. They, unlike felt-tip pens, do not fade from the sun and do not peel off in the rain.
- Use nitron threads (you can use ropes, straw, etc.) to create a head of hair and attach it to the top of your head with pins or sew it on.
- Place the shirt on the crossbar and pin it.
- Stuff the sleeves and interior with straw. Sew or pin the edges of the sleeves and shirt so that the filling does not come out.
- Stuff old gloves with nitron and sew them to the edges of the shirt sleeves.
- Thread a rope through the discs and tie its top edge to the gloves. Let them toss and turn and scare the birds with their shine.
- Stuff your pants with straw so that most of it is on the legs. Tighten the edges of the legs with twine and sew the top to the shirt. There is no need to fix the bottom of your pants. Let them flutter freely in gusts of wind and create the impression of a moving figure.
- Place a hat on your head, and place a dead crow (if you find it somewhere) or a stuffed bird on top.
- If the crows are not found, attach an inflated balloon to your cap. Just leave a little thread at the end so that any breeze causes the ball to swing.
The stuffed Kuzya is ready - place him in the area between the ripening cherries.
Stuffed Dusya made from plastic bags
The larger the packages from which the scarecrow costume is created, the more noise and movement they will create.
To create the beautiful Dusya you will need:
- A stocking or piece of flesh-colored tights.
- Plastic trash bags (or regular bags).
- Tin cans for beer or drinks.
- Twine, pins, thread and needle.
- Nitron.
- Black tow.
- Colored markers.
- Scotch.
- A pole, about 2 meters high, and a shorter crossbar (about a meter).
- See point 1 in the previous master class.
- We create the head from a nylon stocking, which we stuff with thread, nitron, scraps of fabric, etc. (but not straw, because it will stick out in many places and pierce the nylon).
- Place the head on the top of the pole and secure the bottom with twine.
- We draw the face with colored markers and sew on the eyebrows using black tow.
- We create hair from tow and fix it on the top of the head with threads or pins.
- We create a bow from the bag and attach it to the top of the head. It is desirable that the package be blue.
- We make the sleeves: we put plastic garbage bags on the crossbar so that the open edge is towards the sides, and the glued edge is towards the center. (When we put the bag on, the glued edge in the center will break through with a crossbar). We wrap tape around the edge to secure the bag to the frame. Let the second edge flutter and scare the birds.
- We put a T-shirt or a short-sleeved blouse on Dusya.
- We fill the T-shirt with nitron.
- For the skirt you will need plastic bags in two colors (preferably one is blue). First, we tape the long petticoat to the pole, creating it directly on the pole. The second tier - a short skirt - is secured with tape on top of the first. The fuller the skirts are, the better they will move in the wind.
- We give Dusya the iron cans tied with twine into her hand, and let her rattle them, scaring the birds.
Scarecrow "Karkusha"
Karkusha is a scarecrow that can be used to replace a living bird that you don’t want to kill. The silhouette of a crow will scare, if not crows, then sparrows and starlings.
Scaring birds with a bird is the surest way
For Karkusha you will need:
- Black fabric (polyester).
- Children's shorts/breeches in black.
- Black and yellow knee socks.
- Black nylon stocking.
- Styrofoam.
- Black tow or linen.
- Black nitron.
- Glue, twine, thread, pins.
- The marker is black.
- Rods.
- Pole with crossbar.
- This is a smaller scarecrow than Kuzya and Dusya, so a pole 1.5 m long and a crossbar half a meter long are enough.
- We cut out a square from the fabric, the side of which is 50 cm. We cut a hole in the center to put it on the pole, and cut all the edges with ribbons, the length of which is about 5 cm.
- We put the fabric on the crossbar so that there are triangles at the front and back.
- To give the figure volume, we stuff it inside with nitron, and stitch the edges (up to the cut ribbons) with threads or secure them with pins.
- At the edges of the crossbar we tie bunches of tow or flax, which will imitate bird wings. The longer the tow, the better it will flutter.
- We create the head from a black stocking, stuffing it with black nitron. We put it on the pole and secure it with twine.
- Cut out eyes from foam plastic and glue them on.
- Cut out the nose from the foam and glue it (the glue must be quick-setting!).
- Draw the pupils in the whites of the eyes with a black marker.
- We create a forelock from tow and glue it to the top of the head.
- At the level of a meter, we tie a bunch of rods to a pole on which Karkusha will sit.
- We stuff children's shorts and socks with nitron and sew the socks to the legs.
- We sew the shorts to the body and the bars so that it appears that the scarecrow is sitting.
- We cut out the paws from foam plastic and glue them to the socks.
- We tie iron cans to the rods with long threads.
We hope that these three scarecrows, having appeared on your site, will save your crops from bird attacks.
Step-by-step instructions for drawing a stuffed animal
1. Scarecrows are often supported by two pieces of wood arranged in a crossbar shape. To draw this, start by drawing a pair of straight, horizontal, parallel lines. Enclose the ends of the lines using short, curved lines. Then draw another set of straight, parallel lines perpendicular to the first. Trace the top of these lines with a short line.
2. Draw a short, straight, diagonal line at the top of the crossbar. Enclose the space underneath using a curved line. Notice how the figure curves inward just below the straight line. This outlines the head of the stuffed animal.
3. Erase the guide lines from the head as well as the top of the crossbar.
4. Outline the scarecrow's jacket. On each side of the vertical beam, use long, curved lines to enclose the sides of the "L" shapes.
OTHER EASY DRAWING GUIDELINES:
5. Draw the scarecrow's hat. Draw a curved line across the top of the head and use an additional line to enclose the bell above it. Then draw another curved line through the hat to separate the brim from the body of the hat.
6. Erase the guide lines from the hat and jacket.
7. Draw another line across the hat, creating a stripe. Draw short lines coming from under the hat, showing the straw hair. Draw more straw sticking out from the ends of the sleeves. Draw circles and irregular squares on the jacket to indicate repairs and corrections. Draw a few short lines along the edges of these shapes to form stitches. Finally, draw the tufts of grass underneath the scarecrow using short, curved lines.
8. Erase any remaining guide lines.
9. Detail the face using two shaded circles for the eyes, an inverted rounded triangle for the nose, and a U-shaped line for the mouth. Add finishing details to the garment by drawing a collar on each side of the jacket using two curved lines that meet at a triangular point. Draw a small inverted triangle under the head and draw a straight line from its tip to the bottom of the stuffed animal.
10. Paint your scarecrow and let it scare the crows.
DIY children's crafts in summer
In the summer, many children like to relax with their grandmother in the village, at the dacha. To preserve interesting impressions from your summer holiday, you can make this country still life with your children.
DIY country still life
Materials and tools
■ Colored, corrugated, packaging cardboard
■ Colored, white, corrugated paper
■ PVA glue, glue stick
Cut out a circle with a diameter of J 3 cm from white paper and draw a scarecrow's face on it.
2. Take a strip of yellow paper 5 cm wide and make frequent deep cuts on it - this will be the scarecrow's hair. Stick them on your head.
3. Cut 2 narrow strips of 12 and 20 cm long from packaging cardboard and glue them in the form of a cross. Glue the scarecrow's head to the top of the vertical strip.
4. Take the remaining yellow paper with cuts and stick it on the ends of the cross in the places where the hands should be (Fig. 1).
5. Wrap the horizontal strip in red crepe paper and secure with glue (Fig. 2).
6. Use red crepe paper to make the body of a scarecrow. Belt it with a thin blue ribbon.
7. Glue the bottom part of the cross onto the oval made of packaging cardboard and cover the top with another, smaller oval. This is necessary to create volume. Glue the scarecrow to the background.
8. For sunflowers, cut out 2 circles with a diameter of 2 cm from green paper and green corrugated cardboard.
9. From yellow paper, cut out 30 oval petals 1.5 cm long (15 for each flower). Glue the petals onto a circle of green paper, and glue a circle of corrugated paper on top.
10. Cut stems and leaves into heart shapes from green paper.
Head for a scarecrow
To make a scarecrow for the garden you will need one more detail - the head. A fabric bag or two pieces of fabric sewn in the shape of one will be suitable as a head for a scarecrow.
The inside is stuffed with the same filler as all the other components of the scarecrow. All that remains is to attach the eyes, nose, mouth and ears. Also don’t forget about hair, which is made from straw or thread.- Do-it-yourself mailbox - a detailed description of how and what to make a beautiful and convenient mailbox for letters (80 photos and videos)
Flowerbed made from bottles - a master class in making original flowerbeds. 120 photos of decorating a flower bed using plastic
Garden furniture - tips on selection, use and care. Rules for placement and nuances of choosing material (105 photos)
You can simply draw a face, or use a masquerade mask. If you have enough imagination, it won’t be difficult to come up with something to make a head out of. For example, an excellent option is an ordinary five-liter plastic bottle.
And it’s even easier to make a head from a flower pot; you can plant grass here as hair. An old doll head or mannequin head would also look good.
Many people simply don't bother creating the head and attach a tall hat that is tied or stuffed.