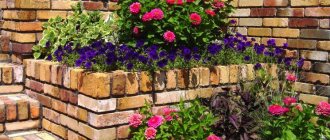
The use of brick in the design of a flower bed gives the area a completely different look. In this article, we’ll look at how to make a flowerbed out of brick with your own hands.
Brief overview of the article
- Advantages and disadvantages
- How to make a flower bed correctly
- Marking
- Fill
- Masonry
- Planting flowers
- Decor
- Recommendations
- Plot size
- Lighting
- Triangular
- Slide
- Round
- Photos of brick flower beds
Advantages and disadvantages
Before drawing up a flowerbed project, it is necessary to take into account all the nuances. Initially, you need to decide on the type of future flower bed and the type of brick required for this.
The main advantages of virtually all types are their beautiful appearance and relatively low cost compared to other materials. In addition, brick allows you to conveniently divide space in the garden and protects against weeds.
The disadvantages include the inability to quickly move the flowerbed. In order to disassemble it, especially if the masonry is laid out in more than one layer, you will need to spend quite a lot of time.
Laying technology
Before laying, it is important to determine how relevant the cement mortar is. The latter serves as a binder, contributing to the strength of the laid brick and the stability of the structure as a whole. From here it is clear that multi-tiered and high brick flower beds are best built using cement.
Cement is also relevant when organizing cross and Flemish facades. At worst, the finished one and a half masonry can be finished with clinker. The only disadvantage of cemented flower beds is the impossibility of dismantling them.
- A squat, single-row laying of brick along a flower bed seems simple. But if it is a “snake”, then you can get injured on the corners of the building material.
- Therefore, high flower beds are safer than low ones.
- On the other hand, multi-tiered and other flower beds rising above the ground sag from their own weight and groundwater.
- To avoid this problem, it is recommended to build a high flower bed on a pre-arranged monolithic or strip foundation.
How to make a flower bed correctly
The construction of a brick flower bed at the dacha involves several stages. All you need:
1. Garden shovel; 2. Roulette; 3. Pegs; 4. Rope; 5. Hammer.
Before starting construction, you need to choose a suitable location on the site. The flowerbed needs sunlight throughout the day. In addition, some varieties of flowers do not like strong winds, so you will need to take care to avoid strong gusts of wind.
When everything is clear with the location, you need to determine the shape of the flowerbed. In most cases, it depends on accompanying buildings, plants or trees. If the flower garden will be located right in the middle of the plot, it is recommended to make a round flower bed. If the flower bed will be located at the edge, a square shape is perfect.
Construction process
Having built beautiful flower beds on your site yourself, it is doubly pleasant to admire them in the future. If you have chosen a design option and everything is prepared, you can begin to apply markings. For this, rope or twine and stakes are used.
The rope is tensioned and at the desired height. You can apply the outline with sand. According to the markings, a ditch is dug out. Its depth should be at least 30 cm for a wall five bricks high.
The higher the wall, the deeper you need to dig. Several tiers will require a depth of at least 80 cm.
Then a sand layer is poured. The next layer is crushed stone. It’s worth finishing with baking again. Each layer should be approximately five centimeters.
The layers are compacted and the first layer of brick is laid. Such a base will provide stability and serve as good drainage. Water will be able to flow freely, which will protect the roots of plants from rotting.
The first three layers of bricks, which are laid on top of each other without cement, will perform the same function. You can completely fold the flowerbed without using cement. But this option will last less.
The fourth and subsequent layers are laid on cement. The solution must be allowed to dry. It is recommended to start filling the finished flowerbed with soil no earlier than 4-5 days after laying.
In order to avoid expansion of the flowerbed under soil pressure from overgrown plants, when laying it, the bricks are slightly shifted inward, forming a barely noticeable shape of the pot. This will help maintain the original shape of the flowerbed longer.
Masonry
This approach will ensure maximum stability of the brick. Once the cement has hardened, you can begin laying the brickwork. When the cement has dried, you can proceed to the next stage of flower garden construction.
Please note that the ratio of sand and soil should be no more than 1:2. This will make it possible to saturate the soil with oxygen. In order to ensure rapid subsidence of the soil, it needs to be watered regularly for 2-3 days.
Formation of fences
Making beds from slate is not as easy as it seems at first glance. Before installing the slate, you need to cut it with a grinder. The slate must be carefully broken into plates so that they are the same width. Next, you need to dig shallow trenches, after which you can begin to install the fence. Creating identical neat beds occurs as follows:
- First, the territory of future beds is marked, bars for fastening are driven into the corners of the perimeter, and a rope is tightly stretched between them. Along a stretched line, a trench is broken into the depth of a spade bayonet.
- Install curbs. The plates must be the same size. Each plate is carefully installed in the trench, lightly nailing them with a hammer. The walls are leveled using a regular building level.
Example of installing a flat slate border
In this case, it does not matter whether the borders are made of flat or wavy slate, with the exception of appearance. Flat slate looks more neat, with it the beds acquire the correct geometric shape, it is easier to saw, and the integrity of the structure will not be compromised. Therefore, you can use any of the proposed options. All those who want to simplify physical work on the land and give the site a well-groomed appearance can create such high beds of slate in their dacha.
Mounted raised beds made of slate
Thin slate has one significant drawback: at the time of distortions and heavy rains, this device needs to be adjusted.
When working with this material, you need to take into account the harmful effects of slate: it contains asbestos cement, which has an adverse effect on the soil composition. Another disadvantage of using slate is its heating from direct sunlight, which increases the evaporation of life-giving moisture from the soil. It can be easily eliminated with frequent watering.
An example of a slate border in a country house
Decor
When all the main work is completed, it’s worth thinking about decoration. Beautiful flower beds will perfectly complement the appearance of the site. In addition, with the proper approach, they are able to focus attention only on themselves, hiding any shortcomings of other buildings.
You can use virtually anything as decoration. As a source of ideas, you can look at photos of brick flower beds; they are often originally decorated.
The easiest way is to add matching elements. For example, the fencing of a flower bed can be painted in a color that will match the color of the house or other buildings on the site.
In the flowerbed itself you can place decorative toys and add small stones. If you wish, you can add beautiful painting to the brickwork, but for this you need to have the appropriate visual skills.
Jaggedness
This laying method is best suited for designing paths that will serve as the border between the flower garden and the pedestrian area. Both whole brick and halves are used here.
But today you can often see low flower beds in this variation. At the same time, their layout is no different in technology from creating borders.
Plot size
To create a beautiful flower bed, you need to correctly select its shape and size for a specific area and place on it. If the area is small, triangular shapes are perfect, less often in the form of an island. In the case of an island, a beautiful bench will go perfectly with it.
It is also worth paying attention to the type of plants that will grow in the flowerbed. It is worth understanding that tall plants are not always able to fit harmoniously into the environment, no matter how much the owners might like it.
In addition, changing the type of plants is much easier than adapting the environment to suit them. Low-growing and bright, as a rule, they look very bright and advantageous, and are actually universal.
Smooth edges
If this option was selected for a structure that “grows in height,” then the installation is done on the transverse edge. For low ones, the brick is placed on one side. This way you can create an even, smooth surface. You choose the width individually.
We recommend reading:
What you need for a comfortable holiday in the country.- Alpine slides in landscape design on a small plot: the best ideas and stages of implementation
How to make a country washbasin: examples of building a simple and convenient washbasin with your own hands (90 photos)
For example, a beautiful flower bed located in front of the house can be 1.5 bricks wide. In this case, the structure can be decorated with various pots and figurines.
Lighting
Depending on the types of plants that are supposed to be planted in the flowerbed, care must be taken to provide adequate sunlight. You may need a place that will be well lit by the sun all day long. It is also worth taking care of protection from the wind. Not all flowers can easily withstand strong gusts of wind; they can break the plants.
Recommendations for creating a flower garden
In order for a flower garden made on your own to look stylish and aesthetically pleasing, you need to take a responsible approach to the choice of plants.
What flowers can be planted in a brick flowerbed?
It is not recommended to plant too many bright flowers in one flowerbed. They will act annoyingly. If the flower bed is large, then planting vegetation in the same color scheme on it is not used.
To make it more attractive, it is recommended to choose several shades that harmoniously combine with each other. If the flower girl is placed in the shade, light flowers are planted on it. And in the sun you can plant purple and dark red plants.
In conclusion, it is worth noting that absolutely any owner of a summer house or country cottage can make a flower girl out of brick. Here it is important to familiarize yourself with the stages of work, select consumables, come up with the optimal dimensions, shape and style of the flowerbed, and stock up on free time.
Slide
Such a flower bed is suitable only for large areas, since in small areas it will visually reduce the space. The point is a smooth transition from the top to the bottom.
The construction stages are virtually the same as in the classic version. Very often they create a gradient effect from flowers, it turns out very beautiful and impressive.
Polygons
Polygonal flower beds fit perfectly into large spaces in a garden or other area. They decorate the area near the house and are able to divide it into separate sectors.
Round
They look good in the middle of the site. If space allows, small semicircular flower beds can be placed around them. They will complement a large flower garden. However, the construction of such an option will take quite a lot of time, not to mention planting flowers, decorating and proper care.
We considered a large number of options for virtually any site. Each of them, if desired, can be changed or supplemented; it all depends only on the imagination of the builder. They can easily be adapted to local climatic conditions by installing additional protection or canopies. In rainy regions, a flower garden is often combined with a gazebo.
Material advantages
Brick allows you to:
- make flower beds in various forms, as well as several levels;
- use other natural materials: wood, stone, grass;
- do not worry about the condition of flower beds for a long time, because brick has a long-term use;
- install high fences for flower beds.
In addition to the above, different colors, textures and shapes will allow you to create flower beds of unique beauty.
Of course, we are talking about quality material. It is not recommended to choose ceramic bricks with cells; they can increase thermal insulation. During frosts it can even turn into ice due to water entering the pores.
Sand-lime brick with low moisture resistance is also not recommended for such purposes. An excellent option is a solid brick that can withstand several cycles of freezing and thawing.
Photos of brick flower beds
Wooden fences
Wood is a very cozy and warm natural material that will look quite natural on the site. It does not heat up in the sun and does not reflect the sun's rays, so it will not burn delicate vegetation. Working with such material is simple, interesting and enjoyable; it does not require any special skills. A significant drawback is the fragility of wood, which is partially compensated by treatment with special impregnations and periodic tinting. In this case, it would be appropriate to use any type of wood - from cut branches to lining, picket fence and even slab.
An unpainted fence of medium height will go well with the decor of an antique garden; it can both enclose flower beds and separate areas of the lawn
Wooden fencing can be very diverse:
- palisade or border made of pegs (blocks) buried in the ground
- inlaid picket fence - both simple and carved planks, including different widths
- mosaic laid out from flat transverse cuts
Cross sections of logs can be dug in or laid to your liking, for example, in a mosaic
- log fence
- branch fence
- wickerwork
It’s quite possible to make a fence from thin branches or a wattle fence yourself
Paving slabs can be used to lay a border of any configuration that is needed for zoning your lawn
A fairly simple decorative fencing for flower beds with your own hands is edging a flower bed with wooden chocks. For this, logs of approximately the same diameter can be used, and 20 cm should be added to the required height of the fence - to this depth they are buried in the ground. Before installation, the logs are cleared of bark and treated with an antiseptic to prevent rot.
A fence made of wooden blocks will be strong and stable if it is dug to a depth of about 20 cm. To protect against rotting, the wood underground should be wrapped in roofing felt tape
In addition, the bottom of the logs can be wrapped in roofing material - this will reliably protect the wood from ground moisture. A ditch is dug along the perimeter of the planned flowerbed, 20 cm deep, logs are placed tightly and evenly in it and, compacted well, they are covered with soil. If the tree is well protected from moisture, such a fence will last for at least ten years.
How to make a wooden border with your own hands - details in the video:
Plastic fencing
Plastic attracts with its excellent performance qualities: immunity to moisture and temperature changes, it is not hygroscopic and durable, and retains its shape perfectly. A plastic fence is easy to install and equally easy to dismantle, replace or rearrange. A huge plus is a large selection of sizes, shapes, sizes and colors; it’s easy to choose a plastic fence to match your landscape design style. There are borders that quite accurately imitate stone, wood or brick.
Plastic fencing made of separate sections is the easiest to install
Multi-level plastic flower bed
The main options for plastic fencing:
- sectional fences are of different colors and configurations, small in height, they already have strong cast pegs at the edges. To get a fence, you just need to drive the pegs into the ground
Sectional plastic fences are the easiest to install and maintain.
Plastic fences can imitate wood; it looks nice and natural, and is doubly convenient to install: you won’t need to ensure that the wooden chocks are the same size
- plastic border - flexible tape in a roll. With its help, you can get a flowerbed of any, the most bizarre shape, or fence off a path that bends along the flower bed. The border tape can be either smooth or have a textured surface: corrugated, imitating stone or brick.
Sectional plastic borders also come in the form of a tape. They are easy to transport, install and maintain
Installing plastic fencing for flower beds with your own hands will take a minimum of time.
Advice!
Before installation, unroll the plastic border and place it in the sun - it will become softer and more flexible, making it easier to install.
A plastic fence with imitation bark on log cuts looks the most natural and very neat
To begin with, dig a ditch around the perimeter of the planned flower bed (the depth depends on the purpose of the border; to protect it from roots, the border is buried deeper). Measure the tape to the required length, and so that the ends do not diverge, fasten them with a stapler. Place the curb tape in the recess and fill its lower part, compacting it well.
Advice!
Along the outer edge, the border can be decorated with small pebbles, crushed stone, cut bark and other bulk materials.
A plastic fencing tape will reliably separate the lawn and the flower bed, so you can indulge in varied decor: pebbles, bark, crushed stone
Light, low, openwork wrought-iron fences will decorate almost any garden. For flower beds with tall flowers, you can choose the appropriate height for such a fence, and it will provide a good view of the flowers
