A small children's house, a piece of the baby's personal space, plays a huge role in his development and upbringing. Here we can talk about the development of responsibility, moral education, developing skills of caring for things, thriftiness, and the ability to make independent decisions.
Wooden playhouses are a great option to entertain children in the country house or in the courtyard of a country house . Ready-made structures are expensive, but such a house can be easily and quickly made with your own hands. It is enough to study the drawings, choose the appropriate one and follow the instructions. We bring to your attention the best ideas and projects of children's playhouses. Their construction does not require special skills - just desire and a minimal set of tools.
There is a wide variety of options in terms of manufacturing methods, materials, sizes and location. What materials can you use to build a house with your own hands and what do you need for this? Here you will find the answers you need.
We build it ourselves: drawings and dimensions of a children’s house in the country
Excellent compact houses for children made by domestic and foreign manufacturers are offered in stores. However, it is much more interesting to build a children's house with your own hands ; drawings with dimensions can be found on the Internet and you can choose the optimal one. Building a new corner of your own with a child of any age will allow you to spend time together and usefully, developing a trusting and warmer relationship. In addition, the house, to the construction of which the child had a hand, even in small things, will become an important object for him. Plus, it will teach him responsibility.
At the stage of drawing a drawing, it is necessary to communicate with the child: how he wants his house to look, in what shape, what color. This moment is important both for education and for the construction itself. This could be the house of a fairy-tale hero, a princess’s tower, or a cartoon garage.
We offer several drawings that will help you decide on a house or serve as the basis for creating your unique structure.
Externally, the house should be designed in accordance with the style of the residential building and the entire landscape. At the same time, the structure should be attractive to the child, so it can be decorated in bright colors and fit, for example, into the concept of a playground.
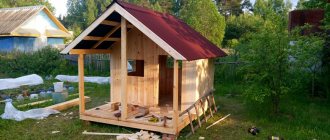
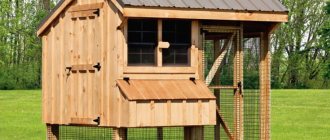
Playhouse for a summer cottage with a sandbox below
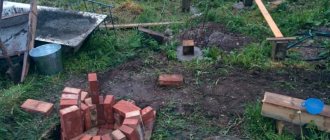
We bring the brought timber 100*100 mm until smooth. You can use a plane, or you can use a drill with sandpaper attached. First with large grains, then with small ones. Afterwards we treat it with a protective compound against rotting and paint it. While the pillars are drying, we drill holes (our diameter is 23 cm, depth 60 cm). We fill them with crushed stone at the bottom near a shovel. We put up the pillars, set them vertically, fill them with crushed stone, compact them, and concrete them.
We prepare the pillars, impregnate them, install them and concrete them
We cut the exposed pillars all to the same level. We fix the same 100*100 mm beam on top. It is also carefully processed so that there are no splinters. We connect it into half a tree: at the ends we cut out recesses half the thickness of the timber. For a 100*100 mm beam, cutouts are 50 mm deep and 100-100 mm in area: so that the same sawn edge of the other beam lies flat.
We fix the top beam. Three have been collected, the fourth is still lying around.
We fasten it securely: 2 long nails (200 mm) on top, corners on the sides with self-tapping screws.
Corners on both sides
We attach an additional beam along the long side. Under it in the middle - above the stand - we cut a notch, also half the thickness of the beam - 50 mm. No more preventing wood from splitting. We cut down the timber at the ends in the same way as those that go along the perimeter: into half a tree. It fits into the prepared gash.
Cut out a seat for the cross beam
A children's house must have a solid margin of safety. Therefore, we play it safe in every connection. To give the structure stability under lateral loads, we will install jibs. We cut them from 50*50 mm timber, sawing the ends at 45°.
Preparing the jibs
We put it at a standstill, squeezing well.
Installation of jib
After installing the jib, we lay the board. This will be the floor of the house.
Without an assistant - no way
We cut the flooring from the boards. It is more convenient to work with a jigsaw, but you can also use a hacksaw.
We cut off the excess boards, leveling them along the timber
On the finished flooring we assemble the frame of a children's playhouse. We use timber 50*50 mm. We position the beams strictly vertically, first fasten them with nails - two on both sides, then reinforce them with corners on self-tapping screws (also on both sides).
Assembling the frame of the house on the second floor
We increase the rigidity of the structure by installing jibs. Then we nail the second floor trim. We simply nail these beams between the pillars. They must be sawed off with great precision so that the building does not warp. We strengthen the joints with corners, then install the jibs.
We put the jibs at the bottom, then assemble the upper harness
We do not nail the jib in the place where the entrance will be.
The main frame is assembled
Next, we install intermediate posts to form windows. The fastening method is the same: two nails on top/bottom, then two corners.
Ready for sheathing
They covered it with boards left over from the packaging of the equipment. You can use it from pallets, buy an inch board (12-13 mm thick), cover it with clapboard or imitation timber, logs, siding.
Sheathing goes quickly
When the sheathing is almost finished, we begin to assemble the rafter system. It’s easier, of course, to make a pitched roof - make one wall higher and no problems. But the gable one looks better, although it is more difficult to execute.
For the rafter system, we place two boards per edge and connect them at the top, sawing off the corners. The ascent depends on the desire and amount of snow. If there is a lot of snow, raise your skate higher. If not, maybe about a meter or less. We knock it down with nails, then we strengthen the connection with overhead plates.
Assembling the rafter system
When building houses, they place either a metal plate or a piece of board here. We decided to use a board.
Reinforcement with overlay
Next, you need to form a gash so that the resulting triangle rests on the upper beam. We put it on, mark the place and roughly cut it out. Then we adjust it so that the rafters “sit” tightly.
It is important to place the rafters correctly
Using the finished sample, we mark the other rafters. We cut it out, knock it under two rafter legs at an angle (all should be the same as a carbon copy). Having installed it on the top of the house, we check the verticality. Then we nail it with two nails on both sides and place the corners.
The rafters are standing
Now the sheathing boards are laid on the rafters. The roofing material will be ondulin. We lay the board 11*100 mm in increments of 30 cm.
The sheathing is mounted
Based on the thickness of the board (11 mm), we use self-tapping screws 25 mm long to fasten the ondulin (so that they fit well into the board. We put rubber gaskets under the caps to prevent leakage.
Laying of roofing material on the roof of the children's house is completed
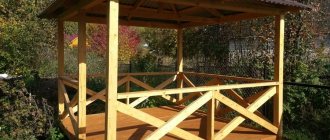
Next - finishing work and safety - railings.
Start of painting
Railings made of treated, sanded boards. Screwed onto powerful 90 mm self-tapping screws. Two for the bottom beam - one for the sheathing board.
Railings are installed on the “veranda” of the house. Powerful self-tapping screws, three for each plank.
At the top, the railings are connected by a 30*30 mm beam. Then a board will be nailed to it - a handrail.
Almost finished The railings are ready for painting
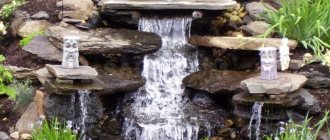
It was decided to put a sandbox downstairs. It is not difficult to assemble: eight boards on the walls, connected at the corners using bars, with a side board nailed on top. Then the sandbox is painted. Read about how to make sandboxes here.
Painting a sandbox with four pairs of hands
Installed in place
Final version (for now)
Even a “non-builder” can build such a children’s house with his own hands. There are no particularly complex jobs; you can get by with basic tools.
Several options from the same series are pictured below. Two are houses with a slide, and one is a one-story option, more suitable for girls.
Downhill
Sports corner in the lower part Children's playhouse with a slide One-story “open” option
Making your own playground is described here.
Classic and improvised materials for the house
Houses can be of varying degrees of complexity, reliability and high cost. However, even on a small budget there is an option that will suit the child’s taste and the parent’s wallet . Budget options made from cardboard or PVC pipes will serve to create structures no less interesting than classic wooden ones. A table, an unnecessary tent, a box of large household appliances - with the proper imagination, everything will come in handy. What can be used to create children's joy - choose for yourself.
Tree and derivatives
The most popular and traditional material for making a children's house is wood. A children's playhouse made of wood can be located on a flat area or on a tree , and be one- or even two-story. Its design can easily take into account the interests of the child: a rocket, a fairy-tale house, a ship, a space station - thanks to the shape or accessories, you can give it the chosen character.
You don't have to buy new boards. Used pallets are perfect for making a house. It is important to sort them correctly when choosing. You cannot take pallets with markings, from the market or with a strong smell. Cleanliness and environmental friendliness are the most important criteria for a children's building.
A plywood house is a simplified version of a wooden structure. This material is easier to find on the farm and easier to process. The frame is covered with plywood sheets or inserts are made into a wooden house.
Plastic
Plastic structures are simple and easy to assemble and very compact . They are easy to transport from place to place and disassemble if necessary. When choosing materials for building a house at home, you will be able to choose environmentally friendly plastic and be confident in the reliability of the new toy. Polycarbonate is best suited for this purpose.
Cardboard
Even more affordable than plywood is cardboard. Sheets of dense material can probably be found in any home. The advantage of such a house is that you can make different design options without fear of spoiling or destroying it. In addition, if the child decorates the house himself, it will become even more near and dear to him.
PVC pipes
For a compact house, affordable material such as PVC pipes is suitable; it is very easy to make it yourself. This route is the most economical, advantageous in terms of placement in a small area, easy to transport and assemble if necessary . The pipes from which the frame is formed are cut in accordance with the drawing. For tight fitting, a tarpaulin or thick fabric would be a good choice. A cape is sewn from the material, windows and doors are cut into it. The house is suitable for playing indoors or outdoors.
Below you will see photos of models of excellent houses for children that you can build on your site or in your apartment.
Playhouses in the apartment: materials and solutions
A house in the garden of a private house is wonderful. But unfortunately, he will be able to please the children only in the warm season. In winter it will be cold, and climbing the icy steps is dangerous. This is only justified if the house is part of a slide. But not everyone has their own territory for equipping a children's playground. Therefore, the optimal solution would be to build it right in the apartment from lightweight materials at hand - fabric, cardboard, plastic. This structure is easy to install, disassemble, store and transport. Therefore, you can take it with you when you move.
Compact cardboard house
The easiest way to make a home out of cardboard is to cut out windows and a door in a large box from a refrigerator, washing machine or other large household appliances. The product is decorated, after which you can start playing. The other option is more complicated. The house diagram is drawn on sheets of corrugated cardboard, cut out and assembled using a construction stapler or glue. The surface of the cardboard building can be left in its original form, or it can be painted or covered with wallpaper. For interior walls, both monochromatic designs and options with patterns are suitable. When choosing a color and print, you need to take into account the gender of the child. External walls can be covered with wallpaper that imitates wood or brick, but this is not necessary. It all depends on the preferences of the little owner - perhaps he wants his house to resemble the castle of the snow queen, Nyusha's house or a palace from a candy country.
House made of fabric and PVC pipes
If you want to create a more substantial structure, assemble your house from ordinary water pipes. Using various adapters and splitters, they can be connected into a lightweight but durable structure. The advantage of this option is that the house can be easily disassembled. Just a few minutes and the structure is ready for transportation. Thanks to this, you can take it with you to nature, to the sea, to the country house and even on a visit. The pipes act as elements of the frame onto which the cover is stretched. It must be sewn to the size of the house, but with small increases to make it easier to stretch the fabric onto the structure. From the inside, fasteners should be provided to secure the fabric with Velcro or ties. Openings for windows and doors must be provided in the walls. It is desirable that, if necessary, the windows can be closed with thick film or fabric shutters with lacing, and the door can be closed with a zipper. This way you can protect your child from wind and cold.
Indian wigwam - an original structure
Wigwam is the home of a “real Indian”. But don’t think that it will only be appropriate in a boy’s bedroom. Girls will play in it with no less pleasure. This unusual and stylish solution will add a daring, exotic touch to the interior of any nursery. This is not just a refuge and a little corner of privacy. A wigwam can inspire you to play interesting games, read books about Indians, and watch movies. How exciting it is to jump around the apartment or shoot at a target, wearing a feather headdress and painting your face, and then relax in the shade of a tent on soft pillows.
There are quite a few ready-made wigwams on sale. But a “real” Indian must be able to build his own house. For this he will need:
- wooden sticks with a round or square cross-section – 6 pcs. The length of the beams is 2 m, thickness is 2-4 cm;
- rope or elastic band;
- drill;
- tent fabric;
- eyelets;
- lace.
Step-by-step instruction
- Drill holes in the poles at a distance of 20-25 cm from the edge.
- Tie the sticks together.
- Place the frame on the floor and spread the supports so that there are even gaps. One of them is the future entrance, more needs to be done.
- We cut out a tent in the shape of a half-sun.
- We wrap the frame with fabric and mark places for sewing fasteners.
- We process the edges of the product, sew on ribbons to secure the tent on the poles.
- In the upper part along the edges we install eyelets and thread the lace.
- We fix the tent to the frame.
You can decorate an improvised wigwam in a variety of ways - whatever you have the patience and imagination to do. Special paints and markers, stickers, jewelry, buttons, and appliques can be used. Inside it is worth sewing pockets for various small things. We lay a blanket and a couple of pillows on the floor and invite the future tenant. Of course, you can surprise him, but it will be much more useful if he himself takes an active part in the creation and arrangement of his “shelter”.
House under the dining table
The easiest and most affordable way to build a playhouse in an apartment is to simply cover the dining table with a blanket or sheet. But such a structure is only suitable for playing hide and seek. The result is a semi-dark space in which you can’t get by without a flashlight. How to make sure that light penetrates into the house? An excellent way out of this situation is a special cover, the top edge of which will exactly match the size of the tabletop. The fabric structure stretches over the table and limits the entire space under it. In the “walls” of the cover, you can provide several openings - windows, a door, and thus provide access to light and air flow. The floor in such a house can be a rug or a small mattress. The walls inside and out can be decorated with various applications, depicting paintings, decor, furniture, and sew small pockets for storing children's treasures. The doors in such a house are closed with zippers, buttons or ties. A useful tool for developing fine motor skills.
How to make a children's playhouse out of wood?
At a summer cottage, it is best to play in a wooden house, and construction can be carried out outdoors on a larger scale than in an apartment. Before you start building a house, you need to think about the main features of this object :
- what type will it be - closed or open;
- what size, on what area it will be located, its height;
- where it will be installed - on the ground or on a tree;
- what material do you plan to use;
- will there be windows, doors, if so, then from what material;
- the presence of extensions: a fence or other fence, terrace, sandbox, stairs, maybe a slide or swing;
- interior decoration - what, from what.
Make sure you have the necessary tools and equipment that you will need to work with wood. To build a house, you will need a plane, jigsaw, hacksaw, drill, chisel and screwdriver, keys, screwdrivers, chisels, glue and paints for finishing. From this basic set you can choose what you will need to build a particular object for your child.
An important point will be to ensure the child's safety while playing . To do this, it is necessary that the site for installing the house is as level as possible. If this is a tree, then there should be no doubt about its reliability. All wood, which is a building material, is carefully checked and processed: there should be no chips or knots. Also, the material must be environmentally friendly.
Carefully check that the screws are screwed in correctly. For roofing, choose soft coverings, for example, onduvilla, ondulin, without sharp edges. Periodically check the fastening points for strength.
We are building a house on a summer cottage
Your own house, just like a real one, will certainly make your child happy. Moreover, on a summer cottage you can build a durable building that will last for more than one year. Construction will be an exciting adventure and will remain in your child’s memory for a lifetime. Let him decide for himself what it will be like - his first “own” home.
Architecture and design can be completely different. From a simple one-story building to a real palace, a pirate ship, a hut on chicken legs or a tree house. On your summer cottage you can build whatever your heart desires.
If you need temporary shelter, put up a tent or hut. For durable buildings, it is better to choose resistant materials - wooden beams, logs, panel structures, polycarbonate. It is the material that influences the choice of construction technology. To avoid possible mistakes, it is recommended to make a layout first.
From wooden beams
A house made of timber is an excellent choice for a durable capital construction. This design will last for many years and will delight more than one generation of children. But it is worth considering that wood is a flammable material. In addition, it is not very friendly with moisture. Bark beetles can settle in it and destroy the timber from the inside. However, all this can be easily avoided. It is enough to treat it with fire-resistant and antiseptic compounds and the house will be reliably protected from such threats. This procedure must be completed before construction work begins. Building a house from timber is a labor-intensive and long-term project. Construction of this kind requires strict adherence to technology.
Frame house made of OSB or plywood
The process can be significantly accelerated if you choose sheets of plywood or OSB as the main material. The house will not be as solid as the previous option, but its construction will not take much time.
At the first stage, a timber frame is constructed. First, the base is assembled - a shield, which is sheathed with OSB on the bottom and clapboard on top. Children often play on the floor, so care must be taken to ensure that they do not sit on a cold surface. A layer of insulation can be laid between the outer layer and the boards. Thick polystyrene foam 10 cm wide is suitable for this purpose. To prevent it from falling through, provide additional protection - pad the bottom with a board base. Next, a supporting structure is constructed for the walls and roof. The finished frame is sheathed with sheet material on the outside and inside. From the street side, both OSB and plywood will look great. Insulation and windproof material are attached from the inside, and then the walls and ceiling are covered with plywood.
Another version of a plywood house is a constructor made from panels with special fastenings - grippers. They are also called paws. The long walls of the house are equipped with them, and there are grooves on the front and back. The “feet” must be directed downward so that, when inserted into the holes, they can be lowered and securely fastened. Disassembly is carried out in the reverse order - the long wall is raised slightly and the fastening easily comes out of the groove. Such houses are good for a summer residence - in winter they can be stored indoors, wrapped in plastic wrap or in special bags.
Panel house
This construction option is optimal for a playhouse. It is assembled from pre-prepared shields. First of all, construct a shield for the base. The supporting frame is made of timber 75 and 100 mm long. Then the floor is laid on this structure. The next step is to assemble the porch frame. After this, the frames of the front and rear walls are made, and then the side walls. A box is mounted on the base. After this, the roof sheathing and ridge are done. Next, the walls of the house are sheathed with sheets of chipboard or plywood, leaving openings for windows and doors. If you do this from the inside and attach decorative strips to the outside, you can get a house in the German half-timbered style. The next stage is roofing. Roofing materials such as flexible tiles, corrugated sheets, colored slate, and waterproof plywood are ideal.
Polycarbonate house
A house with transparent walls and ceiling - what could be more unusual? A polycarbonate building will always be light, warm and cozy. This material has many advantages:
- is characterized by low cost;
- transmits light well;
- easy to install;
- protects from direct sunlight;
- plastic – allows you to create original compositions of rounded shapes.
- variety of colors;
- not afraid of moisture;
- does not support combustion;
- It retains heat well due to its structure - air-filled cells are located inside the sheet.
To create a transparent house, you need to make a frame from metal pipes, cover it with polycarbonate sheets, cut out windows and doors. It is better to do them on one side so that there are no drafts in the future.
Children's house made of pallets
Shipping pallets are often used to create designer furniture for loft or country style interiors. They can be used with exactly the same success when building a playhouse. What is useful at a construction site?
- pallets - at least 8 pieces;
- metal connecting plates – 8 pcs;
- metal corners;
- roofing materials – flexible tiles, euro slate;
- quick-drying paint;
- self-tapping screws;
- grinding attachment;
- sandpaper;
- drill or screwdriver.
It is better to grind, paint pallets and form window and door openings before starting work.
Description of building a house from pallets
- We make the base - we connect two pallets using mounting plates.
- We install walls - structures with removed central lintels and previously formed openings. We attach them to the base using metal corners.
- We form the roof slopes from two pallets. We fasten them together and fasten them to the walls using metal plates.
- We are laying the roof.
- We lay the floor from pallet boards or other suitable material.
- We form window and door frames and paint them.
- We decorate the house from the inside and invite a little tenant.
Log playhouses
Any child will love his own log house. After all, it is so similar to fairy-tale houses and huts. They can be supplemented with a composition of a log well, a bench, or a sandbox. True, to create such a building you need to have special knowledge and skills. It is unlikely that an inexperienced builder will be able to correctly install a log house. This requires a real master.
But don’t despair - if you can’t install a real log house, you can always buy a plastic imitation. There are plenty of offers of various ready-made designs.
House on stilts with additional play areas
An alternative to a log structure can be a house on stilts. This is an intermediate stage between the baby doll version and the tree house. Children love to climb the steps into their “nest,” and for a “jet” descent, you can attach a real slide, install a fireman’s pole, or attach a rope. You can build a spacious two-story play complex with horizontal bars, swings and a sandbox. To erect such a structure, a flat area is not required. The main thing is to align the pillars well vertically and install the base for the floor and roof exactly horizontally.
The piles are installed to a depth of 20 cm and concreted. In regions with harsh winters, to the depth to which the soil freezes. It will not be possible to do without concrete. The pillars will very quickly become unusable.
Next, the piles are tied with timber, boards - logs - are laid on them, and plywood is laid on top. The walls are made of wooden frames covered with plywood sheets. They immediately leave openings for windows and doors. The finished panels are lifted onto the base and the frame is assembled.
If you work alone, it is better to sheathe the frames only on the outside, and do the interior finishing after the frames are brought to the site. This will make it easier to lift them.
The next stages are the formation of a ridge from beams, installation of transverse gables and laying of the roof.
The house on stilts is very reminiscent of a hut on chicken legs. By building it for your baby, you will give him a piece of a fairy tale.
Features of building a tree house
The tree house is an indispensable attribute of most American children's films. The guys love their shelters and are ready to be real good boys, as long as they are not banned from playing there. Can you think of a better place to listen to birdsong, watch the stars or just read in the fresh air? To build such a house, you need to choose the right tree. It should not be old, eaten away by parasites. Ideally, this is a tall plant with an even, strong trunk and spreading branches. Alternatively, the trunk can be forked. In order to avoid problems later, you need to find out whether the tree in your garden is a plant protected by the state, and whether it is necessary to obtain permission to carry out such work.
First of all, a platform is fixed to the tree - the base of the house. This process can be carried out in three different ways:
- The beams supporting the platform are attached directly to the tree.
- The base is suspended using ropes.
- The platform is supported by support pillars dug into the ground.
Don't forget to consider your lifting options. It should be easy for children to climb into the house. In addition, the lift should be as safe as possible. There are the following options for staircase structures:
- rope;
- wooden extension;
- stationary marching.
The platform must be equipped with railings, and sawdust must be placed under the tree - they will soften the blow in case of a fall. The design of such a house can be anything - with walls and a roof, or simply in the form of an A-shaped tent.
Preparatory work
First of all, you need to decide on the location of the children's playhouse. The site should be within your field of vision and away from dangerous structures: cesspools, ponds, technical rooms. Based on the square footage of the selected area, the configuration of the building and additional structural elements are selected: stairs, flooring, benches, ladders, and so on. This is where ideas from already completed projects will come in handy.
Bright playhouse with climbing wall
Light green house with a slide
Simple wooden house
The photos look completely different, but each project is based on similar drawings:
For the manufacture of children's playhouses, environmentally friendly and safe materials are best suited: wood, plywood, antiseptics and water-based paints. Particular attention should be paid to the quality of processing of workpieces - their surface must be well sanded.
Drawings and diagrams
Each homemade children's house differs in size. Based on how many “inhabitants” are planned in it. If the child plays alone, then 1.5 * 1.5 m is more than enough. If there are two children, larger sizes are already needed. At least 2*2 m. Decide for yourself on height too. But it’s better not to do less than 1.5 m.
Approximate dimensions of the children's playhouse
Drawing and layout with dimensions of the hut house
House made of boards and plywood with a slide roof
House for children with a slide
Stages of construction of a children's house with a roof in the form of a slide Materials for the construction of a children's house
Playhouse
Hut house with playground on the second floor
Construction stages
We select materials
To make a house measuring 180*160*140 cm with two window openings and one doorway you will need:
- 4 foam or cinder blocks;
- wooden blocks for the floor, racks and roof;
- floor and roof boards;
- wooden lining for cladding;
- roofing covering (the best option is Ondulin);
- metal mounting angles;
- furniture board;
- special nails for fastening the roof.
The result should be a rectangular children's playhouse, shown in the photo. But, of course, you can make changes to the project to suit your taste.
Do-it-yourself country children's house
Making such a house yourself is quite simple. First you need to purchase the necessary materials:
Recent Entries
Chainsaw or electric saw - what to choose for the garden? 4 mistakes when growing tomatoes in pots that almost all housewives make Secrets of growing seedlings from the Japanese, who are very sensitive to the soil
- 4 sheets of chipboard measuring 2*1.7 m.
- 13 beams with a cross section of 2.5 * 2.5 cm and a length of 2.5 m. They will be needed for the roof and walls. 8 beams need to have one end sharpened.
- 8 beams of the same section and 35 cm long - for floor supports.
- 17 boards with a cross section of 15*5 cm, 2 m long - for flooring and horizontal fastening.
- Any roofing material is suitable for the roof; it is best to use plywood.
- Metal corners and screws.
- Paint and brushes - for painting the structure.
Step-by-step installation instructions
- Level the site on which your building will be located. For control, you can use a building level.
- Assemble a frame of the required size from bars and metal corners. In the corners of the structure, mark the places for the holes. Place the frame aside, dig holes and install blocks in them for an improvised foundation.
- Treat the surface of the blocks with bitumen mastic or cover with roofing felt. Place the frame in place and cover it with boards, leaving small gaps between the floorboards. When temperature and humidity levels change, wood can swell. If you lay the boards end to end, they may warp.
- Carefully treat the finished flooring with an antiseptic, and then with a layer of varnish or paint. Wait until completely dry.
- Attach racks, window and door elements to the base. Use metal corners to strengthen the structure.
- Install the upper lintels and rafters, forming a gable roof. If necessary, the junction of the rafters can be strengthened with spacers. Do not forget to treat all wooden elements with an antiseptic or fungicidal impregnation.
- After this, you can begin sheathing. For this purpose, it is best to use ready-made wooden lining, but to save money, you can take a pre-sanded edged board.
- Sheath the entire frame and gables, leaving window and door openings blank. If desired, install carved trims.
- Place the sheathing boards on the rafters. Fasten the roofing according to the manufacturer's instructions. In the presented project, Ondulin sheets were used.
- Paint the house in bright colors, using stencils, apply designs to the inner and outer surfaces of the walls.
- Take care of the additional arrangement of the playhouse. Children will love the various ladders and ledges for climbing, hammocks, pillows and so on.
If possible, it is better to involve children in the work. It will be much more interesting for a child to play in a house that he built with his own hands. Even if his help consisted only of handing over nails and screws.
How to furnish a house inside: finishing and furnishings
The interior decoration of the house is selected depending on:
- preferences of the little owner;
- dimensions of the building;
- type of construction.
It is best to paint the walls and floors in the house with waterproof paint or varnish, or you can leave them as is, simply treat them with an antiseptic.
The windows can be framed with small curtains, and a soft rug can be laid on the floor. Small pictures, posters, stickers will perfectly decorate the walls.
If in a small tent there is only room for a blanket and a couple of pillows, then in an outdoor wooden house you can install furniture - a dining set, a toy kitchen or a small crib. Miniature shelves and hooks will allow you to conveniently place outerwear and favorite crafts.
So that you can continue playing or reading in the evening, it is worth considering the lighting. Small LED sources or strip are best.
Construction of a children's cardboard house
A small temporary house made of cardboard will delight your child without leaving your apartment. After all, it is more intended specifically for indoor spaces, since moisture, sun and temperature changes make an already unreliable structure completely fragile.
To make such a model you will need thick cardboard . These can be individual sheets or a ready-made large box. You can use the drawing below and transfer it to the material. The parts must be cut carefully, avoiding crumbling and creasing. You can connect using cut grooves and fix them with glue, tape, or a stapler. The house can be decorated by the child himself; appliqués, stickers, and pieces of fabric can be used as decoration.
How to make a house for a baby from old newspapers and magazines?
A house for the baby in which he will play can be made from old newspapers and magazines. How to do it?
- We take several sheets of old paper of equal length, stack them together one on top of the other, and tightly roll them diagonally into a tube.
- We secure the edge of the tube with tape to prevent it from unraveling.
- We connect 3 tubes together with triangles using a stapler.
- We build a square house from triangles. It will require 8 triangles.
- To make a roof, we connect 4 more triangles to the walls of the house.
- We cover the house with a blanket and it is ready for play.
We tightly roll the newspapers into a tube. We make triangles from the newspaper tubes.
Ready frame for a child's house
Ready house for a child
Interior of a house for children
The interior of a home for children, like a home for adults, should reflect the interests and tastes of the little owner. At the same time, we must not forget about its safety: more soft parts, fewer sharp corners, reliable connections. The more different details and little things there are, the more interesting it will be for a young researcher to live in it . Bright colors and cute decor will complete the arrangement of the house.
Children's house: purpose and benefits
A small house is a place for a child to retire, store things dear to his heart, and play with friends. The baby takes care of his home - he arranges furniture in it, decorates it, and wipes off the dust. Thanks to this, moral qualities are formed, a caring attitude towards things and responsibility are brought up, and the first work skills appear. Games with friends help socialization, development of imagination, thinking, memory, and speech.
Roof of a children's house in the country
The construction market offers a wide selection of roofing materials - from budget slate to expensive natural tiles. For playhouses, it is better to purchase an inexpensive but reliable roof that you can quickly install with your own hands.
Ondulin fully meets these criteria. The sheet weighs only 6 kg, which allows it to be installed alone. The material is safe for children's health.
You don’t even need to leave your dacha to purchase. You can order roofing and components on the online store website shop.onduline.ru. Delivery is made from the warehouse of your nearest dealer within three working days.
Don't waste time searching for suitable materials - devote it to your loved ones!
Marking the site for the house and preparing the flooring
Of course, the playhouse is the baby’s personal space, but you should still watch him from time to time. Therefore, build a house in a clearly visible place.
After selecting the desired area, it must be marked . For this you will need a peg and a rope. We fence a square of the required size, compact and level the ground on the site. In the corners of the square you need to dig recesses about 20 cm and place the beams in them. They should be 15 cm above the ground.
Similar 4 holes must be dug in the middle of each side of the site, the bars must be installed and secured.
Thus, there were 8 supports - one in each corner and on each side of the square.
To ensure that the floor of the future house is not skewed, it is necessary to measure the height of all supports again. After this, you need to nail 4 boards , onto which the floor boards are subsequently attached using a screwdriver. The flooring is ready.
Types of gaming devices
Playhouses for children can be classified according to operating conditions. Taking this factor into account makes it possible to divide children's homes into two large groups:
- for installation indoors (house or apartment);
- for installation in a suburban area.
Typically, apartment buildings are more compact.
If living conditions do not allow the installation of a “monumental” structure, and the child really wants his own personal space, parents should think about buying a corner house that will fence off one of the room corners. Large size models are usually purchased for outdoor entertainment. In addition, if the house will be used for several years, then a reasonable solution would be to install it on a kind of foundation. But to implement such ideas you need to choose the appropriate product.
A playhouse is also selected taking into account the material from which the model is made. There are several options in total:
- high-quality plastic;
- tree;
- polyvinyl chloride;
- textile;
- cardboard.
Each material has its own advantages and disadvantages. If a parent decides to create something truly “long-lasting” for a child, then preference should be given to wood. Well, if the priority is the mobility of the structure, then you should focus on plastic, fabric or inflatable structures.
Additional accessories
To diversify the entertainment and expand the repertoire for children’s games, you can buy additional equipment - slides, slides, swings, tunnels and balls. Your child will definitely say “thank you” to you!
Game tunnels
This device can serve as a passage to a bouncy or fabric playhouse, or connect two play structures. In such tunnels, children happily crawl, hide, and visit each other if the device serves as a connection for two houses.
Tunnels come in different shapes and sizes. You can buy a regular “pipe”, as well as a caterpillar or train. Games in such devices help a child grow flexible, dexterous, physically resilient, and generally improve children's health.
Tunnels are sold both together with the children's home and separately. Is it worth purchasing them? This is up to parents to decide, who should focus on the interest of their children.
Balloons
Plastic balls are an excellent exercise machine and massager that allows you to expand the functionality of many familiar toys, including a children's playhouse.
If you have an inflatable or fabric house, try making it a “dry pool” by throwing a set of plastic balls into it.
Games in this design relieve increased tone, strengthen muscles and improve children's mood.
These balls are also used for other purposes. Invite your child to name the color of each ball and count how many balls you have placed in a row. In addition, the child will be able to practice accuracy by throwing balls into a basket or aiming at a specific target.
Children's bed
A home house is often combined with other household items. For example, an older child who is already cramped in a baby’s cradle can purchase a crib combined with a play area.
Such cribs differ in design solutions: some products have sleeping places on the first floor, while others, respectively, on the second. The beds are equipped with high sides, which are removed when the child grows up.
Typically, such cribs are made of wood or plywood. When purchasing, you need to pay attention to safety. Make sure that the products do not have sharp corners, roughness, chips and other defects that could injure the baby.
Low-quality products are characterized by poor painting and a pungent toxic odor. It is important to examine and even smell the crib with the house. This will save the family from purchasing a harmful design and wasting money.
Playhouse for girls: options with photos
Despite the fact that the previous houses are suitable for both boys and girls, there may still be differences based on gender. For example, it is unlikely that a boy will want to have a pink princess house. But for a girl, this choice of house is understandable.
Photo: laopinion.com
And what is a princess without a carriage? The creators of the tents foresaw this desire too.
Photo: dochkisinochki.ru