Such a herbaceous perennial plant as Platycodon, also called broadbell, is a member of the bellflower family. The flowers of these plants look like large, wide bells. In nature, they can often be found in Eastern Siberia, China, the Far East, as well as in Korea and Japan. Platycodons prefer to grow on forest edges, rocky slopes and forest clearings. The name of such a plant comes from the Greek language, and it consists of the words “platys” - “wide, smooth” and “kodon” - “bell”. This genus is monotypic because it includes only 1 species - Platycodon grandiflorus, or broadleaf grandiflora (sometimes confused with Campanula latifolia). This species has been cultivated since 1872, but this flower gained popularity among gardeners only at the beginning of the 20th century.
Content:
- Growing in open ground
- Sowing in containers
- Features of transplanting to a flowerbed
- Care
- Don't let the plant grow tall
- Wintering
Almost everyone who sees Platycodon “live” for the first time is amazed by it. For its large multi-colored bells, which attract the attention of both professionals and novice gardeners, it received a second name - wide bell.
This perennial herbaceous plant reproduces by seeds and vegetatively. Seeds can be sown directly on the beds or in special containers. If you want to get flowering this same year, you should start planting in winter.
Preliminary soil preparation for planting
In about 2 weeks, or even more, it is necessary to prepare the area for planting Platycodon seedlings. To do this, carefully dig up the ground to the depth of a spade bayonet. At the same time as digging, wood ash and mineral fertilizers are added to the soil.
You may be interested in:
Lilies in autumn: care and preparation for winter shelter, pruning Lilies are perennial flowers that require care. In order for bulbous plants to grow well and always bloom, it is necessary...Read more...
Growing in open ground ↑
It is not recommended to plant seeds immediately in a flowerbed, since Platycodon will bloom only after one and a half years when grown from seeds. Therefore, we specially select a seed bed in the garden, always in partial shade, dig it up and carefully level it.
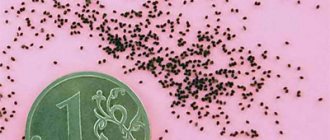
Seeds are sown in late autumn in rows or narrow strips (3-5 cm), lightly sprinkled with earth (0.5-1 cm) and watered. The seeds germinate fairly quickly the following spring. Now all that remains is to water and weed them regularly. Young plants are transferred to the flowerbed only next fall.
Pests and diseases
The platycodon flower is extremely resistant to pests and diseases. The only threat that may arise is an attack by snails. However, this happens extremely rarely. Preventatively, to strengthen the plant, it is worth using complex fertilizers in the spring.
Platycodon needs to be watered only during periods of prolonged drought. The broadbell has a root system that copes well with storing water used when the soil dries out. Plants are primarily threatened by excessive moisture, which causes rot.
Due to the fact that in autumn Platycodon completely disappears from the surface of the earth - the above-ground part dries out, accidental death of the plant can occur during spring work in the garden. Therefore, it is worth noting the place where the broadbell is planted before the onset of frost. In this way, accidental damage will be prevented.
Sowing in containers ↑
Seeds are sown in containers in January-February. At the same time, they are not pressed into the ground, but only lightly sprinkled with light soil, covered with film and placed in a warm place (20 -22 degrees). Within 8-10 days, the broad bell germinates, and only after that the film is removed.
When three to four pairs of leaves appear on the seedlings, they are transplanted three plants into a pot with a diameter of 12-13 centimeters. Bells can grow in them until warm weather arrives, when they need to be transferred to the flowerbed. The first buds will appear 16-18 weeks after germination.
Platycodon after flowering
Collecting seeds
When the capsule inside the flower cracks, you can understand that the seeds are ripe. Seeds are collected only after the pedicels are completely dry (usually in September). Completely new varieties can grow from seeds collected with one’s own hands, and the flowers of such plants will have an unusual color.
Preparing for winter
This flower is a perennial. In this regard, in autumn, its above-ground part must be completely cut off, and the surface of the area must be covered with a thick layer of mulch (humus, dried leaves, peat, sawdust or spruce branches).
Features of transplanting to a flower bed ↑
It is advisable to replant flowers in spring or autumn - both young and adult Platycodon, planting and caring for which differ little.
Almost everyone unanimously says that this perennial does not tolerate any digging and replanting, but I myself have done this many times at the most inopportune time (in the heat) and everything went well. Of course, this required extreme care and attention.
For those who need to do this in unfavorable conditions, we advise you to save all the small roots on the rhizome. Before digging, the plant must be watered, carefully removed from the ground and placed in a bucket of water for about 20 minutes. Only then should it be planted in a new place.
In a flower garden, it is advisable to place specimens at a distance of 15 to 20 centimeters, no more. With this arrangement, heavy bushes support each other, and the entire mass of stems does not fall apart in different directions.
Popular varieties
Here are the most famous varieties of Platycodon, differing mainly in color and height:
- Group of hybrids Astra F1 - with blue, pink and white flowers, single or semi-double, 5-7 cm in diameter, characterized by low growth (10-25 cm).
- Platycodon Astra White - characterized by white, small flowers, small height (20-25 cm).
- Platycodon Astra Pink is a variety with pink flowers.
- Platycodon Astra Rose – pale pink flowers, reaches a height of 50 cm.
- Platycodon Astra Blue is a dwarf variety (20 cm tall), characterized by dark blue, double or semi-double flowers.
- Platycodon Hakone Blue – distinguished by an intense dark blue hue of flowers.
- The Codo group of varieties is characterized by white, blue, pink flowers, single or semi-double, growing up to 20 cm.
- A group of Fuji varieties - the flowers are blue, white, pink, appear in July - August, the height of the bush is 50-70 cm.
- Fairy Snow - a variety with white flowers with blue veins, height - 20-30 cm.
- Florist Pink – pink flowers with dark veins, height – 80 cm.
- Mariesii – blue flowers, variety height – 50 cm, frost-resistant variety.
- "Miss Tilly" Miss Tilly - blue flowers, variety height - 15-20 cm.
- Perlmutterschale - large, light pink flowers (diameter - 8 cm) appear in June, bush height - 50-60 cm.
- Sentimental Blue - blue flowers with a diameter of 7 cm, bush height - 15-20 cm.
- Platycodon Albus - reaches a shoot height of 40 cm, white flowers with delicate blue elements.
Care ↑
In the first week, the transplanted platycodon is watered every day, unless it rains. The soil should always remain slightly moist. After 10 days, the amount of water is gradually reduced.
Caring for the broadbell is extremely simple; all you need to do is remove the weeds and water it; you don’t even need to feed it.
When watering, it is worth remembering that this beautiful perennial can go without watering for quite a long time. But if it lacks moisture, double and semi-double flowers become ordinary and slightly decrease in size.
Feeding is not necessary, but recommended. They are carried out using organic and floral mineral fertilizers. It is better to do this no more than once a month.
6.Reproduction
There are several ways to propagate Platycodon, but the most common is to grow bluebells from seeds. Cuttings are carried out by cutting off the stems, but the percentage of successfully rooted plants is extremely low.
6.1.Growing from seeds
In flower shops you can find a wide variety of Platycodon varieties. This flower is easy to grow from seeds and does not require much effort in caring for young plants. In the first year after sowing, plants usually form only a basal leaf rosette, and the first buds become a decoration of this bush only in the second year.
↑ Up,
6.2.How to collect seeds
You can use personally collected seeds to propagate Platycodon, but it is worth remembering that varietal plants do not always retain their attractive appearance with this method of propagation. Often daughter bushes bloom less abundantly and for a longer period of time, and the flowers may differ in shade from the parent bushes.
Only seeds that have fully ripened on the plants are suitable for collection - unripe planting material simply will not sprout. In the summer months, the very first ones - large and bright flowers are marked with colored threads - it is from these buds that the highest quality planting material is obtained.
↑ Up,
To prevent the seeds from spilling onto the surface of the ground as they ripen, the green seed pods are wrapped in a bandage. To collect seeds, it is better to use a fine - dry and warm day in the first half of September.
After ripening, the boxes are separated from the plants and the seeds are removed, which are then laid out on a sheet of paper and dried in a well-ventilated area for 2 - 3 days.
Planting material prepared in this way is collected in paper envelopes and stored in a cool and dry place, used as needed for 1 - 2 years.
↑ Up,
6.2.1.Sowing seeds
Platycodon is often grown as seedlings at home, and then the plants are transferred to the garden in May. Seeds are sown in late winter - early spring.
In order to increase the germination of planting material, the seeds are placed in a saucer, covered with gauze. Fill the saucer with warm water with growth preparations dissolved in it - epin or zircon. In this form, the seeds are kept for 2 days.
Preliminary cool stratification increases germination well. For this period, the seeds are sprinkled with a small amount of barely damp river sand, placed in a plastic bag and sent to the refrigerator for a month.
↑ Up,
To sow seedlings, you should choose special boxes - greenhouses and make drainage holes in their base. A drainage layer in the form of expanded clay or small pieces of foam is placed on the bottom.
The boxes are filled with soil based on peat and river sand, the surface of which is thoroughly moistened using a sprayer. Seeds are laid out on the surface of the soil and lightly pressed into the ground or sprinkled with a very thin layer of river sand 2-3 mm thick. Repeated spraying is carried out and the seedling boxes are covered with a transparent lid or covered with plastic film to create a greenhouse effect.
Leave the seedlings in a warm room at normal room temperature in a well-lit place without direct sun access. The shelter is lifted daily and any water condensation that appears is wiped off. Ventilation time is increased daily.
You can sow the seeds directly into separate cups, placing 2 - 3 seeds in each cup. As sprouts appear, excess, weaker plants are simply cut off with scissors. With this method, diving will not be necessary. If you sow in special peat containers, then the plants are planted directly in pots in the garden.
↑ Up,
6.2.2.Picking, caring for seedlings
1 - 2 weeks after sowing, it will be possible to observe the appearance of the first shoots. With the appearance of the first shoots, the shelter is completely removed and the seedlings are hardened, lowering the air temperature to 16 - 18 degrees Celsius. The soil is kept evenly moist, but not waterlogged.
When each bush can boast 2 - real leaves. carry out a dive. When diving, each sprout is carefully lifted, along with a lump of earth, and transferred to a small separate glass. When diving, they try to minimally injure the long root.
1 - 2 weeks after picking, nitrogen fertilizers are applied for the first time in a very weak concentration.
↑ Up,
6.3.Dividing the bush
Due to the peculiarities of the root system, plant division is very difficult and often as a result of such manipulations the bushes die. Before deciding to divide mature plants into several parts, you should think twice.
Mature bushes 4 to 5 years old are dug out of the ground, trying not to damage the long and fragile roots, and shake off any remaining soil. If lateral shoots with buds are noticeable at the base of the plant, they can be separated with a knife.
After separation, the wound surface must be sprinkled with coal powder or treated with wood ash for drying and disinfection.
The cuttings are planted in the garden and the soil around the plants is kept evenly moist for 2 - 3 weeks. 1 - 2 years after division, young plants can form the first buds, but often both bushes die.
↑ Up,
6.4.Cuttings
Cuttings are carried out using young shoots that appeared in the spring. They are separated from the mother bush with a sharply sharpened garden knife at the end of spring or very beginning of summer.
Each cutting should contain 2 - 3 internodes and a heel at the base. The lower leaves are completely removed from the cuttings, and the upper ones are shortened by a third or even half their length to reduce moisture loss. The bases of the cuttings are dipped in rooting powder.
Prepare small flower pots filled with a mixture of peat and river sand in equal parts. The surface of the soil is moistened with warm water and the cuttings are immersed in it to a depth of about 1 cm. The cuttings should be positioned at a slight angle.
↑ Up,
The plants are covered with a lid on top to maintain high air humidity. Rooting is carried out in a warm and well-lit place without direct sun.
The signal for the successful completion of the rooting process will be the young shoots that appear at the base of the cutting. A month after the first signs of growth appear, such bushes are ready for planting in the garden.
You can root the cuttings in a simple glass of water, in which an activated carbon tablet has previously been placed. The water is changed every 3 - 4 days, and plants whose roots have reached 1 - 2 cm in length are planted in the ground.
↑ Up,
Wintering ↑
In terms of frost resistance, these flowers can grow well from zones 3 to 10. That is, in the Moscow and Leningrad regions, for example, they winter well without shelter.
But you never know what kind of winter is coming, so it’s better to play it safe and be prepared. To prevent perennials from freezing, they should be covered with peat, soil, buckwheat or sunflower husks. The height of the mulch depends on the zone - the further north, the thicker the protection. In this case, there is no need to tear off the foliage and trim the stems. Cleaning of the plant is done in the spring, when the cover is removed.
Platycodon has been growing in my garden for 12 years now. Although cultivation does not require much time, however, as you noticed, it has its own characteristics. And if you follow all our recommendations, it can successfully grow and bloom in a flowerbed for more than 10 years. At the same time, almost all varieties of broad bells are long-lived, just choose the color and shape of the bells to your taste.
Brief description of the plant
Platycodon grandiflorus is the only species of Platycodon grandiflorus, a perennial plant belonging to the Campanulaceae family. The bellflower family belongs to the order Asterales, which includes asters. Plants from the bellflower family are widespread on all continents except Antarctica and desert areas.
The large-flowered broadbell is a popular garden plant. In the wild, these bell-shaped flowers are found in parts of East Asia - from northeastern China, through the Korean Peninsula, to Japan. Their cultivation is widespread in many countries.
Before you start purchasing, it’s worth finding out what platycodon is characterized by, so that it would be easier to integrate it into a garden or composition in a container or pot on the balcony. Knowing the description of the plant, you can correctly select neighboring species with similar requirements, the cultivation of which is carried out in a similar way.
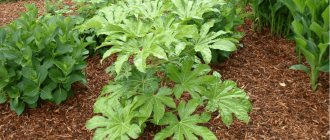
Platycodon grandiflorus is a perennial that can grow to 50-80cm in height if given the right positioning, care and cultivation requirements. There is also a dwarf variety 10-20 cm high. Platycodon is characterized by bare, blue-green shoots and fairly ordinary leaves. The green leaves are located opposite each other, which is typical for bell-shaped plants. They can be ovate or lanceolate, the edges of the leaf blades are serrated.
The fruits are a capsule opening with 5 teeth. Leaves and fruits are not the most important element of the broadbell; the main decoration is the bell-shaped flowers - simple but beautiful. There are varieties with an interesting, half-terry shape and wavy petals.
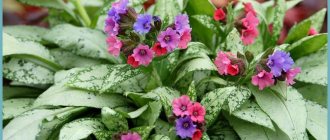
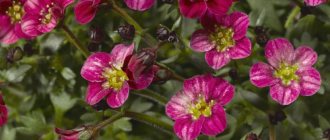
Photo. Platycodon flowers
Platycodon flowers are quite large, the calyx is five-parted, can reach a diameter of 5-8 cm. The corolla is wide, bell-shaped. Flowers can be blue and purple, as well as various shades. White and pink flowers are also found in cultivated varieties. Flowering begins at the turn of July-August and continues until September.
The buds of the grandiflora bellflower also look interesting, forming green or purple little balloons that inflate to reveal a flower. The flower opens fully formed and immediately at its final size.
Photo. Platycodon flower buds