In summer cottages and garden plots, the problem of disposing of organic waste often arises - leaves, weeds, peelings, sawdust and other things. Unlike inorganic waste (glass, plastic, etc.), all this can be used to produce clean, environmentally friendly fertilizer - compost. It is obtained as a result of the biological process of decomposition under the influence of the vital activity of microorganisms.
Adding compost to any soil improves its quality characteristics. Clay soils acquire a lighter, crumbly structure, while sandy soils retain moisture better. Let's look at how you can make a compost pit and prepare compost correctly.
What can you put in?
The following organic wastes are suitable for raw materials, which are divided into two large groups.
Brown waste
These include those that emit carbon.
- fallen leaves;
broken branches, except those that are too thick;- sawdust and shavings;
- cotton and wool rags;
- disposable filters;
- tree bark;
- cardboard, finely torn paper;
- nut shells;
- newspapers.
- hay;
- plant roots;
- ash;
- cereals;
- flowers;
- mown grass;
- rotten boards (for example, from an old fence).
Greens
Waste that releases nitrogen is considered green.
- berries, vegetables and fruits unsuitable for food and processing;
- drunken tea and coffee cake;
- stubs and cleaning;
- scraps of wool;
- leftover soups, cereals;
- eggshell;
- waste products of herbivores.
When adding a large amount of freshly cut grass, the compost preparation time will increase significantly. To speed up the process, lightly cover small layers of grass with soil.
What's not allowed?
Not all organic matter is suitable for fertilization.
The following cannot be placed in a compost bin:
- fresh pet excrement;
- loach, wheatgrass;
- bones;
- leaves and other parts of plants affected by diseases, especially late blight and powdery mildew;
- plants treated with any chemicals;
- weeds whose seeds have ripened;
- inorganic non-degradable waste (rubber, metal, glass, synthetic materials);
- tops of potatoes and tomatoes;
- fats, meat, dairy products;
- fresh and boiled eggs (except shells).
Potato and tomato tops, even healthy-looking ones, can be carriers of late blight. Subsequently, such fertilizer can infect all plants. In addition, this raw material takes a very long time to dispose of; the process will take about 5 years.
Anything that is not suitable for a compost pit should be thrown into a cesspool or removed from the site as garbage.
Requirements for placement
A place on the site is chosen, as a rule, out of sight and one that you don’t mind - where nothing grows due to dense shade or infertility of the soil, somewhere behind outbuildings, if there are any, in the backyard.
There are other important points.
- You need to understand that rotting raw materials will not emit the most pleasant smell, so you should think about moving away from the resting place and about the neighbors. It would be good to know the compass rose so as not to place the pile on the leeward side.
- Consideration should be given to ensuring free access to the pit, since raw materials will be added and taken constantly throughout the season.
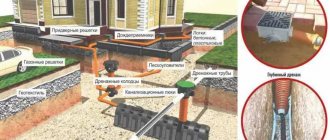
- It is advisable to choose a site on a flat surface, and not in a hole, perhaps with a slight slope, to prevent stagnation of water, which interferes with the flow of oxygen, and therefore extends the process over time.
- The compost heap, although called a pit, must be higher than the ground level. In this case, it will warm up better, it will be more convenient to loosen, water and generally maintain it. The optimal parameters are 50 cm deep, 1 m of fence above the ground. Higher walls will make it difficult to loosen and use compost.
- Avoid proximity to a source of drinking water (must be more than 25 m).
- The place should be in the shade or partial shade - sunlight slows down and dries out the raw materials.
- Do not place the structure under trees, they may get sick and die. Neighborhood with conifers and other evergreen crops is especially not recommended. The best neighbors will be alder and birch.
Do not cover the bottom of the pit with film, slate or other material that does not allow moisture to pass through! It must penetrate from the soil unhindered (depthing will facilitate this), otherwise everything will dry out. The bottom should remain earthen.
Criteria for choosing a ready-made composter for a summer cottage
At the same time, an increasing number of owners of suburban areas are striving to move away from the use of home-made structures, giving preference to purchased models. Let's consider what advantages and disadvantages ready-made designs have, and what parameters you need to pay special attention to before making a purchase.
In most cases, preference is given to simple and convenient composters that are easy to assemble and operate independently. But since the number of offers on the modern market is extremely large, it can be really difficult to independently decide on the most suitable option. Experts recommend using certain criteria as a guide, since models can be:
- collapsible or integral;
- with temperature sensor;
- with a special device that allows you to loosen the contents;
- with a mesh instead of the bottom, which provides protection against rodents;
- various shapes and sizes.
You can build a composter for your dacha yourself or purchase a ready-made model in a specialized store.
Composters also differ in the material that was used for their manufacture. Thus, plastic is the most popular today because it is light in weight, which allows it to be moved around the site without problems, and its service life is extremely long. If the design is planned to be stationary, then you can consider purchasing a metal composter. Wooden models can also be found on sale, but they are not very common due to their short service life and exposure to external factors.
Design features
The ideal dimensions of a structure are usually indicated by the parameters 1.5m x 2m, but ultimately they are determined based on the amount of raw materials that can be accumulated in 2 years. This is how long the process of preparing the finished substrate will take. Therefore, the ideal pit should be twice as large and two-section, designed to last two cycles. The first compartment will contain ready-made waste, the other will contain fresh waste over the next two years.
It is important to know that a small pit will not warm up well as a result of rotting, and this temperature may not be enough to kill all pathogenic microflora and harmful spores. Experts determine the required temperature of 60C and the above-mentioned optimal dimensions.
The structure must have a removable lid on top.
What are the benefits of a compost bin?
On the land, compost pits are used to store waste and surplus food. Subsequently, they decompose and turn into fairly high-quality fertilizer. If at the beginning of the season you build a compost pit at your favorite dacha with your own hands, then in the fall you will have ready-made, incredibly useful fertilizer waiting for you. The average time for compost to “ripen” is three months. Of course, provided that the composter is made correctly and the pit has been given due attention. Otherwise, the decomposition process may take 1-2 years.
Design options
You can arrange a compost pit in different ways; let’s look at several common options.
Regular pit
The simplest construction that does not require additional costs and materials. A shallow hole is made, no more than half a meter deep, into which everything is folded according to the usual principle. The contents are covered with black polyethylene on top. To make it easier to remove for adding waste or using, it is rolled on both sides onto a long handle, which also serves as a load. After each new laying, it is recommended to cover the waste with grass.
The option is simple, but it is difficult to call it effective and convenient. There will be difficulties with mixing, and such a pile will not be able to warm up sufficiently, which means that it will take a longer time for it to rot.
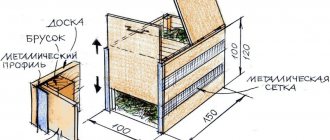
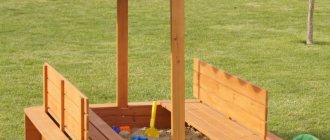
Two-section composter
The materials for manufacturing can be boards, old slate, metal sheets, corrugated sheets, walls from plastic containers, bricks, etc. The optimal dimensions, depending on the size of the site, are 1.5-2 m in width and 2-3 m in length. Make a deepening of 0.5-0.8 m.
To secure the structure in the corners (stepping back the required distance from the pit), sections of pipes or large-diameter metal rods that can withstand the weight of the compost heap are dug in. Wooden poles are not suitable for this purpose, since the rotting process will invariably affect them, and the structure will not last long due to the load.
Install the walls, not forgetting the ventilation holes. A partition is installed in the middle, dividing the structure into two equal-sized compartments. Ready humus will be stored in one of them, and “young” waste will be stored in the second. It is better to make the lid hinged, on hinges, so that it does not move and tightly covers the contents.
It is advisable to treat the supporting sections of metal pipes with an anti-corrosion bioprotective compound, and all wooden parts with protective impregnation, and then cover them with two layers of acrylic paint.
The bottom, as already mentioned, cannot be covered with waterproof material, but straw, sawdust or tree bark are perfect for this - they will provide the necessary air exchange and allow excess moisture to escape quietly.
If desired, you can make three sections. The first will contain a ready-made substrate, the second will contain a completely ripening substrate, and the third will be intended for laying new raw materials.
Single section composter
A simpler and fairly compact option. You will have to take the finished product from below, for which you need to make a hole in one of the walls (or better yet, on different sides), from which the ripe fertilizer will be removed. There should be a distance of at least 30-40 cm between the wall of the box and the ground. In this case, there is no need to mix the substrate.
Concrete box
A structure that will be completed literally once and for all. Neat and reliable. To do this, you need to dig a trench of the required perimeter with a depth of 70-80 cm and make formwork. Pour concrete into it, remove the formwork and remove the soil from the box to the required depth. As a cover, you can use a wooden board or film pressed with a metal mesh.
Ready made plastic container
The modern market offers ready-made composter structures made of plastic. They have different sizes (ranging from 400 -1000l), the necessary ventilation holes (make sure of this!) and a lid.
Their cost depends on the size, design and region and usually ranges from 2 to 10 thousand rubles.
Do not make compost pits that are too large; their contents will overheat, which is also undesirable, since this will lead to the death of the necessary microorganisms.
Popular creation methods
For a do-it-yourself compost pit, all manufacturing options can be divided into several types. Let's list them.
Regular waste pile
It is not difficult to prepare this version of the heap. All you have to do is choose the most suitable place to place the compost heap. Then gradually place the waste. If possible, they are laid in layers. For example, food scraps can be mixed with straw, green grass and manure.
As soon as the height reaches a meter, you will need to make 3-4 indentations and pour compost liquid inside. It significantly speeds up the process, so the first compost will be ready in three months.
The option described above is one of the fastest ways to obtain compost at minimal cost.
All you need to create a compost heap is a wheelbarrow and a shovel.
Classic pit
One way to make it is to dig a small, square-shaped hole in the ground. Cover your version of the pit with branches and hay at the bottom, as well as bark. Next, place food and vegetable waste. The temperature inside will not be very high, so it is recommended to immediately cover with film.
Please note that this option is the least successful of all. Firstly, such a pit warms up much worse. Secondly, the temperature in it is not always high. But it has a small area and is easy to arrange.
Classic compost pit
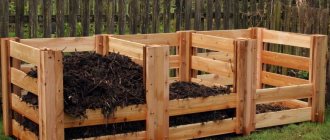
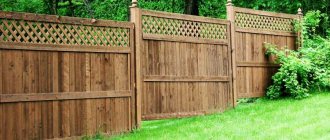
Building a compost box from wood
How to make a compost pit correctly so that the design is inexpensive and practical? To do this, you can use bars, sheets of metal with slate. The pit making process is as follows:
- You remove the top layer approximately 35-40 centimeters thick.
- Next, drive in pegs around the perimeter.
- A fence will need to be installed around the pit. You can make it from pallets, use wood blocks, boards and boards. It is also allowed to use other materials: flat and corrugated slate, polycarbonate, metal sheets.
- The height of the fence is no more than one meter. Otherwise, even with great growth, you will find it inconvenient to mix the compost.
- The structure is covered with plywood or film. Compost warms up well, so this design is considered optimal in all areas.
- This magical Moorish lawn
- Design on 6 acres
How to fill it correctly?
Before laying the raw materials, clear the bottom of the pit from the turf and dig it well to a depth of 30 cm. This will provide conditions for the active life of worms and the penetration of beneficial microorganisms, which will provide indispensable assistance in the waste processing process. In addition, excess water will drain well into the loose soil.
We begin laying, alternating layers of wet and dry, brown and green raw materials. Their optimal ratio should be approximately the following: 3 parts brown waste to 1 part green waste, and there should be 5 times more wet raw materials than dry ones. Anything large should be broken or chopped.
Moisten (not too much) and close with a lid.
The raw materials should not be compacted too much, but excessive looseness is also undesirable. Everything should be in moderation, especially humidity.
Care of aerobic and anaerobic composting soil
With anaerobic composting, human intervention is not required. The main thing is that the temperature outside corresponds to the mode of functioning of the bacteria. In winter, the container is moved to a warm room.
If ripening occurs with access to air, then the more air there is, the faster the compost will be ready. To do this, loosen the components with a pitchfork every 2–3 weeks In hot weather, the pile is watered with clean water without chlorine. To prevent rain from getting inside the compost bin, it is covered with film or a piece of plastic.
Tips for proper use
Storing compost is not everything. Proper further actions will help speed up the decay process and make the fertilizer more nutritious. Please adhere to the following guidelines.
- Moisten the pile periodically, but don't overdo it. When dry, rotting stops.
- From time to time, pierce the compost with a pitchfork and, as it were, “comb” it. This is necessary for better access of oxygen, which is an important component of the overall process.
- A black film used to cover the top of the pile helps to reduce cooking time.
- If possible, add earthworms to the compost.
- To improve aeration, maintain looseness of the mass and accelerate decay, the compost must be stirred occasionally.
The following additives help speed up cooking.
- Rotted horse manure.
- Some types of plants (valerian, chamomile, dandelions, yarrow).
- Specially produced activating preparations, for example, Baikal EM-1, Compostin and Compostar.
- Stale (dried) bird droppings.
- Legume stems.
- Bone and dolomite meal.
- Superphosphate and complex mineral fertilizers.
As the contents rot, the temperature inside rises, and light steam may even rise from the heap. This is normal and indicates that everything is going well.
Spare no effort and time for this simple structure. This will solve the problem of recycling a considerable part of organic waste, and will provide valuable fertilizer, the quality and environmental friendliness of which you will be absolutely sure of.