Molds for paving slabs are special matrices for casting building material, which can be used at home to produce elements with your own hands. The need to create tiles may arise if you want to decorate the area with an original exclusive coating, saving significantly and getting exactly as much material as you need.
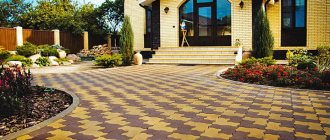
The advantages of paving garden paths, adjacent areas, and other landscape elements with paving slabs leave no one in doubt: the coating made in this way will be reliable and durable, beautiful and aesthetically pleasing, smooth and ideal. Using paving slabs, you can create a unique decor that is compatible with other elements of the architectural ensemble and landscape of the area.
Modern manufacturers offer a large assortment of tiles, which, however, is limited to the choice of standard patterns and colors, is high in cost, and requires costs for organizing loading and unloading operations and transportation. In view of all these features, many craftsmen prefer to make building materials with their own hands, using molds for the production of paving slabs.
Molds can be made from various materials - rubber, plaster, various types of plastic, wood, etc. You can buy ready-made templates or make your own, implementing a unique idea and saving a lot of money.
Types of paving slabs
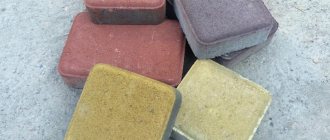
Paving slabs come in a variety of shapes, colors and designs. Every year, manufacturers offer more and more new product positions, so the choice is quite large.
Variety of paving slab shapes:
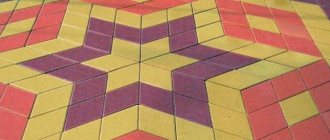
- Rhombus - offers maximum freedom in terms of design: using several types of this type of element, you can even create 3D effects.
- Square - tiles can be made in different versions, with patterns. The standard size is 500x500x50 millimeters. By using tiles of different sizes and colors, you can also create original patterns.
- Clover - often used for paving squares and parks, made of concrete with granite crushed stone. The tile has a smooth surface, is not afraid of dirt, and is always clean and aesthetically pleasing.
- Brick - can withstand maximum loads, which is ensured by the shape of a geometrically regular parallelepiped.
- The wave lasts a long time without moving even under heavy loads. The coating is created with a puzzle effect, therefore it is very durable and beautiful (when using several colors, for example).
- Galvanized tiles with round edges are a good choice for summer cottages and suburban areas where there are no heavy loads. Looks good.
- English cobblestone - imitates brown or gray natural stone, produced by vibration casting, looks stylish and simple.
- Tiles with teeth on the sides guarantee the highest level of strength when joining elements; therefore, they are often laid where cars drive and there are heavy loads.
Materials for making paving slabs:
- Cement and sand - environmentally friendly, produced in a wide range of colors and shapes, usually obtained in a bright shade, very durable, not afraid of water and ultraviolet radiation, can be dismantled and re-laid. Typically, such tiles are used to make coverings for city parks and sidewalks.
- Clinker - tiles are obtained with a rough surface, safe and environmentally friendly, strong and durable. Usually the choice is represented by a large number of natural shades.
- Rubber - such tiles are used for arranging children's playgrounds and institutional areas. You won't be able to slip on such a surface, and even if you fall, the impact won't be strong. Even in icy conditions, the tiles are safe, as they provide good grip on shoes.
- Plastic (polymer and sand) - tiles are made by heating and melting polymers, sand and dyes, then pressed. The tiles do not contain cement dust or toxins, they do not wear off, withstand maximum mechanical loads, do not involve cracks or chips, do not require special care, and are available in a huge number of shades and patterns.
- Granite is a material produced by sintering natural stone chips. Such tiles are not afraid of aggressive influences, are strong and durable, and look expensive and elegant.
Paving slab production technology:
- Vibratory casting - concrete mixture is filled into casting molds, placed on a vibrating table, where the mixture is compacted. Then the tiles are dried for 24 hours at a temperature of +40 degrees. The tiles are resistant to temperature changes, highly durable, and durable.
- Vibrocompression - concrete solution is poured into molds installed on a vibrating machine, and the top is pressed with a piston. The mixture is compacted, the tiles are of an ideal geometric shape, with a rough surface. The material can easily withstand high humidity, high and low temperatures, durable and strong.
- Hyperpressing - the technology is similar to the previous method, but without vibration. Here, high pressure for compaction is created thanks to a hydraulic press. Production is automated, the percentage of defects is minimal, so the tiles are cheaper.
Home production involves the use of the casting method. All you need to create beautiful and original tiles are molds and concrete mortar.
Concrete paths: strengths and weaknesses
The material from which the paths are made plays a key role. Therefore, do not forget that the convenience and aesthetics of the path will depend on the characteristics of the concrete mixture. For example, its advantages include the following points:
- affordable cost of raw materials and tools;
- durability of the constructed path;
- concrete can be reinforced with metal components to increase the rigidity and stability of the path;
- the prevalence of the material - it can be found and purchased in any city;
- it is possible to build a structure in areas with high groundwater levels;
- room for imagination in terms of design: a summer resident can fill roads of any shape and width, guided by personal preferences or inspired by architects’ designs publicly available on the Internet;
- the use of special additives makes it possible to improve the properties of the concrete mixture - increase its resistance to water, frost, temperature changes, various loads, and so on.
Disadvantages of concrete paths:
- the risk of cracks on the trail caused by soil displacement or flooding;
- the construction of permanent paths from dry concrete does not involve a simple dismantling process, so they cannot be moved to another place or removed without the use of special equipment;
- To pour the concrete solution, it must be warm outside, no rain. Also, the concrete must be completely dry before the path is ready for use;
- the procedure of mixing the components of the solution - concrete, sand, gravel and additives takes a lot of effort and time, it will be difficult to do it with a shovel, so most likely you will need a concrete mixer;
- In order to achieve the ideal appearance and high strength of finished concrete paths in a summer cottage, the installation of a formwork structure will be required during their construction. For this, the dacha owner will have to allocate time and money to purchase boards for formwork.
Ready-made forms: types and characteristics
Forms for pouring paving slabs can be very different in material, configuration, size, number of elements, etc. The most important thing that you need to decide right away is the material of the mold and the method of getting it into production: buying a factory one or making it yourself.
Each of the materials has its own pros and cons and features. As for whether to use homemade or factory templates, each master decides for himself, based on desire and financial capabilities.
Rubber molds
Rubber molds are not very popular, as they have a significant mass, are expensive and difficult to use. To work with a rubber matrix, you will need a vibrating table, a special drying rack, and portable shields for transporting workpieces to the drying site.
The use of rubber molds is not justified. Not only does this significantly increase the cost of the process, but also manufacturers, in an attempt to reduce product costs, add soot to the rubber, which makes the molds of lower quality and short-lived, capable of staining the tiles a dark color. Each production mold must be washed with hydrochloric acid after use, which can also be a problem.
Made from sheet plastic
The production of paving slabs in plastic molds involves the use of materials such as polystyrene, PVC, ABS, and acrylic. All forms are stamped on high-tech thermal vacuum machines using the vacuum molding method. But each material should be considered separately.
PVC plastic
Tile casting can be carried out in molds made of different plastics. The best matrices are made from a film type of material. But the walls of such templates are thin; they need to be transferred to the drying area on something solid. The shape is susceptible to deformation and requires the use of stands.
After the tiles are ready and removed, the templates must be washed in a soapy solution to prevent concrete from sticking, which takes time and delays the production process. When planning to cast tiles with your own hands, you need to remember that even careful operation and careful care will not add durability to film forms: they will last for a maximum of 15-25 pours.
Two-millimeter PVC plastic is considered more durable - in reality, the molds are made with a wall thickness of 1.5 millimeters; to use them you will also need a shield, stands, and places for drying. There should be no pressure on full containers; after use, the mold must be washed thoroughly; the tiles must be left for at least 2 days. Thickened PVC is more durable than film, but it is also enough for a maximum of 70 pours.
Thus, the use of PVC molds is only relevant for small volumes of material, otherwise the templates will have to be changed frequently and the process will be extremely lengthy due to the need to keep the tiles in the mold until they completely harden.
ABS plastic
The molds for making paving slabs from this material are of high quality and meet the standards. But most often they are used for casting large elements, since it will be difficult to give even outlines to small tiles in an ABS plastic template. If you leave the contours round, then difficulties will arise in installing the covering from such tiles.
On the other hand, tiles cast in such forms turn out to be very beautiful - with a glossy shine, bright, durable. The tiles are kept in the molds for 2 days; after using the matrix, they must be thoroughly washed off any concrete that has adhered.
When choosing forms, you need to take into account a nuance: high-quality products are made exclusively from light plastic. The dark color of the plastic indicates that the quality of the material is low, the matrix will be thin in bends, with any deformation the product will become covered with cracks, etc.
Silicone forms
The most popular option among those who are wondering how to make paving slabs themselves. Silicone molds are easy to use, elastic, and allow you to draw the smallest details of a pattern and create beautiful, high-quality tiles. But the material is not suitable for mass production, as it wears out quite quickly.
For home production of small volumes of tiles, silicone is an excellent choice. Any craftsman can quickly and easily make tiles of the most unusual design or choose a standard template from the many available on the market.
Polyurethane
Forms made from this material are distinguished by excellent quality, strength, and durability. Suitable for mass production as well. The blanks imitate different textures very well - natural stone turns out to be almost perfect and hardly distinguishable from natural stone. All the craftsmen who used polyurethane in their work note only the advantages, except for one nuance - factory-made molds are quite expensive.
Formoplast
This option is practically not used today, as it involves a one-time use. Formoplast is enough for one pour, which is not justified even for creating tiles for a small garden path. Even a narrow alley in a small area requires far from a dozen tiles, and buying a lot of mold plastic matrices (even if the cost is not too high) is simply unprofitable.
Polystyrene
The polystyrene mold for pouring paving slabs is considered to be of the highest quality. It conveys the texture of even marble perfectly – both in design, pattern, and shine. You can create exclusive elements. Working with the molds is simple; after pouring, you don’t need to soak or wash them for a long time, since the tiles come out of the container themselves.
Such forms are quite expensive, but it is justified. When choosing, you need to pay attention to the presence of a protective film inside the matrix: if it is not there, it means that it is a low-quality template, but a banal fake made of cheaper material, made without following technology.
Fiberglass
This type of mold is most often used in the production of small garden objects and volumetric slabs. Fiberglass allows you to create not only large tiles for arranging paths, but even figures for landscape decoration.
But the matrices are not very comfortable to use: they require mandatory lubrication before pouring the solution, which often provokes the appearance of cavities and pores in the cast elements.
The tiles do not have a glossy sheen; after removal, the elements often have to be modified. Therefore, for the production of small paving slabs, fiberglass molds are not the best option.
Filling the mold
For a garden path made of concrete, you will need a higher grade of cement than for conventional buildings: M350 and higher. Firstly, the sidewalk does not experience a uniform load, but a point load - while a person walks or equipment passes. Secondly, increased exposure to environmental conditions increases the requirements for coating quality. Filling Features:
- Concrete consistency – 1:3 (cement/sand).
- The use of metal rods or mesh for screeding is inappropriate for this method of making a track. Fiber fiber is used as a reinforcing element when mixing the solution.
- Moisture penetrates into the pores of concrete, which expands and injures it when it freezes. Therefore, water is the worst enemy of the garden path. To better preserve the coating and increase moisture resistance, water-repellent additives are included in the solution. Additives create a protective layer, closing external pores.
- When pouring a path using a mold, the density and fluidity of the solution are of great importance. They are characterized by the amount of water in the composition and the quality of mixing. In order for the mixture to fill the entire volume of the plastic mold, the concrete must be sufficiently fluid (this can be seen with the naked eye). This is achieved by thorough mixing: undissolved lumps of sand and additional inclusions are not needed. The density is regulated by water: the solution should be medium - not liquid and not very dense, so that when the mold is removed, the tiles do not fall apart or spread.
- After mixing the concrete, the mixture is poured into the established form and evenly distributed into sections with a trowel.
- If necessary, the solution is added on top and the empty areas are filled again. The partitions of the form are on the same plane, so it is very convenient to level the top layer using a smoothing board, a regular board or other flat object.
- If the solution is thick enough, the concrete will not flow when the mold is removed. However, if it was not possible to prepare such a mixture, the area is given 5-10 minutes to harden (for quick setting, cement with special additives is used).
- The form is carefully pulled out and moved to a new location.
- The procedure is repeated until the entire track is ready.
- The period of hardening and setting is about 30 days, but you can walk on the sidewalk within a week (of course, driving a car is not yet recommended). Watering the concrete daily with water is a standard and effective procedure to ensure the strength of the layer.
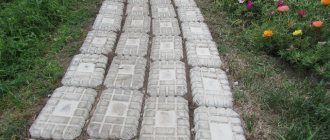
Photo: platform made from a car mold - With the help of coloring, the garden path is given an original appearance, which puts it on par with ready-made colored tiles.
For this purpose, different paints are used: rubber, synthetic, organic, silicate, etc. The main required property is wear resistance. You can also color the solution itself when mixing: this will give the path an even and rich shade. The use of several dyes allows you to create a unique pattern from tiles of different colors.
Step-by-step instructions in photographs
How to choose a practical shape
If you don’t want to wonder how to make molds for paving slabs with your own hands, but want to buy a factory template, you need to choose the right one. The quality of products depends on the correct production of the element and the material used in the process. It is worth paying attention to the products of companies that have managed to establish themselves well in the market and have a lot of positive feedback from customers (even if their forms are a little more expensive).
Suitable options for home production:
- Forms made from virgin polyethylene always have an ideal contour, good rigidity, and do not involve cracks or deformations during operation. Such templates can withstand up to 1000 fills.
- Forms made from secondary polymers - tiles produced using them are clear, with a beautiful pattern, and ideal geometry. The mold can withstand up to 500 pours. To buy really high-quality templates, you need to carefully consider them when purchasing: good templates always have a beautiful shiny surface and do not crack when compressed.
- Molds made of granulated polystyrene can withstand up to 100 pours and guarantee a perfectly flat, glossy surface. But the concrete is kept in them for at least 2 days, so the process will be lengthy.
Before purchasing a product, you must study the quality certificate, which contains all the information about the raw materials, other properties and characteristics.
In addition, when choosing a specific material, production conditions, volumes and other specific factors are taken into account. In Moscow and the regions there is a fairly wide range of matrices for every taste and budget.
Forms for the path: how to make them yourself?
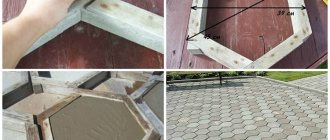
It is best to buy blocks of wood with a cross-section of 50 mm to create a stencil; they need to be sanded and treated with an antiseptic. For a tighter connection, cut grooves at the ends of the beams, and fix the outside corners with metal corners.
The workpiece can be of any size and type. Much depends on the manufacturer’s imagination, design and type of site. You can divide the mold inside using bars into several parts to cast 3-4 small tiles at once. The bottom of the stencil can be a laminated plywood sheet, which is attached to the bars with nails or self-tapping screws.
Important! A mold made using this technology can be used to pour the mixture many times. Before adding the mixture, the walls and bottom are coated with waste oil so that the frozen product can be easily pulled out of the mold. If you have formed a large template, then when pouring the mixture in the center, lay a reinforcing mesh.
Making a Metal Mold
To make a mold for a garden path with your own hands, you can use sheet metal (even barrel hoops will do, but they will have to be coated with a protective agent). Strips of the required width are cut from metal using a grinding machine or special scissors, which correspond to the height of the path: a centimeter for the pedestrian area and 6 centimeters for the parking space. It is easy to make shapes of the desired shape from such strips. All that remains is to secure the workpiece using a welding machine or self-tapping screws.
Making your own mold
When deciding to make homemade molds for paving slabs with your own hands, you must first become familiar with the features of working with different materials, choose the appropriate option and study the technology. In principle, this is not so difficult, and if everything is done correctly, it is quite possible to obtain high-quality and durable molds for the production of elements with the desired characteristics.
Tree
Wood forms are the simplest and most affordable option. To create the shape, you will need bars that are connected to each other in such a way as to create a closed figure, the inner surface of which will serve to create the outlines of the paving stones. All matrices must be the same so that the tiles fit well together during installation. Therefore, you should not make complex configurations - the best choice would be a rectangle, square, rhombus, hexagon.
Only the internal dimensions matter - they need to be calculated accurately. For rectangular/square matrices, the diagonals inside are measured, which must be the same. In a hexagon, check the evenness of the corners with a protractor.
Form assembly process:
- Cutting from wooden blocks the necessary elements according to shape and size.
- Assembling elements with screws.
- Cleaning the inner surface and sanding, coating with several layers of varnish, drying oil (this way the mold can be used several times, protecting it from moisture).
Miracle plastic
The cheapest option for creating molds is production from plastic bottles. To do this, it is best to choose five-liter canisters, the bottom of which is cut off, leaving a part equal to the height of the future tile.
Product packaging, trimmed canisters, and anything that matches the size and shape of the required elements can be used as a container for filling. Such molds are budget-friendly and not the most successful solutions, but they can also be used.
Gypsum
An affordable and easy way for those who don’t know how to make a mold themselves. The only requirement is the presence of a sample matrix.
How to make a plaster mold:
- The assembly of the wooden box is 10 centimeters larger than the model.
- Pouring plaster into the box, squeezing out a cast of the model in it. It is best to use not gypsum in production, but a molding mixture based on it, which will not shrink or crack when hardening, and will be stronger.
- You can do it differently: fill the model with a thick layer of plaster and carefully remove it.
- Then the surface is covered with wax mastic or varnish.
Usually several molds are made at once to speed up production.
Metal
Metal forms provide a smooth, even surface, do not react with water, are durable and strong. But making such a matrix yourself is quite difficult; the option is optimal only in the case of large volumes of tile production. The template will not be flexible, so it is made collapsible to make it easier to remove the tiles after hardening.
The shape and configuration of the matrix can be any. But usually they simply weld rectangular, square, hexagonal frames into which concrete is then poured. By combining frames with a bottom that imitates the relief of natural stone, wood or a pattern, you can get very beautiful tiles.
Polymers
A homemade polymer mold is made in two stages. First, a wooden box is made for pouring plastic, the internal dimensions of which are 2 centimeters larger than required (allowance for the thickness of the matrix walls). Then another box is assembled with the exact outline of the shape.
The second frame is placed in the first so as to create an even gap. Molten plastic is poured into this gap. When using polyurethane, you must take care of personal protective equipment and ventilation of the room. If a tile with a complex pattern is created, then an exact model is used, placed in a box.
After the product has hardened, take it out of the box, remove any irregularities with sandpaper and use the mold for its intended purpose. It involves repeated use, but requires certain skills and experience in operation.
Silicone molds are more flexible and of higher quality (but also more expensive). They can be used repeatedly. True, they do not hold their shape very well; if the master lacks experience, they can sag and squint. Silicone molds are made according to the same principle as other types of plastic: the master model is installed in a wooden box, filled with a layer of material at least 1 centimeter thick, and removed after crystallization.
Things to remember:
- The wooden box and the master model must be fitted perfectly (check the lines and corners with a level and other tools) so that the shape is smooth and neat.
- The plastic hardens quite quickly - the work must be carried out confidently.
- It is better to make a wooden box collapsible so that after hardening you can remove the plastic mold without breaking it.
Natural gifts
You can find an original design by simply observing the world around you and looking at natural textures and reliefs. You can even use burdock leaves to create unusual tiles: just apply a thick layer of concrete mortar on it, press firmly and, after drying, cut the tile along the contour. Such “leaves” are then placed on the territory at a certain distance, for steps.
How to make a concrete path using a mold: step-by-step instructions
First, you need to choose a place for a path from a mold at your dacha with your own hands, make a design, make calculations, and stock up on building materials and tools. And later, based on this, it will be possible to calculate the width and shape of the path.
You will need a simple piece of paper on which to make a plan. Indicate the location of buildings and important areas. Connect them with lines that will be the axes for the paths. It’s better to make the paths a little curved - this way you can make your site more original.
The tools you will need are a hammer, a concrete mixer, shovels, spatulas, and so on. It is also worth preparing cement mortar, sand, crushed stone, a mixture for moisture insulation, and components for the formwork structure.
Formation of a work plan is the most important stage of any construction. Before building a garden path with your own hands using a form, you need to plan everything and calculate the amount of building materials. More information about choosing a layer of solution depending on the soil:
- for clayey 4–6 centimeters;
- for sandy, light loamy 8–10 centimeters;
- for a marshy one, you will need a gravel cushion 5 centimeters thick.
You can’t do without arranging a sand cushion. Its thickness should be approximately 12–15 centimeters. Calculating proportions is also simple. For example, you make a path 1 meter wide (W), 10 meters long (D), 10 centimeters thick (T), and the bottom layer of sand (P) is 10 centimeters. Before creating a sand cushion, you need to find out how much artificial material is required.
Which material is better
When creating a home template, it is very important to choose the right material. Requirements for it are determined by the characteristics of tile production. So, the mold is used to pour a liquid cement mixture inside, which is then compacted and hardened. Then the product is taken out and in order for the removal to be easy, without damage, the material must be either very smooth or lubricated with something.
Basic material requirements for the mold:
- Minimal water absorption, sufficient resistance to moisture.
- High rigidity and sufficient wear resistance are desirable.
- Resistance to interaction with abrasives.
- No thermal expansion when the ambient temperature changes.
Plastic, silicone, and polyurethane are considered the most durable: they are not afraid of moisture, are easy to clean, and can be used repeatedly. The easiest way is to make a homemade template from wood or weld it from metal. Metal matrices are considered the most durable and rigid; gypsum matrices are the cheapest. Much depends on the preparation of the master - skills and experience in working with this or that material will greatly facilitate the entire process.
What tools may be required
The use of tools largely depends on the choice of material. A standard set will definitely come in handy - a hacksaw, screws and a screwdriver (screwdriver, drill), and a hammer. To work with metal, a welding machine, metal drills, and rivet material may be useful. Practice shows that during such work there are no unnecessary tools ; non-standard solutions can be made, for which a variety of devices will be needed.
Some forms for pouring paving slabs must be protected from moisture using drying oil, paint or varnish. To do this you will need a brush, paint and solvent. The choice of protective coating is not so important; the main thing is to ensure cutoff from water .
To sand finished products you will need sandpaper , a sander or a drill with a sanding attachment.
This point is important because the surface of the tile must be smooth. In addition, it is difficult to remove finished tiles from rough formwork and can break them.
Find out on the pages of our website how to clean cement from paving slabs! We'll tell you what tools and materials you'll need for this.
And in this article you will find some useful tips on how to remove grass between paving slabs!
We have also prepared step-by-step instructions for you on how to properly make paths from paving slabs! Look for details in the following material.
Preparing for pouring
Before pouring cement mortar into the mold, it must be properly prepared. Many craftsmen do not know what they lubricate the molds with before starting work, which then makes it much more difficult to remove the tiles. Typically, drying oil, varnish, or materials of this type are used for lubrication to prevent contact with water. True, there is no need to smear molds made of silicone, polyurethane and plastic.
All molds can be lubricated before filling with wax mastic, so that it is easier to remove the hardened tiles later. The layer is applied thin and even, without drops or streaks. You need to decide how to lubricate the mold based on the material that was used to make it: for example, impregnation is required for wood, but not always for polymers.
It is advisable that the mold have handles/grips, which will make it much easier to remove the tiles. After all, the weight of concrete is quite large and when carrying or removing tiles, it is necessary to eliminate the risk of falling.
Types of forms for garden paths
The process of self-production of concrete pavement using special stencils is quite labor-intensive, but has many advantages. Matrices can be bought at a hardware store, or if desired, you can make them yourself.
Any method is profitable, since to create a concrete surface on garden paths you only need to spend money on sand, cement and crushed stone. There is no need to buy ready-made slabs. To obtain colored tiles, a special dye is added to the solution.
Matrices for concrete coating are:
- Silicone.
- Plastic.
- Wooden.
- Metal.
Forms for garden paths
The device can contain various patterns: paving stones, round stones or irregularly shaped rectangles. You can make a frame with your own hands from available materials: iron pipes, metal plates, wooden boards, silicone, tin.
A solid bottom stencil is used to create tiles or pavers that are separate from the path. It is poured with concrete and left to dry. After drying, the slab is carefully removed. This type of device is usually made of durable silicone. It is soft and easily removed from hardened slabs.
Through formwork is used directly on the site where it is necessary to pave the garden path. Place a stencil on the ground and fill it with solution. After drying, the device is removed.
Possible errors, tips
A homemade form is always a risk: that the material was chosen incorrectly, that the production technology was not followed, that the nuances were not studied somewhere in advance. But only those who do nothing make no mistakes, so it’s definitely worth trying to create matrices yourself. And take into account the experience of the masters.
Things to remember when creating a form:
- It is allowed and encouraged to tilt the walls of the matrix outward (inward is unacceptable).
- When working with plastic, you should not make the walls too thin - they will quickly crack and wear out. It is advisable to maintain the thickness of the mold so that the master can easily carry a workpiece full of concrete without deformation.
- Templates made of plaster and wood are periodically coated with paints and varnishes to renew the layer, protecting it from deformation and moisture.
- You can use any plastic objects as molds - pipe scraps, containers, parts, etc.
Advantages and disadvantages of using walkway molds
Few people know why forms are so popular. The main advantages of such products:
- when using a special form for pouring the concrete mixture, it is easier to complete the installation;
- the stencil is used to construct artistic paths for the garden; not everyone can make such patterns with their own hands;
- aesthetics of the structure; in comparison, a solid strip of concrete does not look so impressive;
- the ability to create the appearance of laying natural stone in the ground, thanks to the irregular shape of the cells;
- minimal costs when constructing paths; for beautiful decoration you only need stencils;
- you can easily change the color of the coating by painting;
- the path can last a long time, and that’s all, because it is created from a cement composition and sand, the combination of these building materials ensures high strength;
- tiles made using a stencil can easily withstand temperature changes;
- the simplest production technology.
Safety precautions when working
When using chemically active components in your work, you should definitely think about protection and ensure air access to the room. Eyes and respiratory organs are protected with goggles and a respirator. Under no circumstances should these measures be neglected when working with polyurethane.
Welding work is carried out in accordance with safety regulations - in a room with fire extinguishing equipment, keeping in mind the standards for working with the electrical network. One way or another, health protection should be a priority during the work process.
Creating molds for the production of paving slabs is an interesting and creative process that allows you to implement the most unusual design ideas, as well as significantly save on the purchase of factory matrices. With certain skills and experience, you can create real masterpieces that are in no way inferior in quality to factory samples.
Features and Benefits
Buying a finished product is the simplest and fastest solution. Despite the large selection of different materials, this approach does not make it possible to fully realize all ideas and solutions. In addition, the cost of finished products often does not correspond to their quality.
By making tiles yourself, you can be sure of the quality of the material.
In turn, using different forms for filling has a number of advantages:
- Affordable price. Special matrices make it possible to create original and unique tiles using inexpensive and simple materials. In this case, the budget for the work will be minimal.
- Reliability and durability. The basis of the concreting process is a sand-cement mortar, the distinctive characteristics of which are reliability, the ability to withstand heavy loads and durability.
- Originality of design. Using homemade forms allows you to make a path according to your own design, which has no analogues. In addition, homemade forms are an excellent solution in cases where it is impossible to find tiles that suit certain parameters.
- Non-standard approach. Regardless of what shape the future tile will be, you can use paint, glass, pebbles and other materials as decorative elements. For the most part, products that are presented on the domestic market cannot boast of such a design.
The peculiarity of creating forms for garden paths yourself is that it is a labor-intensive process that requires considerable time and physical effort, but all this is compensated by a worthy end result.
Laying paths
When the molds for pouring are ready in a ratio of 1:3, a solution of cement and sand is prepared. Water is added until the consistency of thick sour cream is formed. Cement grades M-400 and M-300 are best suited. First, you need to thoroughly mix the cement and water, and only then gradually add water. For mixing, you can use a concrete mixer, a construction mixer, or a drill with a special attachment. The finished solution must be poured into molds pre-treated with oil no later than 1–3 hours. To guarantee quality, it is recommended to pre-cover wooden and metal blanks with film.
This is useful: preparing a mixture for concrete paths.
Depending on weather conditions, the drying process lasts 3–5 days, but the surface must be sprayed with water 1–2 times a day to minimize the likelihood of cracks.
The frozen material is removed from the blanks and left to harden in a cool, dry place for 2–3 weeks.
Of course, making matrices for garden paths yourself requires certain physical and time costs, but following all the technological processes you can get a result that will exceed all expectations.
Technology for making a garden path using a mold
If the slabs for laying are made in advance, then the creation of a path in the garden begins with preparing the location. The quality and durability of the result of all subsequent work depends on the seriousness of the approach at this stage. To do this, they organize a kind of foundation:
- dig up the soil in the future location of the tiles in the form of a trench (about 10 cm deep);
- fill the resulting hole with crushed stone (up to 3 cm deep), gravel and sand are laid on top of it.
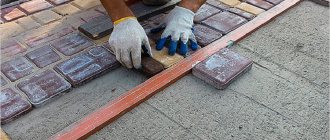
Work with tiles begins on the constructed base. The finished elements are installed on top of the sand layer. Each tile, in most cases, is installed tightly to each other.
The laid out parts of the path are compacted with a rubber hammer. Sand is poured on top to fill existing voids. The compacted path is finally cleared of excess debris.
Decorative plaster- Artificial turf - what are the advantages?
- What is a sludge pump and why is it needed?
If there are no ready-made tiles, then the technology for creating the path will be different. As preparation, dig a trench 5 cm deep. Molds for casting tiles are placed on the resulting area. Using a rubber mallet, deepen the cells. The base soil and the mold itself are slightly moistened.
The workspace is covered with a small amount of crushed stone. After this, they begin to work with concrete: they make a solution, form tiles, level and iron future stones.
Adding crushed stone to the cement mixture will create an interesting visual effect and increase strength. In the process of creating elements, it is desirable to give them a slightly convex shape. This will allow water not to stagnate on the path.
Using molds to create paths in the garden is common. With their help you can create an original landscape design. Having looked at the photos of the forms for the paths and the results of their application, you can understand that the scope for creativity is not limited.