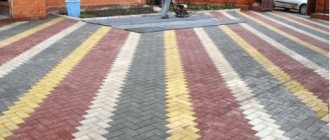
Concrete sculptures are an excellent solution for decorating the courtyard of a country house, a personal plot, or the territory of a summer cottage. Despite the fact that real sculptors do not really like concrete due to some features, the material is perfectly suitable for making simple sculptures at home.
A correctly poured concrete sculpture is strong and durable, can be painted in any shade, is not afraid of external aggressive factors, and is heavy, which makes it impossible for the product to be stolen. It is also important that the production of concrete sculptures is relatively inexpensive, and all stages of the work do not require any special skills, knowledge, tools, or materials.
Everything you need to make a concrete figure with your own hands can be found in a workshop or bought at the nearest supermarket. There are several technologies for creating sculptures from concrete mortar, and each master chooses the one that is most suitable for his purposes and allows him to obtain the best result.
Every craftsman can make simple and uncomplicated concrete figures. The main stages are the preparation of everything necessary, the correct mixing of the concrete solution, quick and high-quality pouring, drying in optimal conditions. After the monolith gains strength, it is no longer afraid of anything and will stand for a long time, maintaining its ideal appearance.
Necessary materials
Before making a concrete sculpture, you need to take care of everything that may be needed during the work process: tools, materials, sketches, containers, additional funds.
Plan for preparing everything needed to create concrete figures:
- When choosing a sketch and method for creating a sculpture, it is better to start with simple and accessible options, since not everyone can implement large-scale projects. When choosing a figure, be sure to take into account the size and landscape of the territory, the design of the architectural ensemble, and the ability to harmoniously fit the sculpture into the exterior. So, for children's playgrounds they make cute figurines of gnomes or animals, for the garden - mushrooms and stands for flower beds, lions are often chosen for gates, etc.
- Creating the sketch itself - if you don’t have the ability, it is advisable to draw the future figure at least schematically. The more accurately the idea is conveyed on paper, the easier it will be to calculate the dimensions and determine the order of actions.
- Experienced craftsmen advise creating 3D models of figures in a reduced form from plasticine or a piece of clay. This way it will be possible to more realistically imagine the process of creating a figure, calculate everything correctly, and accurately determine the size and scale.
- Tools - a concrete mixer and containers for preparing concrete mixture (or a mixer, a special attachment for a drill), shovels of various sizes, a spatula, a trowel, wire cutters, pliers. If you plan to fill the sculpture, you will need a mold (you can buy it or make it yourself).
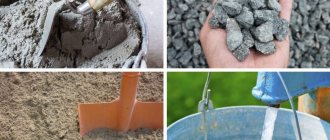
- Materials - water, sand, cement, plasticizer for preparing a concrete mixture, polyethylene film to protect the yard, steel or aluminum wire for the production of a frame for three-dimensional figures, primer and paint to give the figure an aesthetic appearance.
Production technologies
When planning to create a future concrete sculpture with your own hands, it is important to choose the right production technology. At home, you can implement three methods: hand modeling, frame, pouring into molds.
Modeling by hand is a method that does not require special devices and tools, but requires certain skills and the importance of preparing a solution of the correct consistency. Provided that the mixture is not too liquid and not very thick, it is convenient and easy to sculpt from it, it is quite possible to create small crafts. Typically, this option is chosen to create a mass of small figures to decorate the garden, flower pots, stands for flower beds, etc.
The frame method is the most complex, but it makes it possible to create real masterpieces. So, first they create a three-dimensional frame of the future figure from wire, then they cover it with a concrete mixture (they stick it on, roughly speaking), give the mixture a shape, wait for it to dry and paint it, giving the desired color, drawing certain elements (when creating animals, they draw eyes, ears , nose, etc.). The method is suitable for creating sculptures of any size.
The technology of pouring into a mold is the simplest, as it only requires the presence of a mold and strict adherence to all stages. It is important to correctly and accurately pour the concrete solution into the container, then wait for it to dry and carefully remove the finished product. Afterwards it is allowed to fully gain strength, painted as desired, etc.
You can make the molds yourself or buy ready-made ones. Typically this method is used to create figures of small size but high complexity.
Decoration of garden figures made of concrete
Decoration of statues for the garden can be done the next day after production. The cement has not yet completely dried, so it is possible to correct the defects and apply the necessary lines to the figure.
After eliminating the shortcomings, they proceed to grinding the material. Then the figure needs to stand for seven days to allow the crushed stone to fully set. Large parts are sanded using a grinder, small figures are sanded using sandpaper.
Then the part is wiped with a wet cloth and allowed to dry. After all the above procedures, you can paint and varnish the figure.
Subtleties of the frame method
Frame making of sculptures, despite the presence of certain nuances, does not involve any special difficulties. The sculpture is made on the basis of a wire structure, which serves as the basis of the product. A wire model usually repeats only the basic elements of the structure, since it has the goal of creating a base on which all the necessary details can be sculpted.
Despite the fact that often any unnecessary elements (boxes, rags, wood) are used to create figures, it is best to make a frame from aluminum/steel wire. There are several ways to create a model. Small and medium-sized figures are made from an aluminum base using a regular bond due to the elasticity of the material.
But steel wire involves the implementation of a combined method - certain parts of the frame are connected with pliers, others are connected by welding. It is best to make figures using frame technology hollow.
Advantages of creating a hollow sculpture:
- Possibility to save materials - when it comes to the production of large figures, too much concrete will be needed (when choosing a pour, also inside).
- Lightness - if it is necessary to transport a figure, a product weighing several hundred kilograms will have to be moved using special equipment.
- More efficient coating of the frame with concrete, accuracy.
A concrete sculpture using frame technology is created quite simply: first, a frame is made of wire, it is covered with a construction mesh with an accurate transfer of volumes and shapes. Then concrete is applied to the frame with a trowel and spatula. A new layer is added only after the previous one has dried. Concrete should be applied to the sculptural frame using gentle and light movements.
Then the concrete is allowed to dry completely and gain strength. If there are any shortcomings, they are corrected before the mixture finally sets - smudges, unevenness, etc. are removed.
How to make a sculpture frame
For a concrete sculpture, the frame is 80% of the work. It sets its general appearance and proportions, gives the sculpture strength, and holds the concrete in place during the sculpting process.
We start with the main frame. → We weld (the link tells about welding with an inverter) from durable elements - pipes, rolled steel, thick reinforcement. While the concrete hardens, this frame has to bear its weight, that is, practically the weight of the entire sculpture.
The “primary” skeleton serves as a support for the “secondary” frame, which:
- holds concrete during the molding process, transferring the load from its weight to the main frame;
- serves as the basis of a mesh holding concrete;
- defines the main elements of the sculpture, excluding the smallest details;
We bend the secondary frame from 6-8 mm smooth reinforcement and connect it by welding and twisting wire. A-II “corrugated tape” is also suitable; A-III. It is more difficult to bend, but for relatively straight parts it is even better.
Finally, we close the large gaps between the rods of the secondary frame with mesh or wrap it with wire, securing it with twists. Leave the distance between the turns or mesh cells at approximately 2.5-3 cm.
As a result, we get a wire sculpture, 2-6 cm in size “thinner” than the future concrete one.
The components of the frame are visible in the example of a sculpture of a dolphin for a fountain (Fig. 3).
Components of the sculpture frame
Pouring into ready-made molds
The concrete mixture can be poured into a mold that will allow you to obtain a figure of a certain volume and configuration. You can buy ready-made forms or make them from some containers with your own hands. Most often, craftsmen do what they need themselves, since the assortment in stores is quite limited. As in the case of the frame, it is not at all necessary to pour any complex structures into the molds - it is enough to make the general shape, and then do the rest by hand.
So, small mushrooms are poured using an old basin or a plastic bottle. The cap is poured into a basin, the leg is made by pouring the mixture into a plastic bottle (after the material has hardened, just cut the bottle). By showing ingenuity and imagination, you can create a variety of interesting shapes from available materials, which can then be simply processed.
Preparation of concrete mixture for pouring into a mold:
- The sand is carefully sifted to eliminate the possibility of large fractions and debris getting into the solution.
- Sand and cement are mixed in a ratio of one to three; if it is possible to choose between gray/white cement, color wishes are taken into account. On a white base, all colors look brighter and more saturated, but gray cement costs less.
- Clean water is gradually added to the mixture of sand and binder; a plasticizer can be added (based on the proportion of 200 milliliters per 50 kilograms of cement).
- The solution is mixed very carefully and thoroughly; the consistency of the finished mixture should be similar to thick sour cream.
After the concrete is poured into the mold, it is covered with film and allowed to dry for 12 hours. It is advisable to protect from moisture and rain. Then the product can be removed from the mold, allowed to gain strength and painted.
Composition of the solution
To sculpt concrete sculptures with your own hands, you will need a plastic mixture that will cling well to the frame and pre-laid layers. As a rule, decorative concrete with additives is used for such purposes. It differs from the usual material in its white color and the content of multi-colored granite chips.
The main additives include clay and lime. They are the ones who make sculptural concrete from ordinary concrete and allow you to create various products with your own hands. It is recommended to use kaolin clay. Because other types of clay give a gray tint.
You also need to purchase plasticizers that will reduce the mixture’s need for water. For these purposes, PVA emulsion or CMC is used. They also provide the solution with good adhesion. For the first balls, polypropylene fiber will be required, which will ensure greater adhesion of the first layers and provide the material with protection from cracks and resistance to low temperatures.
Note! The gypsum mixture will increase the setting. Its only drawback is a decrease in the resistance of concrete to temperature changes.
Let's look at the approximate composition of concrete for DIY garden sculptures:
- sand – 500 grams;
- cement – 250 grams;
- water – 110 milliliters;
- lime – 70 grams;
- crushed stone - 1 kilogram;
- clay – 110 grams;
- gypsum – 20 grams;
- fiber – 30 grams;
- PVA – 9 grams.
Attention! PVA emulsion must be pre-mixed with water and then added to the main solution. The remaining ingredients are used in dry form. The consistency of the finished solution should resemble thick sour cream.
Craft ideas for beginners
It’s worth starting with the simplest figures and sculptures. These can be mushrooms, gnomes, animals, various characters from fairy tales. Moreover, when it comes to bright figures, it is worth considering not so much the complexity of making the sculpture itself, but rather giving it brightness and compliance with the sketch. So, an ordinary mushroom is a stalk and a semicircle, but the correct coloring gives it a similarity with the idea.
The same applies to animals and characters from fairy tales - the shapes themselves are simple, but not everyone knows how to beautifully paint the figures they make. Below are many options for simple crafts with which you can start creating sculptures and concrete products.
Concrete fungus
Mushrooms can also be different - you can make a boletus or fly agaric from concrete, decorating your garden and backyard area. It is unlikely that you will be able to obtain an exact copy of the mushroom model, and this is not necessary. Mushrooms are not ideal in nature. It is much more important to ensure that the figure resembles the idea itself and gives it a beautiful look. For the sculpture, concrete is used, the consistency of which resembles slightly melted butter.
Step-by-step instructions for creating a concrete mushroom:
- Make a hole in the sand with a deep bowl.
- Place a burdock leaf on the bottom (it will make the surface rough).
- Take a plastic bottle or rolled roofing felt/linoleum into a tube.
- Fill both parts with concrete.
- After all the elements have dried, you can fill the top with a new solution and combine both elements.
- Wait 2 days until completely dry, during which the figurine should be covered with film.
Usually, for a complete composition, several mushrooms of different sizes are created and placed around the territory. You can make real mushroom meadows that look very beautiful on a green lawn.
Important Rules
The concrete mixture is prepared as follows: Part cement and twice as much sand (if increased strength is needed, you can take 1 part sand), part glue. Next, add a little water and you need to achieve a thick consistency. The solution will be ready for use and will not cause any trouble.
All crafts require warm conditions and a lot of time to harden. Hardening time can vary up to two weeks. To prevent cracks from appearing, the figure is covered with bags.
After the hardening time has passed, the figure must be covered with a primer, then varnish or paint. If irregularities appear that interfere aesthetically and create inconvenience, use a file and sandpaper.
Cement can be replaced with plaster; this material allows you to make figures hollow and more decorative.