A garden swing made of wood on a personal plot is fun entertainment for children and relaxing relaxation for adults. Ready-made models are usually standard, and they are not cheap. To fully express your creative potential, and at the same time save a considerable amount of money, you can make the design yourself. You will need at least a little skill in working with wood, the necessary tools and 1-2 free days. Step-by-step instructions will help you implement your plans quickly, accurately and as simply as possible.
Varieties of wooden swings
You can install various structures on your site:
- Children's mini swings that don't require much space. A chair or seat with a backrest is suspended on a horizontal beam, a strong tree branch or any strong support. The main thing is to minimize the risk of injury to the child from slipping and falling.
- “Nest” swing, where metal rings braided with cord or covered with fabric are used as a seat. You can make such structures with your own hands from a gymnastics hoop or a profile bent pipe.
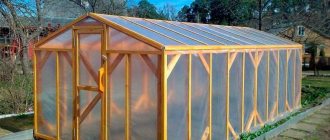
- A swing-bench for several people to ride at the same time, reaching a length of 2-2.5 m. The materials are wood, metal, plastic or combinations thereof. To protect from rain and sun, install a canopy made of polycarbonate or waterproof awning fabric.
- A hanging ball chair is an original design in the form of a sphere with seating inside. In the traditional design, it is woven from flexible rattan. At home, bent metal tubes and durable plastic cord are used.
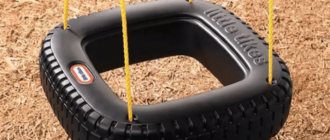
Showing your imagination, you can make a wooden swing with your own hands from anything. Home craftsmen use various items that have served their time - car tires, wicker baskets, old chairs, armchairs and even sofas.
Wooden garden swing: features, types, characteristics
Metal, plastic or wood are often used to make garden swings, and each of the three materials has its own pros and cons. But in the case of making a garden swing with your own hands, the advantage is entirely on the side of wood, since it is difficult to find other raw materials more suitable for this.
The only serious drawback of wooden garden swings concerns any product made of wood. This is a comparative fragility and the associated need to use all kinds of means to protect and antiseptically treat wood surfaces so that they suffer less from the adverse effects of the following factors:
- rain;
- snowfalls;
- direct sun;
- mold and fungal infections;
- pests;
- strong temperature changes;
- rotting.
You can try to realize your personal ideas and projects by building a swing with a unique design yourself.
Important! Garden swings can be placed under a canopy or an awning to protect the wood from premature deterioration and the negative effects of sun and rain.
The problem associated with pests, fungal diseases, mold and rot can be easily solved by using special antiseptic and protective products for wood.
Garden swing design, drawings
To indicate the scope of work and calculate the approximate consumption of materials, a drawing is drawn up, which you can do yourself or use a ready-made one from the Internet. For example, this simple option
The design is more complex with composite racks and jibs
Diagram of a swing with a canopy
Double swing for those who like challenging but interesting tasks
The design of a simple garden swing made of wood includes:
- supports made of timber, boards or cleaned round timber of small diameter, which can be A-, X- or U-shaped, with triangular or trapezoidal side elements;
- seats made of wooden planks with or without backrests, armrests;
- suspensions - chains, polypropylene ropes, ropes;
- fastening elements.
If a canopy is to be built, a light, durable frame will be built for mounting the roofing material.
All wooden elements are screwed together with bolts, self-tapping screws, or with additional gluing of the joints. In some connections, nails, staples, and overlays are used. Fasteners must be resistant to corrosion.
For garden swings, inexpensive lumber is usually used - pine, spruce. Larch has the greatest moisture resistance. It is used to make critical parts that are in direct contact with the ground.
Important. If the supports are not stable enough, it is recommended to concrete them to a depth of at least 0.5 m. The wood must first be treated against rotting and wrapped in waterproofing material - roofing felt, film.
For comfort, you can put pillows on the seat or sew soft, removable covers. A mosquito net will help protect you from flies and mosquitoes.
Types of structures
Manufacturers present a large selection of ready-made models from different materials. They differ:
- Material from which they are made: plastic, metal, forged, wood, rope.
- Size and shape.
- There are stationary, portable, collapsible, hanging.
- Covered with an awning, roof or without canopies.
Installation of portable wooden swings under a fabric awning
Conventionally, there are swings for adults and children. Large sofa-type models designed for several people are the most popular type. They are additionally equipped with an awning and soft pillows. Suspended structures with a spring attract attention. The seat is made in the shape of a basket-cocoon made of wicker or rattan. They are hung on thick tree branches.
Design and construction of a wicker garden swing in the form of a cocoon
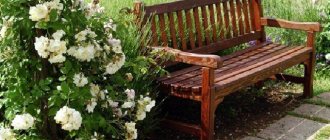
Cabinet sofas attached on ropes to tree supports, beams of a country terrace, gazebos, pergolas will add romantic appeal to a corner of the garden.
For entertainment and active recreation, a Russian swing for several people is suitable. Designs with mosquito nets and a tent are practical and convenient for relaxation and recreation.
Children's ones are smaller in size, in accordance with the child's height. Additionally, they are equipped with safety elements and side supports.
Classic Russian swing made from logs using a chain
Main types:
- balancers;
- hanging;
- pendulum;
- carousel.
You can choose a model according to your wishes, idea of relaxation, and landscape style.
Materials and tools
To build a wooden swing with your own hands, 3 m long with a 1.2 m bench and with A-shaped supports, you will need:
- for racks - 4 beams with a section of 100x100 mm and a length of 3 m;
- for the crossbar - 80x100 mm timber of the same length;
- for side lintels - board 32x100 or 40x100 mm, 6 m long;
- for the seat frame - a 50x50 mm block with a total length of 5 m;
- chain or rope for suspensions;
- for attaching suspensions and seats - carbines, ready-made rings, pieces of reinforcement or thick nails;
- stainless or galvanized fasteners - bolts, self-tapping screws, nails, linings;
- clamps, tools for cutting and sanding wood;
- drill, screwdriver;
- antiseptic impregnation, paints and varnishes;
- shovel, cement, sand, roofing felt (for concreting supports);
- tape measure, pencil, square.
Types of designs
The first step to creation is choosing a location and type of structure. There are more than 20 varieties of garden swings made of wood. Their differences lie in design features, dimensions, purpose, and type of seat. In terms of mobility and weight, the most common types are:
- Stationary. They are characterized by large sizes, a firmly fixed base: it is either poured with concrete or buried in the ground. A swing made of this type of wood can be installed in a gazebo. In this case, the base is mounted on the floor.
- Portable. They are lightweight and compact in design. It is stable and does not require fastening. The swing is easy to carry due to its low weight.
- Collapsible. Such products consist of a frame and a suspended structure. A special type of threaded fasteners facilitates repeated assembly and disassembly of the swing. The compact size when folded allows you to transport them in a car and take them with you to nature.
- Hanging. Swing models of this type often do not have a frame. The simplest option is rope with a wooden plank as a seat, which can be hung on a tree, to a beam on the veranda or a horizontal bar in the house. Complex types are attached using hooks on the ceiling. An example is hanging nest chairs made of factory-made rattan or do-it-yourself wooden swing benches.
There are adult and children's options based on the weight they can bear. The latter are usually used for entertainment. Children's swings made of wood are almost always single-seater, while for the older generations of the family, romantic double-seater models with opposite seats, as well as multi-seater ones in the form of sofas, are installed.
Portable
Hanging
Collapsible
Stationary
Among the types of swings installed at the dacha with your own hands, designs with sun protection are very popular. This can be a canopy made of straw, an awning on a frame made of slats, or a canopy made of plastic. It is better to place products without such devices in a shady place. There are several types of swings based on the structure of the frame:
- U-shaped. Consist of two vertical posts and one horizontal crossbar. Stability depends on the reliability of fastening in the ground (or other foundation). Creating such a wooden swing with your own hands will require a little time and materials.
- L-shaped. It is a structure of two pairs of bars and a crossbar connected at the top point. The model is stable and does not require careful strengthening.
- X-shaped. This design has low support connections, resulting in the formation of lintels on which timber is laid horizontally. The swing is simple to make, but requires additional reinforcement at the base.
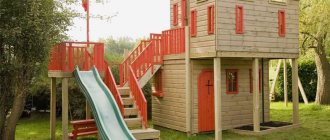
- A-shaped. They are characterized by increased stability due to additional structural elements - sidewalls, which increase reliability. They are best adapted to a full-fledged complex for children with ropes and ladders.
Before you make a swing, you need to prepare the materials. It is necessary to decide in advance which types of wood are best to use and how to treat the surface. The reliability, durability, and safety of the product depend on the choice of source material.
A-shaped
L-shaped
U-shaped
X-shaped
Selecting a location
Before you make a garden swing from wood with your own hands, you need to choose the right place on the site:
- the site must be level for easy installation of supports, with a comfortable and safe surface;
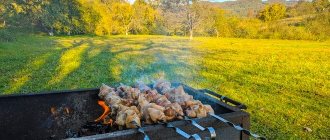
- the structure can be placed next to a barbecue, oven or barbecue, but avoid sparks from open fire;
- maintain a safe distance from buildings, poles, trees, fences.
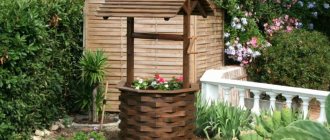
To protect the recreation area from rain, wind or sun, install a canopy or install the structure on a covered terrace or veranda. A garden swing looks very organic, surrounded by climbing plants, under a spreading shady tree, near a small pond that can be dug out by hand.
Do-it-yourself garden swing made of wood: photos and drawings, sizes and modifications
If you have decided to start creating a swing at your summer cottage yourself, first of all you should decide on the type of structure you want to install and determine a suitable place to place it. To facilitate and speed up the design and preparation stage, use a photo of a do-it-yourself wooden garden swing, of which there are many drawings on the Internet.
Drawing of a wooden swing of the optimal size for one person
Varieties of DIY garden swings made of wood
The classification of garden swings is quite extensive. In this case, the main types of structures are presented:
- family - have high capacity. The design is based on a long bench, which acts as a large seat that can simultaneously accommodate up to 5 people. In most cases, swings of this type are equipped with their own canopy, protecting from sunlight and bad weather;
The family swing can comfortably accommodate 3-5 people
- children's designs can have a significant number of modifications. Most often, the main components of such a product are supports, a small seat and fasteners. It is important to ensure a full level of safety for the child. For these purposes, the design must include protective elements that will prevent the baby from falling. Such elements include a comfortable backrest, handrails on the sides, a partition located in front, seat belts that secure the child inside the seat;
Original children's swing made of wood in the shape of a horse
- portable – products with compact dimensions and light weight. These characteristics allow you not only to move the swing around the site, but also to put it in a car for transportation to another place during your vacation. As a rule, such products are secured to a tree branch or to a pre-made support.
Portable swings can be moved to any place on the site, depending on weather conditions
Choosing a place to place a children's swing with your own hands made of wood
Any type of construction that is carried out on the territory of a suburban land plot begins with the design stage and selection of the appropriate location.
A simple children's swing made using a wooden board and rope
Whenever possible, you should select a plot of land with a flat surface in your garden. It is advisable that this area be sheltered from the sun and precipitation. The ideal place to create a swing is an area under a tree where thick shadow falls. Installation on a porch protected by a canopy is allowed.
All these conditions directly affect the level of operating comfort, since sitting on a swing seat that is hot under the sun is unpleasant and uncomfortable. And unimpeded exposure to rain can damage the structure.
When placing a children's swing in the garden, it is necessary to provide enough space for swinging
It is also worth taking into account the fact that as the sun moves across the sky, the shadow cast by a tree or other objects will move. For installation, you should select a place where there will be shade at midday. During this period of the day the sun has its strongest and most aggressive influence.
Drawings and photos of a DIY garden swing made of wood for a summer residence
If we talk about universal designs, then a hanging swing, installed on A-shaped supports, will become a real recreational object for the whole family. Moreover, they can be installed both in large summer cottages and in small gardens near the house. And the process itself is not expensive in terms of time and effort.
Swing chair design with soft cushion cover
The list of required tools for work should include:
- tape measure and pencil (the tape measure can be replaced with a measuring tape);
- mechanical or electric jigsaw;
- circular saw;
- hacksaw;
- square for measuring angles (combined type);
- rafter pins;
DIY swing bed
- test square;
- sawhorses;
- thicknesser and planer;
- hammer, screwdriver, clamps, wrenches;
- chisel (25 mm);
- electric drill with a set of drills (10, 8 and 4.5 mm);
- sanding block.
Simple wooden swing for children's outdoor games
A swing in a quiet corner of the garden will allow you to enjoy the aromas of greenery
Wooden swing: step by step instructions
Before you make a garden swing from wood, you need to prepare the lumber - plan it until smooth, treat it with antiseptics, and cut it to size according to the drawing. If you have an electric planer or a hand router, chamfer the edges of the parts. This operation will allow you to avoid scratches or splinters during assembly and further operation of the structure.
Chamfering with an electric plane
Frame making
If the supports are to be concreted, the production of the racks begins with processing the upper ends of the beams. To do this, they are cut at an angle, using a square or template for marking. A horizontal crossbar will later be attached along the cutting line.
This node can be solved in various ways. The support beam is attached to the posts along the cutting line as in the photo
You can place the beam directly on the ends of the posts and secure it firmly
If the supports are connected below, the horizontal beam is laid at the intersection point in the resulting nest
The inclined posts are fastened together with boards in 2-3 places. They provide rigidity and serve for uniform load transfer.
If the supports are sufficiently stable, you can do without concreting. The side posts are cut along the bottom edge, having calculated in advance the angle of the beams at the top point, and then the joints of the semi-assembled structure are adjusted in place.
Assembling side supports from two boards with intermediate reinforcing ties
The crossbar is mounted “on edge” to provide the necessary bending strength. They are secured to the posts with through connections using bolts and washers. Additionally, the joints can be reinforced with galvanized or wooden overlays and staples.
When concreting, the lower part of the supports is wrapped with roofing felt and installed in pre-dug (or drilled with a hand drill) holes. A layer of crushed stone and sand is poured onto the bottom. The structure is fixed and the base is poured with concrete.
How to make a swing seat from wood
A 50x50 mm block is sawn into 60 cm long pieces. The height of the back and the width of the bench will be the same. The ends adjacent to each other are cut at a slight angle to give an anatomically comfortable shape - you can sit on such a seat, reclining slightly.
The frame elements are connected to each other with bolts or joined “together” and the fastening points are reinforced with glue and overlays. For a seat 1.2 m long, the bars are installed in increments of 40 cm.
The connection “to the paw” is performed as follows:
- A rectangular or trapezoidal section is cut out at the ends of the timber.
- Coat the joint planes with glue.
- Connect in 2 mutually perpendicular directions.
- Additionally, they are tightened with bolts, wood rivets or self-tapping screws.
Photo of how to make swing seats from wood
Planks are attached to the seat frame
Armrests are installed on the side of the bench at such a height that you can comfortably rest your hand. In addition to comfort when riding, they serve as protection against sideways falls.
Assembly of the structure
When the wooden supports of the garden swing are ready and stand securely on the ground, we begin to assemble the entire structure. First, strong suspensions (chains, ropes, ropes) are attached to the seat.
This can be done in various ways:
- Drill holes in the bars, thread a chain or rope through them and place the hangers under the seat. Tie the ends with a strong knot or secure
- Hammer nails into the side elements of the frame and make eyelets from them, then secure the hangers with carabiners or rings.
- Use ready-made eye bolts with threads.
Then the upper ends of the hangers are attached to the crossbar. This node can be solved in different ways:
- Buy ready-made fasteners designed specifically for such structures. It is installed using the provided mounting plate with holes, then a rope or chain is threaded into the ring.
- Use a powerful hinged bolt or a pin with a bent end, insert it into the hole drilled in the beam, and secure with a nut and washer;
- Instead of a hairpin, you can take a piece of reinforcement or large nails and cut threads at their ends.
- Wrap a strong chain around the crossbar several turns and secure with wire or a ring.
Another way to attach hangers
Important. To distribute forces evenly, wood fasteners are used together with washers. This protects soft wood from destruction as a result of dynamic loads.
In swings designed for light weight users, the role of fastenings can be played by the suspensions themselves. To do this, form loops at the ends of the rope and use them to secure the seat. The bench is suspended at a height of 40-60 cm from the ground. A higher or lower position is uncomfortable for placing your feet while riding.
DIY finishing of a wooden swing
The wooden swing itself is quite colorful for the design of a personal plot. Decorative techniques will help you achieve greater effect:
- tinting to resemble noble types of wood followed by varnishing in several layers;
- painting with compounds that harmonize in color with other buildings;
- artistic wood carving;
- antique stylization or fairy-tale plot;
- design of side pillars with grilles;
- making an arched canopy from bright polycarbonate or making it in the form of a gable “tower”;
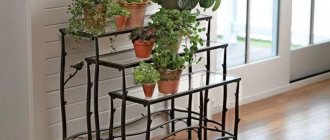
- hanging pots with beautiful flowering plants;
- laying LED strip along the frame for illumination at night;
- use of textiles, pillows, removable covers.
You can decorate the swing using a manual or programmable tabletop router. The figured details look very impressive, giving the design an elegant look.
Bench with milled back
Even the simplest wooden swing, painted in bright colors or decorated with multi-colored lanterns, will become the “highlight” of the garden and a source of pride for the owner.
How to build a garden swing yourself
To build it you will need lumber, woodworking tools, a couple of free hours and unlimited imagination.
The following materials are required for this design:
- 4 beams 100*100 mm, 3 m each, for side supports;
- beam 80*80 cm 2.5 m long - for the top crossbar;
- crossbar 100x30x600 mm for side tie.
Operating procedure:
- Using a grinder, you need to cut the posts to the required length, then connect them in the shape of the letter A with side ties that provide good stability to the sidewalls. The upper ties are placed at a height of 20 cm from the ground, and the lower ones - 60 cm from the ground.
- The supports must be installed in pre-dug holes 80 cm deep. All work is carried out level. The entire structure is installed using knitting needles with a diameter of 10 mm, which are installed through holes at the crossing points of the crossbars. On both sides, nuts and washers are screwed onto the spokes and tightened.
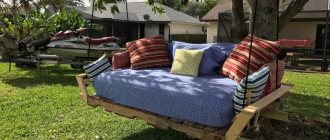
- The bench itself can be made from construction pallets suspended on ropes, for which holes are pre-drilled. If a backrest is needed for a swing, it is made of beams.
The canopy over the swing is made in this way: 2 triangles made of timber are mounted on both sides of the top crossbar. Then boards are attached to the crossbar, onto which thick awning fabric or tarpaulin is stretched, or polycarbonate is secured.
How to care for a wooden swing
The tree is subject to the destructive effects of many unfavorable factors. Fluctuations in temperature and humidity cause wood to crack. Sun rays provoke photoaging. Woodworms gnaw through numerous passages, and mold and fungi quickly render wooden structures unusable.
Regular care will help protect against all this:
- impregnation with antiseptic solutions;
- treatment with waterproof paints;
- varnishing with compositions for external use.
Events should be carried out at least once every 1.5-2 years.
Important. If possible, it is advisable to place the structure in a dry room for the winter, for example, a garage or shed. This will greatly extend the life of the garden swing.
Buying Tips
This chapter is especially for those who have already decided to make an expensive purchase, but do not know how to avoid being led by scammers and want to buy a truly high-quality product. We read and remember.
The swing test should begin by checking its rigidity. Try to loosen the structure. Determine how stable it is, how tightly the parts fit. Believe me, if the structure already seems sloppy, then over time it will completely turn into junk.
Take a closer look at the construction material. Reputable companies use pipes, while “handicraftsmen” use profiles. Along the way, take a closer look at the bends. They should not be reinforced in any way. Various additional plates there say that “garage” technologies were used in production, since the factory bend easily withstands a load of 300 kg, which is enough for a swing.
Next, look at what the chains are attached to. Special lugs must be provided for them. A rope thrown over a beam or a chain threaded directly through a pipe is again a sure sign of “handicraft”.
Now about painting. Factory products are coated with a powder material, while scammers use acrylic varnish or synthetic enamel. Moisten a piece of cloth with cellulose solvent and lightly rub the frame with it. If there is paint left on the rag, there is no smell of powder coatings, which means it’s not worth buying this swing.
Raise the pillows and look at what they are lying on. Ideally, this should be a shell mesh. Well, in the worst case, welded, but certainly not canvas. The latter is used only in the cheapest models.
Speaking of the pillows themselves. Avoid products with polyurethane chips. They are very short-lived and wear out quickly. Brands use only solid solid sheets, which will last for decades.
It's more difficult with covers. So, dralon fades under ultraviolet light, but it lasts for years. Cotton is not very durable, but it is more pleasant to the touch and is not afraid of sunlight. Here everyone is their own adviser.
A canopy is much easier to deal with. If it's polyester, that's good. Mesh polyethylene - we pass by. It won't survive even three seasons.
Be sure to check that the swing comes with a mosquito net. If you miss this point, you will buy mosquito protection separately, and even think about how to attach it later.
Last but not least, check the comfort of the product. There are different supports in the armrests, backrest mobility. You may be surprised, but if your swing has successfully passed all the previous “nitpicking”, then the manufacturer has probably taken care of the pleasant little things.
Combined swing
Very often, swings on personal plots have a combined design - the supports are made of profile steel pipe, and the comfortable seat is made of wood. This option has certain advantages: the metal is less susceptible to moisture and, with proper care, lasts a very long time.
Steel profiles do not rot or crack. Assembly is possible both with bolts and welding. The strength of the steel frame allows it to withstand high loads. A swing with a wooden seat and metal elements decorated with openwork forging looks very impressive.
DIY workshops
Step-by-step instructions help bring popular models to life. Making a garden swing from wood with your own hands will not be difficult even for a person who does not have a carpenter's education, if you strictly follow the recommendations. You can make children's and adult models with different frame designs.
Children's A-frames
The preparatory stage includes drawing the diagram. Sizes are determined based on the age, height and weight of the child. When calculating, you should use the basic rules:
- The height of the seat hanging above the ground is at least half a meter. This will allow the child to stop the swing on his own without interfering with the ride.
- For comfortable use, the seat width should not be less than 60 cm.
- The length of the suspension is 1.6 m, which allows you to swing while standing if you wish.
- The height of the supports from the ground to the crossbar is determined by the thickness of the swing seat and is in the range of 2.1-2.3 m.
First you need to prepare materials and tools. For an A-frame, a beam is suitable as a support. The necessary condition is dry material without signs of spoilage.
The timber should not have any surface defects in the form of knots or holes.
A complete list of what you will need to make a swing:
- Four beams with a cross section of 80 x 80 cm or 100 x 50 cm as a support, plus one of the same for the crossbar.
- A board measuring 60 x 30 x 2.5 cm for a seat, plus an additional three or four pieces for armrests and a backrest for a small child (up to six years old is required).
- Suspension chains with stainless steel coating or cables, strong ropes – 2 pieces.
- 250 pieces of self-tapping screws 50 x 3.5 mm and 50 pieces 80 x 4.5 mm for fastening the frame.
- Hooks (carbine, steel angle) for attaching hangers.
- Wood primer, varnish, paint, fungicides against fungi.
The tools you will need are: a plane, a screwdriver, an electric jigsaw or chainsaw, wood drills, a plumb line, a level, a tape measure, and a grinder. After preparing the materials and devices, you can begin to implement the plan:
- The area chosen for the swing must be cleared of grass, debris, and nearby bushes, then leveled. If necessary, you can concrete the site (increases the risk of injury if you fall) or make wooden flooring in case of further expansion into a children's complex.
- It is necessary to prepare the beams: sand them to reduce the risk of splinters, treat them with fungicide and primer.
- The A-type swing frame is assembled directly on the ground. To begin, saw off a corner at one end of each of the four beams, then fit the paired elements tightly and fasten them with self-tapping screws. Install supports on the ground. For additional stability, you can use staples, a rod, or dig a beam into the ground, tarring the ends.
- Install the crossbar, securing it with an angle or a suitable nozzle.
- Make a seat out of boards. You can improve the model with a backrest, armrests, or use available materials: tires, pallets, old children's chairs.
- Secure the suspension to the top crossbar. A rope knot or more reliable methods are used as fastening: an anchor, a carabiner, steel pads, special swing knots.
The final stage is decorating the finished structure - painting it with paints that are resistant to external influences. They must be non-toxic and safe for children. Mandatory maintenance includes periodic checking of joints, structural stability, and absence of damage.
Assemble the seat frame
Connect the frame to the rear supports
Attach the front supports
Secure the armrests
Fix the back and seat elements
Hang the finished product on an A-frame
With canopy
A canopy will help protect your resting place from bad weather. Multi-seat swings are used as a seat - benches suitable for family time. Constructions of this type are made on the basis of an A-frame. To the set of tools described in the first master class, you need to add:
- As a support - 5 two-meter beams measuring 140 x 45 mm and two parts for spacers with a cross-section of 140 x 45 mm, lengths 96 and 23 cm.
- For the bench - bars with a cross section of 70 x 35 mm. You will need: 2 pieces 95.5 cm long, 4 pieces 60 cm long, 2 pieces 120 cm long (seat) and 27.5 cm long (armrests). You also need three strips 70 x 25 mm for a backrest 130 cm long and 8 strips for a seat 130 cm long.
- 2 canopies each made of beams 70 x 35 mm, two meters long and 90 cm long.
Step-by-step execution consists of creating a support, a swing-bench, and a canopy. As the latter, you can use a waterproof awning. This option will protect both from the scorching sun and from rain. Master Class:
- It is necessary to make oblique cuts at the ends of the supports. The most convenient way to do this is with a square with rafter pins.
- Connect the swing supports to each other and the cross beam. Next, the spacers need to be cut at an angle and attached at a distance of 15 cm below the top beam. Fix the lower bars half a meter from the ground.
- Assemble a rectangular frame for the awning. Secure it with self-tapping screws. The frame is attached to the upper struts in the rear and in the middle at a slight angle to allow water to drain.
- Assemble the seat from the parts using a hammer and nails: first - the frame, then fill the base and backrest strips.
- Hang the bench on chains using eye bolts and snap hooks. Chains length – 110 cm.
- Attach the canopy to the frame.
In addition to the awning, you can use plastic sheets, metal tiles, and corrugated sheets as a protective roof. Finished products must be protected from the destructive effects of weather conditions: treated with a primer, painted. A DIY garden swing made of wood with a canopy is ready.
For a gazebo or porch
A hanging swing in a gazebo, porch, veranda or terrace is not only a place to relax, but also an excellent decorative element. Most often they are made in the form of sofas. The main condition is the presence of a strong support beam to which the hangers are attached. The set of materials and tools is reduced due to the fact that there is no need to make supports. For a seat with armrests and backrest measuring 1400 x 600 you need:
- a block with a cross section of 70 x 40 mm for the seat frame: 2 pieces 1400 mm long and 3 600 mm long;
- strips 70 x 25 mm in 1400 mm - 2 pieces and in 600 mm - 2 pieces for the back;
- two bars 270 mm and 600 mm long for armrests;
- boards 600 x 200 x 30 mm – 3 pieces, 600 x 100 x 2.5 mm – 4 pieces for the back;
- boards 600 x 200 x 30 mm – 8 pieces for the base of the seat;
- ropes with a metal core 3 m long - 2 pieces;
- metal hooks – 2 pieces;
- hammer, nails, screwdriver, screws;
- mattress, pillows, bedspread.
Step-by-step instructions for assembling such a sofa consist of creating a frame for the base and backrest. The parts are connected with nails and attached to the beam with metal hooks. Stages of work:
- Make the base of the sofa from the beams. Additionally reinforce with metal corners.
- Make a back frame and connect it to the base.
- For a back with a cross-shaped pattern from boards, it is necessary to make corner cuts, and also cut out grooves in the lower beams for a beautiful overlap. The boards are nailed to the frame bars.
- Make armrests.
- Attach the ropes to the base of the sofa, and additionally secure them at the armrests.
- Drive in hooks and hang the swing-sofa.
The last stage is decoration. Textiles – mattress, pillows, bedspreads – will give the sofa a cozy look. An easier way to create a hanging swing for a porch or veranda is to use available materials, for example, an old wooden crib. It must first be strengthened by lining the frame of the base and back with strong beams. You can use pallets to create a hanging swing bed in a gazebo or on a terrace.
Prepare details
Assemble the bench parts
Hang
From pallets
DIY swings made from pallets are very popular among novice craftsmen due to the minimal cost of time and materials. One or two pallets, hangers and fasteners are enough. Pallets must be strong, without signs of rot, mold, or cracks. Either rigging devices or carabiners are used as fastening. Tools for making:
- hacksaw;
- pliers;
- drill;
- screwdriver;
- spanners;
- plumb lines;
- spanners;
- level, roulette.
Step-by-step instructions for the simplest hanging swing from pallets include preliminary sanding, treatment with impregnations, and paint. Next, the ropes are secured using a simple “horse knot”. The structure is suspended either from the gazebo beam or from an A-shaped support. The pillows, headboard and sides will add comfort, turning the swing into a sleeping place in nature. Using corners you can create a sofa. It is recommended to use a couple of bars as armrests.
Prepare pallets
Screw the back
Secure anchors
Paint
Decorate with soft pads and pillows
Hang
Pergola style
A pergola-style swing is a structure in the form of a mini-gazebo on four pillars with a roof. Sometimes they are additionally closed on the sides with openwork or blank walls to protect from the wind. The seat is usually two- or three-seater in the form of a bench. The stability of this design is much higher, but the list of necessary materials is larger than for a traditional A-shaped swing with a canopy. For a model measuring 3000 x 1000 x 2100 mm you will need a number of materials:
- Four support posts with a cross section of 90 x 90 mm and a height of 2.1 m.
- Two top crossbars 90 x 90 mm, three meters long.
- Four side bars 90 x 90 mm, 1000 mm long.
- 8 bars with a cross section of 22 x 140 mm and a length of 1020 mm for a canopy.
- 8 dowels with a cross section of 10 mm and a length of 75 mm.
For the seat you need bars 90 x 90 long:
- 660 mm (2 pieces)
- 1625 mm (4 units);
- 375 mm (2 pieces);
- 540 mm (2 units);
- 1270 mm (2 pieces).
You will also need 3 bars 140 x 30 with a length of 310 mm and 1685 mm, with a cross-section of 90 x 30 mm and a length of 560 mm, two pieces for the armrests. The parts are connected to each other using dowels. Fasteners for swings must be made of stainless metal.
Assembly and installation steps:
- Creating a pergola. Assemble the parts by fastening the support posts together using the side crossbars, and then the front and rear ones.
- Install the frame and, if necessary, nail additional side posts at the base of the swing.
- Assemble the swing seat.
- Make a canopy by filling slats at equal distances from each other. To protect it from rain and sun, you can lay an awning, tarpaulin or metal tile on top. A more aesthetic option, a living canopy of weaving plants such as grapes or hops, is fraught with proximity to insects.
- Attach the hangers to the bench and top bar.
The last thing that needs to be done is to decorate the structure, namely, coat it with varnish or paint. The wood should also be treated with protection against rot and fungus. Openwork screens can be attached to the side crossbars as walls.
Prepare the seat parts
Cover the seat with slats
Dig holes for pillars
Secure the pillars with concrete
Fasten the transverse and longitudinal beams
Hang a swing
Made from logs with double legs
Such swings have a U-shape, reinforced double legs in the form of lower struts. All this helps improve stability. Logs must be sanded, sanded, and varnished. From these you need to prepare support beams, a crossbar, four spacers, two for each support. The parts are fastened together with metal staples.
Step-by-step assembly of a log swing with double legs:
- Sanded logs should be impregnated with a special compound and varnished. The ends that are to be dug into the ground must be tarred or etched with machine oil.
- Make inclined cuts on the stops.
- Dig the support posts into the ground.
- Attach the stops.
- Place the crossbar and secure with staples.
- Attach hangers, install a seat - a board or a chair.
The considered methods and master classes for creating swings have their pros and cons. They all differ in complexity of execution and materials. Having studied them, you can quickly understand how to make a garden swing from wood yourself, and a variety of diagrams and ready-made drawings will make the task of arranging your garden plot easier.
Prepare pine logs
Tie the logs together with a knitting needle
Fasten the side posts
Hang a swing
Folding swing
This design option will allow you to use the swing not only for a seat, but also as a comfortable wide bed. The bench is made of 2 independent parts, which are connected to each other via hinges.
To unfold the swing, remove the chain from the side eyes and fix it in the new position. A spacious and comfortable relaxation device is ready.
Swing-folding bed
Photos of children's swings made of wood with your own hands and how to create them
Children's design options are much easier to implement, since the requirements for weight loads are much lower. On the other hand, safety standards in this case must be strictly followed, since children are extremely mobile and can swing in various ways.
DIY children's swing made from a skateboard
Log swing
Exercises on a log swing are very useful for the physical development of children. The simplest design, similar to a swing scale, consists of a support and a log swinging on it.
You can use a section of the same log as a support post. The rotation unit is made of a metal rod and washers. To help children hold on, small wooden handrails are attached to the swing.
The prepared parts are assembled very quickly. It takes very little effort, but the end result is laughter and joy for children.
Simple and fun fun - log swing
Additional materials for creating a family or children's hanging wooden swing
The final dimensions of the structure are: 2.1 m (width), 1.235 m (depth) and 1.9 m (height). It is recommended to use impregnated pine as a raw material.
Dimensional table of fasteners:
| Fastener type | Dimensional parameters, mm |
| Galvanized screws | 8x65 |
| Screws (24 pcs.) | 8x50 |
| Screws | 8x38 |
| Screws (8 pcs.) | 10x75 |
| Nails (roofing) | 2.5x40 |
| Nails (convex head) | 2.5x65 |
| Screws with a square head and washers for them (8 pcs.) | 8x100 |
| Bolts with a semicircular head and nuts for them (2 pcs.) | 10x125 |
| Eye bolts with washers for them and lock nuts (6 pcs.) | 100 |
In addition to the fasteners, you will need a number of additional materials: a pair of wooden spacers for the corner area (length 38 cm), sandpaper with a grit level of 120, hooks equipped with a safety lock (6 pcs., 5 mm), a chain 4.4 m long (link thickness 2 cm).
A swing with a soft mattress and cozy pillows is a great place to relax
Swing gazebo with table
The holiday option for a large group is quite difficult to manufacture. The swing consists of a durable frame with a canopy, 2 benches, a table and a movable platform. Thanks to the hinged mounts, even a child can swing the structure.
To make the frame, planed smooth logs or strong beams with a section of 100x100 mm, 150x150 mm are used. The tabletop and seats with backrest are made of 25 mm thick boards. Hinges are located in places where furniture is attached to the platform, as well as at the points of intersection of horizontal planes with vertical structures. This method ensures the stability of all objects on the table - water in glasses does not spill even with strong rocking.
Photo of a hybrid of a swing and a gazebo.
Create a drawing
Do-it-yourself drawings of a wooden swing for a summer house are created according to exact parameters. It is necessary to take into account factors such as the strength of materials and the stability of the final structure. The dimensions of the structure, as well as the amplitude of swinging with the length of the suspension, respectively, will depend on the chosen location. Without having engineering skills, it is possible to make a competent drawing, but only with extreme care, accurate measurements of source materials, and compliance with the recommendations of experienced craftsmen. Adviсe:
- The first thing you need to do is draw a diagram of the swing support.
- Based on the selected type of frame and material characteristics (length, thickness, load-bearing capacity), calculate the height and width of the supporting structure. Enter data into the drawing.
- Separately model the layout of the seat, indicating the length, width, height, presence of a backrest, and armrests.
- Additionally, make a drawing of the fastenings.
It is at the modeling stage that it is possible to identify flaws and weak points in the design. It is necessary to provide reinforcing elements: stops, jumpers, additional fasteners. Drawings must include:
- type of frame (for complex structures - in several projections);
- height and perimeter of the base;
- list and localization of reinforcing elements (spacers, jumpers, gussets);
- type, quantity, dimensions of seats, methods of fastening;
- length, thickness, suspension material.
It is much easier to use ready-made patterns for making a swing for the garden. They are painted and well designed. Such drawings, if necessary, are made in two or more projections; each part includes not only numerical dimensions, but also explanatory notes. Additionally, there is a list of instructions and useful tips on how to make a garden swing.
Features of material selection
The durability and reliability of the structure directly depends on the quality of the wood used. You should not save money by creating a frame from scrap lumber. Few people would want to ride on a swing that could fall apart at any moment. The tree must be dry, without signs of rotting, cracks or large knots.
To make a stationary structure, use solid round timber of small diameter or timber. Each of these materials has its own strengths and weaknesses - the choice is up to the master. We can only note that a professionally made swing from solid trunks will have a truly original look, but parts made from timber are easier to process and easier to connect with each other.
Tools
The swing is not particularly complex in design, however, in order for the work to go quickly and there are no delays due to the lack of one or another tool, you need to be prepared. The list of tools directly depends on the complexity of the project, in any case you will need:
- hand saw or electric wood saw;
- hammer and mallet;
- set of chisels;
- electric drill;
- Sander;
- measuring instrument (tape measure, ruler, square, pencil);
- brushes for treating wood with antiseptic and varnishing.
You also can’t do without fasteners. Depending on the chosen fastening method, these can be nails, screws (self-tapping screws) or bolts. Metal corners will provide additional strength to the structure.
Installation location
Before starting work, you should carefully inspect the area and choose the optimal place where the swing will be installed. Of course, if you decide to make a bungee, all you need to do is find a suitable tree.
In addition, for hanging and any other options, the following must be taken into account:
- the place should be sufficiently far from walls, fences, trees, bushes;
- you need to choose a site with sufficient illumination, this will ensure the durability of the structure, preventing the wood from becoming damp;
- the platform must be level, without distortion;
- There should be no draft, otherwise the rest may turn into a chronic cold.
Ideally, the site should be covered with grass or fine sand. Don’t forget that a swing is not the safest place for children, and falling on the grass is much more pleasant than falling on asphalt or concrete.