Home / Interior furniture / Decor and creativity
Reading time: 7 minutes
A
A
To make a craft house with your own hands, you do not need to have any special knowledge/skills. It is enough to find a good option, acquire a minimum of materials and devote several hours to the manufacturing process.
It’s even better to involve your baby in work - this will become a really interesting pastime for him! In any case, a craft house for kindergarten is easy. Check out the best ideas we've collected in this article to see for yourself.
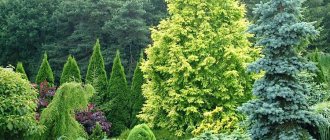
Craft house for kindergarten
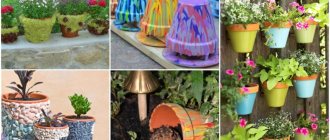
On a note! The most accessible materials for crafts are paper, cardboard, and plasticine. In addition, you can use pumpkins, clothespins, chestnuts, various types of boxes and much more!
Often houses are made of wood
DIY houses (photo)
- What can you do with your own hands?
- Option #1. Autumn house on the edge
- Option #2. A hut on chicken legs
- Option #3. Old Man-Lesovich's House
- Option number 4. Hut in the clearing
- Option #5. New Year's house
- Option number 6. Hut made of paper tubes
- Option No. 7. Santa Claus's Hut Video – House for a hedgehog
- Video - Review of a house made of twigs with your own hands
What can you do with your own hands?
There are many ideas for a house on the Internet. Using simple materials at hand, you can make for your child:
- a hut on chicken legs;
- a house made of branches;
- Old Man-Lesovich's house;
- original pumpkin house;
- a hut in a clearing;
- forester's hut, etc.
Various types of craft houses
There are a lot of options and ideas, your imagination is limitless! Armed with patience and skill, you will definitely make a beautiful craft.
New Year's house with snow on the roof
Let's get acquainted with the most popular options and try to bring them to life together.
Cute DIY hut
Note! If you understand what to use for making and how to approach this process, you can create a true work of art! Of course, the first time you get a product that is far from perfect, but this is only a matter of time.
Baba Yaga with her hut on chicken legs
Tree entrance
The tower can be “carved” into the trunk of a living tree. To do this, you do not need to saw, violating the integrity of the trunk. We simply cut out a door from suitable materials, make a canopy from planks or slate, build a porch - we attach all this to the trunk near the ground. This homemade house looks very mysterious. Who can live behind the door? Maybe a hedgehog or a wood elf?
Option #1. Autumn house on the edge
A simple version of a craft house, using only natural materials.
Step 1. First of all, make a house. For this you will need:
- scissors;
- pencil;
- PVA glue;
- cardboard.
Tools and materials for making a house
Step 2. Make a box for the future house from thick cardboard. The base is four cardboard squares connected to each other via cardboard inserts (see photo below).
Thick cardboard box
Step 3. After this, the house needs to be decorated. For work, prepare:
- reed brushwood;
- PVA glue;
- pruner;
- brush.
What is required to decorate a house
Step 4. Using pruning shears, cut the brushwood to the required size. Next, glue the brushwood to the walls of the future craft.
Brushwood sticks to the walls
Step 5. Wait for the glue to dry and begin creating the roof. For this purpose, glue cardboard triangles to the sides, connecting them with a crossbar.
Making a house roof
Step 6. After this, cover the roof with the same cardboard.
The roof is covered with cardboard
Step 7. To decorate the roof, use fluffy reed tassels and PVA glue.
Roof decor with reed tassels
Step 8. Cut out a door and window from cardboard and glue them to the house. Next, place the product on a flat cardboard cover, securing it to the surface with double-sided tape.
The house is installed on a cardboard cover
Step 9: Decorate the bottom of the lid using dry leaves. By the way, it is recommended to glue the leaves for reliability.
The bottom is decorated with leaves
Step 10. Now start decorating the “home” area. This can be done using different elements - for example, acorns, making cute little people out of them. Prepare for this:
- the acorns themselves;
- matches;
- plasticine;
- gypsy needle
What is required to make men
Step 11. Connect the acorns with matches. Make arms/legs from pieces of matches. Put hats on the little people's feet so they can stand. And plasticine will be used as a fixative.
Ready-made people
Step 12. Place the finished people on the cardboard base.
The men are installed on the base
Step 13. Now you can further decorate the composition. For example, to make ladybugs from chestnuts, for which you will need:
- the chestnuts themselves;
- plasticine;
- brush No. 00;
- black/white paint (acrylic).
Ladybug making kit
Step 14. Color the chestnut tree as in the photo below. Secure the ladybug to the base using the same plasticine.
Ready ladybug
Step 15. To make the composition look even prettier, decorate it with pine cones, rowan branches, and dried flowers.
Additional decor of the composition
Step 16. That's it, the house on the edge is ready! Now it will not only please the baby, but will also become a decoration for the kindergarten.
Finished composition “House on the edge”
LiveInternetLiveInternet
Master class on making a house-terem for the little mouse Manyuni https://www.diary.ru/~scargeear/p183283597.htm?oam PVC was chosen as the base material. Reasons: lighter than plywood, stronger than cardboard, easy to cut and glue. I want to make a house with a blank facade and glazed windows; in this case, I’m not interested in doing the interior decoration. Therefore, there are holes in the back walls so that when transporting the house you can put stuff and dolls there, and the insides are not decorated in any way. The design consists of two separate parts, also for ease of transportation. In the future, we plan to select such materials so that the decor does not break or scratch during transportation and so that I do not have to transport the house like a “crystal vase.” I always think about convenience and I’m not ready to make some sacrifices on the altar of beauty. Front view. Back view. Before painting, tests were carried out on a piece of plastic; It turned out that even sanded PVC acrylic comes off if you scratch it. Therefore, I decided to cover the house with textured paper (toilet paper, as you understand, but you can also buy corrugated paper, the only difference is in the show-off). I tore it into small pieces and pasted it in random order so that the texture lay in different directions. Joiner's glue "Moment": ever since the guy introduced me to this glue, I look down on PVA a little. Carpentry is about the same thing, but it dries much faster. A closer look at the texture: Pasting the walls of the house took me three evenings. Painstaking and dreary work. All ends are also sealed, with a bend inward. The roof was covered with simple office paper and strips, which saved me a lot of time. There will be tiles on top, so this paper will not be visible. Now let's paint. Paints - Maimeri Acrilico in tubes, they have excellent coverage, good color mixing, a slightly pasty consistency, and most importantly - the price "src="//static.diary.ru/picture/1135.gif" /> I liked working with them, and I bought a basic set of colors. The walls of the house are painted with white acrylic, the roof is black. I already wrote that I’ve been digging hard on diorama websites, and they provide a black base for all sorts of textures, so I decided not to reinvent the wheel and do as told. The white color, even in combination with the texture, turned out to be too flat, so I decided to add shades. I did it completely at random))) The first shade was brick-pink, the acrylic was diluted to the consistency of thick sour cream, I applied a couple of strokes to the surface with a brush and quickly rubbed it with a cotton pad (without wasting a second, because acrylic dries instantly!) Diorama makers rub it with oil, It takes longer to dry, but I don’t see any point in buying more oil. As a result, we have painted protruding areas of the texture. The second shade was matched to the first, diluted the greenish-brown color and washed out the surface. I wiped off the excess with a cotton pad. The areas around the frames, under the roof and near the ground were more dirty. According to the Quenta, my house is located in the forest, near a swamp, so it is assumed that it has turned green from moisture, overgrown with moss and all that. Both colors are clearly visible here. Now we glue the wooden frames. I got the veneer through connections, but in general they buy it in stores for modellers. I bought the 5x5 linden rail there. The glue is the same carpentry “Moment”, it glues perfectly. The guy suggested cutting the slats with a laser, which would have saved me a lot of effort, but in this case, the clumsier the better. Here we will have a balcony. We are currently gluing the frame and wooden floor. PART 2
The balcony is glued.
It consists of square strips (linden) and toothpicks (bamboo). Holes were drilled in the planks for toothpick pins, and the whole thing was assembled with wood glue. The balcony floor is covered with veneer. All wooden parts are covered with cherry stain. Alcohol stain, the darkest one I had (I specifically asked for one that wasn’t the smelliest, they come in different bases). I really enjoyed working with it: it perfectly impregnates the material and flows into the cracks. Let's start with the tiles. Pieces of cardboard 1x1.5 cm, rounded on one side. I spent a lot of time cutting this stuff out by hand. I thought about how much time it would take to paint it all with acrylic, especially the ends of each tile. I was horrified. I tried painting cardboard with stain and suddenly I got an excellent imitation of pine bark. And random spots of glue resemble traces of resin. I glue the tiles in rows, and impregnate each next one with stain. Everything is glued. I also spent a lot of time - but not as much as I could have)) The pipe is made of terracotta Mungyo Sculpt Dry, the grooves are applied wet. Somewhere it’s crooked, somewhere it’s a little cracked - it’s all to our advantage. The tiles are also glued unevenly. To reveal all these nuances more clearly, the roof and chimney will still need to be additionally painted. The doors are also made of veneer, glued to a cardboard base (painted black, like the roof). I additionally applied the relief with a needle. Blanks for stones are made from wads of toilet paper. Although I have real stones, it will be lighter in weight. PART 3
Making shutters.
I cut pieces of cardboard, paint the surface under the shutter black, and paint the surface against the wall white. I cut veneer boards and apply the relief with a needle. The shutters are painted with stain and then glued. I'm building frames. Pieces of transparent acrylic are glued with a strip of paper along the end so that everything else sticks to them more reliably. Then I cut the veneer again and glue it. The slats on the small windows are made of matches; for the balcony window I had to take a thin round stick (torn out of a bamboo napkin) and cut off half to get a flat side. It took me a long time to work on shutters and windows; I only spent a day making the frames and slats. The windows are glued to the house from the inside. Balcony. I paint the tiles. The principle is this: I mixed a terracotta color and painted each tile separately in a chaotic order - about a quarter of the total quantity. I added more white to create a lighter tone - again I painted a quarter of all the tiles. I mixed a darker color and painted the rest. Due to the fact that some tiles are painted more densely, others thinner, and four colors, the result is such an artistic mess. I finished painting some of the tiles with approximately the same mixture, but less brown, and more white and black - the result was a grayer shade. I also painted the pipe with thinly diluted black - it immediately took on a shabby look. The chimney hole is painted black. I painted the ground thicker, with several shades of green. I also painted the stones. Dark tone is the base, lighter ones on top: gray, brown, green, light gray lichen spots. Toilet pellets are now unrecognizable)) So, we have beautiful new tiles. The house is located in a damp area, so I will do lichen not only on the stones, but also on the roof. I take an ordinary kitchen sponge, spread some light gray paint with a green tint, and randomly poke the sponge into the tiles. It turns out well. Please note that there is no pipe. I sat it on two toothpick pegs and two holes in the roof. Roman advised to leave it removable - for ease of transportation)) The tiles are still too new, and it wouldn’t hurt to tone down the lichen stains. I mix the gray-brown-green color and poke it with a washcloth, even thicker than before. The roof is the bomb! Compare with reference. I painted the pipe with the same colors as the tiles. Now the shutters and frames look too new compared to the roof. I'll spoil them too. Wood turns gray from the sun and water, so I spread gray paint and stain all the wooden elements on the protruding parts, leaving the recesses untouched. The same goes for the balcony and the door. Here you can see copper slats, hinges and handle. Everything was done using standard wirework techniques, the slats are heavily flattened wire. The copper needs to be aged, I will do this later, so the elements are hanging on their word of honor for now. PART 4
I think moss deserves its own post.
Diorama makers often find materials for their compositions in the most unexpected places. This is what happened to me too. This idea was prompted by one video tutorial in which trees were made with a crown of wood shavings (this happens if you scrape the floors, they are very small). Here's the kitchen scourer I used to apply texture to the roof. The green abrasive part consists of fibers that perfectly imitated moss (as it turned out). I hoped that something would work out for me, but I didn’t expect such a good result. It’s still better to take a green washcloth, because acrylic does not paint over absolutely everything. I tore off this part and cut it into small pieces with scissors. I mix the paint of the desired color in a jar - it’s still the same Maimeri acrylic. I added about a teaspoon of Moment wood glue there. Pour out all the pieces and mix well. The time required to work with such a batch until it begins to set is exactly up to half an hour. There is no retarder in acrylic, its role is played by glue. I had two such batches. And I mix it, and separate the fibers, and stick it - all with these two toothpicks, it’s very convenient for me. Result: Roof. It’s even better live, I’m still a photographer. The moss holds up very well thanks to a large amount of high-quality glue with a plasticizer. You can grab with your hands, etc. PART 5
The flower boxes are glued together from PVC, like the frame of the house, and covered with toilet paper.
The top is painted with acrylic: a solid layer of brown paint, and then black paint with a dry brush. The result is such a multi-colored texture, and thanks to the relief, the toilet paper actually looks like wood)) Copper holders are inserted into holes in the wall. They hold tightly and will not fall out during exposure, but I will remove them for transportation. I repainted the pipe to match the color of stone, not clay. Pieces of Icelandic moss, pine needles, etc. are glued to the roof. Lantern: glass - thin acrylic film (it was a badge from an exhibition), vertical bars - ordinary office paper, bottom and lid - PVC. Everything is assembled with superglue, because otherwise the acrylic will come off. Inside is a piece of toothpick instead of a candle. Everything is painted with a variety of acrylics: the base is dark brown, accents are gold and black. The flashlight is also held in the wall by a hole. At first I wanted to hang it on the right side of the house above the window, but since that facade will practically not be visible at the exhibition, I changed my mind. I’m still in no hurry to patina the copper elements: what if I want to do something else? I'm starting to get to the swamp. Roman cut me a piece of acrylic 3 mm thick (what it was) using a laser. You could cut it by hand, but this way there is less risk of ruining a good piece of acrylic. Cardboard is placed under the acrylic. I only had green, so I had to paint it black. The edges of the swamp are covered with toilet paper to keep the whole structure together. Next is painting the edges: a dark brown-green tone as the base, lighter ones are applied with a washcloth. The surface of the swamp was also tamped with a washcloth to imitate duckweed. My first experience of sculpting flowers from Claycraft Deco)) I bought it from Handmade Studio. The scale for such work is a little abnormal, the diameter of the water lilies is 1 cm, which is approximately 1/6 format. Blue flowers are 4 mm in diameter. Even my fine motor skills are not always enough for the desired result, but I try. That yellow one over there is a centerpiece for the next flowers, I haven’t figured out which ones yet. Here is a video tutorial on modeling in Russian. There are a lot of courses on Deco, because... both the material and the technology are patented, but we are not looking for hard ways)) PART 6
I stuck water lily leaves.
They turned out right the second time: I wanted to make it so that you could simply lay groups of leaves on the swamp, and not glue them tightly, this is necessary for ease of transportation. This means the bottom side should be flat. The first version of the leaves was quite thick, but it was warped (I didn’t throw away the leaves - maybe they’ll come in handy, they’re lying on the sides of the swamp). I googled the properties of Deco: they still write that it warps when drying(((I had to come up with a workaround: what if the leaves were made thinner and glued to a piece of cardboard? No sooner said than done. This is the limit of mixing paint, at which the clay does not fall apart when sculpting Here you can see the different stages of the process: on the left is a cardboard template for leaves, in the center is a glued island from the back, on the top right is another from the front side, on the bottom right is a finished island of leaves, already glued onto the cardboard. As you can see, it is quite flat. I painted the leaves a dull color, because the water lilies are very monochromatic (and why did I sculpt different colors, I don’t know?), glued the water lilies in. Along the edges of the swamp, I added moss, tinted it with different colors. And these are strawberries in boxes. She took over I have a lot of time, because flowers are sculpted in stages. I successfully adapted the eye of a needle to form the middle of the petals, and in general I learned a lot of new things)) The process looks like this: 1. I sculpt flowers. I mix green paint into clay, sculpt leaves. The parts are drying. 2. I cut the wires, with one I bend a loop at the end - this is for buds and berries, with the other - a circle bent perpendicularly, for flowers, and I leave some of the wires like this - this is for leaves. 3. I glue the flowers and leaves onto the wires, and stick the buds raw onto the wires with a loop. I mix red paint. I shape the berries, poke them with the eye of a needle to add texture, and place them on wires. The glue is drying. I'm waiting for it to dry completely. Freshly applied parts also dry. 4. I tear off the buds and berries from the wires, dip the wires in glue, and stick them back in. The glue is drying. 5. I knead the green clay again. On flowers, berries and buds I form blanks for sepals. 6. While the sepals are drying, I cut out the cloves on the already dried leaves with a template knife. I collect leaf blanks in threes and twist the wires. 7. Carefully tear off the sepals, cut out the cloves, and glue them back. 8. I paint the centers of the leaves green, trying to create a gradient towards the edges. I paint all the stems and legs with acrylic; it fits perfectly on the wire and does not crack when bent. I paint the noses of the berries light green and the centers of the flowers yellow. In short, I’ve been fiddling with all this for more than one day))) It’s time to plant our strawberries! I glued the leaves to the bottom of the boxes. Instead of soil, I stuffed the same moss with glue into the boxes and stuck flowers and berries into them. I arranged everything beautifully and am waiting for the glue to dry. Ready! PART 7
I stuck on various leaves and flowers, painted the wire stems with acrylic, and glued the leaves.
The stems for the reeds are the same wire, but with the insulation left (green), obtained from a twisted pair. The top is painted with acrylic, then a reed flower stalk is attached. Reed leaves were made like this: a sausage is rolled on a flat surface, then flattened on the handle of a brush - this is how we get a semicircular shape, it bends in the right way and is laid out to dry. The bottom of the sheet becomes more prominent, the top - flatter. You can see blanks of leaves for ivy on the left, on tubes of paint)) After drying, they will not be flat, but semicircular. The blank will produce two leaves. The ivy stem was made from very thin wire, and the leaves, after the blanks had dried, were cut with a breadboard tool. There are three piles of different colors: the lightest leaves will be at the ends of the branches, the darker ones will be at the base. Flowers of different varieties and types were planted under the house)) For the leaves, I also mixed clay of different colors, some were also painted. I made curtains for the windows and balcony door, since the interior was not done - in general, so that it would not be too noticeable)) Ivy on the house. The technology is still the same: we paint the branches with acrylic, let it dry, and glue each leaf onto PVA. It is attached to the wall with small wire staples, under which holes are pierced in the wall with a needle. I brushed a little over the leaves to give it some heterogeneity. A little more general plan. I also decided to make the reeds into separate elements for ease of transportation. The bases are cut out of PVC, covered with toilet paper, painted, then holes are filled with an awl, wire stems are glued into them. I also glued individual wire pins to the individual leaves. Inserts with minimal gaps. The bottom of the “islands” with reeds is decorated with loofah grass, just like the shores of the lake. That's almost all)) We need to finish literally some little things, add household items to the locations to give the house a residential feel. PART 8
Stools. Made of veneer and square slats (the same ones from which the balcony railing in 2 parts is made), stained on top, then sanded. I tried to paint them with acrylic, but it didn't work out. Two gray byaks are preparations for pumpkins: toilet paper, thread, glue. Made to save material, although they could have been sculpted entirely from Deco. The pumpkins are ready. I tinted the depressions a little with brown paint for a more lively look. The bench was made of the same materials as the balcony: there were still a lot of these square slats left, it was a pity)) Thin crossbars - from a loose bamboo rug. Mushrooms! I did it several evenings: I stuck a bunch together, beat around the bush - it didn’t seem like enough, I stuck it again, and so on several times))) The container for mushrooms was also made of a bamboo mat: there were two types of slats. Paper hoops, assembled with glue. The bottom is triple, slats-cardboard-slats, sitting in a barrel with glue. Deco bowl. They also have mushrooms on the balcony under the roof. I laid out a linen rug, made another jug from Deco, and bought a mug at the Montpassier bead store. Yes, I know that the exhibition is in the spring, and we have both mushrooms and pumpkins here - but I strongly associate mice with homeliness and thriftiness, so the theme of the harvest was revealed. The composition will also include a wheelbarrow and a bag of sugar from that same photo shoot - why waste it)) Well, that’s all, the work is finished. See photos of Manyuni in the surroundings
Option #2. A hut on chicken legs
What child doesn't love fairy tales? Therefore, the baby will definitely help you in creating the house of the famous fairy-tale character - Baba Yaga. To make this craft you will need:
- dry moss;
- glue;
- cones (pine or spruce), always open;
- plasticine;
- leaves pre-ironed with an iron;
- clothespins;
- dry berries.
Baba Yaga with her hut on chicken legs
Stages of making a hut (continued)
Stages of making a hut (completion).jpg
Here is one of the simplest schemes for making such a hut. The templates, of course, can be any, but with this option there will be no difficulties for either you or your baby.
Black hut on chicken legs
Another version of the hut
On a note! It is important here that the scenery matches the atmosphere of the fairytale forest. After all, we are talking about Baba Yaga’s house, and she, as you know, lives in places inaccessible to outsiders.
Original house with pen stand
Option #3. Old Man-Lesovich's House
Old Man-Lesovich's hut
Making such a craft can take a lot of time, up to several days. This is a great opportunity to get even closer to your child! What is needed for such a house? How to make such a composition? Just follow our recommendations.
- To work, you will need a cookie or cake package. Decorate it with pieces of old wallpaper, create a background of an autumn forest. Use pine cones, acorns and matches to make the inhabitants of the forest - the Old Man of the Forest, as well as his friend the hedgehog.
- Take a kefir box and make a house out of it. Cover the walls with dill sticks (choose large ones) to create the effect of logs. To make stumps under which the hedgehog will live, use branch cuts.
- To make a path to the pond, use colored beans and semolina. To create a water effect, use colored paper and make pebbles from plum pits.
- Decorate a clearing with a forest with moss, leaves and branches.
We decorate the forest and clearing with pieces of moss
Forest house made of pine cones
This craft is very simple. To make it you will need opened cones and wire.
Operating procedure:
- We wash and dry the prepared cones.
- We weave a row of 4 cones. To do this, we tie each cone one by one with wire to the previous one.
- We make three more similar rows.
- From the resulting blanks we make the wall of the future house, wrapping them around the outer perimeter with wire.
- Following the above scheme, we make all the walls of the house.
- The roof will turn out original if you make it in the form of an arch. To do this, bend a row woven from several cones into a semicircle.
- From the received elements we assemble a house, fastening it with wire.
You can get creative and put Lesovichok, made from leftover pine cones, in this house. This craft is perfect for display in kindergarten.
Option number 4. Hut in the clearing
This is a more complex design, and therefore the manufacturing process can take a long time.
Hut in the clearing
For work, prepare:
- wire;
- scotch;
- cardboard box;
- pine needles;
- chestnuts (several kilograms);
- scissors;
- dry branches;
- fallen leaves of different colors;
- glue;
- handle;
- berries.
Autumn crafts for an exhibition
Having prepared everything you need, start working with your child in order to instill in him curiosity and useful skills.
This toy is easy to assemble
The sequence of actions is as follows. First make a foundation on which the structure will stand. Make a house out of a box, preparing a 40x40 cm square. Also cut out the house elements from cardboard, and then connect them with tape. Then attach to the base.
What kind of house can you make with your own hands?
Cut out the door with windows from white paper and glue it. Draw the curtains with a pen, and decorate the walls with chestnuts. The roof and ground around the house can be decorated with berries, pine needles, and leaves.
Matchstick house
On a note! Using this algorithm, a house can be made from almost any material, using glue and tape to connect the components.
A beautiful house can be made from any material
This kind of pastime will definitely please your baby; he will be happy to help you make it.
Do-it-yourself house made of branches for the garden
The new time spent together will delight the child, and he will enthusiastically help in collecting it for a long time.
Preparatory stages before creating a house sketch
Before you begin planning to build a house, it is worth addressing several issues:
- Select a tree or several trees to secure the structure.
- If support is needed, then you need to think about it.
- Calculate the number of children and the weight of the house that will be created. Make sure the tree or trees you choose can withstand the load.
- Think over the type of house, its design, availability of parts.
- Select the best option for fastening and fixing the structure.
- Takes care of accidental falls. The surface of the ground under the house should not be too compacted, not covered with concrete or tiles.
- Consider the safest possible stairs for ascending and descending.
After these points, you can begin the sketch and plan for building the house. A selection of photos of finished houses will serve as an example; they can be used as a basis and supplemented with your own elements.
Option #5. New Year's house
DIY New Year's house
To make such a craft house, prepare:
- various decorations (balls, bells, tinsel);
- white cardboard;
- stationery knife;
- paper;
- scissors;
- PVA glue;
- glue stick;
- glitter;
- paint;
- ruler;
- if you want - latex primer.
Diagram of details of the future design
Step 1. First of all, draw your template or download a ready-made one from the link below.
Step 2. Cut out all the structural elements from paper, glue them with a glue stick to the cardboard (as an option, you can use double-sided tape).
Step 3. Next, cut out the elements from cardboard. Cut out windows, doors and other elements with a stationery knife.
Step 4. Fold the parts along the bend lines, and then glue them together.
Step 5. If you want, you can apply a layer of primer to the house to avoid its deformation.
Stages of making a house
Step 6. Now paint the craft, wait for the paint to dry and start decorating.
Note! The craft can be hung with a thread on the Christmas tree or, alternatively, simply placed on a flat surface.
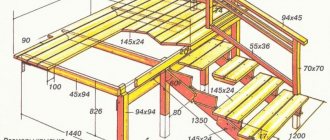
Construction stages
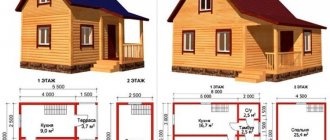
First of all, you need to purchase all the necessary materials. You need to prepare sheets of plywood, beams, boards, roofing material, corners for fastening parts, screws, varnish, paint and brushes.
Stage 1. Marking the place
It is worth choosing a place to install the house that can be easily monitored.
When building a house and wooden supports, it is necessary to fence off the area that the house will occupy with pegs. The supports are installed at a distance of about 20 cm.
In order for the house to be level, it must be leveled using a level. Next, boards are attached to the supports, on which the floors will later be laid.
Stage 2. Wall installation
First of all, you need to prepare the blanks. To do this, pointed beams are attached to the chipboard sheets along the edges.
One wall is made from one sheet of plywood. Cut holes for doors and windows in the right places. The prepared walls are fixed to the finished flooring. Angles and screws will help secure them.
Stage 3. Roof installation
Having decided on the shape, they proceed to installing the roof. A special frame is made for a sloping roof. Roofing material is laid on top of it. Very often, to facilitate the process, the roof is made flat.
To increase the strength of the structure, metal corners are used.
Stage 4. Tree house decor
The house can be decorated with wood carvings or beautiful carved windows.
You can give children paints so that they can decorate the walls and doors themselves. This activity is usually very exciting for children of any age.
Don't forget to think about the stairs and other options for getting into the tree house.
Option number 6. Hut made of paper tubes
House made of paper tubes
To get started, prepare everything you need:
- thin paper (you can use plain printed paper);
- decorations;
- cardboard;
- pencil;
- PVA glue;
- scissors.
Step 1. Prepare pieces of paper of the same size, roll each into a tube. It is convenient to do this with a pencil - this will make the work easier.
Step 2. Draw doors and windows on cardboard/paper, then cut them out.
Step 3. Glue the tubes together as shown in the photo so that you end up with a hut.
Step 4. After this, glue the doors and windows to the craft.
Step 5. Finally, decorate the resulting craft according to your personal preferences.
Stages of making a house from paper tubes
You can also check out another manufacturing option.
Another version of a paper house
Unusual house made from cuttings
To construct this house you will need experience working with wood products and ability to use tools.
The house is assembled according to the type of log houses.
Let's prepare:
- several wooden cuttings;
- a small part from a sheet of chipboard;
- kebab skewers or sushi sticks;
- drill, jigsaw, chisel;
- finishing varnish.
Progress:
- We cut the cuttings into bars of the same length according to the size of the house.
- We fasten the blocks with tape, measure 3 cm from the edge and drill a hole in the center. It should be larger in diameter than wooden sticks.
- On each “log” in the hole area, we use a chisel to cut out semicircular recesses for better fastening of the parts together.
- We assemble the “log house” of the future house, matching the holes. We hammer wooden rods into them.
- To make a roof from a sheet of chipboard, we cut out two rectangles and nail them with small nails.
- Using a jigsaw, we make blanks for the ridge, shutters, doors and canopy from laminated chipboard. Glue the resulting parts to the craft.
- We install the house on a strong foundation.
- From thin cuts obtained from the remaining cuttings, we draw a path to the house.
- We decorate the composition at our discretion and cover it with varnish.
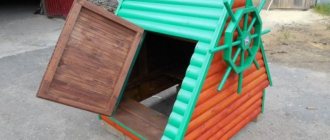
Option No. 7. Santa Claus's Hut
DIY Santa Claus house
Not a very complicated craft, for the manufacture of which you will need:
- scissors;
- polyurethane foam, gun for it;
- cardboard box;
- brushes;
- sandpaper;
- paints;
- stationery knife;
- scotch.
Step 1. Take a prepared cardboard box and make a house out of it. To do this, cut the box into parts, and then glue them together.
Step 2. Cut out the doors and windows using a utility knife. To do this, first draw them with a pencil.
The house is decorated with polyurethane foam
Step 3. Decorate the house with polyurethane foam, applying it in strips about 1.5 cm wide. The foam will swell as it dries, and therefore you can leave a few millimeters of gap between the strips when applying.
Step 4. After covering the house with foam, wait half an hour (during this time the foam will dry).
The foam should dry for 30 minutes
The house is completely sealed with polyurethane foam
Another photo of the result of the work
Step 5. Start making the stand. Cut a rectangle out of cardboard, slightly larger than the base of the hut. Glue the house to the stand, decorate the perimeter with the last mounting foam.
House stand
On a note! Instead of polyurethane foam, snow can be imitated with ordinary cotton wool glued with PVA glue. In addition, you can additionally cut out snow slides from cardboard/paper, a Christmas tree, a snowman, and snowdrifts. All this can be glued to the base by bending the bottom part and applying glue to it.
Step 6. If using foam, cut off the excess material after it has dried using a utility knife. Then apply sandpaper treatment.
Trimming excess polyurethane foam
The foam is cut with a stationery knife
Step 7. After this, paint all the parts in the color you like.
Finished house after painting
Video – House for a hedgehog
Materials for work
The first and most important task for the master is to prepare the necessary materials, as well as tools and a workplace.
As a suitable workplace, you should choose a wide table and a comfortable chair of sufficient height.
To prevent visual impairment, the young master should be provided with high-quality lighting.
If the work on making crafts involves the use of paints and adhesives, it is better to take care of reliable ventilation in the room.
Also at the first stage you need to prepare the following set:
- An organizer in which the child will store small parts, fasteners, decorative items, brushes, pens, needles. With this approach, all tools and materials used will be in a certain place, in strict order.
- A set of paints and brushes for decorating finished crafts.
- To fasten parts together, glue, paper clips, and self-tapping screws are often used (the specific choice of fasteners depends on the level of complexity of the craft).
- Scissors and a sharp utility knife are useful when cutting out small parts for later assembly.
- Consumables can include pine cones, wooden twigs, ice cream sticks, wooden slats, and cardboard boxes.
Very original houses, serving as a souvenir or gift, can be made from bottle caps or ordinary matches. A novice master will definitely need templates or samples according to which the child will conduct creative work.
Option No. 8. Houses for gnomes
DIY cardboard house: gnome's home
For work, prepare:
- cardboard toilet paper rolls;
- multi-colored sparkles;
- paper (white and colored);
- glue (PVA is possible);
- glue stick;
- black felt-tip pen.
Step 1: Cut one sleeve in half. Cut two more so that you get one short piece and one long piece from each. Thanks to this, the houses will turn out to be of different sizes.
Bushings are cut
Step 2. Cut the paper into 15-centimeter strips (their width should be several centimeters greater than the width of the cylinders that will be wrapped in them).
Step 3. Take colored paper, cut out doors and windows from it. Draw the details of the windows and door handles with a felt-tip pen.
Step 4. Glue the resulting doors and windows to the white stripes using a glue stick.
Doors and windows glued to a strip of paper
Step 5. Wrap the strips around the corresponding cylinders and secure with glue. Fold excess paper inside the cylinders.
Fold the excess paper into the cylinder
Step 6. Make several cones using colored paper and glue the ends. The cones themselves must be glued to the houses.
On a note! You can put a little glue on each cone and then sprinkle it with glitter - it will be a kind of imitation of snow.
Cone made of colored paper
Ready-made housing for gnomes
How to assemble walls
- Fix the four tubes on a firm base so that they form a square.
- Two short tubes should be located between a pair of long ones.
- Continue attaching the paper “logs” so that pieces of different lengths alternate on each side.
- So, the walls are ready.
- Now take some paper and cut out the door and steps in any shape and size and then color them.
- You can place paper logs under the stairs.
Option number 9. Paper house
DIY paper house
To create such beauty, prepare:
- a cardboard box (from cereal, for example);
- masking tape;
- ruler;
- clothespin;
- pencil;
- PVA glue;
- scissors.
Tools and materials
Step 1. First, open the box completely and then place it on the table.
The box is being cut
Step 2. Draw a longitudinal line on it about 2.5 cm below the middle.
A straight line is drawn
Step 3: Make cuts on the cardboard as shown in the image below. The dots here are where exactly the cuts should be.
Incisions are made
Step 4. Next, cut off those parts indicated by crosses.
Unnecessary parts of the box are cut off
Step 5. Turn the cardboard over and apply a small amount of glue to the fold (see photo).
Glue is applied to the bend
Step 6. Then fold the box, but with the pattern inside, and then secure it with glue.
The box is folded with the pattern facing inward
Then it is fixed with glue
Result of work
Step 7. The opposite narrow sides must be bent so that the roof of the house is ultimately formed. Each part is bent in half.
Bend opposite narrow sides
Step 8: Trim the wide sides to glue them to the roof section formed in the previous step. Cut generously - you will bend it and glue it.
Trimming wide sides
You need to cut with reserve
You should get something like this
Step 9. As a result, you will have a house like this. Decorate it as you wish.
These houses can be decorated as you wish.
For example, you can cover it with multi-colored paper, and draw doors and windows using a felt-tip pen.
Decorated houses
Nuances when planning a house
When planning a house for children, you need to consider some important details:
- The playhouse must be safe to use.
- It should be as similar as possible to a real home.
- The roof of the house should be made of good material so that it does not get wet from the rain.
- It’s worth decorating everything inside so that the child feels comfortable and enjoys playing in it.
- All elements of the house structure must be well sanded, without protruding nails or sharp corners, so that there is no risk of injury.
- It is not advisable to place the house too low from the surface of the ground. Optimal height 1-1.3 m
Option No. 10. Houses for gnomes (alternative option)
DIY houses for gnomes
Making such houses is not difficult. To begin, prepare:
- toilet paper rolls;
- brush;
- felt;
- paints (both acrylic and watercolor can be used);
- PVA glue;
- scissors.
What you need for work
After preparing everything you need, start manufacturing. Proceed in accordance with the instructions below.
Table. Master class on creating houses for gnomes.
| Steps, photo | Description of actions |
| Step 1 | First, paint the cardboard sleeves with paint. Choose the colors you like best. |
| Step 2 | Next, make a door in each house. To do this, make a cutout in the sleeve in the shape of an inverted letter P. |
| Step 3 | Use felt to make the roof. Cut an isosceles triangle from the material, form it into a cone, and glue the ends together. |
| Step 4 | In our example, a triangle was made with sides of 15 cm and a base of 15 cm. |
| Step 5 | Finally, glue the roofs to the pre-painted houses. That's it, the crafts are ready! |
House roof and decor
Now proceed to making the roof - bend a sheet of cardboard in half, make cuts from the edges and bend it again.
- Then glue the triangles on both sides - the roof slope.
- The roof will be installed on the walls.
- All that remains is to decorate the yard around the paper house - a garden, a well, trees - as your imagination dictates!