Review author: Terrari School of Design
How nice it is to spend your free time at the dacha with your family. Messing around in the garden, cooking, watching the kids play with the dog or cat. And at the end of the day, after pleasant and useful work, go to the bathhouse and just relax.
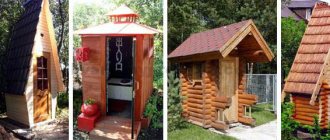
After all, if you don’t have this magical remedy on your site, then you need to build it as quickly as possible. Having looked through specialized magazines, you can find a variety of colorful photos of a bathhouse in a country house that will not leave anyone indifferent, and certainly one of them will definitely appeal to you. All that remains is to make up your mind and start construction, fulfilling a number of conditions.
Selecting a location
Typically, summer cottages are quite small in size. There are some tips about the location where the building will be located:
- Elevation. This will make it much easier to drain excess water.
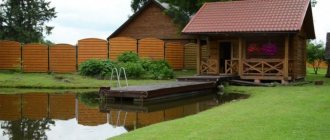
- Near any body of water.
- It is convenient when the entrance to the bathhouse is visible from the window of the house itself.
But it is also important to remember fire safety and think through everything, taking into account existing measures. For example, there should be no less than eight meters between the mini sauna and the house.
If this norm is violated, the situation can lead to conflict with neighbors, even leading to court proceedings.
How to choose the right place for a bath
The most important point is to choose where your future bathhouse will be located. The chosen location must comply with both existing legislation and your convenience in using it. The following recommendations will help you when choosing:
- We decide where the bathhouse will be located relative to the house: separately from it or as an extension to it, each of these options has its own pros and cons.
- It is believed that it is better to build a bathhouse in the backyard in silence.
- During construction, be sure to provide ventilation and wastewater disposal.
- When positioning the building, take into account the location of the light and the direction of the wind: the best is the southern part, protected from the wind; I recommend placing the windows to the west.
- The best option for a bathhouse will be located at a distance from other structures; if you decide to add one to the house, be sure to follow fire safety rules.
- When you have decided on the size and its placement, follow the rules of distance from the boundaries of the site (2.5 m) so that neighbors do not have discomfort and complaints in the future.
- Maintain a distance to the water intake - no more than 20m.
Materials
Various types of modern baths can be built using a variety of materials. There are several types of buildings:
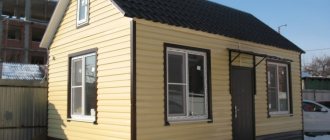
- Frame. Usually they choose it because of its low price and good quality. And thanks to the lightness of the material, you won’t need a lot of money for the foundation.
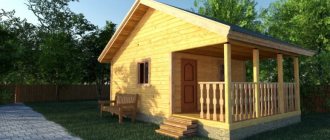
- Wooden. This design will be somewhat more expensive than the previous one, but will be stronger and of better quality. In addition, you won’t have to insulate it.
- Brick or stone. Such a bathhouse is built quite rarely, since such a structure requires a stronger foundation, and the walls are frozen, and it takes a long time to warm them up. But there is an exception - gas and foam blocks. The walls are warm and do not require a strong foundation. The only downside is poor moisture tolerance.
- Arbolite. A very good material that makes the bathhouse warm, durable and does not require much expense.
A bathhouse in the house complicates engineering solutions
The Russian bathhouse is a complex engineering structure, the ventilation system of which faces a number of tasks:
- it supplies combustion air to the furnace;
- it directs heated air along the ceiling from the stove to the shelf;
- it directs fresh air for the steamed to breathe;
- it removes exhaust air from the steam room;
- she performs burst ventilation;
- she dries out the steam room after using it.
It is much more difficult (and more expensive!) to fulfill all these engineering requirements in a built-in bathhouse than in a free-standing one.
Frame bath
For such a structure, it is important to take reliable resources. The beams of the frame bath must first be dried and leveled if necessary. A lattice frame is produced for the walls. To make it you need:
- The bars differ in their cross-section and are suitable in size.
- Insulation with excellent thermal insulation qualities. It will be used when filling the structure.
- Something to sheath the structure on both sides. Typically, OSB, edged boards, siding or lining are used for this.
Minimum dimensions of premises and baths
Everyone selects the optimal size of the bathhouse based on their preferences and capabilities, but the acceptable minimum (we are not talking about comfort, but about strict necessity) can be taken from the table.
| Premises | Number of bathers with simultaneous sitting and lying position | ||||
| 2 | 2-3 | 3 | 3-4 | 4 | |
| Steam room: dimensions (cm), area (m²) | 115×180 2,07 | 130×180 2,34 | 140×180 2,52 | 150×180 2,7 | 150×200 3,0 |
| Washing room: dimensions (cm), area (m²) | 180×180 3,24 | 180×180 3,24 | 180×200 3,6 | 180×210 3,78 | 200×210 4,2 |
| Dressing room: dimensions (cm), area (m²) | 120×295 3,54 | 130×310 4,03 | 140×340 4,76 | 150×360 5,4 | 180×360 6,48 |
| Bathhouse as a whole: dimensions (cm), area (m²) | 295×300 8,85 | 310×310 9,61 | 320×340 10,88 | 330×360 11,88 | 360×380 13,68 |
For a seasonal bath this is quite enough.
Siberian grandfatherForumHouse Member
We have been using the sauna measuring 2.20 x 6 m for more than five years at our dacha, mainly during the warm season (April-December). The stove is heated from the outside, which is convenient - no rubbish is dragged into the dressing room with firewood, and no ash spills onto the floor when cleaning the ash pit. During the harvest season we use the shower almost every day. The dressing room is relatively small, but it is quite enough to change clothes and sit and relax after the steam room. I agree with those who consider a relaxation room in a bathhouse to be an excess - it is much more pleasant to sit after a bath in a gazebo or simply under a canopy. Dimensions are given approximately along the internal perimeter without taking into account the thickness of the walls.
If we talk about comfort in a bathhouse for year-round use, it’s worth adding a few squares to the minimum.
Evgeny-M FORUMHOUSE Member
Life experience is the minimum for a bathhouse, this is 5x4 m, you can fit any desire, and anything smaller is a search for compromises.
Also, when choosing the dimensions of a bathhouse, the type of wall material is also taken into account - while brick/block buildings can be almost anything, frame and wooden buildings are “tied” to the size of the lumber and cladding.
Brick, stone or block bathhouse
The walls can be made of ceramic or silicate bricks, rubble, limestone, shell rock, foam blocks, cinder blocks, and gas blocks.
Design work
The construction of the bathhouse must be carried out in compliance with the requirements of Building Codes and Regulations 02/30/97. The building assumes the presence of: a covered canopy, a relaxation room, a washing room, a steam room, and a bathroom.
The design stage includes the development of working drawings for the general construction part, special interior finishing work, water and electricity supply, sewerage system, natural and forced ventilation system.
Arbolite bathhouse
This material is durable and lightweight, often found in the construction of prefabricated baths. Arbolite blocks, in fact, can be easily made with your own hands.
For this you will need ordinary sawdust, but if they are not available and cannot be purchased, then ready-made blocks are sold quite inexpensively.
Erecting walls made of wood concrete does not take much time, which is also a definite plus.
Possible mistakes
There are several mistakes that owners tend to make when designing a site with a bathhouse:
- congestion;
- randomness;
- non-compliance with SNiP;
- failure to comply with fire safety.
Often, owners of small-sized and unconventional-shaped plots try to fit in as many objects as possible. This not only violates the style of the site and the ease of movement around it, but also violates the norms that apply to the distance between objects.
Construction stages
Many people wonder how they can build a bathhouse themselves. It is best not to build it alone, so it would be nice to call one of your relatives for help.
Otherwise, the process will drag on for a long time, and besides, there are jobs that cannot be done alone.
A bathhouse in the house is less comfortable than a free-standing one
This point practically eliminates the only tangible “plus” of a built-in bathhouse. Well, yes, you won’t have to go into the house with a wet head in the cold, and for some this will probably be worth a lot; but how many unpleasant “buts” appear here!
- “But” No. 1: a separate bathhouse is always more comfortable. There you can provide a spacious relaxation room, a more comfortable steam room, and a pleasant nook for storing firewood.
- “But” No. 2: a separate bathhouse is always more private. There is less risk that you will catch the eyes of guests and household members when you jump from the steam room into a snowdrift or into a swimming pool.
- “But” No. 3 : in a separate bathhouse we don’t disturb anyone!
TarynFORUMHOUSE Member
My bathhouse starts at 6 pm and lasts until 1-2 am (guests). And this is inevitable noise. And again, after the steam room, where can you go to sit and drink tea?
Marking
After choosing a place to place the building, you need to mark the territory. To do this, you need to transfer the size of the building to the terrain.
Pegs that are driven into the future corners of the bathhouse will help with this. It is important to ensure that the angles are exactly right. Further actions depend on the foundation:
- Slab. Expensive, chosen only when absolutely necessary. They are marked either exactly in size, or a little wider so that the foundation extends beyond the building;
- Tape. The most used, relatively cheap, high quality. The marking is carried out so that the concrete tape runs along the perimeter and under the partitions;
- Columnar. Also popular, most often refers to buildings made of wood. They are marked based on the size of the bathhouse and the number of supports made;
- Screw. Some people think that this method is a recent development, but it is not. It has been serving in various buildings for many years and performs well. Its advantages are the ease and speed of installation, as well as the unnecessary need for earthworks. And such a foundation is not afraid of uneven terrain. The marking is carried out precisely, based on the number of piles.
Planning principles
There are general rules for planning areas where the bathhouse is located:
- determine the boundary of the site;
- decide whether the bathhouse will be a separate building or will be part of a house, garage or other building;
- locate all outbuildings behind the residential building.
One of the basic rules when planning is to get to know your neighbors and tell them where the bathhouse and other facilities will be located. This is important, since it will not be possible to place a well or pumping station next to your neighbor’s toilet. Another rule is to carry out land surveying.
To do this, you need to call a surveyor and determine the boundaries of the site : the engineer with the information enters all the information into the cadastral map, where the boundaries of the territory will be visible. Thanks to the presence of a cadastral plan, there will be no future disputes with neighbors.
It is also important to decide whether the bathhouse will be a free-standing structure. This solution is relevant if the plot has dimensions of more than 6 acres. Otherwise, it is better to attach the bathhouse to other structures. For example, owners often decide to build a bathhouse on the ground floor of a residential building with an entrance from the terrace. Sometimes the entrance to the sauna is from the garage, which also saves space.
When placing a bathhouse together with other buildings, do not forget about the presence of all the necessary premises for the operation of the sauna: steam room, shower, vestibule, bathroom and relaxation area.
Rules and regulations
There are some deviations from the general rules that should also be taken into account when planning. They relate to the shape and size of the site for the construction of a bathhouse.
According to the forms of memory
The placement of the steam room and other objects also depends on the shape of the site:
If it is rectangular, then there will be no problems with placement. Here you can realize all the owner’s ideas, there is no need to invent something or be cunning with the location.- If the shape is L-shaped, then there is a kind of niche that will be hidden from prying eyes. In such a niche you can set up a bathhouse and properly connect all communications to it, which will not interfere with the site.
- If the shape of the site is triangular, you can dilute it with round winding paths, and place the bathhouse among the green spaces behind the residential building.
- If the site has an elongated shape, there will be several difficulties. It is important to divide the territory into zones to make it convenient to move around.
Flower plantings, trees and shrubs can be used as details that will separate the zones. Bright plants can be planted near the short side of the plot. In this case, it is better to place the residential building on the short side of the fence, and build a bathhouse, garage and other buildings along the long side.
By territory size
If a large area requires the free placement of all buildings, then small areas of 5-6 acres require compact planning . For example, if the plot is small, then you can place a residential building along the long side of the fence, attaching a garage to it.
From the back entrance, where there is a terrace, lay a path to the bathhouse, and make the bathhouse itself at the back of the yard. It rarely happens when a sauna is planned in the most visible place - this is inconvenient, since people do not use the sauna every day.
Right next to the bathhouse you can place a children's playground, and on the other side you can make a small beautiful garden with flowers. If there is space left, you can make a small area for a garden for growing vegetables.
Fill
A shallow strip foundation is suitable when the soil is dry, there is no moisture, there is little frost in winter, and the construction is not heavy.
To do it, you need:
- Conduct internal markings.
- It’s good to think in advance where the stove is located so that you can immediately lay the foundation for it too.
- To simplify the work, you can place wooden structures resembling benches in the corners. They are needed to attach the measuring cord.
- Get rid of the fertile layer of soil and make a trench. The clay obtained from it can be used as bedding later. The depth of the trench should reach a durable layer of clay. Most often, 50-60 centimeters are required.
- Level the bottom and cover the trench with a layer of sand, and then wet it with water and compact it. The thickness should be more than 15 centimeters.
- Fill in a new layer of crushed stone and compact it.
- Make formwork and cover it with polyethylene from the inside.
- Build a structure made of metal or plastic and lower it into the trench. To raise it above the topping, you can put granite pieces underneath.
- Fill the foundation with concrete and level the resulting area. The formwork can only be removed after at least a week.
Concrete becomes very strong after about a month, so it must be handled carefully at first. It’s better to wait a month before moving on to building a bathhouse.
Where to start designing?
Any project development begins with determining its shape and size. Country plots are not always sold square or rectangular.
If this is the case, then the owner is lucky, but often he has to purchase irregularly shaped land for real estate. Then the question arises: where is it better to place the bathhouse on the plan? One of the basic rules is the optimal marking of the territory, taking into account all the buildings on it.
The development of a sauna project always begins with an assessment of the conditions in which the sauna itself and other facilities will be built. The characteristics of the land must be indicated here.
A few basic nuances with which to start designing a site with a bathhouse:
- relief;
- soil quality;
- availability of groundwater;
- climate;
- sizes and shape.
The terrain can be flat or hilly, have ravines or hills. All this should be taken into account when drawing up the project, because it is not recommended to place the bathhouse on uneven surfaces. To do this, you will first need to level the area.
The quality of the soil needs to be determined for further landscape design around the sauna - if the fertile layer is less than 10 cm, then soil will have to be brought in. This point will become important if you want to create beautiful areas around the bathhouse for relaxation.
If groundwater flows too high, then it is necessary to equip a drainage system. This is especially true if the bathhouse is planned from a log house or wooden beams: flooding of a structure made from such material should not be allowed. Climatic conditions are also important - they determine the construction material.
The shape and size directly affect not only the landscape design around the sauna, but also the placement of objects around the area. If the site has the shape of the letter “g”, then you will have to think about how best to place the bathhouse, and in what part of the territory to plan a residential building, garage and other objects.
Scheme
A layout diagram is created in order to clearly understand where and how various objects will be located throughout the territory. What to do :
- to start, take a sheet of white plain paper;
- if the area is irregular in shape, then the sheet can be cut to fit it;
- You can cut out objects from paper of other colors: bathhouse, house, garage, gazebo;
- Next, you should arrange the objects at your discretion by moving them.
This method allows you to carefully consider all planning decisions: when the owner moves objects, he thinks through various layout options, thereby choosing the best one.
Do not forget that all objects on the plan must be cut to scale and correspond to the dimensions of the site. After the owner comes to a final decision, objects can be drawn on the diagram. To do this, you need to draw the territory with a pencil on a sheet of paper and transfer all its buildings to scale onto the sheet.
You must specify the location:
- residential premises;
- the bathhouse itself;
- utility and auxiliary buildings;
- draw a fence;
- draw the location of communications.
If desired, you can place green spaces on the diagram. When the scheme is ready, it can be worked out in a computer version using site design programs.
Walls
When building a brick, stone or block bathhouse, masonry always starts from the corners. A solution of cement and sand is created and blocks are laid on it.
You should also use stretched string to lay the material evenly.
Having made lintels on top of the doors and windows, you need to make formwork at the top and build an armored belt. It is needed to secure the bolts on which the Mauerlat board will be attached. When the mixture is completely dry, you can begin to make the roof.
Standard solutions
In order to make it easier for you to prepare for the construction of a frame bath, we have collected for you the best projects and drawings that will help you cope with the task. These materials will be great for DIY construction if you are faced with the task of building both a rather modest 3x4 frame bathhouse and a more spacious 3x6 one. Let's consider other popular options: 5x5, 6x6, 6x8. Dividing by building area will help you better navigate this variety of promising solutions.
5x5
6x6
6x8
3x6
3x4
Frame installation
The frame is made of wood, insulated and sheathed with various types of finishes. To carry out a vapor barrier, take a film specially created for this purpose.
This will prevent moisture from accumulating inside. As insulation, you can use mineral wool or fiberglass. They seal perfectly and do not spoil natural air exchange.
The walls should be insulated and sheathed after the work on the roof is completed. This way the materials will not suffer from possible getting wet.
The built-in Finnish sauna was not invented because of a good life
And, as the members of FORUMHOUSE say, they are far from new to this life, “under favorable circumstances, you don’t need to do this for yourself.”
AlexeyL Member of FORUMHOUSE
As far as I know, the “dry sauna” was invented by the Finns in the middle of the last century solely out of poverty, during the war and after the war. Particularly because it is easier to build a dry sauna into a city house without waterproofing. Then, for the same reason, the idea was picked up by businessmen in perestroika Russia. Under favorable circumstances, there is no need to do this for yourself.
The “native” Finnish sauna is not dry at all. It is just wet enough, with brooms and a constant supply of a ladle to the heater. Of course, in a Russian bath the humidity/temperature ratio is higher, but in an authentic Finnish sauna “the water also comes in liters.”
Floors
A frame bathhouse requires only insulation of the floor and covering it with boards, but other buildings, on the contrary, require more difficult work:
- Installation of logs;
- Tricks of the subfloor;
- Securing the vapor barrier;
- Laying insulation;
- Performing waterproofing;
- Laying floor boards.
Buildings built with a columnar or pile foundation can only afford an insulated wooden floor.
How to arrange the interior
Finishing materials are presented on the market in such a wide palette that their choice will allow you to realize any idea in any style. The main thing is to combine the originality of the interior with ease of use and not clutter the space with unnecessary details .
Wooden objects, ladles, brooms as decor, and hand-woven rugs on the floor are suitable for a Russian bath. The style of the chalet will be recreated by bouquets of fragrant herbs, tablecloths, tea sets, and hunter’s attributes. High ceilings and accent lighting deepen the contemporary style.
Furniture is chosen depending on the size of the bathhouse . The dressing room can be marked with a wooden hanger, and a small cabinet is sufficient to store cleaning supplies. Don't forget about a bench for easy changing.
A wooden table, sofa or soft chairs will be placed in the relaxation room. You can equip the walls with shelves for storing dishes and accessories for the bath.
The walls are wooden or painted in light colors. All items perform specific functions, nothing superfluous. The furniture and interior are in harmony with each other .
Which project you should choose depends on the type of bathhouse, since each requires its own conditions and materials . The traditional project includes a dressing room, washing room, and steam room. The remaining rooms and areas are planned based on the size of the site. The bath complex may include a swimming pool, an attic, and a veranda. The premises can perform combined functions. Popular wood projects require additional treatment and protection, and foam block buildings represent the most budget-friendly option. The style of the bathhouse is created using materials, furniture, and decorative items. The interior should be practical, environmentally friendly and safe.
Ceiling
Aspen, alder and linden will serve wonderfully as ceiling materials. They are not particularly thermally conductive, which means they will not heat up from the warmth of the dressing room or rest room.
It is recommended to sheath it with wooden clapboard, which can easily withstand elevated temperatures. You cannot take pine or spruce, as they release resin when heated.
In addition, fiberboard and chipboard sheets are also dangerous to use as ceilings - they can emit fumes that are dangerous to humans.
Optimal steam room sizes
There are quite a large number of projects and layouts of bathhouses of all sizes available on the Internet, ranging from mini-houses to full-fledged complexes with a swimming pool.
There is plenty to choose from, but it’s not so problematic to independently develop a layout to suit your “wants”, rather than deal with adjustments.
unforgivenFORUMHOUSE Member
It is much wiser to take a pencil and paper (or the appropriate program) and, having thought it through, draw a PLAN of the bathhouse than to cram all the necessary premises into the general dimensions taken from the ceiling.
The starting point when designing a bathhouse is the dimensions of the main room - the steam room, the calculation of which takes into account several factors.
- Average number of visitors at the same time.
- What type of oven will it be?
- Operating mode.
The area of a steam room, as well as a private bath, in general, is not regulated by standards, solely by common sense and one’s own capabilities. But it is believed that comfortable bath procedures are possible if at least 1 m² is allocated for each person in the steam room. Again, if the household is large, the square footage is clearly not enough for them, and it is better to allocate 1.5 or 2 m² per visitor.
In addition to the number of steamers, the dimensions of the furnace equipment are also taken into account. Modern sauna stoves are mostly compact, but there must be a safety zone around, the size of which depends on the type of structure. This is 500 mm on each side for a brick stove (metal in a brick frame) and 1 m for a metal stove.
The operating mode refers not only to the intensity of use of the bath, although this factor is also important, but also to the preferences of the steamers. If sitting three people can take a steam bath in a 2x1.5 m room, then lying down, and even with a broom, you won’t fit in a three-meter steam room, and it will be at least 2.4x2 m. As for the ceiling height, it varies in within 2-2.5 m, the optimal height is considered to be 2.1 m. This value is enough for the majority of visitors, with the expectation of swinging a broom, if there is no “Uncle Styopa” among the household members or friends who may come to the bathhouse.
Roof
The first step is to install hydro and thermal insulation. Basically, the roof greatly depends on the area in which the bathhouse is built. So, for example, if the wind in these places is strong, then the slope must be small, and vice versa.
After installing the roof, you need to finish it, and then think about ventilation.
Step-by-step construction of an object with your own hands
Construction is taking place in stages:
- along the perimeter of the future building and under its load-bearing internal walls, pits are created to form a strip foundation;
- sand is poured onto the bottom of the trench, the finished “cushion” is pressed and watered;
- the pits are filled with reinforcing bars and liquid concrete, the layer of which is smoothed with cement mortar;
Before pouring concrete, formwork is constructed from boards - the base for a brick kiln is formed from concrete;
- several layers of waterproofing material treated with bitumen mastic are placed on the platform;
- assemble the frame, connecting the beams using the method “at the corners in a paw, and the ends in half a tree without a trace”, laying insulation between them and installing dowels through each row at a distance of 20 cm from the edge;
The corners are connected in 4 steps, and the ends are connected in 3 steps - prepare a platform for the floor, that is, pour a 10 cm layer of sand, press it, and then cover it with a 10 cm layer of crushed stone;
- the crushed stone is covered with sheets of roofing felt, the edges touching several centimeters;
- cement is placed on the roofing material, creating a screed with a slope, thereby arranging the flow of waste water towards a sewer pipe built into the ground and leading to a separately dug hole;
- a facing material is glued onto the hardened cement screed, and a wooden sheathing is placed on top of it;
Wooden sheathing on the floor prevents your feet from touching the cold floor - floor beams are attached to the upper bars of the walls in a horizontal position;
- the installed beams are connected with iron brackets to the rafters - thick beams;
- fasten the rafter legs to each other using ridge beams;
- the rafters are covered with rolled waterproofing sheets and wooden flooring - the basis for the roofing material;
- create a ceiling, that is, lay out boards every 2.5 meters for non-load-bearing walls;
- A vapor barrier film is laid on top of the ceilings and thermal insulation material is placed.
Ventilation
Many people think that it is completely unnecessary, but this is not so. Without ventilation, hot air is trapped at the top, and on the contrary, it is cold at the bottom.
It is better to place the first vent hole lower, next to the boiler, and the second one near the ceiling, on the other side. The bathhouse should be ventilated every couple of hours. This will make it possible to keep warm.
Example of design with photo
To clearly understand how best to place a bathhouse on a site, you can give a visual example.
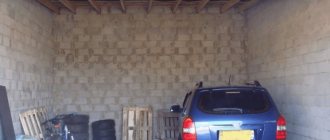
This diagram shows that the bathhouse is located next to the garage, and the entrance to it is through the garage. On a square plot, all requirements for the distance between residential buildings are perfectly met. All outbuildings are located away from the sauna.
Insulation and vapor barrier
A frame bathhouse is not insulated - when constructing the frame, thermal insulation is immediately installed in it. A wooden structure needs a sheathing where the necessary material will be laid. But other types require more complex work.
You will need mineral wool, the thickness depending on the climate conditions and the type of bath. As a rule, the layer thickness is about fifty millimeters. The insulation itself can be either mats or rolls.
Vapor barrier is very different from waterproofing. The first one will do its job perfectly, even if it’s cheap, while the second one will only ruin everything.
Therefore, you need to be careful not to confuse them and not buy a fake.
Some technical points
Firewood is a traditional and beloved type of fuel by many.
Even at the preparation and planning stage, you should decide several technical issues:
- What type of fuel will the stove run on? If it is gas or electric, you should find out if the supply system to your site is strong enough to accommodate the increase in consumption or power. If it is firewood, then you should allocate a place for harvesting (cutting) and storing firewood;
- What equipment will be involved in the work? If it is heavy equipment (excavator, crane, etc.), then you should think through the routes for their movement around the site, otherwise the builders will destroy your entire garden and will not spare your garden;
- Are there any prohibiting rules adopted in your dacha cooperative or partnership regarding such objects? This can be found out from neighbors or administration;
- How will the landscape of the site change? You will have to build a path to the steam room, install sewerage and water supply, and this is all excavation work that may not fit well with the existing country house design and decor.
Another example of a perfectly placed object.
Important! You can and should build garden baths with your own hands, but you should take into account all the risks and losses that construction will entail and compare them with your capabilities and simple expediency.
Finishing
The simplest and most convenient materials for finishing a finished bathhouse at the dacha will be lining or something similar. And if we talk about finishing the exterior, then absolutely anything that is suitable for cladding a house will be suitable.
But if the bathhouse is built from rounded logs, then it already looks attractive and there is no need to sheath it.
Useful tips
The construction of a small private bathhouse on a personal plot is a complex and responsible undertaking. To get a decent result of your work, experts recommend drawing up a detailed plan for the construction process. This will simplify the passage of the main stages of work and avoid serious mistakes.
Step-by-step instructions for building a mini-bath include the following steps:
- Choosing a location on a building site.
- Construction of a foundation for a bathhouse.
- Construction of walls, partitions and interfloor ceilings.
- Installation of the rafter system.
- Thermal insulation, waterproofing and vapor barrier of walls, ceilings and floors.
- External insulation and cladding.
- Installation of heating equipment and chimney.
- Laying floors, installing door and window structures.
- Communications supply.
- Internal cladding of premises.
- Selection and arrangement of furniture, bath accessories.
Furniture
You can do all the arrangement yourself, or purchase it in stores before studying a huge number of photos of the bathhouse inside and decide what you like.
There are no restrictions in the choice of material, but there is no need to use chipboard - such furniture will soon become unusable because it cannot withstand strong humidity.
Here are the main points, after which you will get a pretty good bathhouse, where you can invite not only relatives, but also friends to take a steam bath. After all, colorful photos of a bathhouse in a country house will not leave anyone indifferent.
Project development
The project is easy to do yourself, taking into account the overall dimensions of the future structure. When calculating the dimensions, take into account the number of people who will be in the room at the same time. To comfortably accommodate one person you need 3 sq. m area.
At the planning stage, you should accurately determine the location of the person in the steam room. Seats will require less space than sunbeds to accommodate an adult horizontally.
In addition, it is important to think through the internal layout of the bathhouse in detail. The main room is the steam room. It can be supplemented with a shower room, a relaxation room, and a dressing room. If the area of the site does not allow you to place a spacious bathhouse, then you will have to limit yourself to a steam room and a small dressing room.
The table contains average standards for different bath options.
Independent work on the project will allow you to create the most convenient structure, taking into account various individual wishes.
Photo of a bathhouse at a summer cottage
Foundation
A fairly common foundation design for a sauna house is reinforced concrete supporting pillars and a grillage. First, plastic pipes are buried into the ground to a depth of one and a half meters. Support pillars are placed around the perimeter and, without fail, at the corners of the building.
Frames made of class A3 corrugated reinforcement are inserted into the pipes and concreted, leaving the upper part of the reinforcing bars exposed. Now, along the perimeter of the house, formwork is made of multilayer plywood for the grillage, into which steel frames are inserted. After attaching the frames to the rods of the support pillars, the entire formwork is filled with concrete mixture.
Sewage system
When constructing the foundation, installation holes should be provided at the required level for laying sewer pipes. A drainage well up to one and a half meters deep is installed not far from the bathhouse. Then they fill it with large crushed stone to one third of the depth of the well, cover it with a wooden lid and install a ventilation mushroom.
The receiving manifold is made of plastic pipes with a diameter of 100 mm with a natural slope of five degrees. Wastewater receivers are installed from the washing department, sanitary unit, and only then proceed to the installation of floors.