In the summer, it is impossible to live in a dacha without a gazebo or a tent. But since it takes quite a long time to build a gazebo, you can stop at building a convenient collapsible tent. It can be made from a variety of available materials in a few days. In summer, it will provide excellent protection from the sun if you decide to have a family picnic outside. And for the rest of the year, you can simply assemble it and store it in the garage, closet or pantry. You can easily make a tent with your own hands at minimal cost.
Video: how to assemble a pavilion tent
The tent is a lightweight and comfortable design, so it will be simply indispensable for a summer residence during the summer holidays. It can be installed in literally a few minutes, so it will not take up much space in a small summer cottage. After rest, the structure is quickly assembled and put away in the pantry. You can take a tent on a metal frame with you to a river or lake, on a hike or a long journey. And if you build it at your dacha and install comfortable furniture, as well as a barbecue or grill, you will be able to have a great rest with your friends and acquaintances.
Preparatory work: choosing the size and drawing up drawings
The size of the tent directly depends on the size of the site. If a standard summer cottage plot is 6 acres, then the tent will be small. It should not look awkward against the backdrop of a country house and other buildings, but should fit harmoniously into the landscape and correspond to the overall style.
The design style should fit well into the overall design of the site
Before you start purchasing materials, you need to draw up a preliminary drawing. This will not only allow you to settle on a specific option, but will also give you the opportunity to make the necessary adjustments before starting work.
The diagram shows the dimensions of the structure and lays out the fabric for the awning.
This diagram shows all the necessary dimensions and quantities of materials for construction. If desired, they can be changed and recalculated.
Depending on the purpose, the area of the tent’s internal space can range from 5 to 100 m2. The optimal size for a summer cottage is considered to be 5–10 m2.
A simple rectangular or polygonal tent can be assembled from metal or polypropylene pipes.
The metal frame gives the tent the necessary strength, and well-chosen fabric partitions provide a harmonious appearance.
This design can be collapsible. By replacing the awning, you can completely update the appearance of the tent.
You can stretch any awning onto a collapsible metal frame, completely changing the appearance of the tent
The Saxon-type tent looks no less original . He can often be found at various historical reconstructions and during rock festivals.
The Saxon tent is easy to assemble and requires a minimum of materials
The cutting and assembly scheme is very simple. Depending on the climate, you can choose different materials for the awning.
The drawing indicates not only the size of the tent, but also the required amount of materials
An arched tent looks much more attractive and interesting. As a rule, it is large in size, but if desired, you can make a smaller version.
Ceremonial events are often held in arched tents
It is assembled on the basis of a metal frame, which will require certain skills, but the result will please you.
Step-by-step instructions for building a country tent with a mosquito net
The construction of a tent can be carried out at any time of the year, but it is better to do it in warm, windless weather. The event is simple, but it must be carried out in a certain sequence, without missing any details. In addition to the estimate, you should draw up a plan that will indicate the detailed procedure for performing all actions.
Sizing and drawing
Drawing of a quadrangular tent
The shape varies between buildings with the number of corners from four to eight. The more sides, the more original the object looks. The slopes can be rounded or broken. Sloping structures have better aerodynamics, and inside buildings with smooth walls there is more free space.
The size is determined by the purpose of use of the structure. On average, one person needs 1.5 m² of space. If, in addition to the table and chairs, there are other objects under the canopy, their dimensions are added.
The following data should be shown on the drawings:
- bottom trim;
- vertical racks;
- roof;
- partitions;
- awning fragments;
- window slits;
- mechanisms for lifting, opening and fixing fabric;
- guy wires and how to attach them.
After checking the calculations, you can move on to the practical phase.
Preparing the base
To prevent water from flowing into the tent, it is recommended to lay out a platform.
In any case, the ground is wet in the spring and after rain. This is an objectivity that cannot be eliminated, but it is quite possible to reduce the influence to a minimum. To do this, you can lay out the site with concrete slabs, pallets, or simply fill it with crushed stone and sand, creating a slight elevation.
To prevent the lightweight structure from being overturned by the wind, it must be securely attached to the ground. It's better to do it from above and below. Secure the lower harness with clamps or bolts to stakes driven into the ground, and secure the top with at least four guy wires. If possible, tie the ropes to poles, fences or trees so that they do not interfere with people walking near the tent.
Materials and tools needed to build a tent
Using a previously drawn up drawing, you can calculate the amount of material for the frame and for the manufacture of the canopy and side walls. If you have the necessary skills, you can cut and sew the parts of the canopy and side parts yourself. But you can entrust the manufacture of the awning to specialists, providing preliminary drawings and specifying the necessary elements for attaching the awning to the frame. These can be either ties or special hooks or fixing Velcro tape.
To install a wooden frame, you can make a strip or column foundation or dig foundation bars into the ground.
To build a simple wooden tent frame we will need:
- wooden blocks with a section of 50X50 mm and a height of 2.7 and 2.4 m;
- boards 30–40 mm thick;
- metal corners and screws;
- antiseptic or primer for wood processing;
- shovel;
- brace or garden drill;
- building level;
- corner;
- hacksaw or grinder;
- construction tape;
- screwdriver or electric drill;
- hammer.
Types of tents
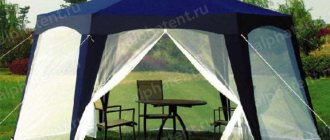
Tent-pavilion for events with a large number of people
When deciding on construction, you should consider various design options.
- Foldable. They are distinguished by their small size and articulated joints. Designed for occasional use when planning any events in open areas.
- Gazebos. A more massive structure. It has blank walls and can be equipped with windows, mosquito nets, and ventilation hoods. The connections are bolted, so the structure is erected for a long time, sometimes not only for the summer, but also including the winter period.
- Tourist. They are characterized by their small size, the use of high-strength materials and low weight. They are equipped with guy ropes, nets and other hiking accessories.
- Pavilion. Large facilities designed to accommodate large numbers of people. The walls are separate, if necessary, they are raised, lowered all or separately.
The optimal solution for a garden is considered to be gazebo-type structures. They are lightweight, inexpensive, and can take the form of a light canopy or a completely enclosed room.
DIY summer cottage tent made of transparent fabric
This tent option is perfect if you do not want to create bulky structures on the site, but simply want to organize a small recreation area. For a tent like this you will need a large piece of transparent fabric, such as tulle or tulle.
The simplest solution is to simply throw the fabric over a branch in the area, laying it out in beautiful folds at the bottom. You can randomly scatter pillows under it and organize an impromptu lounge area. The method takes two minutes and looks really chic.
If you want to create a more durable and textured option, try using some kind of rounded base. This could be, for example, an old hoop. Fasten the fabric in a circle so that the structure itself looks like a canopy. You can go further and use several bases to make the tent more spread out. If you don't have a hoop at hand, use old lampshades as a base.
The nuances of preparing the base for a tent in the country
The tent should look organically on the site and be positioned in such a way that there are flower beds nearby or a picturesque view opens up. You can also place it on the green lawn next to the house.
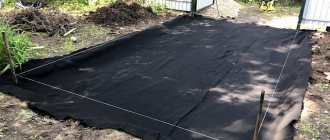
The site for installing the tent must first be perfectly leveled and cleared of weeds, large roots and stones. For a stationary tent, you must first pour a strip foundation, and on top of it make a flooring made of wood, natural stone, rolled lawn or paving slabs.
For a collapsible structure, you must first mark the site, clear it of debris and roots, and remove up to 15 centimeters of soil. Then pour a 10 cm layer of sand, thoroughly pour it with water and compact it, and cover it with a 5 cm layer of granulation on top.
The site for installing the tent must be leveled
Folding tents
An excellent option for country picnics. These tents are compact and small. They have no walls and are supported on a quadrangular support. The awning tent is convenient to transport and easy to assemble.
Thick fabric tent
This type of tent would be appropriate as an impromptu bedroom or a small secret corner on the site. To create it, you can take any old curtains or sheets, but keep in mind that in this case you definitely need some kind of reliable foundation.
If in the previous version the main emphasis was on airiness and weightlessness, here, on the contrary, stability is important. A piece of furniture will do, such as a bed or an old couch that you will need to secure the fabric around. If you don’t need a “dull” effect, you can beautifully drape the fabric like curtains, unraveling it only in moments of privacy. By the way, if you have a small open gazebo on your site, you can also decorate it with fabric and turn it into an impromptu tent.
Existing designs: choose the appropriate one
Now there is a simple opportunity to buy a ready-made structure and any components for it. But we decided to build the tent ourselves. If you are still new to constructing buildings for a summer cottage, ready-made tent designs and various details will make your task much easier. But if you already have some experience, then the work will not be difficult at all .
First of all, you need to choose the type of tent: round or square, large or small, fabric or canvas.
Please note: the main parts of the future building are the base and the body. Therefore, you need to focus on the material of the structure being manufactured.
Lightweight metal construction
In this article we will look at frames made of wood, steel angle and profile pipe, as well as lightweight structures made of aluminum. The lighter the design you choose, the easier it is to choose the material.
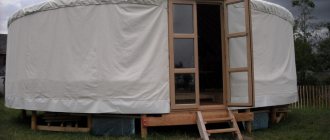
- Wooden tents. This tent is like a gazebo, decorated with fabric curtains and various accessories that provide coziness and comfort. They are made from timber (plain and laminated) or from logs. Usually this is a standard wooden frame with a roof around which the structure is installed.
- A metal tent for a summer residence resembles an arch. In construction, a profile pipe, a metal roller, and fittings are used, which are welded or bolted. The roof frame of such a tent can be covered not only with thick fabric, but also with roofing material.
- A lightweight tent is a collapsible structure with a removable installation location. Its body is made of aluminum or galvanized steel profile, and you can always remove it and move it.
Advantages of an awning gazebo
The gazebo tent has a number of advantages that make such a product an indispensable assistant when relaxing outdoors or in the countryside. If necessary, it can be quickly expanded and rolled up, spending a minimum of effort and time. Thanks to its compactness, there are no problems when transporting the tent - when folded, it takes up little space in the trunk or inside the car. It can be stored on the balcony, warehouse and utility room.
Tent gazebos, made from high-quality materials, are excellent protection from bad weather - ultraviolet rays, rain, wind and insects.
Manufacturers make tent gazebos of different sizes, from small to large. Small tents are designed for 1-2 people, and spacious ones can accommodate up to 8 people. A separate category includes tourist gazebos, which are characterized by a reliable fastening system and the strength of the material, coated with protective solutions against moisture and elevated temperatures.
How and with what to secure the tent on different surfaces
To ensure the strength of the building, additional fastenings should be installed.
Options for mounting a tent in the ground and on asphalt
When installing the structure on the ground, it is necessary to use safety guy wires. This way the building will last longer. The guy ropes consist of pegs 20 cm long and are driven in around the perimeter of the tent.
When installing a building in asphalt, it is necessary to use metal rods. They are inserted into special holes and filled with concrete.