Andrey
19192 0 0
Andrey August 2, 2016Specialization: facade finishing, interior finishing, construction of dachas, garages. Experience of an amateur gardener and gardener. We also have experience in repairing cars and motorcycles. Hobbies: playing the guitar and many other things that I don’t have time for :)
When setting up a summer cottage, summer residents usually have the issue of storing equipment, since it is extremely inconvenient to carry it with them. This problem can be solved by building a utility block. Building this structure is easier than it seems at first glance, and you can see this from this article, in which I will tell you how to build a utility block with a toilet and a firewood shed.
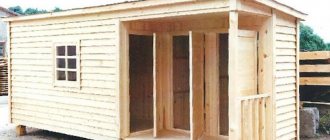
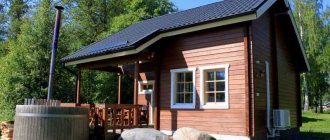
Utility block with shower and toilet
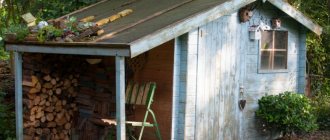
Shed with a gable roof made of metal tiles
This barn was built alone.
The construction is also frame: the cheapest way. In this case, the assembly method is “balloon” - gradual alignment of the racks. It all starts the same way: first we made columns for the foundation. Only this time they are brick. Foundation for a barn made of brick pillars
As you can see, there are studs built into the corner posts. Holes are drilled in the strapping beam and it is put on studs. They can be done not only in corners, but also on intermediate posts: it will hold on more firmly.
This barn has a small porch-veranda, so a cross beam is installed at the required distance. And the wall will support it. Columns were also pre-made for it.
The logs were also attached to the plates
The logs can also be attached with a notch. Then a notch in the shape of the log is cut out in the strapping beam. In depth it should not exceed 30% of the thickness of the beam, so the joist is cut so that it is flush with the frame. This method is more labor-intensive.
Next, the frame was assembled: corner posts 100*100 mm, intermediate posts - 50*100 mm, the top frame and rafter system were assembled from the same board. The triangles at the top are reinforced with applied metal plates. Smaller plates were also attached at the junction of the upper frame beam and the racks. They were connected end-to-end without cutting, nailed on top and diagonally with nails. The plates reduced the likelihood of folding under lateral loads.
Frame assembled
Next, the rafter system was assembled - a 150 * 50 mm board, on which - lathing for metal tiles. It was chosen because the dacha was roofed with the same material.
Assembled rafter system with sheathing
The frame was covered with OSB sheets - the most convenient size for construction. Subsequently, the walls will be finished with wood siding.
This is an almost finished barn with a gable roof. Wall decoration left
The sheathing, by the way, does not have to be made of plywood or OSB. You can attach the lining or board directly to the racks. But then, when assembling the frame, you need to install slopes: without the rigidity of the slab material, the building will be flimsy. If you don’t set the slopes, you can swing them by hand.
Such braces will give sufficient rigidity to the walls of the frame shed
After installing the braces, you can add boards, lining, block house, imitation timber, siding - the choice is yours.
Frame shed sheathed with boards
Similar frame sheds can be made from profile pipes. For strapping and corner posts, a cross-section of 60*60 mm or 60*40 mm is sufficient; for intermediate posts, even less - 20*40 will be normal. Only to attach the outer sheathing will you need to assemble and fasten the sheathing. Read more about building a shed from pipes and metal profiles here.
For those who are concerned about the appearance of the building, here are some ideas on how to make a barn beautiful in video format.
You can read about site planning and the basics of landscape design here.
Installation of the main roof frame and rafters
For this type of work we use smaller beams than when assembling the base. At the very beginning, work is carried out to assemble the frame with the end. During this procedure, do not forget that there will be openings for windows in the walls.
The base posts must be well fixed, so metal corners and screws are used for fastening to the frame.
To securely fasten the beam in the reinforcement, you need to make a hole with a diameter of no more than one centimeter, on which the corner posts will be fixed.
An example of installing a utility unit corner post
All other elements must be installed using bolts. The frame is assembled, after which the installation of the front facade can begin. Now we place two separate doorways and install partitions.
Also, during the assembly of the facade, it is necessary to take into account the location of the windows and install window crossbars, the location of which should be 80 centimeters higher from the lower frame.
At the end, upper junctions two meters high are installed, using the smallest timber. At the end, work is carried out on the internal and external cladding using lining. To cover roofs, various roofing materials are used, such as sheet iron, tiles or slate. Then the windows and doors are installed. Thus, having a little experience in construction work, you can easily assemble your own utility unit.
Useful tips
To make it easier and simpler to approach the arrangement of a utility block with a shower and toilet at your dacha with your own hands, you should take into account the following recommendations:
- Since the auxiliary building includes a shower room, it is necessary to foresee in advance how the water will be supplied. As an option, use a plastic barrel to which a tube with a watering can is attached. If you choose this method, then it is better to make the roof flat. In addition, you need to securely fix the water container itself. Also, the water tank can be installed on a metal structure, building it next to the utility unit.
- For a comfortable stay in the bathroom, you should consider a seat. If the toilet will be used in winter, it is recommended to give preference to a foam product. Such budget material is able to retain heat, despite weather conditions.
- It is more advisable to create a cesspool for the shower and toilet at the stage of arranging the foundation. It would be more correct if the main part of it is located outside the building. If the walls of the pit have a load-bearing function, then they are laid out of brick and made of concrete. If there is no load, tires can be used to fill the pit.
- Before laying the grillage, they must be treated with an antiseptic to prevent the appearance of putrefactive processes on them.
Installation of the base from the frame
There is no need to wait for the foundation to completely harden. While waiting, you can assemble the frame. Large bars are fixed in the shape of a rectangle and are well fixed. As a result, we get a rectangle with a side length of six by three meters. For good stability, special fastenings called “half-tree” will be used. All connections are made using self-tapping screws.
Next, protective measures are established against negative factors such as mold, moisture and insects. An antiseptic is used for this purpose. There is a more traditional option for protection - two layers of regular paint on drying oil.
Assembled floor frame for utility room
Now our base is ready for installation.
Materials
A combined toilet and shower in a country house can be made with your own hands from different materials, namely:
- Wood is an affordable material, and it’s also easy to work with. Such a structure does not require a serious foundation; a columnar foundation is sufficient. But there are also disadvantages - wood is short-lived, especially if it is constantly in contact with water.
- The brick of this toilet with shower is solid and will last for many years. But it requires a strong strip foundation; this design will be quite expensive.
- Aerated block is a relatively affordable material; due to the fact that the blocks are large, the construction will take place quickly.
- Corrugated sheeting is quite durable, relatively cheap and easy to fix, but in hot weather it will heat up in the sun.
Distance to a pit toilet for 2022
For holiday villages, sanitary standards were adjusted taking into account the constant complaints and disputes of neighbors about the discomfort from neighboring toilets. According to SNiP 30-02-97 as amended in 2022 and SP 53.13330.2021, in the territory of dacha settlements, rural and urban settlements, toilets with cesspool type pits should be installed at a distance of 12 m instead of 8–10 m.
Their construction for a holiday village requires permission from the SES at the design stage. Instead of traditional houses over a pit, it is recommended to build septic tanks and install biotoilets with special compounds processing feces into odorless inorganic substances, as well as powder toilets with processing feces into dry matter.
If you have a home sewer system and the types of pits recommended by SNiP, you can place the toilet closer. The demarcation between a dry closet and a septic tank from a neighbor's house is allowed 6 m, for a powder closet - 8 m.
The distance from the toilet to the neighbor’s residential building should be measured at 12 m, the same as to your own. According to changes in SNiP, the permissible distance to the playground and cellar remains 8 meters.
Based on SanPiN 42-128-4690-88, for places where the size of the plots does not allow maintaining the distance to yard toilets and waste disposal pits, standards are established by a commission that includes representatives:
- Quarterly Committee.
- Regional architecture.
- SES - Sanitary and Epidemiological Station.
- Housing and maintenance department.
Based on the results of the site inspection, the commission draws up a report with recommendations on the layout of plots and changes in the minimum distances between residential buildings and toilets. Documents are submitted to the executive committee or village council for approval.
In rural areas or villages, in cities and towns, an outdoor public toilet should be located from public buildings, schools and shops at a distance of 20 to 100 m.
This utility unit combines three functions;
This utility unit (pictured on the left) is designed for storing garden tools, storing tools or equipment. After harvesting, the harvested supplies can be dried and packaged indoors.
The toilet room is located inside the woodshed (there is no need to install an additional building on the site), and it will significantly save your budget, since buying a separate toilet and delivering it will cost a tidy sum. Our development of a 3 in 1 utility unit will help you save a lot and free up space for beds and flower beds.
The woodshed is designed for storing and drying firewood. This woodshed can accommodate up to 8 meters of cubic firewood.
Utility units with shower and toilet are the right solution for hygiene while relaxing in the country
On this site you can find and select utility units of any complexity, size and layout. From a simple stay on the site while performing land work, to temporary residence in the lap of nature on weekends or during vacation. Using ideas that have already been implemented and shown in the photo, you can create your own or improve an existing one, and the company that will be chosen for construction will successfully design it and recreate it in reality.
A small but quite spacious utility unit is placed on a small area Source bezgoroda.com
Advantages of cabins
Unlike ordinary outbuildings, which previously served as temporary housing, standard cabins are more durable and reliable. By leaving things and equipment in the shed for a long time, you don’t have to worry about the safety of all this property.
The cabins are built on the basis of professional designs, in which the optimal dimensions of the premises, window and door openings are used. In projects, the most comfortable arrangement of all planning elements is thought out. Therefore, country houses are quite convenient to use. You can at least stay in them overnight or shelter from the rain. In any case, having installed an equipped change house, you will not have to build a separate shower-toilet for your dacha.
Inexpensive lightweight materials are used to make cabins. They can be placed on a prepared site without having to carry out complex work on building a foundation. The materials of garden houses allow for high-quality insulation of walls, floors and ceilings, and therefore they are suitable for use at any time of the year.
Insulated cabin for year-round useSource vagon32.ru
If necessary, the cabin can be moved and installed in another location. If such a temporary building is needed for only one or two seasons while a cottage is being built on the site, then upon completion of construction it can be sold to other summer residents.
Video about building wooden sheds
The barn turned out to be beautiful, but not cheap. But it is decent in size, strong and in appearance no different from a house - it fits into the composition. Everything is shown/described in detail, there is one violation: the waterproofing under the metal tiles is laid vertically. Even with good gluing of the strips, sooner or later the water will make a path for itself. Otherwise, everything is correct.
In this case, the barn is built with your own hands on what is probably the cheapest foundation: concrete is poured into old tires. The frame stands on these “pillars”. Naturally, they need to be placed on a flat, reliable surface and they themselves must be at the same level. In terms of strength, the base will not be inferior to the best concrete blocks, and may even surpass them. Tires protruding from under the structure can be closed by making a step and subsequently placing flowers on it or using it for other needs. It will be even more practical.
Another video with a step-by-step illustration of the construction of a frame barn made of timber.
Finishing a country toilet inside - photo
The choice of materials that can be used when finishing a country toilet is huge. Today you can use this:
- Styrofoam,
- PVC panels,
- plywood,
- clapboard
This is not a complete list of options - by visiting a suitable hardware store, it is easy to find a number of other materials, each of which has a number of advantages that make them the best choice for a particular user.
When choosing, you need to pay attention not only to the cost, but also to the ease of installation. For example, it is much easier to cover walls with polystyrene foam or plywood with your own hands. But for lining or panels it is often necessary to arrange lathing - the exception is cases when the walls are already flat.
Basics of joint construction of a bathhouse with a utility block
According to the standard, a bathhouse with a utility block is built on the same foundation, where a small extension is made with all the necessary communications. Also, this block can be introduced in advance into the construction plan as another room of the building. Such a bath is subject to a larger set of conditions that must be met in order to obtain an effective, reliable and safe complex.
We are talking about the following nuances:
- separate entrances and exits should be provided for the extension, which will significantly increase the safety of visitors;
- care should be taken to provide separate water supply branches to the utility block with bathhouse and toilet, since the usual container above the sauna stove is not enough to ensure a regular supply of water to all rooms;
- additional arrangement of the heating system will make it possible to use the extension, like a bathhouse, in the winter;
- The roof will be most effective only if it is shared between both buildings;
- a thorough fire safety check will allow the complex building to be used without risk to visitors;
- Sewer outlets must be created separately for the bathhouse and utility block. It is also worth finding out in advance whether the bathhouse needs to be registered and, if necessary, taking the necessary measures.
The advantages of such buildings, combined according to all the rules, are quite obvious:
- you can equip an extension for a kitchen block, which is very much appreciated if you spend much more time in the bathhouse than 1.5-2 hours;
- an additional toilet is installed that will not create discomfort inside the main building;
- The expanded space allows all preparations for receiving guests to be carried out in the annex, and the relaxation room can be used as a real living room.
It is also worth deciding in advance what exactly will be the main building: a utility block or a bathhouse. Some may think that there is not much difference, but in fact the design and its use will be very different between the two options.
Standard designs for bathhouses with a utility block involve the use of an extension as an additional room, where it will be possible to do a number of things that were previously inaccessible due to lack of space and lack of equipment in the bathhouse. It makes sense to make the main utility block only in the conditions of a summer cottage, where there is no large space for the construction of a full-fledged bathhouse. But such a bathhouse for a dacha will still not be superfluous.
Typically, in such complexes, the bathhouse consists only of a dressing room and a steam room, and the utility block houses the necessary equipment and other equipment for working on the land. A toilet and shower can also be equipped.
Step-by-step instructions for building a toilet and shower combined with a shed
First of all, you need to start with markings and a cesspool, then the floor, walls, and the roof and ceiling complete the construction. It is advisable to call helpers (for example, friends or relatives), especially those who understand construction. Since it will be difficult to build a utility unit alone, and it will also take longer. Now let's start construction:
- Select an area and mark it for the foundation and cesspool, be sure to level it.
- Dig a hole: depth up to two meters, width 1 meter, and length 1.5 meters.
- Concrete the bottom and reinforce the walls with bricks; you can use concrete.
- Make 20-centimeter holes in the area, up to 80 centimeters deep, for the foundation.
- Place sand on the bottom (10 centimeters is enough) and compact it thoroughly.
- Install formwork, reinforcement and pour concrete pillars.
- Wait a few days until it dries and remove the formwork.
- Install a drain pipe under the place where the shower will be.
- The bars are connected to wooden elements and attached to the concrete structure using studs.
- Make a channel frame over the cesspool.
- Install a frame based on beams in the corners, and place pillars on both sides in the place where the door will be.
- Make the top trim, attach it with screws and corners, then attach the ridge board to it.
- Make the rafters from boards, size 65 cm, then install the sheathing (it is desirable that the boards protrude by 20 cm).
- All that remains is to attach the wind boards and cover the roof with tiles or corrugated sheets.
- Make the floor from boards, at least 40 mm wide, fasten with self-tapping screws to the bottom trim.
- Sheathe the walls and ceiling with boards (do not sheathe the floor in the shower room), first, if necessary, insulate with foam plastic and seal the cracks with foam (ventilation must be done).
- Dig a ditch and lay a sewer pipe from the shower.
- Cover the floor in the shower with crushed stone and fill it with concrete; the floor should slope toward the drain hole.
- Once the concrete has dried, treat the surface with bitumen mastic.
- Lay a wooden floor on top of the concrete, treat the surface of the walls and floor with waterproofing agents.
- Treat the surface of the building with two layers of yacht varnish.
- Run water into the shower and check operation.
- Arrange the remaining premises for your own needs.
So in a week you can build a utility block with a toilet and shower for your dacha with your own hands. Moreover, you will have to wait several days for the concrete to dry. Inside the building, you can, at your own discretion, create partitions, additional rooms, install electricity, and beautifully decorate the toilet and shower room. The main thing is to turn on your imagination and pick up the instrument.
Projects
Today, outbuildings with a woodshed are mainly represented by three projects. The most common is the standard small version, perfect for a summer residence. It is a utility room with an open shed for firewood. This option is remarkable in that it does not take up much area of the site, and its construction is not too expensive financially. Such a structure will be considered temporary.
The next option is made in the form of a change house, a terrace and an open space for storing firewood. Another option combines under one roof, in addition to the woodshed and utility room, several more useful sections. Most often they are done with a shower and toilet. However, in this case, you will have to equip a capital cesspool, preferably sealed.
There are also interesting projects for outbuildings with a workshop or covered storage space for firewood or a car. In some areas this type is very convenient due to climatic conditions. It is no less convenient when not only a woodshed, but also a small shed is adjacent to the utility room. Such a structure is very good to place in the corner of the site.
When a project is chosen, it is important to do it yourself or select ready-made drawings. Before this, it is necessary to calculate all the design details and designate them
There should also be a detailed plan of the structure and the dimensions of each of the individual sections.
Purpose of the utility unit on the farm
Buildings such as a utility block do not have any frames or restrictions in choosing the width, length and height of the building.
Detailed layout of a utility block 5x5 meters with a bathroom
Their appearance depends entirely on your desire and imagination. You have the right to turn your shed into either an ordinary shed or a fairy-tale house in which you will have a pleasant time. If you want to be at the peak of fashion, you can build a utility unit from several sections in a minimalist style. Such a compact structure will not take up much space in your summer cottage.
In addition, if you do not want to carry out all the work yourself, then there is the opportunity to purchase a ready-made structure, which you only have to assemble in literally half a day with your own hands.
Basically, such structures, which can be bought at most building materials stores, are a container with a modular frame structure. Such a “shed” is formed from the main material, a channel and a corner, and then covered with a wooden slab.
This is what a finished utility unit made of metal and wood looks like
There are several main advantages of this type of structure:
- The first is the ease of creating drawings.
- There is no need to spend a lot of time on the construction of a utility block.
- There is no need for pre-installation of the foundation.
- High mobility of the structure.
- You have the opportunity to disassemble or assemble the structure with your own hands many times.
- Absolutely any summer resident or owner of a private plot can buy such a utility block project.
Materials
For a utility block with a firewood shed and other rooms, you can choose the same materials as for building a house. The main material can be wood, brick, gas blocks. Here the choice primarily depends on the preferences of the homeowner and his financial capabilities. The simplest option is a frame utility block, which is easy to build yourself.
When choosing a material, it is important to decide in advance whether the utility room is being built once and for a long time, or whether it will be rebuilt many times in the future. In the latter case, it is better to choose inexpensive materials
For example, you can make a utility block from timber, thick boards, lining, slate and tin.
For stationary options, wood, brick and gas block are suitable. For projects where a shower and toilet are also provided, it is necessary to build a solid foundation and provide communications. You should not cover the outside walls of a permanent building with plastic clapboard. It is best used to decorate a room from the inside. Most often, utility rooms are built from natural wood, as it is durable and, when treated with special substances, is also resistant to rotting. The woodshed section can be made from timber, round timber, logs, poles, boards, slats.
Buildings for utility purposes are rarely built from stone and concrete. But rooms made of profiled pipes have become increasingly common lately. This is due to the reliability and durability of metal structures. For canopies, you can use modern materials such as ondulin, metal tiles, polycarbonate and others. A good option for an outbuilding is a frame made of corrugated pipe, standing on brick pillars, and on top a canopy made of metal tiles.
Projects made from wood and polycarbonate also look good. Another option is a frame made of bent metal pipe, a canopy made of corrugated sheets and walls made of perforated metal sheets. You can use a combination of profiled pipe, timber and cellular polycarbonate
If in a dacha space the utility block will be combined with a woodshed, then it is important to choose materials that are resistant to mold and corrosion. It is desirable that their characteristics be as close as possible to wood
Subtleties of choosing building materials
Once the decision on the type of toilet structure has been made, you need to select the material that will be used in construction. The choice of building material is important even at the stage of drawing development.
Most often used:
- tree;
- brick;
- metal.
These are familiar materials for summer residents, which almost everyone knows how to handle.
The most common option for constructing a toilet house in a country house involves the use of frame technology.
The frame is constructed from lumber or rolled metal; the walls of the building can be solid or with ventilation gaps in the upper part.
Most often, the frames of country toilets, built from timber, are sheathed with edged boards, clapboard or block house.
The use of corrugated sheeting, which works perfectly in tandem with both a wooden and a metal frame, allows you to quickly finish finishing the frame.
The finishing of a frame building with cellular polycarbonate and plastic slate looks interesting and works excellent.
A log house looks great, but its construction will require greater expenses compared to a frame structure. Such a toilet does not need to be insulated for use in winter. Brick toilets require a massive foundation. They are not erected over cesspools due to their impressive weight.
The construction of a toilet from foam concrete blocks is much faster than using bricks. This type, like the brick one, requires a foundation and involves installing a dry closet or discharging wastewater into a storage tank.
Wood
When it comes to country house construction, the first thing that comes to mind is all kinds of buildings made of wood.
Boards and beams made from inexpensive, but quite strong and durable coniferous wood are easy to obtain, and the work does not require complex equipment. In extreme cases, you can work with wood even without the use of power tools.
Depending on how you design your toilet, you can build completely different restrooms from the same drawing. One of the options is to decorate the walls with a block house or clapboard
If you want to make a toilet not just practical and functional, but also a full-fledged decorative element at your dacha, try building it from a log house. It will take a lot longer, but the result is worth it.
A country toilet is not the most favorable environment. Wood can rot and collapse if it is not treated with special means. Impregnation with an antiseptic is a mandatory condition when constructing a latrine from lumber.
The construction of a toilet house using frame technology includes a number of traditional stages:
- Stage 1: Installation of the frame on foam concrete supports
- Stage 2: Cutting a hole above the cesspool
- Stage 3: Sheathing the frame according to the plank pattern
- Stage 4: Laying the roof covering
From bricks
The advantages of brick buildings over wooden ones are known to everyone from the fairy tale about the three little pigs.
In addition to strength, a brick toilet has low thermal conductivity, which is important if you go to the country in the cold season. A brick country toilet looks like a house with a single or gable roof. Windows can be designed.
It is not necessary to use ordinary brick. More modern block materials such as foam concrete, cinder block, aerated concrete will be an excellent alternative
The design of such a toilet includes not only a drawing of the above-ground part of the toilet, but also the foundation. In this case, it will not be possible to do without a foundation, since the dead weight of the brick building is quite large.
Without support, the soil will soon become compacted and sag, which will cause cracks in the walls of the toilet.
Made of metal
Metal is a material with a high thermal conductivity coefficient. A closet made of metal sheets will be unbearably hot in summer and very cold in winter.
Without the use of thermal insulation materials, an iron toilet in a country house can only be a temporary project - until the construction of the main toilet.
Most often, corrugated sheets are used, sewn onto a metal profile frame. In this embodiment, a profiled sheet of metal is used. Polycarbonate roof on a metal frame
It is difficult to achieve tightness at the joints of such a thin and flexible material. There will be cracks in the corners through which the wind will blow through the house, which also does not add comfort.
If you apply modern technologies and use sandwich panels as wall materials, you can get a completely comfortable restroom. Polystyrene foam or mineral wool is used as insulation.
Layout options for two-room cabins
Cabins for long-term holidays and permanent residence should be as comfortable as possible. The level of comfort depends on the planning solution. It must meet the needs of residents. Therefore, ready-made country houses are made with a variety of options for the relative arrangement of rooms.
In this video we will talk about country houses and cabins, visit production facilities, consider options for purchasing such a house, and talk in detail about the types and types of small country houses and cabins:
https://youtube.com/watch?v=aWWkFGElpoA
Change house for workers
Builders can be accommodated in the house, the plan of which is presented below. It has everything for 4 people, including a bathroom with shower and a kitchen. Such a building can be insulated and intended for use in winter.
Two-room house for workersSource sk-amigo.ru
Double garden shed
This is a compact housing option for a small family. This type of garden house with shower and toilet is ideal for a summer holiday. There are other options for planning a double cabin, but their main difference is that they are a full-fledged makeshift shelter with a convenient configuration. This project additionally provides a small storage room, which can be entered from the street.
Wide change house for a summer residenceSource m.yukle.mobi
Change house for one person
For one tenant, a house with a simple layout, such as the one in the diagram below, is ideal. A single dwelling can become a watchman’s or security guard’s house on site with its own territory.
House for one tenantSource stroytex.msk.ru
Change house with second level
The video below offers an option for planning a garden house with a pitched roof. In the under-roof space there is a mezzanine bed. This is a very good solution that allows you to save the interior space of a modest home.
House with a bed on the second level:
A light and compact change house can become temporary housing for builders or a convenient garden house that will last for many years. There are many options for country houses, differing in wall material, size, layout and external design. A wide, insulated cabin with amenities and a veranda can easily replace a comfortable small cottage building.
Walls
An uninsulated utility block can only be sheathed on the outside.
The walls of the insulated cabin look like this:
- outer skin;
- waterproofing film;
- insulation tightly laid between the studs;
- vapor-proof film;
- internal lining.
Note. When insulating with mineral wool, a ventilation gap is required between the waterproofing film and the top covering. It is set using an additional distance rod.
The technology of external and internal finishing depends solely on the options used. Even painting OSB is used as the most affordable method. But to improve adhesion to paint, you need to clean off the protective layer.
Video instructions in detail:
How to build?
Before you begin constructing an outbuilding, you should decide on the project and draw up the most accurate drawing possible. And only the next step will be the beginning of construction activities, the result of which will be the creation of an easy-to-use and practical structure. If the layout is initially incorrect, the erected structure will not make the desired impression.
Most often, in summer cottages, inexpensive and budget materials are used when creating a utility unit with your own hands. The most common are wood derivatives, which optimally fit into the surrounding nature outside the city.
It is impossible to imagine carrying out the designated activities without the appropriate tools. Before creating a facility that combines a shower, toilet or garage with a relaxation area under one roof, you should equip yourself with the following devices:
- pencil and paper for drawings;
- yardstick;
- level;
- cord;
- pliers;
- water tank;
- concrete mixer;
- shovel;
- axe;
- self-tapping screws;
- hacksaw;
- plane;
- screwdriver;
- utility wheelbarrow.
As you perform certain manipulations, it will become clear what equipment is missing. All needs are determined on an individual basis. It is possible that some of the designated items will turn out to be superfluous; everything will be determined during the work. There are sequential stages that are recommended to be followed during the construction of a multifunctional building on a summer cottage.
The first step is to select the most suitable location. A territory located in a lowland or pit will not be appropriate. After this, a foundation is laid, preferably columnar, preceded by markings directly on the ground. Here you should use a rope and tape measure. Using the prepared markings, a pit is dug, the optimal depth of which is up to 2 meters. As for the width, it depends on the wishes of the owner of the site.
The dug hole must be strengthened, for which a cement-based mortar and bricks are used, which are held together according to the principle of an adhesive. When such walls are completely ready, the ditch is filled with gravel mixed with sand. After that everything is concreted. As a result, a container is created that does not allow all contents to pass through the walls.
At the next stage, a column-type foundation is installed. To do this, holes are prepared up to 80 cm deep. Sand is placed in them and carefully compacted. A layer of gravel of similar thickness is poured on top of it and compacted. Next, the pillars are lowered into the holes and sprinkled on all sides with sand.
If there is a shower and toilet, the utility room must be equipped with a drain pipe. It is installed in the most convenient place, after which it is taken outside. The easiest way is to assemble the frame in accordance with the project from timber, which does not take much time. Special racks are placed on top of it, the strapping of which is carried out along the upper edge.
An important stage in the construction process is the organization of the roof. For this purpose, several types of materials are used, taking into account individual preferences, desires and financial capabilities. An example of this is:
- roofing felt;
- sheet steel;
- slate;
- corrugated sheets and more.
However, many summer residents give priority to tiles. It is produced in various color options; if chosen correctly, it will harmonize with all objects in the dacha, creating a single composition.
Convenience and simplicity, comfort during the operation of a utility unit with several functional zones largely depends on correctly executed flooring. For this purpose, boards are usually used.
Don't forget about the exterior decoration of the building. Existing wood cladding is treated with oil compounds.
The final stage is represented by interior decoration. The toilet and shower are lined with plastic-based clapboard. Everyone organizes the interior decoration based on their needs. These can be holders for toilet paper, towels, shelves for soap and shampoo, and other accessories. In the storage room you also cannot do without shelves designed for heavy loads, drawers, and containers.
If a summer dining room and a recreation area are being installed in the building, it is appropriate to make a compact table where you can gather with a friendly group or family. Drawers for kitchen utensils, stands, and bedside tables will come in handy.
Carrying out foundation installation work
- At the very beginning of the work, it is necessary to carry out the main stage, which will help mark out the territory of the future foundation. Supports or pillars should be in the center of the marking, as well as in the corners.
- The next stage is preliminary soil preparation. To do this, you need to remove a certain layer of soil to a depth of 20 centimeters. Afterwards, to strengthen the base of your future utility block, sand is poured onto the surface to a level of up to 10 centimeters, after which everything is thoroughly compacted.
- Next, work is carried out to prepare the pit for the pillars. Each of them should be about one meter deep.
- When preparing the foundation, it is worth taking into account the dimensions of your utility room, since the parameters of various nuances depend on them. Before installing the pillars, it is necessary to prepare a hole, make a solid base in it from sand or gravel, previously compacted.
- After this, the pillars are installed, their perpendicularity is checked, and at the end they are secured with sand poured into the hole. For greater strength and reliability, pipes can be filled with cement, which will create a more durable base and increase their service life.
- After carrying out this work, you will need to wait about two weeks until the solution completely hardens. To speed up this process, you need to protect it from direct sunlight and moisten the solution with water.
Foundation preparation
For the strength and stability of the utility block, you first need to build a foundation. For sheds made of wood or those that are collapsible, a columnar foundation is suitable. If the building is made of brick, then a strip-column foundation is needed.
Recent posts Chainsaw or electric saw - what to choose for the garden? 4 mistakes when growing tomatoes in pots that almost all housewives make Secrets of growing seedlings from the Japanese, who are very sensitive to the soil
The process of pouring pillars is very simple. For the posts, you need to take a garden drill and dig round holes located in the corners and in those places where the load of the shed will be maximum; the depth of these holes should be approximately one meter and twenty centimeters. If you have the financial means, you can use asbestos cement pipes.
But it’s cheaper and faster to make your own pipe from roofing felt with the diameter of the hole. Then at the bottom you should make a cushion of sand and gravel from one hundred to one hundred and fifty millimeters, and install a pipe, and inside it a frame made of reinforcement. First, concrete is poured to one third and the pipe is pulled out one hundred millimeters. After two hours, you can add the rest of the concrete.
A strip-column foundation is more difficult to pour. It is necessary to fill the pillars, and between them it is necessary to dig a trench fifty centimeters deep. It should be fifty millimeters wider than the shed wall. Next, formwork is made, reinforcement is laid and concrete is poured.
Types of designs
The flexibility of polycarbonate allows you to create structures of various shapes and purposes.
The shape of the shower can be:
- square;
- rectangular;
- cylindrical.
According to their purpose, the following types of shower stalls are distinguished:
- simple;
- with a locker room;
- with toilet.
An outdoor shower for a summer residence is a frame structure of various shapes. A water tank is installed on top of the cabin. It’s not difficult to create a design with your own hands:
- Prepare the base.
- A strip foundation or foundation is erected on piles.
- The frame is constructed from aluminum or steel profiles.
- Lined with polycarbonate.
- Install the tank.
- They supply water.
- Arranging the interior space.
Wastewater is discharged in various ways:
- install a septic tank;
- pipes are used;
- construct collecting pallets;
- create drainage systems.
In some cases, a summer shower with hot water is installed in the country house. The easiest way is using water pipes. However, not every dacha community has this luxury. Sources of hot water supply can be instantaneous or storage water heater.
Most often, summer residents install a boiler for the kitchen and shower. In this case, the outdoor shower is adjacent to the outer wall of the kitchen.
Attention! For a family of three people, a storage water heater with a volume of 50 liters is installed. The water in it heats up within an hour.
Simple summer shower for a summer house made of polycarbonate
The base of a simple polycarbonate country shower design can be round or square.
Photo instructions for constructing a summer shower at the dacha made of polycarbonate with an absorption well:
- In the selected area, a pit is prepared according to the size of the shower stall, 1-1.5 m deep.
- A third of the pit is filled with fine gravel, the second third with medium gravel, and the third with coarse gravel. Formwork made of boards or bricks is installed around the perimeter and the foundation is poured, leaving a hole in the center for the drain.
- Assembling the frame. The second stage of pouring the foundation is carried out with a slope to the center.
- After the concrete has dried, the hole for draining the water is treated with bitumen mastic.
- The frame is covered with polycarbonate.
- A pallet made of boards is placed on the shower floor. Connect the water supply hose.
- A water tank is installed on the roof.
- Arranging the interior space of the cabin. The siphon, shelves and hooks are attached.
The country shower is ready. Before operation, check the water supply and drainage system. If deficiencies are found, they are eliminated.
Shower for a summer house made of polycarbonate with a changing room
When building a polycarbonate shower for a summer house with a dressing room, you should take into account its differences from a simple design. They consist of dividing the space into two sections using a waterproof bathroom curtain or a lightweight door.
To drain water in the floor, a slope is provided under the drain with a grate. The wooden sheathing will not allow moisture to accumulate in one place and will help the cabin dry out quickly.
Instructions for installing a shower with a changing room and a heated tank:
Shower with toilet for a summer house made of polycarbonate
Summer residents often set up a utility block at their dacha, which solves several problems. It includes:
- shower;
- toilet;
- storage place for garden tools.
Sometimes the utility block includes a kitchen. The summer building is built from inexpensive building materials. A frame structure made of profiles, covered with polycarbonate, is a budget option.
A place on a summer cottage for arranging a utility block is selected according to the same parameters as a toilet
It is important that wastewater does not enter the source of drinking water, so if there is a well on the site, the distance from it to the utility block should not be less than 30 m
Before arranging the foundation for a shower and toilet, a cesspool is prepared.
A frame made of a metal profile or a 4*4 cm wooden beam is erected on the equipped foundation. A base is erected for the toilet seat.
The next step is to erect a gable roof. Set up a base in the shower room. The frame and interior are sheathed.
Roof
The simplest option for a utility block is a pitched roof. There are two solutions:
- Pairs of front and rear pillars are made in two different fixed sizes, and the upper trim is mounted with the required slope. In this case, the rafters are attached directly to the frame itself.
- The racks are made identical, and the top trim is mounted strictly horizontally. The slope angle is formed by additional front (or rear) wall posts, on which another support beam is installed. The rafters are attached with one side to the frame, and the other side to this support beam.
To attach the rafter legs to the frame, use a groove cut in the frame beam. Another option is a support beam with a beveled end, nailed to the rafters and resting on the trim beam.
If corrugated sheets or metal tiles are used as roofing, then a waterproofing film is laid on top of the rafters. For slate, ondulin or bitumen shingles, waterproofing is needed only when the utility block is heated.
The next stage is the installation of the roof sheathing. The pitch of the sheathing depends on the angle of inclination and the nature of the roof. For example, for ondulin, at small roof angles (less than 10°), the sheathing is made continuous.
Additional functions of utility units
In general, it is quite easy to build a garden toilet with a utility block anywhere in your garden plot. The main idea that should be followed during construction is the following: you should save space and try to take into account all your needs during construction.
A good, strong utility unit can become a place for storing hoses, canned food, potatoes, and seeds in winter, when the dacha is empty.
There are no clear rules that should be followed when making the appearance of a building. If desired or necessary, it can even be a corner utility block with a shower and toilet.
This design will allow, say, to hide its true purpose from prying eyes and save space.
Another option for rational use of space is to create a utility block with a second floor. In other words, the building will also have a mezzanine, where it is quite possible to store or hide something.
In general, a typical country toilet with a utility block, as in the photo, can be made in a wide variety of sizes, shapes and styles.
The main thing is to make it practical, convenient and where it won’t bother anyone.
You can’t do without such a building at your dacha. And it can really help to properly organize space and solve a number of important issues.
Maybe
Shapes of toilets
It is necessary to select a suitable material in advance, and after this stage, do the project yourself or look for a suitable ready-made drawing.
There is a wide variety of types of wooden models. The most popular form of toilet is the “birdhouse”, but there are others that vary in the complexity of construction:
Hut house
This cabin is compact and economical. Its simple geometric shape impresses with its ease of construction, and its drawing is also elementary. The side walls double as roof slopes; construction of the above-ground part of the toilet takes only a few hours. Roofing material (for example, soft tiles) is laid on the side walls. The façade and rear wall of the structure require finishing.
Toilet-teremok
It has a diamond shape, which makes the job a little more difficult. To give a fabulous look, various carved decorations are used. The frame is lined with round timber sawn in half, ordinary overlapping boards, block house or thick lining.
Toilet combined with shower
In this case, the drawing of such a structure is the addition of a second similar diagram on one side. If necessary, the size of this cabin can be slightly increased.
Birdhouse
But those craftsmen who choose projects of maximum simplicity during construction will certainly like a wooden birdhouse. The easiest way to build it on the site with your own hands is. The pitched roof and primitive design help reduce the consumption of building materials. In addition, the roof of the country toilet makes it possible to easily place a pressure tank - a useful thing if you plan to build a toilet with a toilet.
But the design has many shortcomings. First of all, the building turns out to be shaky. In addition, it is easily blown by the wind. Finally, with heavy rainfall, moisture will likely seep inside, which will also not add comfort.
Advantages and disadvantages of the combined design
A combined shower and toilet for a dacha, be it a utility block or a modular project, have obvious advantages over separate structures. The advantages include:
Space saving. Designing a single toilet and shower allows you to save more land for a garden (especially valuable for small plots of land).
Each room has a separate entranceSource ydachadacha.ru
- Budget savings. A free-standing toilet and shower require an individual foundation, roof and four walls (in a combined structure, two walls are replaced by a common partition wall). All this will require the purchase of more building materials and more financing.
- Save time. For a combined bathroom, you will need to install one foundation, one roofing system and one cesspool (install one septic tank). Significant savings in time (and, consequently, money) are obtained by organizing a general system of drainage, lighting and ventilation; water supply (if provided) is also supplied to one point.
The combined building, erected with the assistance of professional builders, is expedient, functional and has no significant disadvantages. A combined bathroom built independently may have some disadvantages:
Unpleasant odor in the shower due to insufficient sealing and poor ventilation.
This type of construction is beneficial for many reasons. Source mercabadom.ru
- Insufficient (poorly calculated) size of the cesspool and its poor organization. With such a deficiency, the likelihood of soil and groundwater contamination increases. You will also have to use pumping services more often, which means increased maintenance costs.
- A shower cabin with a toilet for a summer house, built with your own hands, is rarely equipped with a full-fledged infrastructure. To use the shower, you will need to make arrangements in advance. You will have to carry water, pour it into a container on the roof and wait until it warms up enough. The task becomes more difficult in cloudy weather and in the presence of a large family.
Sanitary and hygienic standards for country toilets
Before starting installation work on the independent construction of a toilet in the country, you should carefully study the regulations that govern the construction procedure. There are certain requirements that must be met:
- check that the toilet does not disturb the neighbors. Otherwise, they have the right to complain to the appropriate authority and there is a possibility that the building will need to be moved;
- choose a location, taking into account all the standards and regulations for placement. If this is not done, the result will be a serious deterioration of the ecological situation in the area, contamination of the soil and nearby reservoirs and water sources. The owner of the site will have to pay fines, and health may also be affected due to environmental pollution;
- when designing, you need to take care of the issue of removing waste from the cesspool;
- When selecting a suitable design, it is important to take into account the characteristics of the site, in particular the water horizon. If groundwater is located close to the surface, you need to opt for a completely sealed system.
Attention! Following these requirements will help prevent a variety of operational problems in the future.
Household units for a summer cottage made of wood
If you plan to make a bathhouse in the utility room, you usually choose brick or wood in the form of timber or logs. A frame structure is also suitable for a bathhouse. Wood, unlike iron or plastic, retains heat much better, so if the room will be used during the cold season, you should choose it.
To heat a utility block made of timber or logs in winter, a heater or stove will be sufficient; in a frame structure, an additional layer of insulation up to 100 mm is required. Insulated utility units for a summer residence do not consume a lot of electricity; due to their small size, they warm up quickly.
Construction of a utility block - capital structure
Before you start building a universal utility unit, you need to ask yourself a few questions:
- Does it make sense to use inventory for housing if you already have a separate house?
- How often do you have to work on site?
- Will there be enough funds to implement the project?
If you have private housing, everything is obvious - major support is not needed. What to do when there is no housing or work. Is it then necessary to study different types of modern utility blocks that offer to live in comfort and coziness even in winter.
No, it’s not necessary, because you won’t have to work, which means you won’t have to spend money on the following elements:
- Complex foundation - strip, columnar, pile.
- Durable building materials - laminated veneer lumber, brick, foam concrete, etc. (although a capital utility block can be erected using a frame method);
- Gable roof with attic;
- Internal cladding - block house, lining or clinker;
- Thermal insulation layer – mineral wool or polystyrene foam;
- Interior partitions;
- Artificial lighting system - cable, wires, corrugations, switches, lamps, meter;
- Water supply system - plumbing, water tanks, water heater, pipes;
- Sewerage – plumbing, pipes, septic tank;
- Ventilation system – pipes for air inflow and outlet;
- Heating system – IF emitter, potbelly stove or electric fireplace;
- Furniture – bed, table, chairs, wardrobe.
Not a single photo of a utility block for a dacha will tell you how much money you have to spend on the corresponding list.
Moreover, the operation of individual products will require additional costs. For example, it is imperative to install a protective screen under a potbelly stove so that the nearest surfaces do not ignite due to high temperature.
And even if an alternative heater is used instead of a traditional fireplace, electricity or gas will require payment.
The question is, where to store pitchforks, shovels, rakes, bags of potatoes, a generator and other working tools and things? The answer is obvious - away from living rooms.
Therefore, the capital utility room should have a large area. If the summer resident agrees with all the above conditions, then he is a real enthusiast, a good guy or just a person without registration.
Stage 5: assembly and installation of the grillage (frame)
Assembly and installation of grillage
The frame must be assembled from beams with a cross-section of 150×150 mm, its size will be 6×3 m. The frame will consist of four sections, measuring 1.5×3 m. The beams that form the frame are connected to each other by half-wood grooves. They need to be fixed with special two (if the frame is installed on an anchor) or four (if installed on reinforcement) wood screws. To install the frame on the foundation, holes should be made in the right place for protruding reinforcement or an anchor.
In order to ensure sealing, 1-2 layers of roofing material must be placed on the pillars so that its edges protrude by 10 cm. They must be bent down so that the water drains and does not accumulate under the wooden beam. Before placing the frame on the foundation, the wood should be coated with an antiseptic - apply at least 2 layers of drying oil. The frame is then installed and secured to the foundation. Along the length of the frame, you need to install three half-timber logs made of 100x100 mm timber, in increments of 135 cm.
Drawings of wooden toilets for a summer residence
In order to make a wooden toilet in the country, at the very beginning you need to create a project drawing. It is necessary in order to calculate as accurately as possible the required amount of building material, clarify the dimensions of the toilet cubicle at the location and determine the sewer drainage scheme (if required).
The plan drawing of the outdoor toilet “Birdhouse” is presented below.
Plan drawing of the outdoor toilet "Izbushka":
Plan drawing of the outdoor toilet "House":
Plan drawing of the outdoor toilet "Shalash":