For land owners, a summer shower is not a luxury, but a pleasant necessity. Especially for summer residents. Having actively “rested” in the garden, before a well-deserved lunch or dinner, it is pleasant to cool off under the cool artificial rain.
The construction of a shower should be the fourth priority when landscaping the site (after the fence, toilet, room for storing equipment). The sooner you have the opportunity to wash off the dust and dirt from yourself after work, the more satisfaction the awareness of yourself as the owner of the land will bring.
To start construction, it is not necessary to “reinvent the wheel”. You can simply look at the photographs, of which there are many in design and construction magazines, and on the Internet, and choose the most convenient option.
Film shower
This type consists of corners made of wood or metal, which are covered with film. The main disadvantage of this structure is its short service life.
If we consider the advantages, then such a shower is easy to assemble and it is mobile. If necessary, it can be moved to another place.
Useful tips
Shower head made from scrap materials
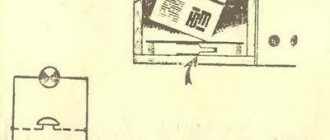
A shower head attached to a garden hose provides a spray of water and is definitely important. But what if you don't want to go to the store and spend your money on it? Then you can use your imagination and make a substitute yourself from what you have at hand. For example, from beer or soda cans, or from a wooden bucket with tiny holes drilled in the bottom. You can attach such a shower to the wall of a barn or to a fence using brackets.
Original shower decorations
Does the summer heat make you longing for the beach? An old surfboard attached as a shower wall will help with this! You can also decorate your shower with a piece of an old fence or a door. And then use your imagination and come up with your own options based on the materials that are available.
Shelves
In a regular bathroom, there are bedside tables and shelves with all the necessary shower accessories. Of course, you can’t put all this in a summer shower, but you can still add some amenities. For example, make small shelves on the walls of your summer shower and place on them shampoo, soap and other things you cannot do without in the shower.
Bathroom
Why not? After all, an outdoor bathroom is a kind of mini swimming pool. Enjoy the water treatments for real!
You can also install a small washbasin; it is very convenient for rinsing your hands outside or washing your face without going into the house.
Frame building
This is a solid monolithic structure that will last a long time. It has good ventilation and fast water heating. The downside is the environmental impact.
After several years of operation of such a structure, the appearance will not be very attractive.
Existing types of shower
To build a shower in a country house, different materials are used. The choice depends only on the finances that you are willing to allocate for this building.
Taps and hoses
You should not skimp on such important components. So, if you purchase a low-quality faucet, the very least that can happen is that water will start leaking. Therefore, it is advisable to buy a container that initially already has a tap. This is not a shower component you should skimp on.
It is advisable to buy hoses with a reserve, since during the installation process unexpected adjustments may appear that will require a longer hose, for example, for draining.
Wooden shower
A wooden shower is a well-known and common construction option. This is explained by the fact that it is very simple to build.
One of the few disadvantages of this type of shower is its poor moisture resistance. To do this, before construction, all wooden parts are treated with special substances.
The optimal type of wood for such buildings is coniferous wood. They have better moisture resistance.
A wooden shower is a frame structure. To protect logs that will be in the ground, they are treated with bitumen mastic and wrapped in roofing felt. The racks are connected at the top and bottom using horizontal bars.
They are usually fastened with bolts and a metal corner. A sanded board is installed in the sides of the cabin. At the end, all wooden parts of the shower are coated with varnish or paint to protect the wood from moisture.
During construction, it is necessary to consider a drain for used water. Shower containers of various shapes and sizes are used for serving. They are located on the roof.
Classic
The most practical and inexpensive outdoor shower has a base made of wood blocks. Here it is important to treat the wood with a special construction varnish to avoid rotting and soaking of the material.
Make sure that the stand for the water tank is strong enough, because when it is filled to its maximum, the structure may simply collapse.
Polycarbonate construction
This type of shower is a little simpler to build than the previous one. For assembly you will need a welding machine. It is used to build a frame, which is made of metal. A profile with a cross-section of 40x60mm is used as racks, and the strapping is made from a profile with a smaller size.
During installation, the racks are concreted. They are connected to each other by jumpers. They make the structure more rigid. A frame is built at the top to install a water tank. The entire structure is painted, thereby protecting the metal from moisture.
The walls are assembled from opaque polycarbonate with a thickness of no more than 10 mm. Cut polycarbonate sheets using a circular saw. Finishing is carried out
Corrugated sheeting for a country shower
Another material from which you can build an outdoor shower is corrugated sheeting. It is relatively lightweight and durable. The frame is constructed from wooden blocks.
The construction of the shower is carried out by analogy with polycarbonate. The transverse profile is used to connect the racks. It adds rigidity to your structure.
The corrugated sheet is fixed with galvanized self-tapping screws and a sealing washer. To cut corrugated sheets, use a grinder.
Preparatory work
The construction of such an important building for a dacha as an outdoor shower begins with the selection of a location. It is recommended to install a stationary shower stall in a sunny area, maintaining a distance of one and a half to two meters from the house. More often it is placed at the back or side. However, there are options for directly connecting the shower head to the main structure.
When calculating the size of the booth, it is taken into account that the minimum area is one square meter, but for convenience, a size larger than the recommended figure should be provided. If possible, they provide a vestibule in which to leave dry things and change clothes, so the area doubles.
An outdoor shower shouldn't be cramped. The more free space there is, the more pleasant and comfortable it will be to be in it.
It is recommended to make the height of the shower stall 2.5 meters. When creating a project, do not forget to leave a gap of about 20 cm from the walls to the ceiling and floor for ventilation. Think through the water supply and drainage system. Its installation is carried out at the stage of construction of the zero cycle. The source can be a well, which is drilled directly on the site, or a water supply.
Small diameter pipes are used to connect the shower stall to the moisture source. It is recommended to choose plastic options, which do not rust or erode compared to their metal counterparts. They are easy to install and put away for the winter.
The source of water for a shower attached to the house can be a home water supply system
It is important to consider draining the water. To do this, at the stage of preparatory work, they dig a drainage hole, which is located directly under the cabin or next to it. The depth is required no higher than 0.6 meters, the diameter is about one meter.
After the hole is dug, the bottom is compacted and a small layer of crushed stone is poured. You can use broken bricks. Then install a pallet made of plastic or wood. If the pit is located next to the cabin being built, then lay a branch from a plastic pipe.
Formation of a drain pit and tray (floor) for a summer shower
Having completed the preliminary stage, they think about what material the cabin itself will be constructed from. This point is important both from a practical and aesthetic point of view.
Cabin made of wood
Having decided to build a wooden shower at the dacha, they prepare the necessary timber and consumables. You will need a rubber hose, pipe, adapter, bracket, nozzle, screws, mixer.
Step-by-step construction technology
- After the drainage pit has been prepared, cinder blocks are laid in the corners, leveling the horizontal line, and a frame is built. It will require a beam of 100x70 mm. It is important to make the top dressing strong, since it must withstand a tank with an optimal volume of 100 liters.
- The frame is sheathed with clapboard. You can use false timber or boards 30 mm thick and 150 mm wide. Provide gaps between the grooves, since the wooden material expands when wet.
- All wood parts are primed using antifungal impregnation, and acrylic water-based varnish is applied in three layers. You can paint the building by choosing a shade that is in harmony with the surrounding landscape and the main buildings in the dacha area.
When designing a cabin, it is important that it harmonizes well with the appearance of the house and garden
Simple and beautiful wooden shower for a summer house
Wood does not like prolonged contact with water, so so that during washing it can easily and quickly flow down, it is advisable to provide small gaps in the floor
Wooden shower stall attached to the house
Polycarbonate shower
From the variety of types of polycarbonate for shower stalls, an opaque option is selected. The most durable structure will be one with a frame made of a 40x20 mm metal profile. You will also need a steel corner 50x50 mm.
Do it yourself
- It is more convenient to assemble the wall frame on a flat, hard platform, where the racks and crossbars are laid. They are welded overlapping and then installed by immersing the racks in a concrete screed prepared for the booth. Check verticality and horizontality, strengthen the hinges for the door.
- All that remains is to cut the polycarbonate to size and fix it to the frame using self-tapping screws. Install a water tank at the top. Plastic flat tanks are recommended. They can act as a roof if they exactly match the dimensions of the cabin.
Advice! A building made of modern, aesthetic polycarbonate looks attractive and organic in any landscape if you choose a color scheme that matches the overall style.
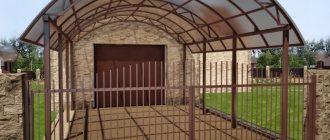
Plastic shower for arched roof
It is better to choose a plastic tank for a country shower; it is cheaper and will last longer than a metal one.
Cabin made of stone, concrete or brick
Having decided to create a durable concrete, brick or stone structure for a summer shower, you need to take into account that you will have to build a foundation.
Construction order and stages
- They dig a trench 20 cm wide and 40 cm deep along the perimeter. Cover it with broken bricks and pour in a liquid cement-sand mixture. A week later, walls from the selected material are erected on the hardened concrete.
- Wooden blocks are laid on the last layer, on which the tank will be installed and the roof roof will be fixed. It is advisable to make it from slate or corrugated board.
- After installing the tank, water is supplied, shower fixtures and taps are attached. The top surface of the tank is covered with black paint, which allows the water to quickly heat up from the sun.
Advice! If it is possible to supply electricity, then a low-power heating element is installed in a metal tank. If necessary, wood-burning titanium is provided in the brick cabin, which allows additional heating of the air inside.
Solid and practical summer shower made of stone in eco style
Sturdy and reliable shower structure made of concrete, lined with beautiful beige tiles
A shower made of stone is durable and reliable for many years
Summer shower made of corrugated sheets
Characterized by durability, strength, and light weight, profiled sheets are popular in the construction of various buildings, including shower stalls.
The shower frame can be made of either wood or metal. It is recommended to first make a frame from a metal profile or wood beams by welding. Then the corrugated sheet is attached to it using galvanized self-tapping screws equipped with sealing washers. First, the walls are sheathed, then the door itself is mounted.
Original shower design made of wood and metal
The semi-closed cabin design is the most common option for a summer shower.
Brick shower
To build a brick shower, you need to prepare the foundation. When the concrete mortar on the foundation has hardened, you can begin laying bricks. Calculate how much area the door will occupy and leave the doorway unblocked.
For the door, choose a frame made of metal or wood. It is sheathed with corrugated board. Wooden blocks are laid on top. They will form the basis for the roof.
Behind the stone wall
0
Stonework reminiscent of knights' castles will make you feel like a real princess. Or a prince? Towel holders can be hidden between stones.
0
0
0
Natural stone always looks impressive, especially when it comes to such impressive sizes.
Choosing a location
Before building a country shower, you need to choose its location. In this case, you must adhere to the following rules:
- The selected location should be illuminated by sunlight throughout the day. This will allow the water in the tank to warm up well.
- It is better to build a shower near the house.
- It must be installed on level ground.
- There is a water drain nearby.
A foundation for an outdoor shower will only be necessary when it is planned to build it from bricks, concrete blocks or other heavy materials.
One of the most common types is a tile foundation. In addition, it serves as a floor in the shower stall.
A little about the nuances of construction
After choosing a shower option, you need to decide on the location. Since the water must be heated by the sun's rays, an open space, further away from trees and the house, is suitable. Preferably at the highest point of the site.
The shower should be spacious enough. It is necessary to provide not only a place for washing, but also a changing room. It is believed that the minimum comfortable shower is:
- height from 2 to 2.5 meters;
- width from 2 meters;
- length from 1.5 meters.
In this case, the washing area itself will occupy approximately 1 square meter.
A capital foundation for such a structure is usually not required. You just need to raise it about twenty centimeters from the ground on small supports (paving slabs, brickwork, foundation blocks...).
Construction process
They choose a place, clean it and make markings.
They dig a pit. When making a brick shower stall, the depth of the pit is approximately 15 cm. 5 cm of sand is poured onto the bottom.
Concrete is poured. The surface must be made smooth. This will avoid making a screed.
Installation of a shower cabin
You can build a shower at your dacha yourself or buy a ready-made model in a store.
If you are purchasing a shower stall, then before purchasing you should pay attention to the following:
Dimensions. The cabin should be comfortable for absolutely all family members. To do this, you need to try on the largest family member in it.
What materials is it made from? Your cabin should not outwardly stand out from the overall design of the summer cottage. The material from which the cabin is made should perform well in this climate.
Water tank size. When choosing, you need to take into account the number of family members and calculate which tank is needed. One person uses approximately 35 liters of water. You should choose a tank with a small reserve.
Price. There is now a wide range of prices for shower designs on the market. You can buy a cabin starting from five thousand rubles and up to infinity.
To install the cabin, you need to prepare a level place. It is best to make a concrete platform on which your shower stall will be stable.
When building a shower, you must complete the following points:
- Make a shower drain of water.
- Build a foundation.
- Build a frame
- Finish.
- Install the tank and connect it to the water.
Shower panel on site
Any partition - made of stone, wood or other materials - can serve as a panel for placing a shower. The advantage of such structures is that their construction requires less materials and effort. At the same time, you get an area for taking water procedures, which, due to the abundance of moisture, does not harm the main structure. But such a summer shower also has its drawbacks. A shower area that is not protected from the wind can cause colds in household members who know nothing about hardening the body.
Using a beach theme for your shower panel can be the highlight of your landscaping. You don’t have to live by the ocean to be able to use a panel in the shape of a surfboard when arranging an area for water treatments.
Ceramic tiles or mosaics, which reliably protect the surface from moisture, are perfect for finishing the panel to which plumbing accessories will be attached. But more affordable options can also be an effective solution - plastic and polyurethane panels will serve as a reliable finish.
The use of non-standard, original models of plumbing accessories can increase the degree of uniqueness not only of the shower sector, but also of the entire landscape design of a summer cottage or personal plot. Large watering cans to imitate tropical rain, a small waterfall, or vice versa, miniature faucets, original shapes and unusual coatings - your imagination is limited only by the budget for building a summer shower.
The panel for placing the shower sector can be the sector of the fence enclosing the area. It all depends on the location of buildings on your site, the passage of communication systems and the type of fence structure. For example, stone, concrete, and wooden structures (with impregnation and protective coating) can be an excellent base for placing plumbing accessories.
Insulation materials
For insulation use:
- Mineral wool. This material is easy to install.
- Glass wool. This option is much more difficult to install; you need to be very careful when working with it.
- Waterproof foam. A new material suitable for insulating shower stalls.
An insulated shower can be used even in adverse weather.
How to drain water if the shower is stationary?
It is easier, if you have a toilet with a cesspool, to connect a pipe to it to drain the water. But if biological products are used for waste treatment, then this option is not suitable.
It is better to dig a drain hole separately. Minimum size, with average water consumption: depth, width and length - 60 centimeters.
Depending on the type of soil, simple drainage is done (expanded clay, broken brick), or the walls are strengthened in a suitable way.
Installing a water tank
When choosing a shower tank you should consider:
- Heating of a metal tank occurs much faster. At the same time, a plastic shower is more durable. It is also an order of magnitude lighter, which makes the process of constructing the foundation and frame easier.
- When painting a tank, you should give preference to dark colors. This will reduce the time it takes to warm up the water.
- Tank tightness. This will avoid water contamination.
- Before installation, it is necessary to make holes in the tank through which water will be drawn in and drained.
At the end of installation, the water source should be connected to the tank. This is done using garden hoses and polyethylene pipes.
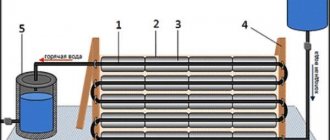
If desired, you can make a heated summer shower. The optimal way to heat water is to use a heating element. You can also heat water using a boiler or boiler. Some use solar panels for heating.
We use the wall of the house to arrange a shower
Placing a summer shower near the wall of the house has its advantages and disadvantages. On the one hand, it is convenient that you can use a common water supply and sewerage system located in the household. On the other hand, the wall of the building will constantly be exposed to moisture. It is advisable to protect the surface with ceramic tiles or any other material that effectively resists high humidity. It is also necessary to ensure the organization of a good drainage system. Otherwise, the constant accumulation of water in the area of the building's foundation can gradually destroy it.
Another advantage of using the wall of a house to organize a place for taking water procedures is the possibility of using lighting for the facade of the main building. If you need to take a shower at night, you will not need to worry about the presence of sources of artificial lighting - the façade of the building is in any case illuminated for safety and as an element of landscape design.
An excellent way to protect the walls of a house from constant exposure to moisture is by tiling with ceramic or stone tiles. In this case, there is no limit to the fulfillment of your fantasies and the manifestation of stylistic preferences. Marbled ceramic tiles, plain or patterned, large or small – it all depends on your personal preferences. If there is a swimming pool on the site, then it would be logical to coordinate the decoration of the wall for the shower with the design of the space in and around the outdoor tank.
Stone tiles (or their spectacular imitation) will look luxurious as a wall decoration to which plumbing accessories are attached - a shower head or faucet. In combination with greenery, the stone surface creates an image close to natural nature.
One of the options for finishing the space in which shower accessories are located is the use of metal sheets. Stainless steel or aluminum look great in a composition made in high-tech style or any direction of modern style. In order to enhance the effect of the originality of the finishing material, you can use original accessories - large square or rectangular watering cans, imitation of tropical rain or a waterfall.
Using a metal sheet, you can build something like a small shower cabin in the summer on a summer cottage or in the courtyard of a private household. The unprepossessing appearance is more than compensated by the low cost of the structure and temporary placement in the local area.
You can equip a summer shower with devices that provide additional opportunities for taking water procedures. For example, building an additional faucet on the lower level of a counter or panel will give you the opportunity to wash only your feet after gardening or bathing your pets right on the site.
Shower drain
Draining is performed in several ways. The water is either discharged into the sewer system or passed through a filter and used for irrigation. The second option allows you to water your summer cottage without unnecessary expenses.
A shower in a country house is a fairly cheap and very necessary device. This article will help you choose a shower cabin and material for it. To make it easier to choose a model, you can look at a photo of a summer shower.
Terrace with outdoor shower
A stand for taking a shower in the summer at your own summer cottage can be organized, for example, on an open terrace - near the pool, or on a covered one, which is a wonderful place for relaxing outdoors.
Yes, this way of organizing a shower can bring a lot of worries and troubles, but it is also a wonderful way to organize a place for hygiene procedures, without worrying about the increased level of humidity in the walls of your country house.
Summer shower photo
Please repost