Building a garage, and even more so an ordinary carport, is not particularly difficult, since it does not require special construction education.
Despite this, you will have to take an interest in the basic technological processes, draw a diagram (project) at least on a piece of plain paper, and also calculate the required amount of various building materials. Building a carport with your own hands saves a lot of money. This article discusses options for schematic solutions for various types of canopies, options for using various building materials, as well as the possibility of building unique canopies.
Features and requirements
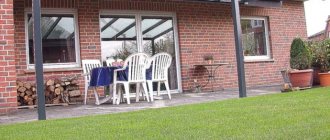
For a novice builder who has not previously practiced the construction of such objects, it is better to attach a canopy to the main building. The fact is that in this case there is already a support, which greatly facilitates the process of further work. If the canopy is made as a separate object, then more experience will be required, and more costs will be required.
The following design options are possible:
- Use a mobile tent. Although the option is not highly reliable, it is possible to change the location of the canopy if necessary. As an option, you can consider a folding structure, which allows you to free up the site at any time or remove the canopy for storage.
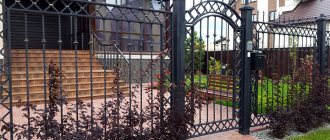
- The canopy with side protective walls has an increased protection function. In this case, internal lining of the walls and ceiling will be required, as well as installation of a drainage system.
- The object must fit harmoniously into the overall design style of the main building, as well as landscape design. To do this, it is better to have a drawing, drawing, dimensions of the building, and also decide on its location.
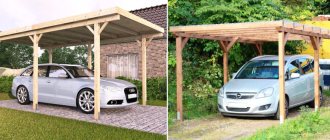
Option made of metal profile and polycarbonate
Naturally, the dimensions of the canopy should be calculated taking into account the dimensions of the vehicle. The dimensions of the car are determined with the doors open. The optimal dimensions for passenger cars are: the height of the canopy is not less than 2 and a half meters, and often three meters. It makes no sense to make the canopy too high, since without side protection precipitation can fall on the car. The reliability of the entire structure depends on the strength of the main elements - the supports. When drawing up a drawing, you must consider:
- The width and length of the entire structure.
- Canopy location.
- Stage of site leveling.
- Selection of supporting elements, as well as roofing material.
The material used largely depends on the shape of the roof and the type of roofing material. Organizing a pitched roof is the simplest option. In addition, this option is the most economical and does not require special construction skills.
A hip roof is much more technically complex, but it can reliably protect the structure from wind and precipitation. The arched roof is also very popular. In addition, the design is quite reliable. The angle of inclination of such a roof should not be more than 10 degrees.
Roof configuration options
Important point! A truck shelter is a stronger and more reliable structure with a platform made of concrete. For passenger cars, it is enough to have a site equipped with paving slabs or equipped with asphalt.
Foundation and supports
When installing canopies and covers with an area of up to 30 m2, direct concreting is used with a support planting depth of up to 800 mm. To strengthen the fastening of the support in concrete, support “heels” are attached to the bottom of the supports. The “heel” is a piece of pipe attached across the bottom of the support.
This support mounting design has the following advantages:
- Ease of manufacture and installation;
- Cheap and reliable design.
And the cons:
- Requirements for marking accuracy;
- Difficulty in dismantling if markings are incorrect.
Complex and heavy structures require reliable and complex supports, such as embedded plates with reinforcement strapping. The required volume of the foundation of such a support is calculated based on the size of the structure. The support is attached to the mounting plate by welding and is additionally reinforced with gussets to improve the rigidity of the structure.
The advantages of the design include:
- Correction of marking defects by moving the support along the plate;
- Durability under heavy loads on the support and foundation.
The disadvantages of the design are as follows:
- Difficulty of installation;
- Costs more.
An alternative to a concrete foundation are screw piles, which we also use when installing metal structures.
A screw pile consists of a hollow thick-walled pipe to the end of which a screw blade is attached. The end of the pipe is made in the form of a cone. This design allows you to “screw” the pile into the ground by rotating it around its axis. Such a support does not require additional concreting or strengthening. After the installation of the pile is completed, the rest of the structure is attached on top of it as with normal installation.
These supports have significant advantages:
- Possibility of installation in winter;
- Easy installation;
- Cheap design.
And also significant disadvantages:
- Less reliable compared to a concrete foundation;
- Less durability.
Types of supporting structures
The nature of the supporting structures depends on the configuration and size of the building, although generally 4 supports are used in the form of metal pillars, which are fastened together along the perimeter by metal elements. Depending on the design, the distance between the supports is chosen to be one and a half meters, for greater reliability. The following options for supporting structures are possible:
- From stone.
- Made of concrete.
- Made of metal.
- Made of wood.
- Made of brick.
In any case, you will have to fork out money, since any options require serious capital investments. You will need not only supports, but also elements for communication, as well as a frame for the roof. It is very important to choose the right thickness of metal supports so that they look harmonious against the general background. The good thing about the metal construction is that it makes maintenance easier in the future.
Canopy with support posts made of 8mm metal pipe
A good-quality large canopy will require a significant area, as well as the use of special construction machinery and equipment. It is hardly possible to do without additional help even when installing supports. If you use additional building materials and cover the canopy, you can get a protected structure in the form of a garage.
As a rule, pipes with a diameter of 8 centimeters or more are selected. They are filled with concrete mortar and also coated with anti-corrosion compounds.
Supports made of brick, stone or concrete look good and do not require additional protection measures, while their durability is decades. The use of wood is considered a cheaper option, despite the fact that wood requires high-quality protection and is not durable. The roof is not necessarily made of the same material as the columns. This approach allows you to have a unique design that combines incompatible design elements. As a rule, everyone wants to get away from templates in order to get their own, unique building.
Wooden supports
Wooden support structures are installed without the use of special equipment and you can often get by with just one assistant, having first dug the hole yourself or by hiring one worker.
Wooden structures have one significant drawback - they are afraid of moisture. To increase their service life, wooden structures must be treated with antiseptics, and such actions must be carried out regularly, every year. Naturally, only hard trees are suitable as supports.
Wooden pole option
If you pay attention to the table, you can make the right choice:
| Breed | Brinell hardness) | Density (kg/m3) | Note |
| Birch | 3,0 | 600 | Stability is average. Over time the color will deepen. |
| Larch | 2,6 | 500 | After a few years, a gray coating will appear. Regular treatment will be required. |
| Oak | 3,7 | 700 | After a couple of years the tree will become darker. |
| Ash | 4,0 | 700 | Fade quickly. Treatment with impregnation twice a year will correct the situation. |
| Pear | 3,3 | 680 | After a couple of years, a reddish tint will appear. If the house is made of red brick, it will look organic. |
| Cherry | 3,0 | 580 | Excellent stability. The color will become deeper in the future. |
| Pine | 3,5 | 550 | Features increased stability. Practically does not change color. |
When choosing structural elements made of wood, it is very important to understand that after several years of use, building elements made of wood will have a completely different appearance. If there are cracks, you should understand that the wood will dry out over time. The best combination of factors such as price and quality is found in species such as pine and larch.
Standard variation of an open wooden canopy
It is important to know! The part of the support that is dug into the ground is especially susceptible to external influences. To extend its service life, this part is tarred or covered with a special impregnated material.
DIY carport
How to build a quality shed depends on many factors. First you need to outline the perimeter of the future site. In order for the extension under the car to be strong, you need to pour a foundation for the supports and concrete the pillars. You can build a carport at your dacha with your own hands on a pile-screw foundation or on a strip foundation. To build a foundation for the pillars, you will need sand, cement, crushed stone, supporting elements, a shovel and a concrete mixer.
If you don’t know how to make a foundation, then the drawings will help you. First you need to remove the turf and dig a hole around the entire perimeter of the future structure. How to install canopy posts depends on the material used. Holes are dug under the supports. This work can be done with a drill. Then the racks are installed and filled with a cement composition with the addition of crushed stone. After this, it is necessary to fill the ditch around the entire perimeter at ground level. If you want to know how to properly install a car shelter at your dacha, then remember that you need to let the foundation settle for a couple of weeks.
Marking for the foundation
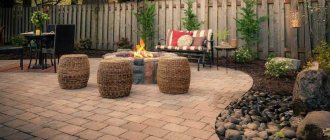
The extension involves the installation of a high-quality platform. In this case, it needs to be covered with crushed stone and paving slabs laid.
When selecting materials, take into account the design of the structure near the house and the building itself. If everything is made of timber, then construction from boards is an excellent option. If the entire dacha ensemble was built using corrugated sheets, then the rest of the structures are made of the same material.
Car roofing made of polycarbonate is capable of transmitting sunlight, which makes the entire structure light. At the same time, for construction in the yard, you can use polycarbonate of various thicknesses and a varied color palette. Various roofing materials are used for covering.
We build a structure according to a design that takes into account the shape of the roof (single-pitched, double-pitched or domed version), as well as the height of the structure and wind and snow loads
This is especially important if the carport attached to the house
In the table you can see important points of the construction process.
| Image | Important Steps | Description |
| Creating a metal frame | The metal frame can be welded. For this you will need a profiled pipe, a welding unit and a grinder. | |
| Construction of a wooden frame | A simple option made from timber. To do this you will need bolts and nuts, a hacksaw, a wrench for the size of the bolt and a beam. All elements are treated with antiseptic compounds. | |
| Installation of supports | The locations of the pegs are measured using pegs and twine. Holes for racks need to be dug to a depth of 50 cm. It is recommended to weld pieces of reinforcement in the lower part for greater durability. The supporting parts are placed in the recesses and filled with concrete. | |
| Installation of roofing elements | Along the entire perimeter of the frame, you need to tie the top and bottom. Before welding, the parts can be secured with clamps. It is necessary to make a large number of corners and then attach them to the frame. Then these elements are secured with ties. In this case, they will serve as sheathing and stiffeners. | |
| Final work | Cover the metal with two layers of anti-corrosion paint, and the wood with an antiseptic. Roofing material is laid over the corners and secured to the frame. | |
| How to lay out the flooring under a canopy | The budget option involves the use of rolled lawn or seeded grass. You can also use gravel chips, clinker bricks or paving slabs. |
In the photo you can see what a building made from scrap materials looks like. And also in the video below you can see a step-by-step installation of such a design.
Watch this video on YouTube
If you want to build a yard canopy on the cheap, you can make the structures out of fabric or a banner. When deciding how to build a building, consider different options and designs. You can also look at the garden version of canopies. You can see how to build a structure in the garden or yard yourself in a step-by-step master class.
When constructing structures, remember these rules:
- the best distance between supports is 1.15 meters, and the length of the structure is selected depending on the number of cars;
- when choosing a height, do not forget that you need to take into account the dimensions of the car with the trunk;
- supports can be made of timber, concrete or brick;
- The most inexpensive, strong and durable materials include polycarbonate and corrugated sheets.
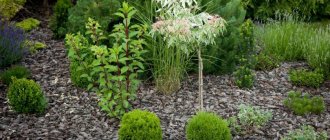
The canopy can be decorated with wooden bars, as well as beautiful forged elements. Beautiful plants, vines and climbing plants can be used to decorate lightweight buildings.
Beautiful decor
Related article:
Installation of wooden supports
First of all, you should prepare the site, after which you can begin installing the supports.
To do this you should do this:
- To begin with, holes are dug with a diameter of slightly more than 1 meter. Their size depends on the size of the support bars.
- Wooden beams are inserted into the pits, filled with crushed stone and filled with sand-cement mortar. It is very important at this stage to align and secure the supports strictly vertically.
- Each support is controlled using a building level.
Installation of a support column for a garage canopy
As a rule, complete hardening of the solution occurs within 72 hours, after which it is permissible to carry out further work.
As an advice ! When using wood as building elements, it would be useful to treat them with fire-resistant compounds.
Character of the roofing covering
The choice of roofing material is another important stage of construction. And although many believe that slate and iron are the least suitable materials in terms of price and weight, I would like to object. Nowadays, slate and iron are the most accessible and cheap building materials, distinguished by a number of advantages, although they are difficult to relate to modern design.
Polycarbonate, which has good characteristics, is becoming increasingly popular:
- Modern appearance.
- Lets in sunlight.
- Has good performance characteristics.
- The material is quite flexible and elastic.
- Easy to install.
Variety of material colors
Nowadays, in construction stores there is a huge selection of color solutions for this material. For some reason, many people point out that polycarbonate is cheap. Most likely, it could be a domestic manufacturer, since this material is quite expensive, although it is in demand if you have extra money. If such means are available, it is permissible to choose polycarbonate of varying degrees of transparency.
Installation of polycarbonate roofing
Polycarbonate sheets are distinguished by the fact that they are lightweight, so their installation can be done independently. Suitable for fastening are screws with a wide head (PS) and a screwdriver. The material allows you to build a roof of any configuration, but within reasonable limits. Most roofs made from polycarbonate are in the form of an arch. This material can be used to sew up the sides of the canopy, protecting the interior from bad weather.
The following approach to purchasing and installation is recommended:
- Preference should be given to products from well-known companies.
- Cellular sheets, which are characterized by better technological installation characteristics, are more suitable.
- It is better to make the roof from solid polycarbonate sheets, and it is better to use the sections for lining the walls.
- The ends of the sheets will have to be covered with special punched tape, otherwise repairs will have to be done every year.
- The sheets should be placed with the protective film coating facing out. This material is easy to process, so it can be cut into pieces of appropriate sizes without any problems.
Matte sheets on arched roof
The sheets are fixed using thermal washers, and then the protective film must be removed. The end parts of the sheets are covered with a special aluminum-based tape. A roof made from polycarbonate requires further maintenance.
Care comes down to:
- To treat the surface with conventional detergents.
- Maintenance should not be carried out at elevated temperatures.
- At high temperatures (heat), this material becomes less resistant to mechanical stress.
The video below shows how to properly attach polycarbonate sheets.
WHAT TO USE POLYCARBONATE FOR A CANOPY
How to make a canopy for polycarbonate (photo report)
Used materials:
- professional pipe for racks 80*80 14.6 m;
- for arches 50*25 - 4 pcs. 6 m each + 50*25 - 10 pcs. 6 m each for spacers;
The canopy was built over the already finished path. The posts were buried in the gap between the curb and the fence. It turned out that the supports of the canopy were placed near the fence posts. It was decided to use them when setting the level: they attached them with anchors so as not to suffer when pouring.
This is how the pillars were attached
We straighten the pillars
The metal pillars of the racks were buried 1.2 m into the ground, covered with crushed stone, and filled with concrete. When the concrete set, the top trim was welded.
We weld the top trim
Afterwards the production of trusses began. First, profiles with the required radius were bent on a pipe bender (rise at the highest point 1.2 m). Afterwards, the assembly of the “constructor” began.
Truss assembly
Clamps were useful; they were used to hold parts together so that they would not move during work. They fixed it to the first truss so that everything was done accurately. There were a lot of clamps)))
Cut, fold, cook
Once all the trusses were complete, they were cleaned, sanded down to white metal, then primed and painted twice. Then the acrobatics began. It is necessary to install heavy trusses on poles, align them vertically, without knocking down the diagonals.
Performing an acrobatic sketch
As soon as we managed to set it correctly, we quickly tacked it by welding, leaving the thorough welding of the seams “for later,” after the final inspection: everything should be on the same level.
Performing an acrobatic sketch
A miracle happened, everything turned out to be almost on the same level. We do not take into account a small difference of a few millimeters.
All farms are displayed on the same level
Now we weld the sheathing from a 50*25 mm profile pipe under polycarbonate. We place them along the long side of the canopy. The installation step was chosen to be 0.8 m.
We weld pipes for fastening polycarbonate
All that remains is to attach the polycarbonate. It is attached to self-tapping screws through special thermal washers (sold in the same place where polycarbonate is sold). The two sheets are connected using special profiles. They are detachable and non-detachable. One-piece ones are cheaper, but then you won’t be able to make anything else out of this polycarbonate. So we used detachable ones.
The first sheet is fixed
It is also necessary to cover the edges of all sheets, otherwise dust and midges will get inside, then moisture will appear due to evaporation, and then mold. And the coating will look deplorable. Therefore, we install special plugs on the edges.
Some recommendations
The drawings must contain real numbers showing the overall dimensions of the entire structure, as well as each element separately. This will allow you to complete all the work much faster.
Having studied the entire process of building a carport, it would be a good idea to use some tips if you have not previously done this.
Tips and recommendations can provide very important, useful information, regardless of what building materials the shed is built from.
It is imperative to take care of water drainage by installing a drainage system. The configuration of this system largely depends on the dimensions of the building.
Gutter installation
The following suggestions can be considered as advice:
- The number of supports depends on the size of the canopy, so there may be more than 4 of them.
- To protect the entire structure, it is better to make a concrete platform, otherwise the structure may become deformed.
- If you use a drill to drill holes in the ground, the work can be sped up quite significantly.
- To install supports, it is permissible to use formwork.
- The concrete solution must meet the strength requirements indicated on the packaging. When pouring, you can take advantage of the moment by inserting metal brackets, to which you will later attach wooden supports.
Laying some roofing materials requires preliminary installation of roofing felt. These are galvanizing, profiled sheets, ondulin and others. In addition, they require installation of sheathing. The construction of a metal frame will require additional fastening in the form of crossbars welded to the main structural elements.
Standard design: diagram with dimensions
If necessary, the connecting boards are strengthened by additional beams connected to each other using bolts. A wooden roof can be built using a wide 10-centimeter board. The upper part of the roof, the so-called ridge, is strengthened with additional racks. It is very important not to forget that in winter the load on the roof increases significantly due to fallen snow. When the roof (frame) is made of metal, it makes no sense to install wooden supports.
Important point! If the average load on a specific (design) canopy is about 1 thousand kg, then the supports made of brick or concrete should not be thinner than 300 mm.
The following video shows the steps to build a typical arch-shaped carport.
Simple arched polycarbonate canopy
DIY carport: step-by-step construction
To build this structure for a car without errors, choose a suitable location. This issue has been studied in detail above. It should only be emphasized that the new building should not worsen the functionality of existing objects: house, garage, gazebo. It is created in a single style.
If the canopy is attached to the house, the butt joints are studied separately. It is necessary to exclude the possibility of mutual negative influence during the movement of supports due to high groundwater levels in severe frosts. In the most difficult situations, the structure is installed on a pile-screw foundation.
To find out how to inexpensively make a reliable support, geological research will be useful. To do this, before starting construction, several holes are made in the intended locations for installing the poles for the canopy. Such a check is required if the extension weighs significantly. If the foundation for the pillars turns out to be too expensive, they try to find a suitable place to install the carport in the yard or garden.
Several options for concreting pillars. The metal support can be immersed in the solution, or the corresponding embedded parts can be installed in it when pouring.
At the same time, you need to decide on the materials of the frame and roof. This will help calculate the load from the building and the parameters of the foundation. The following details should be clarified at this stage:
- If there is not enough natural light, you will have to install appropriate devices. They must be designed for outdoor use. Lamps that meet the IP54 standard and higher are well protected from moisture.
- LEDs are used to save energy. Such lamps are able to function uninterruptedly in difficult conditions for several years.
- A country carport near the house is useful for minor repairs, changing oil and other consumable fluids, cleaning the interior and washing. To connect electric tools, you can install a socket here. You should find out how to install it and other devices and wiring in accordance with current safety standards.
- A single-pitched and double-pitched canopy must be supplemented with an appropriate drainage circuit. It is necessary to clarify how to properly connect it to the general sewerage system.
After the answers to the above questions have been received, drawings must be prepared. If you don’t know how to do it yourself in strict accordance with design standards, contact specialized specialists. A lightweight, simple yard plank structure can be built with a large margin of safety without careful calculations. But even in this budget option, it is better to prepare a documentation package:
- sketches with dimensions;
- lists of materials, tools;
- important technological notes.
This description of a typical algorithm of actions will help you figure out how to build a carport in your country house with your own hands:
- To determine the boundaries of the roof, you need to take the appropriate parameters of the machine and increase the boundaries in all directions by 0.8-1.25 m. The supports are installed so that they do not create obstacles when maneuvering and disembarking passengers.
- Based on the design documentation data, the necessary components are purchased.
- The site on the garden plot must be prepared taking into account the weight of the vehicle and the intensity of use of the parking lot. In any case, remove the soil to a depth of 15 cm or more. A cushion is created from crushed stone, gravel, sand, and the appropriate layer is compacted to obtain a homogeneous structure.
- Taking into account the characteristics of the chosen technology, a strip, columnar, or slab foundation is constructed.
- For heavy equipment, a platform is created from reinforced concrete.
- After the construction mixtures have completely hardened, installation operations begin. First, a frame made of metal or wooden elements is installed. The roof, decorative elements, lamps, and other equipment are attached to it.
The following photos provide additional useful tips and tricks.
It is more convenient to weld and paint individual parts in a stationary workshop. Directly on site it will be enough to perform only installation operations
You can make various useful devices from a banner or truck awning. In particular, a carport
The fabric makes a good protectant from the sun and rain.
It should be noted that it is difficult to create a durable, reliable structure from available materials. You should give preference to a carefully designed project, or purchase a ready-made kit for the appropriate purpose.
In this video, the author of the project talks about how you can cheaply create a functional garden shed at your dacha:
https://youtube.com/watch?v=mHwIyRRSJEg
Related article:
Application of decorative elements
A built carport is usually improved. There are several approaches, with decor most often used as an important factor in giving the building an attractive appearance. Decorating is a process that is possible only after the construction of the structure, and the general approach should be thought out at the planning stage, although anything can happen: first the canopy is built, and then the decorative elements are thought out. If the canopy is completely open, then the decorative elements are located exclusively around the perimeter.
Decoration options:
- The use of decorative elements made of metal. This option is expensive, but with proper care the decorative elements will last a long time. Many people call this option elite.
Option with forged elements - The wooden structure should be decorated with decorative elements made of wood, constructing a “Scandinavian” mesh around the perimeter. The option is made of solid or carved boards.
Decor with wooden elements - As an option, you can use clapboard and sew up the gables with it or cover them with polycarbonate. This approach looks harmonious in combination with wooden and other types of columns.
Brick columns combined with a weightless polycarbonate roof - When using wood as the main building material, the ends of the structure are decorated with carved decorative elements made of wood. The drainage system is also attached to these same elements.
Unusual geometry and ease of installation - A tent canopy can be either stationary or mobile. Although the design is simple (pictured below), it performs its functions.
Mobile version of the canopy tent - An interesting option for a canopy is the use of stone in combination with wood, although the incompatibility of the structural elements immediately catches your eye: it’s too rough.
Stone columns and wood. - The organization of lighting inside the canopy is considered an important decorative element. The modern style is LED tubular lamps (strips).
Arched version with lighting
Spotlights look great, creating very cool lighting, more decorative than practical.
Low monolithic canopy with spot lighting
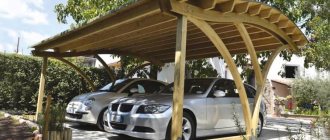
Mobile canopy
Mobile metal canopies consist of a folding compact structure - frames with awnings. They will protect the car during precipitation anywhere. You can install a mobile structure on one car in two hours.
Using awnings as a summer option would be an ideal solution, but they cannot replace a full-fledged warm garage. It is possible to build a canopy for summer cottages without large material costs. Ready-made projects will help realize the idea of building with your own hands.
- Author of the material
- Other materials
Author Christian
A professional auto mechanic with more than 7 years of experience at one of the largest service stations in Moscow. I am well versed in cars such as VAZ, Kia, Peugeot, Bmw, Audi, Mercedes and many others. If you want to receive a professional answer, leave your feedback in the comments to this material.
The problem of protecting the car body from sunlight and precipitation can be solved in different ways. One of the most inexpensive options is a carport built from available building materials. Such designs have proven themselves well and are widely used in country houses and summer cottages, which are used primarily for relaxation on weekends and during vacations.
Wooden carport
The main function of such a structure is to ensure the safety of the external surfaces of the car body from external factors. The main enemy of metal is moisture, which falls in the form of rain or snow. Particularly big problems can arise in winter, when ice forms on glass and paintwork. When melt water flows into the handles for opening doors and then freezes, difficulties arise with access inside.
Harsh ultraviolet radiation causes paint to quickly fade and the car to lose its presentation. Taking into account the listed factors, a decision is made to erect a canopy of one design or another. At the initial stage, technical requirements for the structure are formulated, and based on them, you can begin to carry out design work and select the main building material.
Carport made of polycarbonate Return to contents
Essential elements
One should not ignore the fact that even a simple carport requires detailed drawings and diagrams.
All calculations are carried out solely on the basis of the selected building materials. Either metal pipes or wooden beams are used as supports. It is equally important to decide on the type of roofing material. Options can be suggested:
- Profiled sheets.
- Polycarbonate sheets.
- Metal tiles.
It is important to maintain a distance of one and a half meters between supports. We should also not forget about the drainage system.
Therefore, we can safely say that there are not so few nuances, despite the simplicity of the design, especially since there is no point in complicating this structure.