Without exception, all lovers of outdoor recreation will appreciate the advantages of tents. You can throw a noisy party in the open air or spend an unforgettable romantic evening in the lap of nature. The canopy will protect from the sun in hot weather and provide shelter from sudden rain or strong wind. You can put it in many places - a cottage, a garden, any area suitable for leisure.
Thanks to its simple design, consisting of a slatted base and a fabric canopy, making a tent with your own hands is not difficult, even with minimal experience in construction. It is enough just to organize this process correctly, choose the right tools and materials. Then the building will turn out beautiful and reliable, serving its owners for many years.
What types of tents are there (types)?
If you have an idea to make a tent, you first need to decide for what purpose it will be used and how often. Depending on the needs of future owners, you can choose different options.
Giving tents can have the following design:
- folding (such awnings can be purchased at almost any travel store, they are easy to assemble and disassemble, and can be used both at home and during trips to nature);
- stationary (a lightweight gazebo that can be assembled when it warms up and disassembled when it turns out to be unnecessary);
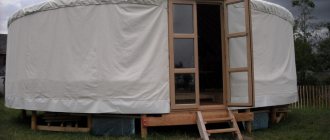
- pavilion type (this type of building has a stationary base in the form of a platform made of wood or concrete, around the perimeter of which support posts are installed and a fabric or mesh frame is stretched).
The easiest way is to buy a tent for your summer cottage in a store and assemble it as needed. For example, when you urgently need to set an outdoor table for the arrival of a large group of guests.
The best choice for a country house is a gazebo-tent or a full-fledged pavilion. They look luxurious, and to make them does not require large financial investments. All work can be done independently or with minimal participation of specialists.
Variety of designs
Tents come in different shapes and designs, but mostly they are either closed or open buildings.
In this case, everything depends on the period of operation of the building. If it is summer time and the tent will be assembled for the cold season, then an open building is ideal. The closed type can be used in the fall, but in winter it will be cool. There are two types of mobile buildings: open and closed. The simplest model of a tent is a dome on four supports; this option can be used in both autumn and summer.
IMPORTANT! An open type of gazebo is installed near a barbecue or a private house; this type of construction serves as an additional decoration for a personal plot.
An awning with closed walls is simply irreplaceable in extreme heat or rain. If you use a mosquito net, you can also save yourself from insects. Moreover, for air circulation, you can open one of the walls.
Preparing the place
Before you start building a tent with your own hands, you need to choose a place to place it. This is an important stage, which determines how firmly the canopy will stay on the support. The comfort of people who will spend time under it also depends on the location of the canopy for relaxation. It is unlikely that anyone will enjoy being in a dark or insect-infested place.
The following will certainly come in handy while working:
- shovel;
- buckets;
- hatchet;
- scrap.
To make it more convenient to collect garbage, it is better to prepare special containers (bags, containers) in advance. Packaged waste is much easier to transport and will not interfere with subsequent stages of construction.
Features of territory preparation
The area where you plan to start installing the tent yourself must meet the following requirements:
- installation is possible only on a flat surface;
- the soil is quite dense;
- there is a distance between the awning and the nearest objects.
The structure is placed in such a way that it is convenient to use. It is necessary to take care of the design side - it is good if the design is in harmony with all nearby objects, and does not interfere with the flow of light into windows, garden plants, etc.
Creating a quality platform
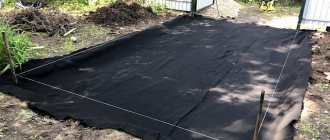
When the territory has been selected, this area should be cleared of grass and weeds, debris, and stones. If you plan to install a tent for children or a collapsible version, it will be enough to mark where the support pegs will be driven in in the future. If desired, you can lay a rolled lawn on the selected area.
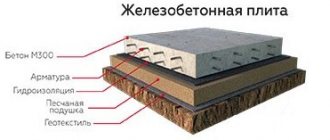
For a stationary awning, additional work should be done with the soil layer. To do this, a perimeter is outlined and then 15 cm of rock is removed in depth. Then the resulting depression is filled 2/3 with clean sand. A layer of granulation is placed on top. After drying, flooring can be laid on this surface.
There is another type of foundation preparation - using concrete. In this case, the hole is dug at least half a meter deep. It is completely filled with mortar, and supports are embedded into it along the perimeter. The resulting platform after hardening will be very durable; boards, saw cuts, and terrace slabs can be laid on it.
How and with what to secure the tent on different surfaces
To ensure the strength of the building, additional fastenings should be installed.
When installing the structure on the ground, it is necessary to use safety guy wires. This way the building will last longer. The guy ropes consist of pegs 20 cm long and are driven in around the perimeter of the tent.
When installing a building in asphalt, it is necessary to use metal rods. They are inserted into special holes and filled with concrete.
How to make a tent with your own hands?
A variety of materials are used in the manufacture of summer cottage tents. The frame is usually installed from natural wood or metal. Various types of moisture-resistant fabric and special insect repellent nets are used as covering. It is imperative to draw up a detailed drawing and estimate of the materials used in construction.
Tent assembly
When all preparatory activities are completed and a high-quality site has appeared on the agreed area, the next stage of construction begins - the installation of supporting elements.
When carrying out the work you will need the following tools:
- hacksaw;
- hammer;
- motor drill;
- screwdriver
For measuring operations:
- level;
- roulette;
- ruler.
When assembling ready-made gazebos made of metal or aluminum, you will need Phillips and flathead screwdrivers and wrenches. Self-tapping screws, nails, etc. are used to assemble a wooden base.
Calculation of construction raw materials
If you plan to build a simple tent, then you can get by with a piece of tarpaulin or other material measuring 4x6 m. But to make the calculations correctly, it is better to make a pattern, that is, go to a sewing workshop, where they can sew the tent according to the provided drawing.
For its construction, beams and rafters are needed
In addition to the material that will need to cover the tent, you will need the following:
- 8 beams with a diameter of 8x8 cm and a height of 2.1 m (or metal rods);
- 4 roof rafters (or wire);
- 14 boards for the top trim;
- nails and screws;
- mosquito net.
The tools you will need during tent construction are:
- brace;
- screwdriver;
- electric drill;
- Bulgarian;
- hammer.
Installation of load-bearing racks and roof
When making a tent with your own hands, you should install supports. If the site is made of concrete, then they are installed at the stage of hardening of the base. For wooden or metal options, you will have to drill holes.
Depth of holes for installing racks:
- steel - 50 cm;
- made of wood - 70-90 cm.
Depending on the shape, a different number of support pillars is required. For a square one, 4 are enough (you can install the 5th in the center of the frame). For more complex (round, oval) buildings, the number of racks is usually larger and amounts to 8-10 pieces.
The support pillars are installed strictly vertically, leveling and compacting the hole with soil. It is better to use 100x100 cm timber, having previously treated the material with anti-rotting compounds.
Briefly about the main thing
You can talk for a long time about how to build a canopy for a house or country house, because there are many ways to organize shelter from the sun or precipitation.
To work, you will need a minimum of materials and equipment: mainly wooden beams, covering material and fasteners.
The cheapest and fastest method remains the installation of a simple beam system.
Solid polycarbonate material is installed on the beams or a tent covering is stretched. If desired, such a canopy can be built folding - like a horizontal or slightly inclined curtain.
Ratings 0
Roof installation
The roof of a wooden structure must have slopes; rafters are installed for this purpose. Or you can simply make the supports on one side 30 cm longer. The metal pins will be connected to the roof using steel angles, connectors, etc. The gazebo is already ready and created in accordance with the drawings, so no additional actions are required. A tent with a folding roof is assembled in accordance with the instructions and drawings, since in this case there are specific manufacturing and installation features.
After installing the frame, the tent is almost ready with your own hands - all that remains is to hang the awning. It is better to order one from a textile agency, but if you have the appropriate experience, you can sew it yourself.
Making a children's tent
To build a tent for children, you will need a hoop made of plastic or metal (the larger the diameter, the better), fabric (2 pieces). One of them is 1.5-2 m high (its length will depend on the reach of the hula hoop). The other part of the textile is about 2-3 times smaller; it will be used to create the dome.
The assembly procedure itself is described as follows:
- The main piece of fabric should be sewn onto the hoop like a curtain. This is done using loops of threads of matching color (you can use braid). The result will be a blank for the future awning.
- Next you need to make a dome. To do this, you need to cut 8 isosceles triangles from the remaining piece of fabric. The base of each of them must be ? from the diagonal of the hoop, the length of the remaining two sides is ? hula hoop cross sections. All the triangles need to be folded and sewn together along the long sides to ultimately form a dome.
- The second part of the textile is also sewn onto the hoop. A fabric loop is attached to the top of the dome.
If there is no suitable wood, you can build an L-shaped beam with a hook at the end. It will serve as an excellent basis for a DIY children's tent.
Decoration options
After completing the construction of the tent, it is worth treating it with colored or natural varnish. The awning can be sewn from fabric of cheerful and bright colors, and the fasteners and Velcro of the mosquito net will serve as additional decor.
Place wicker furniture inside the room, hang light, flowing curtains; if there is electricity, then bedside lamps or floor lamps look very nice. Also, cute vases, pots and figurines will add atmosphere and comfort to the room.
A tent is a very comfortable and lightweight structure that makes outdoor recreation unforgettable. You can comfortably sit here for the whole family and enjoy breakfast or lunch at a large table, enjoying the contemplation of nature and breathing fresh air.