Home » Landscape design » Garden paths
Editor choice
Vladimir 05/07/2020
51348 Views 4 comments
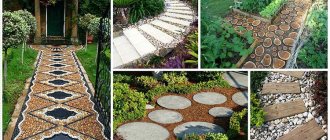
A variety of DIY garden paths at the dacha will not only become a real decoration for your site, but will also ensure safe movement at any time of the year. After all, walking on wet ground in spring and autumn is very difficult and also unpleasant.
In addition, in the absence of equipped paths, guests, children and pets can trample the lawn or flowerbed. They can be made without the involvement of a construction team; you just need to carefully plan the process, choose the optimal material and technology.
Preparatory stage
Any construction on a site must begin with a layout. It can be done on paper or using special programs.
Site plan created by a computer program
Planning is carried out in several stages:
1First, the area is marked. Paths should be located so that it is convenient to reach all buildings and structures. On a sheet or monitor, draw the boundaries of the site, the location of residential buildings, outbuildings, greenhouses, bathhouses, outdoor toilets
2All objects are connected by straight or winding lines, which indicate future objects. It is important to correctly calculate their parameters: two people walking towards each other should not interfere with each other. Therefore, the width of the garden path is chosen 100-150 cm, paths 45-65 cm
3In swampy areas and regions where there is a lot of rainfall, it is necessary to provide a drainage system. Drains are built on both sides of the paths to help drain excess water. If this is not done, frozen water will spoil the material of the paths: concrete, wood, paving slabs
4Calculate the required slope, which will allow water to drain and not stagnate on the surface of the paths. It is especially important to make an elevation when building near flower beds and beds so that the coating does not suffer during watering
5Planned objects are tried on the ground. Pegs are driven in along the paths of future paths and threads are pulled. This way you can evaluate how convenient it will be to use them.
Layout of the site on paper, where buildings, paths, large trees are indicated
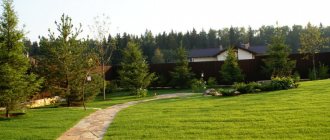
Straight paths are easier to lay out and maintain, while curved paths look more attractive.
Landscape designers recommend creating winding paths in small areas; they help visually expand the boundaries of the garden. They need to be located away from large trees, as the roots can damage the created surfaces.
After marking, they begin to remove the top fertile soil layer in the marked areas. The depth of the trench will depend on the height of the sand cushion. If the soil in the area is loose, then crushed stone or gravel is poured into the bottom of the trench, and then sand.
When laying bricks or using tiles, lay a border on the sides of the path. The width of the trenches in this case increases by two thicknesses of the curb stone.
How to work with clinker bricks
If you decide to decorate your garden in a country style, the material will fit perfectly into the overall picture. It is necessary to pay close attention to the paving method. A garden path with smooth curves will look impressive. At the same time, pay attention that the path does not consist of sharp turns, this will prevent material from being trampled along the inner corner. The process of working with coating is not complicated, but it has several nuances:
- the site is marked to determine the zero line, the slope is made in the direction of convenient removal of excess moisture;
- Pegs are placed in the corners of the site and a rope is stretched along them;
- a second rope is fixed to one of the pegs and retracted 90 degrees;
- boards are dug into the ground, a little away from the pegs, if necessary, an additional layer of soil is poured and compacted;
- a solution consisting of cement and sand is prepared;
- clinker brick is laid using a rubber hammer;
- If necessary, fill the seams with additional mortar.
Consider the presence of a border. The border will look great from an aesthetic point of view and will help maintain the contours of the path, blocking the path of flowing moisture. It can be formed using bricks, carefully placing the material on the edges of the path or burying it in pre-dug small trenches.
Smooth curves will further decorate the overall picture.
The border will further decorate the path
This material fits perfectly into country style
See also Do-it-yourself country house design from scrap materials
What materials can be used for construction
The fundamental factors when choosing a building material are the general architectural appearance of the site , financial capabilities and the availability of construction skills.
Almost anyone can lay a path with gravel, but only an experienced craftsman can lay brick or mosaic.
Let's look at the main types of materials and their features.
Natural stone
In landscape design, expensive types of granite, marble, porphyry, and basalt are used. You can choose from available sandstone, limestone, tuff, shale, and dolomite. Stones differ in color, processing, and ability to absorb moisture.
If there is financial opportunity, sawn stone slabs are used, which create exclusive designs, but are expensive.
Winding path made of sawn natural stone
Some types of limestone and tuff actively absorb moisture. To preserve the strength of the stone, it is recommended to coat its surface with moisture-repellent agents.
The advantages of the material include durability and environmental friendliness. Disadvantages include high cost and significant weight. In humid climates, the surface of the stone becomes covered with an ice crust in winter, making it easy to slip on it.
Wood
Various types of wood are suitable for laying garden paths:
1Log cuts
Log cuts. One of the cheapest options
2Wooden tiles
Wooden Tiles for Outdoor Use
3Boards
Using boards for arranging paths and borders
The material is not durable and resistant to moisture, so it requires regular treatment with moisture and bioprotective compounds. The advantage is environmental friendliness and availability of wood.
To create paths, you can use scraps left over from the construction of the main facilities.
The most durable species: oak, larch.
To make the wood last longer, it is treated with hot drying oil and laid on a sand bed with a layer of polyethylene film. An elevation is made in the central part of the trench so that moisture can roll off.
You can arrange the cuts in any order, filling the gaps with sand, small crushed stone, and gravel. If the gaps are filled with soil, grass will soon grow on it.
Paving slabs and paving stones
The materials are characterized by high levels of strength, durability, resistance to changes in humidity and temperature. Their service life is at least 10 years. However, the paving stones themselves and their installation are quite expensive. This is especially true for owners of large dachas.
Fan layout of paving stones. A decorative border is laid along the edges, level with the paving stones.
When constructing a path from tiles, it is necessary to constantly monitor the surface according to the building level, otherwise it will be uncomfortable to walk on it. It is better not to use elements with cracks; they will quickly become unusable.
Gray paving slabs combined with lawn grass look attractive
Brick
The material is an alternative to paving stones. For landscape design, only clinker bricks are used. The cost of materials and installation work is high. Elements and borders are fixed with cement mortar.
Red brick herringbone masonry
Laying can be done with the wide or narrow part of the brick at the top, combining elements of different colors and textures. Properly executed brickwork on the ground will last a long time.
Combined masonry of brick, natural stone slabs, paving slabs
Concrete, including decorative varieties
The material is highly durable and durable. It is not afraid of moisture, combines perfectly with stone or tiles, and also serves as a basis for their installation.
Special plasticizer additives are added to the composition of decorative concrete, which increase resistance to mechanical damage, sunlight, and temperature changes.
Paths near the house made of printed concrete
Using special technologies and plasticizer additives, it is possible to obtain an imitation of natural stone from concrete.
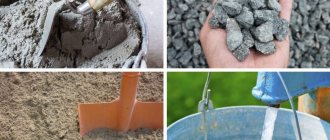
The optimal solution is prepared:
- from 1 part cement
- 2 parts sand
- 3 shares of crushed stone
Installation of formwork along the edges is required . The solution can be poured directly onto the prepared area or slabs can be made from it in molds.
Decorative slabs cast from concrete, laid out crosswise
Gravel and crushed stone
Even a novice master can create bulk objects from gravel or crushed stone . The pebbles just need to be compacted thoroughly. The shape of the filling can be either straight or curved.
The cost of the material is low with a long service life and good strength.
Combined road of stone slabs, organic material and gravel with cement curb
The disadvantages of bulk objects made of pebbles include:
- Difficulty in cleaning up dirt and fallen leaves
- low permitted load
- difficulty moving on poorly compacted surfaces
Designer mosaic masonry made of gravel, natural stone and cement mortar
To maintain the clarity of the forms of the filling, it is necessary to install a border along the edges. To get rid of weed germination, lay a layer of film or treat the stones with herbicides.
Plastic elements
Plastic products for decorating garden paths are made in the form of slabs and paving slabs. The material is lightweight, moisture resistant, and comes in a variety of shapes and sizes.
The price of plastic plates is affordable for everyone.
Tiles made of green plastic will harmoniously fit into the surrounding landscape
It will take a little time to build the deck on the ground; the elements include fastening systems. But as we know, plastic tends to fade in the sun and cannot withstand significant loads.
Another option for black plastic slabs
Also used for arranging paths are bark, lawn grass in rolls, ceramic tiles and their chips, and tennessite, consisting of a mixture of lime, clay and ceramic chips.
Next, we’ll look at ways to make tracks yourself from the most popular materials.
Paving slabs
Paving slabs will last for many years, as long as they are laid correctly. Choosing a tile will not be difficult; there are many types of coatings on the construction market, ranging from color to size and pattern applied to the surface. You can easily install the material yourself, without the help of professionals. To save money, it makes sense to use the cheapest and simplest methods for laying paving slabs. To work, you will need tools that every owner will probably have: a bayonet and shovel, a peg, a level, a rubber hammer, a rake, a device for leveling the soil, a brush with hard bristles.
To lay tiles yourself, you will need a standard set of tools.
For tiles to last for a long time, they need to be laid correctly.
See alsoPlants for landscape design
Self-leveling concrete path
For construction, you need to choose dry weather so that the concrete can harden and dry.
The work is performed in the following sequence:
1 Preparation of a trench with specified parameters. Its depth must be at least 10 cm, width and length according to individual measurements
2 Construction of a sand cushion. The trench is filled with sand; the layer thickness should be 5-6 cm.
The filling is compacted and spilled with water
3 Installation of formwork. Along the edges of the trench, narrow shields made of plywood, knocked down boards or wood boards are installed. The height of the formwork should correspond to the height of the path with a margin of 20-30 cm
4 Preparing the solution . The dry cement mixture is poured with water and mixed with a construction mixer or concrete mixer.
If you are a novice master, then you need to prepare small portions of the mixture so that you have time to pour it before it hardens.
5 Filling. Fill the prepared trench with the solution, level the mixture using the rule
Poured concrete in formwork
6 Decoration. After the mixture has partially hardened, shell rock, crushed ceramic tiles, colored glass, and other decorative elements can be laid on the surface of the pouring material.
After 2-3 days, the formwork is removed and a concrete path is used.
Use of wood
The purpose of any garden path is purely utilitarian, but what if you show a little imagination and approach creatively the issue of arranging the territory. Wood is an environmentally friendly material with an aesthetically attractive appearance. Wooden paths will decorate any area and will look non-trivial and interesting. The material can be timber, boards, garden parquet or boards. But increasingly, cut wood is used to decorate a personal plot.
Before starting work, you need to make a choice between numerous types of wood. It all depends on how long you plan to use the track. Oak will last about ten years, pine will not lose its properties for 7 years. Larch can be considered the most durable species; it is the most durable and will last about 25 years. The more load will be placed on the path, the larger the wood blanks should be in diameter. It is advisable to make them at least 15 cm in height. With such dimensions, the wood cut is firmly fixed in pre-prepared holes and will not fall out during operation.
IMPORTANT! It is necessary to discard saw cuts that have cracks. Before laying, it is recommended to clear the tree of bark, this will extend its service life.
The marking of the site is carried out as in the cases described above. For comfortable movement of one person, 60 cm of the path width will be quite enough. A waterproofing film is laid at the bottom of the trench. If you don’t have it at hand, you can use regular plastic film. The next step will be to distribute the required amount of crushed stone on the prepared surface. Crushed stone acts as drainage and protects the wood from unwanted moisture. The sand is distributed in an even layer, after which you can begin laying the cut. The distance should be minimal. The gaps between the workpieces are filled with sand, and the material is watered with a small amount of water to compact it. You can decorate the path in different ways. For example, paint the cut, sow the gaps with grass or decorate with pebbles. Remember, wood is susceptible to negative environmental influences, so before laying it is better to coat it with special compounds that prevent it from rotting.
| Wooden paths | Installation recommendations |
| From the saw | It is necessary to dry the material well, place large parts along the edge of the path, the remaining elements can be used for fencing. |
| From timber | In the center of the dug trench, the base should be significantly higher to allow water to drain out. Cover the structure with gravel and compact it well. |
| From boards | In several places on the timber, cuts are made into which transverse parts are inserted. The wood can be treated with stain, and a border can be built along the edges of the structure. |
You can make a wooden path yourself
Wooden paths will decorate any area and will look non-trivial and interesting
See alsoDesign ideas for decorating a terrace
Road made of wooden blocks
If you have a lot of saw cuts or lumps of different diameters, then you can quickly build a beautiful path from them.
It is recommended that all saw cuts be pre-impregnated with a protective agent against rotting (antiseptic), mold and wetting.
Sequence of work:
1
Preparing the trench. Its depth is calculated based on the height of the cuts with a margin of 6-7 cm
2
The trench is filled with fine gravel and sand. The thickness of the layers should be at least 3-4 cm. The filling is thoroughly compacted and spilled with water
3
The saw cuts are installed in the prepared trench; the gap between them should be minimal. It is important to adjust the height of all cuts so that the surface of the path is free of protrusions
4
The gaps between the elements are filled with sand and gravel mixture and moistened
5
After drying the sand, the finished object will look like this:
The gaps between the chocks, on the contrary, can be left large and filled with fine gravel. A photo of such a combination is presented below.
Path made of saw cuts with pebbles
Preparing the base
In accordance with technology, it is necessary to begin the construction of a road surface by creating a solid foundation . This fully applies to arranging paths in the countryside with your own hands. To comply with this requirement, it is necessary to dig a corridor along the entire width of the future alley, the depth of which is calculated as follows: you need to measure the height of the drainage layer, and then add it to the thickness of the material chosen for the installation of the path.
The bottom of the corridor needs thorough preparation, which must be thoroughly compacted and filled with a layer of crushed stone 2-3 cm thick. Next, a layer of fine gravel (0.5 mm) is laid on it, and a sand cushion 0.5-1 m thick should be laid last.
The construction of the path base must be approached with great seriousness, as it protects the path from erosion and ensures its long service life . After you complete this stage of path construction, you can begin laying the material itself.
Bark or gravel paths
It is possible to carry out work on filling paths without having any construction skills at all. Small and medium-sized pebbles are suitable for backfilling; moving around large ones is not very convenient.
An environmentally friendly material option would be pine bark.
The order of work is as follows:
1At the selected location for the path, a trench with the required parameters is dug
2The bottom of the trench is covered with agrofibre, film or other non-woven material
3 A curb stone is installed on both sides of the trench. It will not allow stones or bark to spread across the surface
4 Pebbles or pieces of bark are poured into the trench in a layer of at least 5 cm and compacted tightly. You can use the path immediately
Gravel paths between beds
Asphalt and pebble garden path
This is one of the most beautiful garden paths. It's not difficult to make. All you need is to use pebbles and paving stones. Unlike a regular paver walkway, this walkway uses flag-shaped or square stone slabs. Place them at the same distance from each other along the entire path. Then fill the voids with pebbles. To make the stones stand out, it is best to use a stone of a different shade than the pebbles.
Care instructions
Timely and careful cleaning of paths from debris, fallen leaves, and preventing the accumulation of water will extend their service life. It is not recommended to use salt or reagents to remove ice crust; they can spoil the base material and negatively affect plants growing nearby.
If weeds appear between logs, boards, and stones, they are removed regularly. Overgrown grass looks unsightly and increases the gaps between the elements of the path.
If the material is not moisture resistant, then regularly treat it with protective agents.
Whatever material and method of making garden paths you choose, the main thing is to be creative in the process.
Plastic modules
The use of plastic modules in laying garden paths is a new technology that has managed to win thousands of fans all over the world. Plastic is a material that is quite light, cheap, durable and strong. The advantage is that the plastic modules can be dismantled at any time. They are not exposed to negative environmental influences and do not enter into chemical reactions. It is in this case that you can choose any option, because there is a huge amount of plastic of various shapes and colors on the market. The tile includes a backing and an outer part. The substrate is designed for air ventilation and drainage of excess moisture. Before installation, it is necessary to level the surface on which you plan to lay the material. It is better to lay additional drainage on the soil. Crushed stone can be used as drainage. The installation itself is quite simple and is carried out using a locking fastening. This is how the parts of the tiles are connected to each other.
| Kinds | Main characteristics |
| Garden parquet | Planks that are laid out in sections on prepared soil. The elements are connected using a locking mechanism. |
| Lattice modular coverings | Installation must be done on a perfectly flat surface. The material is relatively inexpensive and quite durable. |
| Lawn grate | A cellular material that does not require preliminary soil preparation before installation. |
Plastic modules are not very expensive and easy to install
The lawn grate does not require special preparatory work
See alsoBeautiful landscape design of a country house: we create it ourselves