Home » Building a house
Alexander Korovaev 04/30/2020
14383 Views
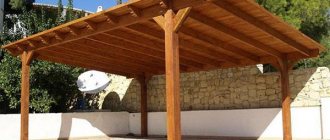
The canopy over the entrance is the most important architectural element of any building. After all, it performs not only an aesthetic, but also a protective function. To make your own canopy over the porch, you can use materials that can withstand significant wind and snow loads.
Do you need a canopy over the porch?
A canopy, or, as it is also called, a canopy, is a simple structure erected over the porch. To build it, a strong frame must be made, which is securely attached to the wall of the house or installed on special supports. The top is covered with roofing material. A building that does not have a canopy has an unfinished look. But the main purpose of the canopy is to protect the door and porch from the effects of rain and snow.
In addition, thanks to the canopy, you don’t have to worry about water dripping unpleasantly onto your head during bad weather. Once under the canopy, you can fold your umbrella and calmly enter the room. In addition, if in winter moisture accumulates near the threshold, then during severe frosts ice will form there, on which it is easy to slip and injure your limbs. In summer, the structure serves as protection from direct sunlight on the front door. Thanks to this, the paint will not fade and the handle will not heat up under the scorching sun.
Installation options
The easiest way is to install straight awnings. Even a person who has never done this can cope with such a task. But you need to remember that there must be a slope here, and this is especially true for large terraces and canopies. There will be less precipitation in the form of rain and snow on the roof.
Gable awnings at the dacha will perfectly decorate the house, and they can be covered with tiles and slate. The reliability of such a massive roof will be ensured by support pillars.
If desired, the canopy can be made three-wheeled or rounded. It is better to take materials that are flexible and easy to install.
But the main thing is that the canopy fits harmoniously into the composition of the home and fulfills its function, protecting the door and creating convenience when entering the house.
Canopy requirements
Before you make a canopy over the porch with your own hands, you need to learn the following rules:
- The material must be strong and withstand heavy loads caused by natural phenomena.
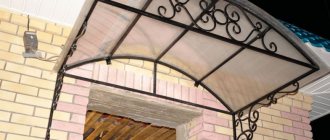
Polycarbonate canopy Source alstroy.kz
- Be careful with fastenings. To build a frame that is attached to the wall of the house, you will need about ten metal anchors. If you are planning a canopy more than two meters long, then you will need supports made in the form of racks. When installing support pillars, it is necessary to make a recess of at least one and a half meters and concrete it. You can begin further work only after the filling has completely hardened.
- The slope of the visor must be at least 20 degrees. The maximum slope is allowed no more than 50 degrees.
- In the place where the canopy meets the wall, it is necessary to install waterproofing.
- The canopy must have a drainage system for melt and rain water. To do this, you can use filling containers, a storm drain or a gutter.
- The length of the visor should be 60 centimeters greater than the width of the doors. On each side you need to set aside at least 30 centimeters.
- The width of the visor must be at least 70 centimeters.
- In order for the door to open comfortably and the canopy not to interfere, it must be raised to a height of at least 30 centimeters.
- When using thin roofing material, the sheathing must be made continuous.
- The canopy should be a complement to the overall structure.
The canopy complements the entire building Source bezgoroda.com
Important ! It is recommended to build a canopy along with the construction of the entire house. This way you can save significantly on your budget by using leftover building materials.
Making a polycarbonate visor in stages
A canopy over a porch of the simplest form can be mounted even without much experience. If you know how and love to work with wood or metal, then you will be able to handle even the most complex products.
Product drawing
It is hardly possible to do without this stage of work. Even if you have some experience, a pre-drawn diagram indicating the dimensions of the product will allow you to avoid annoying mistakes. You can develop visor sketches yourself or use ready-made ones, of which there are plenty on the Internet.
Shape of polycarbonate products
After choosing the shape of the product, you need to arm yourself with a tape measure and measure the width of the front door. Now you need to add 60 cm to this size - you will get the width of the future visor. The height is chosen arbitrarily - you should focus mainly on the architectural features of the building itself. Just remember that to ensure normal water flow and snow removal, the canopy is made with a slope of at least 20°.
When designing a canopy over a polycarbonate porch, it is worth taking into account the standard width of polycarbonate sheets. It is equal to 210 cm. The width of such sheets can be 300, 600 or even 120 cm.
It is necessary to calculate not only the length, width of the product, the dimensions of the struts, but also the number of jumpers. In order for the visor to fit tightly to the frame, a distance of 30 cm must be left between them.
Frame assembly
The metal frame is assembled by welding or fasteners. The metal is pre-cleaned of rust and dirt. After assembly is completed, it is primed and painted.
When making a frame for a gable canopy over the porch of a house, parts located at right angles are secured in a clamp or vice before welding. It is not worth making a seam in one pass. It is better to make several spot tacks, check the correct location of the parts, align them if necessary, and only then finish welding.
To increase the rigidity of the structure, it is necessary to weld several transverse strips . Their number depends on the size of the visor. The last to be attached are the crossbars under the sheathing.
Drawing of a simple arched canopy
When making a canopy of an arched or other complex shape, metal pipes are bent with a pipe bender. You can also bend metal by making cuts every 30-40 cm along the entire length of the pipe. After it is bent, such slots are again connected by welding. Subsequently, they are cleaned of scale with a grinder, primed and painted. For larger canopies, stops and connecting beams are used. The number of stiffeners directly depends on the size of the visor.
To attach a small canopy to a wall, 4 anchors are enough. To do this, holes are pre-drilled in the corners of the metal frame, the diameter of which is equal to the diameter of the anchors, and appropriate markings are made on the wall.
For large canopies, racks are prepared and welded to the frame. They are deepened into the ground by 0.5 m and filled with concrete mortar. Part of the pipes going into the ground is coated with bitumen mastic to protect against rust.
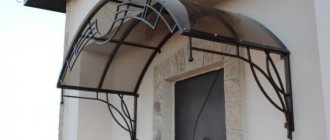
Products of complex shapes in combination with forged metal look very attractive. They are quite difficult to manufacture. It is better to buy such a canopy over a polycarbonate porch ready-made. You can attach it to the wall yourself.
To illuminate the entrance to the building, you can use spotlights mounted in the cladding of the structure.
Wall mounting methods
There are several such methods, you can use a visor:
- weld to the fittings built into the wall; it is laid in the masonry at the stage of construction of the building
- secure to U-shaped brackets; This method is only permissible for installing light awnings
- fasten with anchor bolts (the most common method)
Polycarbonate fastening
Schematic drawing of a gable polycarbonate canopy
Sheets of this material are connected to each other using special profiles . The polycarbonate is attached to the frame with self-tapping screws equipped with thermal washers. To prevent the polycarbonate from cracking during thermal expansion due to temperature changes, you should not screw the screws too tightly.
To protect against raindrops and snow, the ends are also covered with a profile. To ensure a tight fit of the material, it is necessary to provide a silicone or rubber layer between the frame and the roof.
To prevent moisture from entering, the places where the canopy is attached to the wall should be sealed . To do this, use special mastics, roofing silicone or other materials with similar properties. You can also use rubber or pieces of flexible roofing material.
At the junction of the canopy and the porch, it is necessary to attach a fender strip , otherwise water will flow down the wall. This method is used for installing any type of roof, including polycarbonate.
To create arched structures, you need to buy polycarbonate with straight honeycombs. It is not recommended to bend material with honeycombs in the form of triangles.
Types of visors
Before you make a canopy over the front door, you need to decide on the choice of material.
The canopy can be made:
- made of wood;
- polycarbonate;
- corrugated sheets;
- metal tiles;
- flexible tiles.
The strength and reliability of the structure itself plays a big role in the design of the visor. The frame is usually made of metal corners, pipes, and wooden blocks. If a lightweight material is used for roofing work, then an aluminum profile is also suitable for the frame. Canopies differ from each other both in the type of material and in the type of installation, design, size and shape of the roof.
Most often, the canopy does not greatly exceed the size of the porch, but there are cases when the canopy also covers the path leading to the entrance. Such options can be used in the summer as a terrace and spend your leisure time here. If you make the sides of the canopy closed, it will perfectly protect the entrance to the house from the wind.
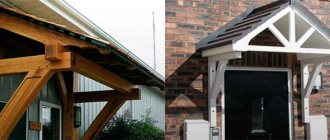
Wooden canopy Source twoidvor.com
According to the type of installation, the structure can be divided into two types:
- Supporting . In this case, the canopy is made of heavy materials; they must be securely fixed. Therefore, before making a canopy over the porch, you need to take care of metal or wooden supports on which one side of the canopy will rest, the second should be attached directly to the wall of the house.
- Mounted . Such structures are distinguished by their lightness and simplicity of construction. Most often, such canopies are made to decorate the house, since they are not able to fully protect the porch from rain and snow.
Canopy over the front door Source v-dver.ru
How to make a canopy over the porch with your own hands can be seen in photographs of ready-made projects and choose the option you like. There is a wide range of canopies that differ from each other in shape and design.
The most popular installation options are:
- Shed roof.
This is a classic option that is still popular today due to its functionality and does not require much effort in installation. Even a person who has never known how to make a visor can cope with such a job. This roofing option is perfect for installing large canopies and terraces.
Slate and corrugated sheets are used for covering. The only thing you need to pay attention to is the angle of inclination. It should be sufficient so that snow or rainwater does not linger on the surface.
Shed roof Source www.kovkadom.ru
See also: Catalog of house projects with a terrace and porch.
- A gable or three-pitch canopy will decorate your home.
Tiles are ideal for the roof of such a canopy. Since the canopy turns out to be heavy, it is recommended to make supports for it. Support pillars made of brick will look beautiful.
The three-slope version is more difficult to implement, but despite this, such a canopy looks beautiful.
Gable canopy Source prom.st
- Semicircular canopy.
This form has been used before. Metal sheets were used for coating. Nowadays they cover the roof with modern materials, in particular cellular polycarbonate. The material is flexible and easy to install. In addition, such a visor looks quite original and presentable.
Since the design is very light, it is used in a mounted version. In this form, you can make both small canopies and much larger ones that cover the entire facade of the house.
- Shaped canopies, including dome-shaped canopies.
To create such structures, experience in construction is required.
Making curly visors is very difficult, but at the same time they are distinguished by originality and a non-standard solution. For the roof you will need materials that have special technical characteristics. Tiles, cellular or monolithic polycarbonate are perfect here. In this case, the canopies can be dome-shaped, polygonal, or have a concave roof.
Canopy in the shape of a dome Source dveri-termorazryv.ru
Tips for creating a drawing
The visor is, at first glance, a very simple design. However, during work, many shortcomings arise on their own. To prevent this from happening, you should definitely do a design and drawing, it will allow you to calculate the slope, dimensions and other design parameters.
Today it is very easy to make a drawing; you can even take a ready-made diagram as a basis. To do this, you should take ready-made drawings and, based on them, design a suitable visor. If you don't have basic design skills, contact an architecture firm. Such a service is affordable for most consumers.
Based on the diagram, it is easier to count the required materials and draw up an estimate. Even a sketchy sketch will allow you to avoid unnecessary expenses.
Material for making canopies
The lifespan of a canopy depends on what it is covered with. On the modern market you can find a variety of types of roofing materials. Before you build a canopy over the porch with your own hands, it is important to familiarize yourself with their characteristics and properties and only then make a choice.
Polycarbonate canopy
Today, this roofing material is in great demand. Polycarbonate sheets have a wide palette of colors, so they fit perfectly into any design of the main building. This material has many advantages:
- the sheets are transparent, which allows only partially creating a shadow on the facade of the house;
- wide range of colors;
- the material is lightweight, but at the same time has sufficient strength;
- easy to install on a structure;
- flexible, making it suitable for covering canopies of various shapes.
Polycarbonate also has disadvantages, among which we can note its weak shock resistance. It is more fragile than corrugated sheets, slate or tiles. It can easily withstand the weight of snow, but a broken branch will easily break it.
Colored polycarbonate is suitable for making a canopy in any building Source vorota-zabory-navesy.ru
Metal roofing
Metal tiles are a modern material that can be classified as classic, since several decades ago, tiles were one of the main roofing materials. But in those days it was too heavy and at the same time fragile. In modern production, metal tiles are made of a metal base and a polymer coating, which makes it reliable and durable. The advantages include:
- long-term use, at least 45 years;
- durable material;
- perfectly withstands the influence of the external environment;
- metal tiles are easy to install on the roof.
The disadvantage of tiles is their high cost compared to other roofing materials.
Metal tiles are in harmony with the main building Source idachi.ru
See also: Catalog of companies that specialize in the design and installation of small forms.
Purpose of the entrance canopy
If we talk about the structure as a whole, the canopy or awning over the porch consists of a frame and roofing felt (lining). There may also be support posts that support the outer edge of the canopy. They are not required. They are needed when there is no confidence that the structure will be able to withstand precipitation without additional supports.
Canopy over the entrance: general view
Precipitation usually refers to snow. In regions with a lot of snow, you can make the slope of the canopy steep so that the snow melts quickly, or install additional supports. You can do both as usual: the margin of safety/strength is reassuring and reassuring.
Video description
How to properly make a polycarbonate canopy, watch the video.
A canopy with a tiled roof is best done during construction work of the entire building. In this case, the remaining material will be suitable for the visor, which will allow you to make the entire roof in one design. Since the roofing material is not lightweight, it is recommended to build the canopy on support pillars.
Corrugated roofing
This material is not particularly original and it will not be possible to make the canopy decorative. But modern manufacturers have begun to produce profiled sheets with multi-colored coatings. A canopy made from this coating has a number of advantages:
- the roof is durable and withstands impacts well;
- the material is light;
- the roof is covered without much effort;
- low cost of material.
The advantage of corrugated sheeting is its ease of installation Source gidlestnic.ru
Do-it-yourself canopy for a private house on supports
A canopy on support poles has an undeniable advantage: different materials can be used for its manufacture.
The installation process involves the following steps:
- Installation of supports. To do this, you need to place two racks at a distance of 1.5-2 meters from the wall. The supports can be brick, concrete or metal.
- Installation of the rafter system. Opposite the supports, recesses are made in the wall, into which the beams are inserted at one end, and the other end is laid on the support. Using studs and nuts, fix the beams to the supports. The visor can have a flat shape or a house. For the first option, boards are sewn across the beams; the second option involves installing a full roof with a ridge, sheathing and waterproofing.
- The canopy is sheathed with roofing material.
- Hemming the bottom of the roof above the porch. For this purpose, you can use plastic panels or siding. During the cladding process, you can install spotlights.
Source of the article: https://kryshadoma.com/montazh-i-remont-krovli/kak-sdelat-kryshu-nad-kryltsom-svoimi-rukami-vidy-i-sposoby-montazha-kozyrkov.html
Video description
In this video you will see several examples of the design of a wrought-iron canopy over the entrance:
Wave slate for awnings
This material was the most common a few years ago. Today it has lost a little of its popularity, but it is still used in roofing work. Wave slate has its advantages:
- the material is reliable and perfectly withstands environmental influences;
- such a roof is practically not heated by the sun's rays;
- Slate roofing will last a long time.
Despite all the advantages, slate also has disadvantages:
- heavy;
- sheets break easily;
- Due to the fragility of corrugated slate sheets, installation is difficult.
For a canopy covered with slate, you will need to install supports. Source garant-metall57.ru
Before making a canopy over the door from wave slate, you must take into account its weight, so the frame needs to be made strong, securely attached to the wall and taken care of the supports.
Wave slate can be replaced with analogues: plastic and euro slate. They also have similar waves, but at the same time weigh less and have a wide palette of colors that will look impressive on the roof.
Wooden canopy
For those who love wood products, it will be interesting to learn how to make a wooden canopy over the porch with your own hands. After all, this material has always been popular and still remains fashionable. These canopies are best suited for houses made of wood or with a similar design. The advantages of a wooden canopy are:
- environmentally friendly material;
- Truly decorative elements are made from wood;
- protects well from the scorching rays of the sun in summer;
- easy to install.
Wooden canopies look original Source viland-kovka.ru
Choosing a roof for a canopy
Another important point is the choice of a protective coating that will perform the task of protecting the area under the canopy from rain, snow, hail and other atmospheric phenomena. For a single-pitch, gable or hip structure, you can use almost any roofing material. Usually it is matched to the covering of the main roof of the house. If metal tiles have already been installed, then it makes more sense to use it for the canopy.
Keep in mind that a canopy, despite its small size, is another type of roof. All additional roofing elements must be installed during its construction. If necessary, you can install a drainage system to drain rainwater.
It is also worth considering possible loads on the frame, therefore, when using heavy roofs (for example, ceramic tiles), you need to select bars with a larger cross-section (about 100x100 mm) and appropriate fastening of the structure to the wall. You can also use metal elements as supports during construction.
Support material
The following materials can be used for support:
- Metal support post. It can be used in any design. At the same time, it will be more reliable, strong and practical. Such a support can be sheathed with any roofing material. For maintenance, it will be enough to coat the surface with a protective anti-corrosion agent or simply paint it.
- Wooden support posts. Suitable for houses built from similar materials or lined with wood paneling. But such supports must be regularly maintained by treating them with special substances. In addition, if the front door faces the sunny side, then the wooden pillars will quickly fail: they will become cracked or twisted.
Wooden supports look original against the general background of the house Source static.wixstatic.com
- Brick pillars . This is ideal for heavy structures. They can be tiled. The only downside is that they are difficult to make. Thus, construction will cost much more. To make the support more durable, metal reinforcement is installed in the center.
Calculation of a truss for a canopy
When calculating a truss for a canopy, it is important to be guided not only by the overall convenience of the location, but also by aesthetics, as well as the angle of the roof, the configuration of the roofing system and other parameters. You can prepare a drawing of a truss for a canopy, compare the planned dimensions with the territory and ease of access, correctly place the gate, think over the water drainage system and snow slopes
We will make a farm from a profile pipe. This is the most affordable material, easy to weld. We will learn the parameters of the profile pipe a little later, since they must be carefully calculated. To begin, determine the length of the overall metal structure.
The height of the ground to the ridge, as well as the type of roofing system, will depend on this.
The easiest way to equip a shed roof, but with this arrangement it is important to remember that the maximum step between two adjacent trusses should be no more than 1.75 m
Having determined the angle of inclination for yourself based on individual parameters, calculate the angle of inclination of the sheathing. On average, experts make it 30 degrees in the plane, or cut it at 45. This way the load will be distributed evenly.
No special calculation is required for canopies whose length does not exceed 30 m. But it’s also not worth saving, since when choosing rolled metal with thin walls, you cannot guarantee the rigidity of the welded parts. There will be vibration, and in the winter, due to snow, the metal frame may sag.
We propose to take a closer look at the preliminary calculation, having agreed that we will build a lean-to canopy, measuring 6 by 4 m. For strength, you should use a metal profile with a cross-section of 30 by 30 mm, with a wall thickness of at least one and a half mm. Having decided on the slope of the roof, we understand that the lower chord of the truss will be 4 m.
The top one will be about 4.5 m. First of all, it is necessary to arrange vertical guides from the same material. We make the largest side about 0.6 m, the smallest in fact, based on the calculated angle of inclination. Next, we divide the top row of the profile into equal parts.
We weld intermediate cross members to the lower part. These crossbars are also called diagonal lintels. They must be made of the same steel as the main frame. If you have the opportunity to save money, you can replace the crossbars with a pipe with a cross-section of 20 by 20 mm.
Previously, we said that with a single-pitch roofing system, you should choose a truss pitch of at least 1.75 mm. For greater reliability, we choose a step equal to 1 m. In total, about 5 similar trusses are suitable for 6 m. They should be mounted on pre-installed supports, then everything should be welded into a single unit, and then the polycarbonate should be secured using special jumpers made of a 20 by 20 mm profile.
How to build your own canopy
After looking at the photographs with images of different types of awnings, you wanted to know how to make a canopy over the front door at the dacha, but you don’t know where to start. A few tips from professionals will be helpful.
The most basic stages of work are:
- draw a diagram and carry out calculations;
- build a frame;
- mount the frame on the wall and install supports;
- cover the frame with roofing material.
When making a diagram, you need to enter the required dimensions. Thanks to these figures, it will be possible to create an estimate to find out what budget will be needed to construct the visor.
When planning the structure, the following factors must be taken into account:
- Climatic conditions. In this case, the amount of snow that falls during the winter is taken into account. Ice formation on the roof surface creates a strong load, which requires the use of durable materials.
The shape of the canopy depends on climatic conditions Source vopros-remont.ru
Canopy on a wooden supporting structure
Wood for poles and frames, of course, is not as durable as metal, but due to its availability and ease of processing, it is chosen more often. The only drawback of the material is its tendency to rot, but if the wood is properly processed, it will last for many years.
Before starting work, you need to decide on the shape of the canopy, make a drawing and detailed drawings indicating all dimensions. It is also necessary to choose fasteners that depend not only on the design loads, but also on the materials of the load-bearing wall (this must be taken into account in order to securely fasten the support beam).
Installation of the support structure
Installation of pillars:
- They dig or drill holes in the ground 20-30 cm deeper than the underground part of the supports. For non-heaving dense soils, the recommended size of the underground part is 1/3, and for soft soils - ½ of the above-ground part. For heaving ones, this is the depth of soil freezing in this region plus 30 cm, which is necessary for the base of the pillar to be below this mark. The diameter of the hole is chosen to be 20-30 cm larger than the diameter of the round post or side of the beam.
- Before installation, the pillars are treated with an antiseptic along the entire length, and the underground part is additionally coated with bitumen mastic.
As a “folk” method, you can burn the underground part with a blowtorch - this is akin to the technology of heat treatment of wood, which clogs open capillary channels. For greater reliability, the underground part can be wrapped with several layers of polymer film or roofing felt. - A cushion of sand or fine crushed stone is poured into the bottom of the hole (hole) to cut off the capillary penetration of moisture to the base of the pillar.
- A post is inserted into the hole, aligned vertically, and secured with temporary spacers.
- Concrete grade M300 is poured into the hole and the solution is compacted with a bayonet (crowbar or piece of reinforcement).
- Check the level, adjust the position of the column if necessary, and leave it in this condition until the concrete matures.
Note. To prevent moisture leakage from concrete during its maturation, a “sleeve” made of roofing felt is used, which is placed in the hole.
The second support pillar is installed in the same way. After the concrete has matured, the temporary spacers are removed and each of the pillars is cut so that the upper edges lie at the same horizontal level at the calculated height. Then a transverse support beam is placed on top of the pillars.
Mounting the support beam on the wall
For a pitched roof, the second support beam is mounted on the wall at some distance higher than the one lying on the pillars. The minimum angle of inclination for a pitched roof can be 6°, but in order for the snow to somehow fall off it, it is recommended to make the inclination angle at least 10°. Moreover, for smaller angles the sheathing must be continuous.
Basic rules and stages of construction
Before building a canopy over the porch, it is necessary to make a frame taking into account the weight of the roofing material. If polycarbonate or corrugated sheets are used, then reinforcement can be used for the frame. For metal tiles and slate, it is necessary to make the structure more massive. In this case, you will need wooden blocks or a metal corner measuring 10 centimeters.
The frame is mounted to the wall with bolts. The junction area needs to be waterproofed using film. If it is necessary to install supports, they are dug into the ground and concreted for reliability.
At the end of the work, the frame is covered with roofing material. It is attached depending on the type of material. To secure the polycarbonate you will need self-tapping screws and thermal washers. The end part of the roof is secured with a special tape.
When installing a canopy, you need to properly seal the seam between the structure and the facade Source stroychik.ru
It is also recommended to fasten corrugated sheets and metal tiles using self-tapping screws. Nails are used for slate. Knowing how to make a canopy over a porch with your own hands from a profile and take the work correctly and responsibly, you will create reliable protection for your front door that will serve for a long time.
Mandatory standards
In addition to the general characteristics, builders use the following instructions when creating canopies:
- The canopy panel must be resistant to temperature changes, precipitation, and most importantly, to gusts of wind.
- The design of the structure is chosen based on the overall architecture of the facade. Also, the slope is developed taking into account the style of the building.
- Only special elements for outdoor use are suitable for fasteners; conventional connections simply will not withstand strong wind loads.
If you comply with the standards described above, you will be able to build a high-quality and durable canopy that will become an elegant addition to the facade and will serve you for decades.
Design Features
A canopy is a small architectural form, part of a covered area that has a functional or decorative purpose. The main function of this structure is to protect the site from precipitation and sun.
Metal profiles compare favorably with other materials in their resistance to biological, chemical, and mechanical influences. Corrugated pipes with a square or rectangular cross-section are easy to design and install. They are equally well suited for installing a small canopy for a porch and creating a spacious covered area.
The canopy consists of:
- foundation;
- supports or suspensions - vertical and inclined load-bearing elements of the frame;
- lateral connecting elements - slopes and trusses;
- rafter system, consisting of rafter legs, trusses, sheathing;
- roofs.
In the case of erecting a canopy over a small area, for example, a porch or a sandbox, you can do without trusses - the structure will fully withstand snow and wind, since it will not have long horizontal sections.
If you plan to install a canopy over a parking space or a swimming pool, the horizontal ceilings and rafter legs will be longer. Such extended elements are vulnerable to load. To distribute it and give rigidity to the structure, in these areas they use not individual pipes, but trusses (reinforced structural parts consisting of two pipes and vertical and inclined elements connecting them - racks and braces).
The foundation for a canopy is most often made columnar, since its equipment does not require large excavations. The roof is made of polycarbonate, corrugated sheets, ondulin and other sheet materials.
Selection of materials and preparation of tools
The main requirement for the quality of profile pipe products is strength. To ensure the stability of the load-bearing parts of the structure made from them, you need to select pipes with minimum parameters equal to 80x80 millimeters. For additional elements, the optimal cross-sectional size will be 40x20 millimeters.
To determine the amount of roofing material, first calculate the area of the surface to be covered, and then increase the result obtained by 5%. Fastening is carried out with roofing bolts and special gaskets.
The structure is assembled in one of the following ways:
- Welding. But for this you need not only to have a welding machine with electrodes, but also to know how to properly weld a canopy from a profile pipe. Without skills, such work cannot be done.
- Using threaded connections. This requires metal corners and mounting bolts.
- Using special clamps.
A do-it-yourself canopy costs much less than a purchased one. It will meet the requirements subject to strict adherence to the technology of its construction.
Dimensions and drawings
Option drawing of a canopy made from a profile pipe
First of all, you need to create a sketch. For example, let’s take a canopy whose roof will be made of polycarbonate. The sketch must show the appearance of the future structure and its approximate dimensions. Then you need to take all measurements at the site where the structure will be installed and create a detailed drawing. The canopy can be built either free-standing or attached to the house.
For example, you have a house 9x6 meters, and in front of it there is a free space of 9x7 meters. In this case, the width of the canopy can be equal to the width of the house wall, i.e. 9 meters. The reach can be made, for example, 6 meters. Thus, a canopy measuring 9x6 meters is obtained.
It is optimal to make a low paradise 240 centimeters high, a high one - 350–360 centimeters.
Simple mathematics calculates the angle of inclination. In this case it is equal to 12–13 degrees.
Now that all the measurements have been made, you can create a drawing. Rafter trusses must be shown on a separate drawing.
Roof truss options
After all the preparatory paper work has been done, you can calculate the required amount of building materials. Always purchase them with a margin of at least 5 percent. This is necessary in case you come across defective products or damage something during the process.