Shapes of canopies
The shape and size of the visor play a decisive role in its selection. It must be a little wider than the entrance to protect from precipitation. Calculate the depth according to your wishes, the architecture of the house and the size of the porch: on average, from 0.5 to 2 m.
Depending on the type of roof and the presence of slopes, canopies can be straight, inclined or embossed. Inclined ones are single- and double-sloped, and relief ones include pyramidal, arched, arched and other unusual models. Regardless of the configuration, it is necessary to provide a drainage system so that precipitation does not accumulate in one place.
Open platform with steps
The simplest and most obvious option for arranging a porch in a private house. For safety reasons, the steps are equipped with rubberized pads or an electric heating system.
The classic design of an open area does not provide for a canopy.
If desired, the porch of a private house can be decorated with a decorative polycarbonate canopy with tinting and sun protection coating to increase operational durability. The photos clearly demonstrate the elegance of such an original solution.
Materials for the visor
A high-quality canopy over the porch is durable and can withstand any adverse weather conditions. Anything can be used: wood, glass, metal, polycarbonate, different types of roofing coverings. If you choose heavy materials, be sure to take into account the load on the frame: for example, reinforced beams with a larger cross-section are needed for ceramic tiles.
Polycarbonate visors
Polycarbonate is a durable and undemanding material with transparency up to 86%. It is hardy, not afraid of temperature changes, corrosion, fungus and rot. It is not affected by moisture and ultraviolet radiation, and it is almost impossible to scratch or damage it.
Polycarbonate can be cellular or monolithic - depending on the shape and size of the visor you want. It is flexible and can be shaped into different shapes for shaped and textured canopies. At the same time, it does not require a reinforced frame and does not create additional load on the facade or foundation.
You can buy a polycarbonate visor ready-made or make it yourself. The main disadvantage of the material is its characteristic appearance. It may not be entirely appropriate on classic log houses, in the style of country, Provence or northern chalets.
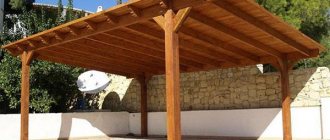
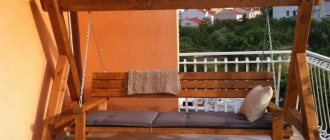
Wooden canopy
Wood is the most environmentally friendly and diverse material, ideally complementing similar wooden houses. In the wake of eco-trends, it is used to make everything: canopies, gazebos, verandas. It is easy to work with and process, paint, varnish, carve and decorate.
Different types of wood differ in strength and moisture resistance, but they are all still quite sensitive to external influences. Such a visor will require regular maintenance, and in cold and humid regions they may not be practical to begin with. With proper preparation and impregnation of the wood, the canopy will last 7-10 years.
Glass canopies
The use of glass for visors is a controversial decision, around which there are many myths. It is considered to be too fragile and not the most practical material. But for a long time now, manufacturers have been creating impact-resistant tempered glass that is almost impossible to damage. And even if it breaks, it crumbles into small, safe fragments.
The main advantage of glass is its aesthetic appearance, which ideally complements modern architecture. You can experiment with tinting and decoration, without being afraid of rust and rotting. The only negative is that the glass requires maintenance so that smudges and stains do not remain on it after rain.
Canopies made of metal tiles
Metal tiles are a high-strength roofing material with excellent technical characteristics. It is durable and unpretentious, it is almost impossible to damage it. Metal tiles have the best anti-vandal properties among popular roofing coverings.
The service life of such a visor can easily reach 50 years without special care. And during all this time it does not fade, does not rust and does not lose its attractive appearance. Metal tiles can be combined with any other building materials, but require special preparation of the base during installation.
Canopies made of corrugated sheets
Corrugated sheets or metal profiles are cold-rolled steel sheets coated with a protective polymer layer. Their main advantages are low price combined with increased mechanical strength and durability. In the assortment of manufacturers you can find colors from a wide and diverse palette.
Corrugated sheeting is easy to work with, it does not require complex preparation and does not weigh down the base, and does not require special treatment or maintenance. Just keep in mind that a canopy made of corrugated sheets is best combined with an identical roof. And during heavy rains, hail or gusty winds, steel sheets will be noisier than wood or polycarbonate.
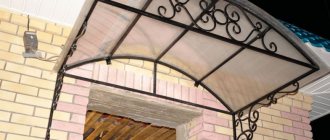
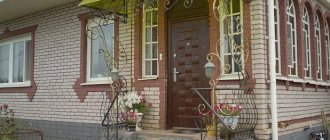
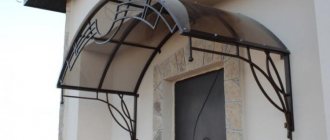
Forged visors
Forged metal visors are a decorative accessory and not real functional protection. They complement classic homes and rustic style. This is a traditional combination with wooden structures that will never go out of style.
Modern forging technologies allow you to create the most interesting and bizarre patterns. Now it is much more affordable, because previously only the rich and aristocrats could afford such luxury. And forged elements retain their attractive appearance for decades, regardless of frost, snow, heat or rain.
MDF: what is it? Types and features of material
Methods for attaching the canopy to the wall
Visors are attached in different ways, depending on weight and configuration. Supporting ones require special supporting supports - this is an option for large canopies and heavy roofing materials, while hanging ones are mounted directly on the wall. Functional canopies protect from bad weather, and decorative canopies complete artistic compositions when decorating the exterior and landscape.
Furniture handles (70 photos): types, materials
Manufacturing a gable structure
The manufacture of the canopy must begin with sketches and measurements, calculating the dimensions of the sheathing and brackets. The quality of the finished product largely depends on this.
Stages of installation of a hinged canopy:
- First, 2 brackets are made by connecting perpendicular beams and securing them at an angle.
- The brackets are installed on the wall at a distance equal to the width of the canopy. Vertical beams are attached to the wall.
- Wooden rafters, made in advance, are fastened with crossbars at the lower ends and attached to the upper beams of the brackets. Next, the ridge beam is installed.
- A prepared sheathing made of timber, plywood or boards is installed.
- Hooks for the drainage system are installed.
- Roofing material is being laid.
- Drainage is installed.
This kind of work requires more skill, so for those who are not confident in their abilities, it is better to entrust it to the masters.
We make a visor with our own hands!
You can even install the visor yourself - you don’t need complex professional skills. But do not forget about safety: it is important that the structure is as strong and durable as possible. The visor should easily withstand the loads of wind, rain and snow.
DIY wooden canopy over the porch
For the simplest single-pitch canopy, you will need moisture-resistant plywood of a suitable size, a board or lining and a sheet of galvanized iron. The elementary design consists of three cross beams on vertical posts that can be made decorative.
First, draw a diagram and stencil of the corner fragments, then transfer the pattern to the plywood. It is best to repeat parts by direct copying to avoid minimal dimensional inaccuracies. Cut out the parts and carefully sand the entire surface and edges with a sheet of sandpaper. Cut out the front strip and leave carved elements with repeating motifs on it for beauty. To make the structure more rigid, lay perpendicular pieces of plywood and install a central crossbar. If you have a very wide cornice, you can make more supporting elements, but think in advance about how to install them above the entrance.
Treat the wood with protective compounds and waterproof varnish, and paint if desired. The steel sheet will become a protective roofing covering, but you can replace it with corrugated sheeting. Don’t forget to bend the back part to protect the junction and small gutters by 1-2 cm to collect precipitation and melt water.
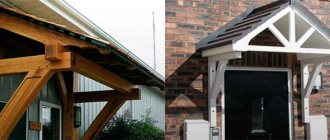
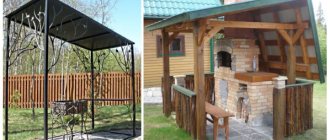
DIY gable canopy
The gable canopy is made of wooden beams and covered with clapboard. You will need corner support posts on which the canopy structure, base or frame for the rafters, frame and roofing are supported. For it, use metal tiles, bitumen shingles or other material of your choice.
Attach vertical sections of timber to the wall above the porch - this will be the basis for the L-shaped racks. Then install the horizontal beams and attach the struts with self-tapping screws. Constantly monitor the level, verticals and horizontals so that the structure is level.
For a wide canopy, three pairs of rafters for the frame are enough, but if you are using a heavy covering, do more. Cut a triangular block at each corner for stability, so as not to leave gaps. It can be glued with regular glue and only then secured with a self-tapping screw.
Cover the finished slopes with clapboard or tongue-and-groove boards - but always light ones. Lay down a waterproofing layer or lay an OSB board, and then proceed to laying the main roofing covering.
DIY polycarbonate visor
Choose polycarbonate: monolithic is stronger, but heavier, and cellular is lighter, but not as durable. For canopies, canopies and similar structures, a honeycomb sheet 8-10 mm thick is sufficient. Keep in mind that the sheet will need to be positioned so that the internal condensate can easily flow out along the internal ribs.
Polycarbonate is laid upward with a protective film, which increases its resistance to ultraviolet radiation. The holes for fasteners should be slightly larger than their diameter - these are thermal gaps. Use rubber washers and gaskets under the screws to prevent dirt from getting into the joints.
When joining sheets, use connecting strips that hide the expansion joint. Cover the ends with covers to drain condensate or glue them with adhesive tape. If you need to bend polycarbonate into an arch, do it immediately on the frame perpendicular to the internal channels and with a radius of 80 cm.
DIY support visor
The construction of a support canopy at first is no different from other single-, double-slope or arched ones - repeat all the steps until the installation stage. The main difference in the installation process: you will need vertical stands. With a wooden frame, use a beam of larger cross-section, and with a metal frame, weld support pipes to it, and then sand, prime and paint the seams.
Curtains for the living room (90 photos): views, beautiful ideas
Canopy over the porch - photo ideas
A canopy over the porch is a useful acquisition for any home. They differ in shapes, materials and appearance, so among all the variety you can easily find an option for yourself. Watch and get inspired!
Did you like the post? Subscribe to our channel in Yandex.Zen, it really helps us in our development!
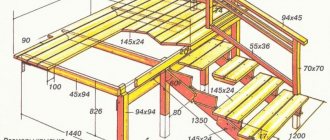
Scheme
If you decide to make a visor yourself, then the diagrams outlined below will help you design your own visor model:
Visor drawing
Arched shape drawing
Arched canopy diagram
Wooden canopy
Gable
Visor design
Canopy with supports
Diagram of a metal visor
Canopy over the porch
Flat visor
Simple design
Did this article help you?