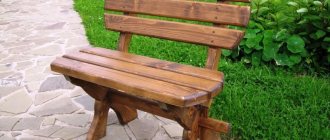
On a warm summer evening, it is pleasant to relax, sitting on a bench, admiring the beauty of a blooming, well-kept garden. Of course, the easiest way is to buy a bench without bothering. But it’s much more pleasant to relax on a bench made with your own hands. You will have to spend two to three evenings on its construction, but you will enjoy the work of your hands for many years. This will be your favorite place at any time of the day, since even in the afternoon heat one of its parts will remain in the shade. And the branches of a spreading tree will give you a pleasant feeling of security and comfort.
In this article we will tell you how to make a bench around a tree with your own hands, we will provide drawings, photos and video instructions.
There are many variations and styles of benches: from deliberately rough to skillfully made, with a bunch of small details; from the most ordinary to the very non-standard and original. To build a bench, different materials are used: wood, plastic, wrought iron, stone, marble and even glass. Combined benches also look great. The most common material for constructing a bench is, of course, wood. This is one of the “warmest” and easiest to process materials. Also, wooden furniture looks very aesthetically pleasing. It’s pleasing to the eye and pleasant to sit down.
Choosing a suitable tree in the garden
Choosing a suitable tree
When determining the location of a round bench, we do not recommend installing it around a young tree, as it may look a little ridiculous, especially since the tree grows quickly and over time the bench will crowd it out.
The thicker the tree, the nicer the round bench around it will look. It is also not advisable to stop at a fruit tree, since in summer or autumn you will have to clean the bench quite often from fallen fruits.
It’s so nice to lean against the bark of an old tree, enjoying the rustling of the leaves. Here you can sit alone, reading your favorite book, or spend unforgettable fun hours in the company of your best friends.
Where is the best place to build such furniture?
For many years, wooden benches have occupied a leading position among landscape designers and connoisseurs of comfort and beauty. Whether metal or wood, with or without a backrest, simple designs or elegant decorative elements, they will never go out of style.
The reason for this popularity is most likely that they serve as a frame for trunks. Retractable large trees have an attractive effect on a person, because under their mighty branches everyone feels protected.
A bench under a tree is a unique symbol of the unity of man with the surrounding nature: while maintaining its functional and decorative qualities, it becomes part of a residential garden
The key element of this pair, of course, is wood. Therefore, the frame of the bench should not restrict, let alone damage, the trunk. It is best to place a round bench under a chestnut, birch, willow or walnut tree.
Fruit trees are not the best option. Fruits falling from trees will spoil the appearance of furniture, leaving marks on the light surface of the wood.
It will be great if from the bench you can see a picturesque panorama of a beautiful flower garden, pond or arch with climbing plants
On hot summer days, it is pleasant to relax on such a bench, hiding in the shade of the foliage. During the autumn months, when the leaves have already fallen, you will enjoy the warmth of the last rays of the sun.
We select and process wood
Bench around a tree
Since the bench you are going to make will be located in the open air, it will be exposed to biological influences from the environment. Therefore, you should choose the right type of wood. Ideal: oak, larch, pine, teak and other materials that are resistant to biological and mechanical influences. As a last resort, you can take any type of wood left over after making something. But if it is not very resistant to moisture and fungi, you should carefully treat it with special impregnations.
DIY raised flower bed under a tree
When creating a flower bed under unfavorable trees, difficulties may arise due to the many roots penetrating the top layer of soil in the tree trunk circle. For the composition you cannot use perennials with deep-penetrating roots; it is much more profitable to plant annuals (ageratum, begonia, amaranth, annual asters, string, carnation, gatsania, lobelia, verbena).
To increase the space for the roots of flower crops to grow, you can design a raised or multi-tiered flower bed in the area under the tree. To make the edge of an asymmetrical flower bed, you can use wooden slats and plastic bottles, and for a round one, bricks, old tires and a plastic border are suitable. Easily and quickly make a square wooden box from boards
It is important that the height of the soil covering the tree trunk does not exceed 10 cm. If the root collar is slightly raised above the soil level, then the soil can be filled higher.
You can make a flower bed from logs in an original and inexpensive way. To do this, thick branches or the trunk of an old tree are sawn into cylinders 20–30 cm long, which, in turn, are split into halves. You can purchase ready-made borders at hardware stores. The prepared logs are treated with an antiseptic and dried.
Then the geotextile tape is cut, to which the logs are attached with staples or nails. Geotextiles will protect the tree from moisture and extend the life of the border. At the next stage, the finished border is buried in the soil around the tree and secured with steel rods. After laying out the non-woven material, installing drainage and backfilling the soil, the flowerbed is ready for planting.
Preparatory work
Dimensions
In order for the bench to stand level, it is necessary to level the area around the tree. Remove excess soil and add a little where necessary. Be careful not to damage the tree's roots. For the same reason, it is not recommended to concrete the legs of a future bench by digging holes in the ground. If possible and desired, the area where the bench will be located can be sprinkled with fine crushed stone or gravel.
So let's get to the fun part. This article provides several options for a ring bench. But first, let's look at how to make the easiest bench to make around a tree - a quadrangular one.
Selection of materials for construction
Garden furniture is designed not only to provide comfortable conditions for relaxation in the center of green open spaces, but also to serve as a bright accent to the original design of a shady corner.
The material for its manufacture can be: wood, stone, metal. However, it is wooden furniture that looks most harmonious in the garden.
Possessing a unique texture, wooden benches look equally beautiful both among the greenery of the garden and against the background of stone and brick buildings on the site
When choosing a material to create a wooden bench or table, give preference to wood species with a dense structure. They better withstand the negative effects of precipitation, maintaining a presentable appearance for several seasons.
Larch is excellent for making garden furniture: the amount of oils and glue makes it the least vulnerable to high humidity and sudden temperature changes
Among the inexpensive species, pine, acacia, cherry or spruce are also suitable for making outdoor tables and chairs. Oak and walnut have a beautiful color and texture. But even with high-quality processing, they are less resistant to climate change and, when exposed to direct sunlight, can gradually dry out completely.
Regardless of the choice of wood type, in order for garden furniture to last for more than one season, all wooden parts and elements must be treated with protective impregnations on both the front and back sides.
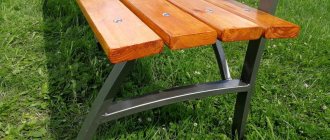
Square bench
Square bench around a tree
In the preparation process, it is important to pay special attention to the selection of the necessary building material and tools. You will need:
Tools:
- screwdriver (or drill);
- jigsaw, circular saw or regular hacksaw;
- sanding machine or sandpaper.
Materials:
- impregnations for wood processing;
- 16 boards 10x5 cm: about 8 m (for support posts);
- 16 boards 10x2.5 cm: about 23 m;
- bolts or screws;
- paint or varnish for finishing the bench (optional).
There are standard sizes for the bench:
- Seat height – 40–45 cm (the legs will rest comfortably on the ground);
- Seat surface width: 45–50 cm.
The bench should not damage the tree trunk, so it is advisable, when constructing it, to leave a small indentation from the crown (10–15 cm). In order for the product to be even, first of all it is necessary to mark 4 internal support points and 4 external ones around the tree on the ground.
We make support posts, of which there will be four. For each of them you will need 4 boards, 10 cm wide, 60 cm long, 50 cm and 2 pieces 40 cm each. They need to be fastened with bolts or self-tapping screws, as shown in the diagram. If you don’t like these base legs, you can use the benches described in the third option of this article – with a backrest. Place the support posts at the pre-marked points.
Scheme of a quadrangular bench
Next, you will need 4 boards for each section of the bench. If the diameter of the trunk is about 50 cm (155–160 cm in girth), and the distance from the crown is 15 cm, the length of one board of the inner square will be 100 cm. Make an oblique cut at an angle of 45°.
It will be easier to carefully cut all the boards of one section if you place them on a flat surface, using spacers between them. Then, using a ruler, mark the cutting line, focusing behind the first, already finished, plank. Then cut along the marked line.
Manufacturing process
Practical recommendations
- If you deviate a little from the size of the bars and support boards, there is nothing wrong with that, the design of the bench will just change a little, and it will still look impressive in the photo. However, the outer frame should still be in the shape of a square. The dimensions of the short sides are decisive, and to the long sides it is worth adding the thickness of the timber, multiplied by 2.
- Water can penetrate the wood through the lower parts of the legs, so it is recommended to treat them with glaze or special oil. A wax-like composition gives a good effect; in the photo, a bench soaked in this product will look great.
- If you are going to make a backrest, you should provide 4 components, 4 backrests and loose seats in advance. As a result, when assembled, you will get an octagon.
- The load capacity of the finished product is sufficient. If you think that the load will be large, install additional supports in the inner square. But if the soil is uneven, installation may cause problems.
- If the elements of the bench have been processed under pressure, the product will be resistant to sunlight and adverse weather conditions. In this case, the wood should not be painted; the sections are not subject to additional processing.
- It is recommended to tilt the backrests slightly back. The design of the legs with two points of support on the seat allows you to give the bench stability.
- It is important to determine in advance where the bench will be placed. Before installation, markings are made on the ground in the form of a regular 6-pointed star or octagon. Drawing a star is very simple - place 2 equilateral triangles on top of each other.
Another solution
If you are not ready to spend too much time on a bench, and the previous option seems rather boring and primitive to you, you can simply modify its design.
Sketch of a bench
To do this, you just need to install one more support post in the middle of each section. The distance from the tree trunk to the edges of the base legs should be the same. And the planks should be cut at an angle not of 45, but of 22.5°. So, you will have eight sections. The length of the shortest bar will be 30 cm. And the longest will be 67.5 cm (with a seat width of 50 cm and a distance from the crown of 15 cm).
Hexagonal bench with backrest
Making a hexagonal bench with a back
After the preparatory work on the area where the bench will be located, it would be useful to mark six points around the tree. You can simplify the task, as well as make the markings more accurate, by making a star-shaped outline from paper (two intersecting equilateral triangles), as shown in the diagram. At each sharp corner of this figure there will be an outer edge of the base leg.
Photo
The photographs provide several original ideas for making a bench around a tree:
Sectional bench
Forged bench
On the embankment
On the street
In landscape design
Yard bench
Scheme
If you want to make a bench around a tree, then below is a diagram that will help you with this:
Diagram of a garden bench around a tree
Seat dimensions
Scheme and photo of the bench
Bench design
Schemes
Did the article help you?
Log bench
To create this design you only need:
- chainsaw;
- thick log.
To create truly comfortable models, the length of the log must be at least one meter.
The work flow is as follows:
- The log must be marked into two parts, which should be unequal in size. The larger one will be the seat, and the smaller one will be the backrest.
- Use a chainsaw to cut the log according to the mark. Irregularities must be removed using the same chainsaw.
- Then cut out a triangle, thus making a fastening called a “dovetail”. Make indentations in the seat and backrest in accordance with the photo.
- Divide the triangular piece into pieces and insert it into the recesses made in the seat.
- Secure the back.
- All that remains is to make the bench more attractive in appearance. To do this, the seat can be placed on legs.
- The legs can be made from half rings of logs. To secure it in the lower part of the seat, you need to make recesses of suitable size.