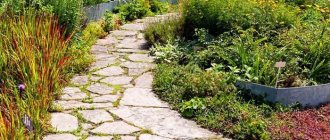
Such paths perform not only a decorative role, but also a functional one. After all, you won’t be moving around the site, jumping from flowerbed to flowerbed - it won’t take long to damage the plants, and besides, such movement is inconvenient.
From this article you will learn how to create a garden path or path from wood cuts with your own hands - with photos and examples of successful options for the site.
Advantages and disadvantages
If every little detail is thought out in the design of a personal plot, the work of the owners of the plot becomes much easier. For example, when it’s time to harvest the crops: how can you move around the site without breaking nearby crops and plantings if there are no paths?
DIY path made from wood cuts. photo
They can be designed from various materials, but it is important to take into account what raw materials the country house and outbuildings are made of, and take into account the features of the style chosen for landscape design. Guided by these points, you can begin to select materials.
Let's consider the main advantages and disadvantages of country paths designed from wood cuts.
Advantages:
- environmental friendliness;
- trees, large branches and firewood cut down during site clearing are affordable materials;
- You can make an unusual path from different types of wood. Each tree has its own unique pattern;
- Paths made from wooden saw cuts are easy to lay; special tools and specialist services are not required. The task of laying paths is not difficult to cope with on your own;
- such trails require minimal maintenance;
- After heavy rainfall, water does not accumulate on the paths, and you can walk to the garden for harvesting without puddles.
Do-it-yourself garden paths made of wood, photo
The disadvantages of such paths include their short service life. Wood is a natural material, it is subject to the process of decay, so after some time the paths will require restoration.
Wood is prone to fire, and after rains such paths slip a lot, so you need to move along them with caution. To eliminate this drawback, the surface of the paths should be treated with coarse sandpaper.
Creative ideas for the original design and landscape design of a small area: examples of arranging a limited area, useful advice from experts.
Read about the features of using Moorish lawn in landscape design in this article.
Where to get material for paths
For paving paths in the garden, you can purchase ready-made material, which is offered by different manufacturers. Quite often, wood cuts have already been treated with special compounds and impregnations, and are completely ready for installation. All that remains for the owners of their personal plots is to design the paths correctly and install a suitable foundation for them. This option is suitable for those who have no financial restrictions. Since such building materials are quite expensive, and not all residents of private houses can afford it.
If we are talking about a modest budget, it is worth looking for fallen trees on the site or outside it and making cuts from them yourself. This process is quite painstaking and lengthy, but the cheapest.
Tools and materials for work
Despite the fact that the work associated with installing paths on a personal property is considered a simple task, it will be difficult to cope with this task alone.
Path made from wood cuts, photo
Before you start, you need to prepare your supplies. Paths can be created from simple stumps of small height, from dies, logs or end parts of logs.
So, you will need:
- tree cuts;
- level;
- drying oil and brush;
- mallet;
- spatula and bucket;
- sand and gravel;
- water;
- waterproofing material in rolls.
Having prepared everything that is required, you can begin the preparatory stage - prepare the wood, decide what your path will be like (determine the optimal shape and size.
Wood cuts for paths, photo
An important step is the choice of material to bring your idea to life.
Advice! Don't skimp and buy hardwood. For example, the service life of pine is about 7 years, oak is about 10, and the most durable hardwoods will last about 20-25 years. But if you couldn’t find the right species, you can use the wood that you have at your disposal, or the one that suits the price.
As for the cost of wood cuts, which are a suitable material for creating paths in the country, birch blanks are the cheapest - about 700 rubles. for 100 sq. m, the highest cost of saw cuts from hardwood is about 3,700 rubles.
Naturally, some sections will need to be updated in a few years, and maybe a complete rework of the path. The need for restoration work arises approximately three years from the moment the path was laid, but the period again depends on the type of cut you have chosen. But all this is not so scary, because you will already have experience in designing trails, and in the future you will be able to take into account all the nuances and make a more durable path.
What else should you consider? First of all, the dimensions of all the parts separately. The maximum height of a wooden piece can reach 20 cm, but paths made from 10-centimeter saw cuts are not a very suitable option, since they will not stay securely in the ground. Even with a slight load they will come out of line.
Garden paths made of wood, photo
It is recommended to choose cuts that are identical in width, but you need to adjust the height yourself. After completing the work, all you have to do is remove the bark from each cut. You need to get rid of it, because it does not adhere well to the tree and insects quickly appear in it; Because of this, wooden blanks rot.
Important! Inspect each of the cuts: it is important that the workpieces are solid and without damage. If even one workpiece turns out to be of poor quality, then there is a high probability of damage to the entire structure. Feel sorry for the work put into this matter!
Path made of wooden saw cuts, photo
How to make wood cuts with your own hands
Wood can be used of any species. Often used are logs, used timber, trunks of trees uprooted from the garden, and even stumps.
If the financial component of the project is not relevant, choose types of wood for paving that are resistant to decay and the effects of natural factors:
- ash;
- larch;
- nut;
- elm;
- beech;
- aspen.
Logs and stumps are cut with an electric chainsaw into logs 15–20 cm high. The following principles are adhered to:
- the larger the diameter, the more reliable the coating;
- It is easier and faster to lay parts of the same thickness.
Parts with cracks or signs of rot are rejected. Those who walk around the garden without shoes treat the cuts to remove hangnails. The first time they go through it with a plane, then they polish it with a grinder.
The bark of any tree looks decorative, but it must be removed.
To protect against mold, rot, and pests, cuttings of garden trees are treated. The end surfaces are impregnated with copper sulfate, drying oil or store-bought antiseptics. Choose products marked “to protect wood under harsh operating conditions.”
Workpiece processing
Treating wooden blanks with drying oil will help extend the life of paths.
There is nothing difficult in this matter:
- Heat the drying oil, and as soon as it starts to boil, remove the container from the stove.
- All wooden surfaces should be soaked in heated drying oil - this will protect the workpiece from water and insects.
- Allow the saw cuts to dry completely, placing them in a place protected from moisture.
- After this, treat the area that is in the ground with bitumen. This measure will protect the wood from rotting. Thanks to this, the paths will last longer. Treatment with bitumen is optional, but recommended.
Recommendation: if you want the path to look old, you can achieve this effect by treating wooden blanks with a solution prepared on the basis of copper sulfate. But keep in mind that after processing the shade of the wood will change slightly. In this situation, it is not difficult to achieve the perfect color of all cuts, due to which the path will look more harmonious in the landscape.
All processed workpieces should be dried and then taken to the next stage.
Wooden path. photo
Technological sequence
Softwood lumber is a low-budget option. Of course, if possible, it is better to choose beech or oak. When properly treated, such surfaces do not absorb moisture and last for decades. Antiseptic solutions protect wood from the harmful effects of insects. If you need to increase the resistance of the material to mechanical stress, it is better to use varnish or paint.
When using solid boards, preference is given to products of the same length. For complex paths with changes, combinations of planks of different sizes are suitable. When working with wood you will need a plane, nails, a hacksaw, self-tapping screws and a grinder.
A belt sander is more suitable for rough surfaces. It can be used to cut parts as accurately as possible along the marking line. Due to the tape rotating in a circle, the wooden surface can be given any shape.
Preparing the base
Depending on the type of soil and the expected load on the path, the depth of the trench ranges from 20-25 cm. Moreover, its width should coincide with the width of the path. Polyethylene film can be used as a waterproofing material. This material has high tensile strength and elasticity. It is better to lay polyethylene in a continuous layer. If one part of it is not enough, you will have to glue several film sheets with an overlap of 30 cm. To do this, you will need to use construction tape or electrical tape.
The depth of burying logs depends on the type of soil
To prevent the wood from swelling from moisture, it is better to pour fine gravel on top of the waterproofing layer. Backfilling of sand and crushed stone must be done according to the building level. Otherwise, instead of the planned straight path, it will turn out to be wavy.
Workpiece processing
It is best to soak the logs in an antiseptic solution. This is the most economical way to prepare compact workpieces. The surface of larch or oak can also be coated with a protective compound using a roller. It is advisable to apply 4-5 layers of the substance, and take the already treated material to a well-ventilated place. The minimum drying time is 48 hours. If there are more protective layers - 72 hours.
The cut logs need to be sorted by size, cleared of bark and discarded destroyed parts. High-quality material can be treated with drying oil. For this purpose, it is better to use a boiling substance that clogs the wood pores. This treatment will prevent pest attacks, and the ability to absorb moisture will not exceed 2%.
Wood can be treated with antifungal agents using a spray bottle. If you don’t like its natural color, try aging the material using artificial methods, for example, painting light-colored alder cuts with copper sulfate. After this they will take on a dark shade. The lower part of the products must be thoroughly impregnated with hot bitumen.
Laying the path
At this stage, the logs can be laid in accordance with any pattern or in any order. They are usually installed on a sand base. Then tamp down a little and level. The gaps between the lumber are hidden with crushed stone. Sawdust and moss are suitable for processing seams on top.
There is nothing complicated in laying a path, the main thing is to follow simple rules
In order for the garden path to last at least 5 years, during the installation process it is important to adhere to the following rules:
- along the entire length of the path, large cuts are laid first, and only then small ones;
- small trimmings from pear branches will help hide the voids;
- stone fences will make the contours clearer and with their help, construction waste will remain in the depths of the seams, and will not be spread throughout the entire site;
- the optimal distance between cuts is 1-1.5 cm, since in this case the path will take on a more natural look, which is especially important for areas arranged in eco-style.
Paving paths from boards involves preliminary waterproofing of the trench, strengthening the frame and installing the flooring. At the same time, building materials can be laid not only on a perfectly flat base, but also on a hill.
Exquisite decor
You can plant jasmine, lilac or weigela along the paths. A unique feature of the latter shrub is the riot of colors and aromas during the flowering period. The opened corollas change colors... every few hours! The species with ash, red and beige bells are more popular among gardeners. You can also use conifers and bulbous plants as decoration. For a herbaceous border, blue fescue and Italian setaria, more popularly known as “chumiza,” are suitable.
Along the path you can plant flowers, shrubs, and put up garden figurines
See also: what to plant along the path for successful decoration.
Considering that wood goes well with sea pebbles, glass, boulders and plastic, you can bring to life the most unexpected decor options.
Creating markup
It is best to draw up a diagram on a piece of paper, marking the locations of the paths, indicating their configuration, length and other parameters.
If you find this difficult, just do the usual markings. Decide how many paths you want to create in your dacha. If you are going to make just one path, you should think carefully about everything so that you can easily move around the site without bumping into obstacles in the form of beds. All buildings, including a country house, a shed, and a bathhouse, should be located at the same distance.
The optimal width of the path for a summer cottage is 35 cm: in this case, one person can move along it unhindered. But if there is enough space, increase this value by 15 cm. A path 50 cm wide will be more spacious and perfect for walking around the garden.
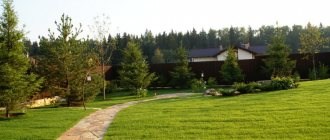
Paths at the dacha made of wood, photo
Everything has been thought out, the route has been determined - it’s time to start taking serious action. To make the markings you will need small wooden pegs. Place them at the beginning of the trail at a distance of 30 cm and at the end. Secure the pegs by driving them into the ground, and then stretch a thick thread or rope between them.
If the path is winding, then at each turn you need to drive in pegs for easier orientation and fulfillment of your plans.
What is needed for work
It’s better to prepare everything you need for work in advance than to be distracted later and waste time and energy searching for, and maybe even purchasing, everything you need.
It is necessary to prepare the following before starting work:
- prepared saw cuts or logs for their production in sufficient quantities;
- twine (or its replacement) and pegs;
- tape measure and building level;
- a regular hammer and for wood (mallet);
- shovel (bayonet and shovel);
- manual tamper (a piece of timber or log 150×150 mm, 0.7-1.5 m long and with handles on the sides);
- paint brush, brush;
- electric saw or chainsaw and wood saw;
- geotextiles or roofing felt or dense polyethylene;
- antifungal agent or drying oil;
- if necessary, “age” the saw cuts - copper sulfate;
- bitumen mixture;
- sand, gravel, medium-fraction crushed stone or river pebbles;
- if necessary, material for borders.
Preparing the base
The materials have been prepared, the markings have been made, now you need to prepare the area for placing the pegs. One should be identical to the markings and dimensions of the future path.
Please note:
- Path parameters - the platform should not be larger than the size of the path (only when installing sides of 5-10 cm) or smaller.
- The depth of the marking should be equal to the length of the cuts plus 20 cm. This is enough for the path to withstand a certain load without changing the location of the parts.
Using available tools, make a trench:
- Perform waterproofing by laying waterproofing material (thick cellophane film for creating greenhouse complexes) along the bottom of the created base.
- It is recommended to lay the film with a minimum margin, and pour fine crushed stone on top of it.
- Thoroughly distribute the drainage layer and make a sand cushion.
- Check the evenness of the surface using a level.
How to arrange a garden path from transverse cuts of a trunk
At the stage of creating country paths from transverse cuts of a trunk, you need to install sides that perform a protective function. But this is not a mandatory measure: proceed from your idea and the material used.
Borders are formed from bricks, small stones, blocks of wood, firewood, they can also be plastic or iron. Choose the material at your discretion, but remember that the fences will be conspicuous. To make the path look harmonious, it is better to use materials of natural origin.
Paths and paths made of wood cuts, photo
Having finished with the sides, lay down the “sand” pillow. Due to this material, the height rises slightly. Add sand sequentially, and moisten it with water to compact it.
Read about how you can use border tape when arranging flower beds and paths in the garden: the nuances of installation, choosing sizes, and recommendations for do-it-yourself installation are described.
Read about how to arrange a beautiful ridge of perennials along the path here.
How to beautifully plant roses along paths? For examples in the photo, see the article at:
Preparatory stage
It happens that already laid elements of a garden path fail or, even worse, become overgrown with weeds. These are the consequences of improper foundation preparation. To avoid such errors, you need to correctly:
- Mark the future path. To do this, you need to install stakes on a flat area and mark the boundaries using tightly stretched cords. In this case, the distance between the pegs should not be less than 2 m.
- Dig a hole 20-25 cm deep within the markings. It is better to do this in dry weather, because a trench filled with water can weaken the strength of the foundation.
- Compact the sand for subsequent installation of curbs.
- Cover the bottom with geotextile to prevent the path from sagging and becoming overgrown with weeds.
- Prepare a drainage layer of fine stones or sand and gravel mixture in a ratio of 7:3.
- Place a sand cushion of the same height on the drainage.
When calculating the number of blanks, experts recommend making a 15 percent increase to the original number of stumps. After all, some lumps may simply not fit into the overall picture of the site or may crack when processed with cutting tools. As for the location of the paths, the starting point for planning should be the house. It is important that the main routes are not interrupted by bends, and that the main paths connect the most important objects: the entrance to the main building, the gazebo and the garage.
Prepared wood cuts can be easily purchased at a hardware store.
Where to get ready-made saw cuts
Ready-made saw cuts can be ordered at any hardware store. Many manufacturers offer products that are well-dried and already treated with antiseptics. The consumer can only install them taking into account the size of the area and the width of the future coating. However, such a purchase can result in a significant amount.
A finished cut of a linden tree 40 cm long and 14 cm wide costs at least 70 rubles. A large cut of oak 3.5-4 cm thick - from 900 rubles and above. Cutting an elm tree measuring 7x8 cm and 2 cm thick will cost buyers 20-25 rubles. And since one track 8-10 meters long will require at least 70 cuts, you will need to pay 10,000-15,000 rubles for everything. And that's not even the limit.
How to do it yourself
If there are old and practically non-viable trees on the site, the harvest will be obtained almost for nothing. Otherwise, you will have to buy a large round timber. Larch is ideal for cutting. This material withstands physical activity well. Its other advantages include good compression and shearing properties along the fibers in the tangential direction. In terms of the latter parameter, larch is several times superior to pine and high-strength oak.
Larch cuts are best suited for paths
Cuts from pear, apple, acacia and hornbeam are of good quality. When choosing materials, it is important to remember: pre-treatment of hardwood requires special knowledge. It will be more convenient for amateur builders to work with walnut or Karelian birch. These species lend themselves better to carpentry, and their structure resembles rosewood and rosewood.
It is important to use dry materials in this case. Otherwise, the saw cuts will quickly crack, and the path will fall apart within a week after installation. The work will require pencils, templates for markings, a power saw and a tape measure.
When starting to make saw cuts with your own hands, you need to:
- remove branches from the trunk;
- carefully treat the surfaces of materials with plows or staples;
- mark the trunk taking into account the rule: the greater the thickness of the log, the greater the height of the cuts;
- for the path to last at least 3 years, their height should not be less than 18-20 cm;
- distribute the main material according to the marks.
When preparing the cuts for the path, they need to be marked and sanded
Creating a path from saw cuts
Having completed the preparatory work, proceed to the most important stage. In order to do everything correctly, you need to decide how the wood blanks will be installed. There are a lot of design options: by changing the position of the parts, you can create the desired pattern.
Laying options: close or at a slight distance. Gaps can be left or small crushed stone can be used to fill.
The principle of installation itself is very simple and does not need a detailed description: select one workpiece, place it on the prepared base, deepen it, apply a little force and then tap it well with a rubberized hammer.
After a certain distance, be sure to check how well you did the job of laying the wooden cuts. To do this, use a level; it can be used to level all the parts. The path should turn out to be impeccably level - of course, by level, and not by eye.
Which saw cuts are best to use?
A path made of stumps can be made from any wood, but the best cuts are considered to be from:
- pine trees It has a presentable appearance, is not attacked by insects and rodents, and is resistant to high moisture. Pine is quite soft and easy to work with. It has low thermal conductivity, wear resistance and increased strength;
- alders It is characterized by uniformity, softness, quick drying without cracking, and a silky structure. Alder is easily processed with any tools and lends itself well to painting with paints and varnishes;
- acacia Attracts with its rich and bright color from dark brown to brown. It has a beautiful texture with distinct rings. Acacia is highly durable and easy to process. It is easy to grind, polish and cut with any power tools;
- oak This is the most sought after and popular type of wood, but it has a high cost. The main advantages of oak include: durability, wear resistance, strength, aesthetics, resistance to rotting, and ease of maintenance. The only thing is that oak is difficult to process with power tools and requires certain carpentry skills.
Important : oak round timber will last more than 10 years, pine – about 5 years, and larch – several decades.
Each owner of a personal plot decides which type of wood to choose for himself, based on the landscape design, personal wishes and his own financial well-being.
Care
It’s not enough to simply lay wood blanks to make beautiful paths. It is also necessary to ensure proper care for them. In the first year, it is recommended to fill the voids between the wooden pieces. For filling, you can use fine crushed stone or sand.
A good option is to let nature fill in the cavities. In a year, the grass will turn green between the harvests.
Advice! To prevent the growth of weeds, fill the cavities with fertile soil and sow lawn grass. Decorative plants will fill the voids in a short time, and such a path will look even more unusual.
The wood can be left untouched, aged artificially, or the stumps can be painted in variegated colors. You will get an original path: children will certainly appreciate such a fun design.
Features of care:
- Set aside one day every year to prevent the condition of garden paths - use an iron scraper to clean round timber;
- after cleaning, cover the workpieces with drying oil or paint;
- inspect the wooden blanks: if there are cracks on them, this indicates a rotting process, the damaged parts will have to be replaced.
Recommendation: at the initial stage, when preparing consumables for creating a garden path, put several blanks in the shed in order to replace damaged ones over time.
Temporary paths
This is the simplest and cheapest option for arranging paths on the site. Unfortunately, it is also short-lived, so it is suitable only as a temporary measure - for example, for the period until normal paths made of tiles, boards or saw cuts are laid in the garden.
Important: for this type of track there is no need to prepare a bed! Bark, twigs, sawdust or shavings are poured without removing the soil!
This option is filling with bark or sawdust. Waste obtained from removing bark from trunks, large chips, bast, sawdust and shavings of various sizes are excellent for avoiding “trampling” dirt in a damp, low-lying area. The thickness of the backfill depends on how large the elements are used, but in general it is at least 3...5 cm. The backfill gradually dries out, is crushed under the weight of users and pressed into the ground. Subsequently, you can arrange a permanent path directly on this flooring.
With finely chopped bark (hardwood), with the addition of sawdust or shavings, you can make a more aesthetically pleasing path. This material is often used for mulching the soil; it is sold in gardening stores ready for backfilling.
In order for the path to remain within the specified limits, it is necessary to arrange a fence - from wattle fence (photo above left), boards or panels (right) or dense green spaces (bottom left).
Execution sequence:
- remove large debris, branches, and stones from the route. If the soil is very uneven, it is advisable to level the ground by removing large protrusions and filling in potholes;
- install fencing elements along the edges of the future path - treated with an antiseptic, coated with resin or burnt boards, wattle fence, large stones;
- fill the bed of the path with the prepared material. If there are fragments of different sizes, larger ones should be placed downward and smaller ones upward, thereby leveling the coating.
Good to know: if the path is not being made on a temporary basis, it is necessary to make an arched profile of the path by adding soil (sand, crushed stone) to the middle and compacting it. You can also make an embankment over the entire area, thereby raising the path above the level of the surrounding soil. In this case, installation of a fence is mandatory.
Popular articles How to grow hydrangea from seeds
From the raised path, during rains and snow melting, water will flow into the ground, thereby ensuring the relative dryness of the embankment and ease of use of the path.
Photo gallery
Below we have made a small selection of photos with options and ideas for garden paths made from sawn wood and logs, which you can arrange with your own hands:
Paths in the country house made of wood on supports
In the form of supports for wooden paths, logs or piles (blocks) laid on a prepared cushion with a longitudinal (along the trajectory of the path) connection can act.
The first option - longitudinal logs from edged boards or timber - is relatively simple to implement.
- The track bed is prepared (as described above).
- They are installed on the edge of the board (beam with the narrow side up). At the same time, for a stable position, the logs are strengthened with spacer pegs, preferably on both sides. The wedges are driven into the prepared cushion to a depth of 15...30 cm.
- Laying plank flooring. To compensate for the thermal expansion of the material, a gap of 1...3 cm is provided between the boards.
In the gaps between the logs you can lay communications - for example, a hose for watering.
By smoothly changing the height of the logs (by trimming, installing wedges), you can make an inclined path.
It is not necessary to immediately install boards of a certain length. You can trim them after installation is complete.
The second option - supporting the logs on piles or blocks - requires more materials and labor.
Concrete/stone blocks are installed on the prepared pad, as shown in the diagram below, or piles are driven into the ground. Next, logs are mounted on the supports. It is better to fasten to concrete/stone blocks using metal brackets, to piles - depending on their material. You can adjust the height of the upper plane of the logs using linings and trimming. Flooring from boards is carried out as usual, fastening to the joists is done with nails or self-tapping screws.
A high-quality, but quite expensive edged board can be replaced with a slab.
If the width of the path does not matter, but it is important to do everything as quickly as possible, you can lay the logs across the path, and the flooring along it. Concrete or wooden sleepers can be used as logs, since they are not afraid of moisture and do not require an embankment
Lay according to the rules
1.Marking will be your first step in creating a track. Moreover, if you choose simple architectural forms, then it will be much easier for you than if you decide to make your path winding or curly. The second option will bring more hassle, but will greatly increase the attractiveness of the idea. You need to mark the edges of the path with pegs.
2. Your next step will be to remove the layer of soil. Usually, for this case, a depth equal to the height of the blade of a conventional shovel is sufficient. You stick it into the ground and immerse it up to the footrests - that's the depth for you. In digital terms this is equal to 20-25cm.
3.Dig out a layer, compact the bottom. The trench must be completely cleaned and the walls and bottom sealed. It’s also a good idea to maintain the terrain’s topography and maintain a slight slope to create drainage. You can check the slope using a bubble level, or simply by relying on your eye.
4. To prevent your path from “floating” during rain or snowmelt, create a drainage layer 5-10 cm thick, using sand and gravel or small crushed stone for this purpose. Clay and even plastic film will do. And their combination will suit even better.
5.After creating the waterproofing cushion, you can begin installing the saw cuts. To make the path fairly level, you can use a rubber hammer, which, with light movements of your hand, will equalize the height of all the cuts.