In modern society, the garden and vegetable garden are gradually becoming a place for relaxation and weekends. The main function – growing vegetables and fruits – remains, of course. But it is noticeably losing ground and reducing volumes.
An increasing number of people consider their dacha a place of emotional relaxation and try to improve and decorate the area.
We’ll tell you in this article how you can create coziness in your dacha using unusual figures.
Do-it-yourself garden figures for the garden and vegetable garden
Garden figures for the garden can be bought in specialized stores, ordered in workshops, or you can create them yourself. By involving your loved ones and friends in the process of sketching and creating garden decorations, you can have fun and get many creative ideas for decoration.
First, you need to decide what topic you want to create in : will it be animals, insects, amphibians, characters from fairy tales and films, analogues of architectural and sculptural masterpieces. necessary to zoning the garden and determine functional zones.
Other materials for making sculptures
To prepare sculptures, you can use all the materials you have at home. This includes wood, wire, clay, and even polyurethane foam. The main thing is to show all your creativity and ingenuity.
Polyurethane foam is an excellent material for creating animals . For example, a sheep or a ram. To make their figures, you will need plastic bottles, tape, about five cans of polyurethane foam and isolon.
The first thing that is done is a frame made of bottles and tape. Then the isolon is cut into strips, which are wrapped around the frame and secured with tape. A small tail and hooves are immediately attached. And the very last stage is filling with polyurethane foam and creating a face.
And here are some more foam sculptures.
The options for garden figures made of wood are simply endless . If one of the branches has fallen in the garden, then it can be used as a beautiful decorative element. Such natural material will allow you to make various fairy-tale characters, small huts and towers, for the manufacture of which you will also need wire and glue.
There are a huge number of ideas for creating garden sculptures. Most of them will not be difficult to do with your own hands, but there are options that require appropriate woodworking skills and a certain amount of craftsmanship.
You can come up with it yourself, or you can look it up in various books and Internet pages. Only desire and demonstrated creativity will decorate any garden, even if it is not very filled with vegetation and other small architectural forms.
Foam crafts
Polystyrene foam is an excellent material for making durable figures for the garden. You can use large pieces of foam plastic and cut off the excess parts according to the sketch to obtain the desired shape.
You can use geometric foam plastic blanks to make cubes, pyramids and other shapes for the garden. All that remains is to paint it with bright colors, and the decor is ready.
Stone figures
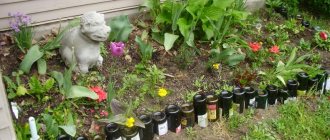
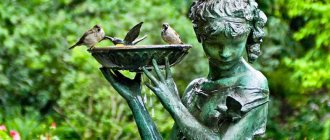
Stone figures can be placed on the edge of an artificial pond or fountain, on ridges and paths. The stone can be painted in the shape of a ladybug, mushroom, turtle, berry, or made into a seat or stand for watering cans.
Where to put the figurine
Choosing a place for a simple figure or a sculptural composition is an important point. After all, an artificial object must harmoniously connect with the natural landscape and fit into a single style. Following simple rules will help you find the right place:
- Draw a plan of the plot or garden on which to schematically distribute decorative decorations.
- Choose a background that matches the sculpture:
- small figures will not get lost in the open spaces of lawns;
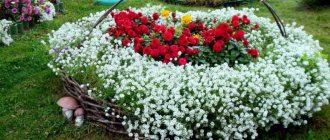
- fences, flower beds, benches, front gardens are a suitable background for placing decorative objects;
- tall trees and shrubs are combined with large sculptural compositions in white and bronze colors.
- Select garden sculptures in accordance with the style of the garden or site.
- Do not combine incompatible things - connect the figures with each other and with the landscape, observing the rules of proportionality and appropriateness.
Finding the right place for a figurine allows you to experience a feeling of delight, aesthetic pleasure and inner comfort.
Crafts for the garden from papier-mâché
Papier-mâché can be useful for decorating a gazebo or recreation area. It is advisable that this material should not be exposed to water, so it is best to place papier-mâché crafts under a roof.
Logs and boards can also become the starting material for the manufacture of garden elements.
How to dilute plaster
The instructions for diluting gypsum, indicated on the packaging with the material, outline all the features of preparing the composition. It is important to dilute the mixture with a reserve of approximately 0.5 liters, which will allow you to quickly correct voids that may form during the pouring process .
The main stages of preparing the gypsum mixture:
- For casting, a solution with the consistency of liquid sour cream is required, and therefore water and plaster are diluted in a 1:1 ratio. In this case, you should add gypsum powder to water, and not vice versa. The bulk substance is poured into the liquid in a thin stream, stirring with a spatula. Large volumes are best stirred with a construction mixer or by hand.
- After removing all lumps and mixing, the mixture can be used for its intended purpose by pouring into the prepared form.
- Complete drying of the product is achieved after at least 24 hours, but the period depends on the size of the craft . It is best to keep it for about two days.
- The product is removed from the mold, the necessary parts are glued together and, if necessary, the voids are corrected. To do this, make a thick solution of gypsum with water in a ratio of 2:1, respectively.
Video: preparing gypsum mortar
Do-it-yourself restoration of garden figures
If there were already figures in the garden, but they fell into disrepair, you can start restoring them.
To repair gypsum elements, you need to stock up on gypsum and cement mortar to mold missing or broken parts.
If stone figures become unusable, you can easily repaint them in other colors and give them new meaning.
Master class: DIY garden figures - video:
- garden figures made of plaster:
- figurines for the garden made of cement:
https://youtu.be/-zeNYxawxgE
,
- DIY figures from cement mortar:
,
- garden figurines from scrap materials:
https://youtu.be/yTtT69xCoyU
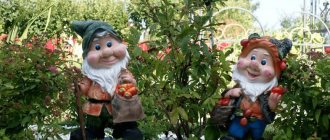
- how to make a plaster gnome for a summer residence:
- how to make an owl figurine:
- DIY garden figures:
- ideas for DIY garden crafts:
- country crafts:
- painting garden figures:
https://youtu.be/Ym5Uqy0RyFI
- how to make a lighthouse from clay pots with your own hands:
Calendar
An Advent calendar is a decoration in which sweets or other pleasant surprises are hidden under windows with certain dates.
Necessary materials:
- Toilet paper rolls;
- Glue gun;
- Cardboard;
- Mugs with numbers;
- Candies.
Process of creation:
- We connect the bushings in such a way that we get a Christmas tree silhouette (a row of 8 bushings, a row of 7 bushings on top, and so on).
- We glue the side walls of the Christmas tree and the back wall so that the cardboard from the sleeves is not visible.
- We fill the empty space of the sleeves with sweets and gifts.
- I glue the free part of the bushings.
- On the closed sleeves we glue cardboard circles with numbers on them
The Christmas tree is ready, you can limit yourself to the number of days in December, but no one will forbid you to make this figurine in the size you want. This decoration will look laconic anywhere in your apartment; you can make a family calendar or a separate one for each family member.
More ideas for decorating an advent calendar from sleeves
Christmas tree made of pine cones
Before creating this figurine, the pine cones need to be washed and dried, or better yet, baked in the oven.
Necessary materials:
- cones;
- glue gun;
- conical base;
- tinsel and decorations.
Process description:
- We take a cone-shaped base and grease the cone with glue and secure it to the cone, moving from the top of the head down.
- So we gradually fill the entire cone with cones.
- The finished product can be coated with paint.
The size of the Christmas tree is up to you, as is the presence of decorations. For such a figurine, it is recommended to take cones that have approximately the same size and shape.
Figures made from branches
Creating such figures also starts with a trip to the forest to collect the necessary material, here’s what you’ll need:
- tree branches (birch, aspen, etc.);
- Christmas tree decorations and tinsel;
- glue gun;
- cardboard base.
Process of creation
- It is necessary to cut out a cardboard base - a circle.
- Creating a tree from branches begins by gluing the thicker ends of the branches to a cardboard base.
- We connect the free ends of the branches with glue.
- We decorate the finished product with tinsel and toys.
Such a Christmas tree will look very unusual; the height of the product and the thickness of the base can be adjusted by reducing or increasing the cardboard base. You can attach a Christmas tree star to the top.
More options for Christmas trees made from branches, made similarly to the previous ones from cones.