Previously, a personal plot was used exclusively for planting and harvesting. Now more and more people want their garden to not only bring benefits, but also please the eye. For this purpose, areas began to be decorated.
There are currently a lot of options to transform your garden. The most popular elements of landscape decor are fountains, figurines, gnomes and much more.
Painting
Inspired by my mother's experience, I decided to make gnomes myself to live in my mini-garden. But an idea occurred to me - to build larger-scale sculptures. Of course, my gnomes did not have human height, but they became a little taller than my mother’s. Another difference in our crafts was that I decided to decorate mine. To ensure that the paint held securely and was not affected by rain, wind or sun, I used acrylic, and then sealed all this splendor with varnish. The gnomes turned out to be very bright and cheerful. But my mother’s original crafts, even compared to mine, looked very original.
Just like that, my personal “do it yourself” section was replenished with another brilliant idea.
Hello, friends!
We continue the gardening theme, or rather, decorating garden plots!
This time, we will make a cute gnome from cement. This decorative craft will wonderfully decorate the landscape of your garden, but it is simple to do and will not cost much at all.
To work you will need:
- Cement mortar;
- Nylon stocking;
- A sleeve from an old sweater or jacket;
- PVA glue;
- Acrylic paints;
- Aerosol paint;
- Aerosol, universal varnish.
Step 1.
We make a standard cement mortar: 1 part cement, 3 parts sand and water. We take a nylon stocking and fill it with the required amount of solution.
Step 2.
We form the solution in the stocking in the form of an elongated drop.
Step 3.
Approximately in, we make a small protrusion and fix it with an elastic band or thread, this part will serve as the gnome’s nose. Let the solution dry for about a day. To ensure that the “drop” does not lose its shape while the cement hardens, the upper part of the stocking can be tied to something.
Step 4.
We remove the stocking and begin making a hat for the gnome. To do this, cut off a straight part of the sleeve from the sweater and tie one edge of it with thread. We make a liquid cement mortar with the addition of PVA glue and thoroughly saturate the sleeve with it. Then, we put the sleeve on the gnome’s head and shape it beautifully.
Step 5.
We wet the area under the nose and sculpt a part from the solution in the form of a beard to this place. Using a fork, we make grooves that imitate beard hair and form a mouth. This step is optional, you can act at your discretion. Leave the craft until completely dry.
Step 6.
Let's move on to coloring the craft. Cover the gnome’s “face” with a rag and paint his hat with spray paint. Then, remove the rag and paint the rest with acrylic paints.
Step 7
After the paint has dried, we coat the entire product with aerosol varnish, this will protect the paint from external influences.
Work is done. Now, you can easily give your garden plot originality with the help of such a wonderful gnome))).
Features of doors and other fairy-tale characters
Yes, these funny creatures are called differently in different countries, we also decided to make our “contribution.”
Nymphs, gnomes, and woodsworts have recently gained popularity among gardeners. And this is not surprising. After all, besides the fact that these funny creatures look beautiful, according to mythology, they protect the territory from various evils.
Also, decorative gnomes on the site have a beneficial effect on the condition of plants.
Who are gnomes
In Germanic and Scandinavian mythology, gnomes are small creatures with a long gray beard and a pointed cap, usually carrying a pick and shovel. They live underground, have magical abilities, are famous for their wealth and skill, and are extremely reluctant to make contact with people. Depending on human behavior, a person can be either rewarded or punished.
Many mysteries and miracles that happen to people in German mythology are explained precisely by the tricks of fairy-tale dwarves. They also served as the prototype for popular decorative figurines - garden gnomes.
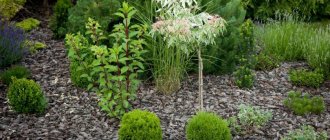
Criterias of choice
In order for the figurine to correspond to the spirit of the garden and adequately decorate the site, when choosing it you need to focus on the design features of the landscape.
Garden style
First of all, you should think about what impression the gnomes will create. Depending on this, they decide where to put them - in the center of the composition or in a more secluded place, so that they become a surprise for guests who turn a corner or go around a tree. The product can personify calm and relaxation or look fun and playful.
Gnomes for the garden must be placed depending on the style
Symbolic decor should be combined with country buildings, auxiliary architecture and other sculptures. If you plan to use the area for official meetings, classical mythological figures in tandem with sundials, fountains and similar paraphernalia would be appropriate. In a more comfortable setting, gnomes look beautiful in motion, as if taken by surprise, and basking in the sun.
Territory size
It is necessary to sensibly correlate the area being equipped with the dimensions of the product. In particular, large thematic compositions will not be appropriate in compact gardens; such models will clutter the space and make it even cramped. Small decorative elements can easily get lost in the vast landscape.
Original do-it-yourself flower beds.
Are you not a sculptor at all? But believe me, you can make these creative flower containers.
We need a plastic container, foam plastic, reinforcing mesh. We make a cement solution by adding a spoonful of gypsum directly into the palm with the solution and thus form our “sculpture”
But not all of us are fans of modern abstract art. But you can easily make garden crafts in a classic style.
But, because You are not a sculptor yet, you need a template - it could very well be an old doll.
Because If this is not just a decorative garden figurine, but a flower bed in the shape of a girl’s head, then the top part needs to be cut off.
Then the head is painted. To add texture, the template is first painted with dark gray paint. Allow to dry and apply a layer of lighter paint. After drying, apply a layer of even lighter paint with light strokes.
This is a very simple process, and all the examples of this style that you see in the article were made by teenagers in a craft class.
History and features of the use of figurines in the garden landscape
Millennia have passed since the time when wealthy houses in the cultural centers of civilization - Japan, China, Egypt - began to use large and small figurines in the decoration of the surrounding area. In addition to small architectural forms, decorative stones were common, collectively forming palm alleys - places for religious rituals. In the gardens of Mesopotamia, wild ivy entwined arbors and pavilions; Indian floating gardens were widely known.
Along with stairs, climbing plants and fruit crops, decorative garden figurines began to spread, placed singly and in groups near artificial ponds and gazebos. In the territory of modern Great Britain, landscape forms are popular to this day in the form of a landscape style without straight lines and symmetry.
Garden gnomes appeared in Germany in the 17th century.
The first garden gnomes appeared in Germany in the 17th century; the plant still produces terracotta figurines, which are in demand all over the world, despite the abundance of ceramic, plaster and plastic budget analogues. They were used not only to decorate the territory, it was believed that they warded off evil, promoted prosperity, and protected the estate. Gradually they spread throughout Europe and the UK, and today they are even used in Asian landscapes.
Master class on making a garden gnome with your own hands
To make a small garden gnome you will need:
- several plastic bottles;
- cellophane;
- tape;
- knife and scissors;
- newspapers;
- egg trays;
- wire.
Take two bottles with a capacity of two and one and a half liters. Connect them together to form a frame. Newspapers will help build the torso, arms and legs. Make a gnome hat, glue on the eyes and nose.
Make papier-mâché; for this you need to dissolve paper newspapers in PVA glue and plaster. Next, treat the surface of the gnome with this mixture. Air dry the finished product for five days. Paint with paint and open with varnish.
Such a gnome will decorate any corner of not only the garden, but also the home. In addition, entire paintings or fairy-tale scenes are made in this way.
Varieties of garden gnomes
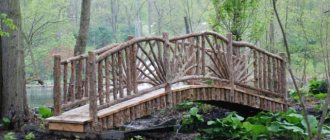
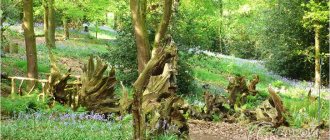
- Gnomes made from natural wood.
Figures made of wood fit very harmoniously into the overall design of the garden. They bring warmth, comfort and joy. To make such figures, it is recommended to use unprocessed material in the form of logs, branches or driftwood. When building such a gnome, a hat made of leaves or moss will perfectly complement the picture.
- Figurine of a gnome made of natural stone.
To build such a figure yourself will require a lot of effort, since here you will have to work with a chisel and a hacksaw. But the result will surprise everyone. After all, gnomes made in this style are distinguished by their originality and refined appearance. They look good in a garden with a classic modern style. To complement the overall picture, use pebbles brought from the lake, which can be painted for variety.
- Garden figure gnome made of polystone.
This material for making gnomes is new, so it is rarely used when performing such work. Although products made with its help are realistic and attractive in appearance. This material is based on aluminum hydroxide, acrylic resins and additional pigments that make it stone. Gnomes made from polystone are durable, abrasion-resistant, and resistant to deformation and temperature changes. The only drawback is the high cost, which is fully justified by the quality of the product.
- Garden gnomes made of plaster.
Plaster figures have always been particularly popular due to the low cost of the material and the ease of working with it. The disadvantages of gypsum include its fragility, so such a gnome should not be on the playground. To make a gnome from plaster, you will need a lot of experience in the field of modeling, since it will be very difficult to give it a shape without experience. Therefore, it is better to make simpler figures from plaster in the form of additional decorations, such as caterpillars, mushrooms, flowers, etc.
- Concrete garden gnomes.
Garden gnomes made from cement mortar are distinguished primarily by their durability. But this will require a special form into which the finished mixture is poured, waiting for it to dry. Another option is to coat the finished frame with cement mortar. To make it, ordinary wire will be enough. In this case, in order to achieve plasticity of the solution and a high level of adhesion to the surface of the wire, it is recommended to add a plasticizer or PVA glue to the finished mixture.
- Garden gnomes based on hay or straw.
Even with the help of ordinary hay you can make figures for the garden. To do this, the material is twisted very tightly in the form of individual parts of the character that needs to be made.
- Gnomes made from improvised means.
The material for making a garden gnome will be ordinary unnecessary garbage, such as old flower pots, basins, a barrel, plastic bottles, tires, etc. If you draw the body of a gnome on a large barrel and add a car tire on top in the form of his head, you will get a funny garden figurine.
- Using polyurethane foam.
It is quite possible to make a garden gnome from polyurethane foam, especially since it is resistant to temperature changes, frost, precipitation and ultraviolet radiation. To create a garden gnome using this method, first prepare a form in the form of its skeleton; for this it is recommended to use materials such as wire, unnecessary garbage in the form of plastic bottles, plates, buckets, sticks, etc. The foam is applied in several stages, and each layer must dry well. A utility knife will help get rid of excess foam. The finished product is painted and varnished.
Cat flower bed.
This cute flowerbed cat is made from a plastic bottle and cement.
We will need: cement, sand, plaster, water, large plastic bottle, wire, paint, wooden slats, varnish.
The owner of this cat, Natasha Koneva, will tell us how to make such a funny figurine with her own hands. We cut off a plastic bottle - this container will be our flower garden. To prevent the cement from slipping off the plastic, we tightly wrap it with wire. We knock down a wooden frame from slats. We attach our plastic container to it.
Mix the cement mortar with the consistency of thick sour cream at the rate of 1 part sand, 1 part cement. We will add gypsum only to the finished portion that we have in our hand, because... the solution with gypsum hardens instantly. We work in rubber gloves.
Take a handful of solution in your hand and add a tablespoon of gypsum to it. Knead it in your hands, roll it into a sausage and attach it to the frame. So, step by step, we apply portions of the solution on top of each other, creating the necessary bulges and smoothing the surface.
We sculpt our cat’s face from small balls of solution in much the same way as we sculpted from plasticine in childhood. In order for small parts to hold better, before attaching them to the body, lubricate the surface of the figure with water.
With a damp hand we polish the surface of our garden figurine. To dry, cover the figurine with cellophane for 3-4 days. On the first day, the figure must be periodically additionally moistened with water. After drying, sand the surface with sandpaper.
You can paint such a figurine with water-based paint, enamel, or car paints. After painting, coat the surface with varnish. For the winter, the garden figurine must be removed from the street, because... It may crack due to frost. You might also want to get yourself such a wonderful cat.
The great thing about cement figurines is that they are cheap to make compared to metal or wood garden figurines. You can start with simple garden crafts, which can be no less interesting than some particularly complex ones. You can combine cement with other materials. — for the face of this little garden fairy “Ladybug” we took the head of an old doll.
Gnomes made of plaster
Garden gnomes made of gypsum tolerate frost, precipitation, and sunlight well. However, they are very fragile. To prevent the gnomes from falling and breaking, they need to be installed away from people and protected from the wind.
You can make plaster sculptures with your own hands. For this you need:
- gypsum;
- glue;
- waterproof paints and brushes;
- varnish;
- plaster or rubber molds for baking.
Step by step process:
- Dilute the plaster according to the instructions on the package.
- Mix thoroughly, add glue for elasticity (the component should occupy 1% of the total volume of the solution).
- When the figure is larger than 0.5 m, a frame made of reinforced pipes and a protrusion for fixing to the surface are required.
- First pour the solution into the mold halfway and wait until it sets. Tap to prevent bubbles.
- Fill in the second part. Level, tap and leave until dry (preferably in the sun in the open air).
- Remove from the mold, decorate with paints, and coat with varnish on top.
For decoration, you can use various available materials: broken glass, etc.
Garden decor from rags and cement in stages
In essence, this is the same flowerpot. But I think this work can also be considered as a decorative element.
For the base, you can take a bucket and wrap it in a bag.
Mix the solution. 2 parts sand, 1 part cement, 1 tbsp. liquid soap and water. We wet the fabric in the concrete. We “put” the fabric on the base.
We lift the edges and fix them with wire. To round the edges on the fold, we insert bottles in the fold areas. This is how we form the flower petals.
Let it harden. Lubricate the workpiece with the solution several times until it hardens completely.
Remove from the base and coat the inside with the solution.
Now you can start coloring. We make a green sepal (outer side of the workpiece) and a red bud (inside the workpiece).
As for me, a few of these “flowers” and a bright flowerbed is ready!
Author
I can’t help but show this work too! It turns out to be a very healthy basket.
Mix cement with water.
The fabric is soaked in the solution and placed on a base - a medium-depth bowl so that it looks like a basket.
We tear the fabric into strips of 10-15 cm. We wet these strips in concrete. We twist them and fix them around the side of our base.
We pay special attention to the top of the basket. Make 2 layers of strips on top
When the workpiece dries well, paint it black.
We apply strokes of brown paint on top with a brush, but do not try too hard to paint over all the curls; a light color makes the pattern more textured.
The basket is ready and can be used as a mini flowerbed!
More details in the author's video.
But there are also completely unexpected solutions.
For example, wrap a cloth soaked in cement mortar around a mannequin. Plant moss in the folds of the “fabric”.
Important Rules
The concrete mixture is prepared as follows: Part cement and twice as much sand (if increased strength is needed, you can take 1 part sand), part glue. Next, add a little water and you need to achieve a thick consistency. The solution will be ready for use and will not cause any trouble.
All crafts require warm conditions and a lot of time to harden. Hardening time can vary up to two weeks. To prevent cracks from appearing, the figure is covered with bags.
After the hardening time has passed, the figure must be covered with a primer, then varnish or paint. If irregularities appear that interfere aesthetically and create inconvenience, use a file and sandpaper.
Cement can be replaced with plaster; this material allows you to make figures hollow and more decorative.
Workshops and ideas for a cement garden for beginners
I'll tell you about a very simple design. I’ll say right away that we are making a Caterpillar. But we will do it in 2 versions.
First way.
We make 2 piles of dry cement.
We lay out a strip of mortar 17-18cm wide on these piles.
Using a round bowl, make circles along the entire length of this strip and cut them out with a spatula.
We place 1.5-liter bottles on some of the circles in the middle.
We form domes around the cans.
We form the same domes, only whole, without the hole from the can, on the remaining circles.
Second
Pour the solution into the stocking. To make this easy to do, insert a ring into the hole of the stocking (you can cut it from a plastic pipe).
We lay out our “snake” and form “balls”. We tighten the stocking with a rope every 17-18 cm.
We place dry mortar or halves of a pipe ring under the workpiece so that the caterpillar can crawl.
Both of our designs must dry and harden. From the first we take out the bottles.
We make balls from the solution. These are the eyes and legs of caterpillars.
We first paint the blanks with basic white paint. And then green. We make the paws and eyes orange.
We fill the holes near the first caterpillar with soil and plant flowers.
Now these insects can be sent to the garden! Let these be the only caterpillars on our site!
Author
Preparation of working staff
It is very easy to prepare the working solution. The main condition is a sufficient amount of it. Since the mixture quickly turns into a solid state (literally after three minutes), you need to prepare it with a small margin. If there is a lot of it when pouring it into the mold, you can simply remove the excess with a spatula. When there is not enough solution, difficulties may arise in the work, and this will affect the appearance of the figure. To prepare liquid gypsum you need:
- Choose a suitable container to make it convenient to mix the contents.
- Pour 5 liters of water (the ratio is usually 10:7).
- For this volume of liquid you need to add 3.5 liters of gypsum.
- Mix the solution with an electric mixer, bringing it to the consistency of sour cream. There should be no lumps or foreign particles in it.
The powder must be poured out carefully, since the cloud of dust rises strongly. It is better to protect the respiratory tract by tying a scarf around the mouth and nose area.
Required materials and tools
To work, you need a spacious room or place on the site, which should be covered with plastic film. This will prevent cement from getting onto your lawn, floors, and other areas. The film can be fixed with bricks or other heavy objects.
After preparing the site, you should take care of tools and materials. You will need:
- a metal container with a volume of at least 10 liters for diluting the solution. A basin, barrel or other similar devices are suitable for this purpose;
- a construction mixer or a drill with a screw attachment - they are used to make the mixture homogeneous;
- much water. It is best if there is a water tap nearby, since the instrument will need to be washed periodically;
- rubber gloves, an apron, napkins and rags that will help keep things clean and do the job comfortably;
- molds for figures (plastic, plaster, silicone, polystyrene, metal, wood and others) or frames. Ready-made options are available in construction stores and craft stores;
Molds for garden figures made of cement can be purchased at hardware stores and craft stores.
Interesting ideas for beginners
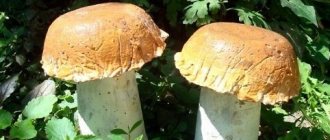
Having no experience in using cement for decorative purposes, it is better to start with something simple that does not require modeling skills and obtaining the desired consistency. The first exhibits in your garden can be cute mushrooms, colorful balls or original flower pots.
To make a mushroom you will need an old rubber ball (the size of the cap will depend on its size), a plastic bottle (it will become the basis for the stem, its size should be proportional to the cap), a metal rod to attach the cap to the stem. The ball is cut into two halves, one of which is placed in a bucket of sand and pressed evenly. Next, cement mortar is poured into the resulting form and leveled.
The bottom and neck of a plastic bottle are cut off and inserted into the filled form in the center, immersing it by 1 - 2 cm. Then, using a long iron rod, the future stem and cap of the mushroom are connected and the cavity inside the bottle is filled with the solution. The product should harden for several days, after which you need to remove the piece of the ball and the plastic cylinder.
After a few more days, the product can be coated with paint and decorated with various elements. Mushrooms of different sizes look impressive on the plot in the form of a small clearing. It is also worth noting that your imagination may tell you to use other containers (bowls, jars) and methods for making garden mushrooms.
https://youtube.com/watch?v=Q15KI_10P7k
It’s enough to just make an openwork ball that seems so light and airy. For the base, use a balloon (the size of the future shapes depends on how much you inflate the balloon). Next, any rope is placed in the prepared solution and then the ball is wrapped around it.
Do not wrap the base too tightly; you need to leave enough holes for further removal of pieces of the burst ball. When the product is dry, you can begin decorative coating.
If you cover the balloons with cement mortar with a small amount of gypsum added for faster hardening, you can get original garden lanterns or flower pots.
Using this technique you can also make vases for dried flowers. In this case, not only the outer side, but also the inner side is subjected to decorative painting.
If you pour the solution into a small hole in rubber balls, you can get monolithic balls of different sizes. Painted in different bright colors and randomly scattered around the garden, they will become a laconic and stylish decoration.
Using plastic containers, you can make a flower pot for Crassula and Crassula Ovata cacti. The container is wrapped in a plastic bag, and a bag of clay or sand is placed inside so that the container holds its shape. Next, it is covered with cement mortar. After complete drying, all auxiliary materials are removed, drainage holes are made in the bottom using a drill, the product is primed and painted.
It's very easy to make a flowerpot using a plastic bucket or vase and another suitable container.
One container is inserted into another, and the solution is poured into the space between them. The result is a high-quality product that can be further decorated by showing your imagination to the fullest.
Flowers planted in flowerpots made from crossed palms look attractive. To create such a masterpiece, use ordinary rubber gloves, which are evenly filled with the solution. For rigidity, you need to insert a thick wire rod into each finger. To ensure a high-quality product, air bubbles must not be allowed to form.
When the gloves are filled, they are given the desired shape and fixed. After a few days, the rubber is cut and removed. If you need to connect two palms, then use the same solution. At the final stage, the surface is polished with sandpaper, primed and painted.
Options for figures made from cement mortar
Artistic concrete is best suited for making flower pots, since the finished product is not afraid of moisture. The easiest way to cast a flower container is to use a plastic flowerpot as a mold, with a plastic bottle placed inside to form a void. A true masterpiece is a flower pot in the shape of a woman’s head, in which flowers grow that imitate a hairstyle.
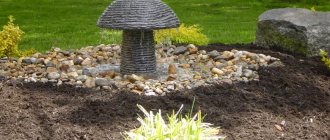
The simplest option is to pour some cement mortar into an old rubber ball. You will get a ladybug, which remains to be painted. A gnome-shaped mushroom head can be made using a plate as a mold. The leg can be fashioned from mortar on a frame made from a plastic bottle.
Sculptures of people are much more difficult to make; we will talk about them below. Fawns are wonderful role models. To make them, polyethylene film is laid on a flat surface. It is convenient to lay out the contours of the figure from flexible plastic border tape. On the outside of the mold, sand and stone are used to secure the tape. It is convenient to fix the tape inside by sticking pieces of wire into the ground. Immediately after pouring the solution, the wire is pulled out.
Concrete crafts sleep constantly
Complex figures are made by pouring cement mortar into special molds, or are molded onto a frame. A description of the manufacture of the following figures follows in the text.
Cat flower bed.
This cute flowerbed cat is made from a plastic bottle and cement. We will need: cement, sand, plaster, water, large plastic bottle, wire, paint, wooden slats, varnish. The owner of this cat, Natasha Koneva, will tell us how to make such a funny figurine with her own hands. We cut off a plastic bottle - this container will be our flower garden. To prevent the cement from slipping off the plastic, we tightly wrap it with wire. We knock down a wooden frame from slats. We attach our plastic container to it. Mix the cement mortar with the consistency of thick sour cream at the rate of 1 part sand, 1 part cement. We will add gypsum only to the finished portion that we have in our hand, because... the solution with gypsum hardens instantly. We work in rubber gloves. Take a handful of solution in your hand and add a tablespoon of gypsum to it. Knead it in your hands, roll it into a sausage and attach it to the frame. So, step by step, we apply portions of the solution on top of each other, creating the necessary bulges and smoothing the surface. We sculpt our cat’s face from small balls of solution in much the same way as we sculpted from plasticine in childhood. In order for small parts to hold better, before attaching them to the body, lubricate the surface of the figure with water. With a damp hand we polish the surface of our garden figurine. To dry, cover the figurine with cellophane for 3-4 days. On the first day, the figure must be periodically additionally moistened with water. After drying, sand the surface with sandpaper. You can paint such a figurine with water-based paint, enamel, or car paints. After painting, coat the surface with varnish. For the winter, the garden figurine must be removed from the street, because... It may crack due to frost. You might also want to get yourself such a wonderful cat. The great thing about cement figurines is that they are cheap to make compared to garden figurines made of metal or wood. You can start with simple garden crafts, which can be no less interesting than some particularly complex ones. You can combine cement with other materials. — for the face of this little garden fairy “Ladybug” we took the head of an old doll.
Where to put the “baby”?
You should not install a garden gnome figurine wherever possible. It is important that it has its place. The gnome must be in harmony with what surrounds him.
If you place it “out of place” without thinking through all the subtleties, then the overall picture will be spoiled.
Freezing
It’s easy to guess that now you need to leave the gnome to freeze. Mom placed him in the gazebo and did not touch him for 24 hours. To be on the safe side, you can give the gnome more time to “mix,” but in our case, the cement solidified securely, and we continued our work. Mom took the scissors and cut off the same knot from the stocking that was on the gnome’s head. Then she completely removed the stocking, and in her hands was a smooth craft made of cement mortar, with even shapes and funny arms and legs. The only negative is that there is a trace left by the knot on the top of the gnome’s head. It can be sanded down with sandpaper, but there is no point in doing so, since further decoration will hide everything.
Great decoration
A garden alve makes the garden more attractive and beautiful. In summer it scares away mischievous birds, in winter it brings brightness and contrast to the monotony.
Many believe that it can bring happiness and contributes to a rich harvest. And its owners become healthier and luckier.
A little history
Man has been decorating the local area with sculptures for more than a millennium. But if in the past this was done mainly for practical reasons, for example, protection from evil spirits, now aesthetic considerations have come to the fore.
In Russia, the tradition of installing sculptures in gardens and parks owes its origin to Peter I. Then the works of Italian masters were installed in the Summer Garden. The novelty appealed to the taste of the broad masses, and the nobles gladly followed the example of Peter I.
Statues decorate the alley of the Summer Garden
Of course, those sculptures bore little resemblance to DIY garden crafts made from cement. Mainly images of Greek deities and statues of various emperors were used.
Spectacular garden craft ideas
If rabbits, gnomes and mushrooms are banal toys for you, then no problem. Landscape design has countless solutions for those who like to surprise their guests. It is desirable, of course, that plaster garden figurines evoke positive emotions. Here are the top 3 cutting-edge sculptures, a couple of which you can make yourself.
Blooming head
Even if you are a terrible sculptor, you can build containers in the form of heads from the abstract movement of modern art.
Blooming HeadSource seattlehelpers.org
To do this, take a plastic container, paste it with pieces of foam plastic in the form of the forehead, nose and lips in the appropriate places and place it under the reinforcing mesh. Next, the outlines of the face are covered with cement mortar. As you work, it is better to add gypsum to it (a spoonful in your palm).
If you prefer delicate faces in a classic style, use a large doll for the template. Cut off the top of her head. Paint the workpiece 3 times: dark gray, light and very light paint. Apply each layer after the previous one has dried. This will give the figure the desired texture. A flower garden is easy to make. The lush vegetation in it will give the doll luxurious hair!
Openwork ball
Resembling a ball of thread, such a ball is a stylish accessory and a universal decoration for any garden. It is made like this: a thick solution is mixed from sand and cement in a 1:1 ratio. A long rope fits in it. Meanwhile, a round balloon is inflated. It is placed on a bucket and evenly wrapped with “cement” rope. After the gray mass hardens, the ball is pierced with a needle.
The resulting art object can be coated with paintSource 1beton.info
"Floating" sculptures
If there is a small body of water on the site, then a large figure emerging from the thickets of its banks will look impressive. It could be a long-haired mermaid, a hippopotamus or an elephant. The highlight of the sculpture is that only its upper part rises above the ground, the rest is missing, creating the illusion of being in water. Figures can also come out of the ground. Organic in this regard - a mole, a person getting out of there with a painful grimace, or a giant palm.
Such sculptures are complex, since their presence in movement is conveyed through the smallest details. For this reason, only gypsum is used here. To implement this idea, it is better to involve professionals.
At a temperature of 15°C, gypsum garden sculptures dry in 24 hours. Source actoc.info
In the video you can see the technology for producing garden figures:
You should always remember that even the most beautiful figure will be fully revealed only if you choose the right place. Of course, you can decorate your garden with plaster figures at any time, but the ideal option is to create a general project for your home landscape or garden.
Caring for gnomes
It is important not only to choose the right garden figure, but also to properly care for it. It is worth checking your garden gnome periodically for cleanliness.
If a lot of dust has accumulated on it, then you should get rid of it immediately by wiping the gnome with a towel. If the garden gnome has become very dirty, it should be washed.
It is also worth checking your garden figure for mechanical damage. If any cracks are found, apply sealant to them.
It happens that due to wind or hail, gnomes break. In such a situation, you should immediately throw out the figure and replace it with a new one.