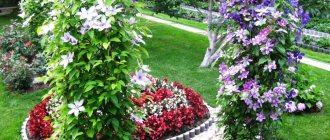
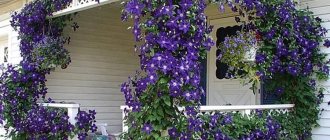
Surely many have observed a flowering carpet on the wall or fence of a garden house. A variety of vibrant colors appear on the carpet every summer. Even when the vine is not blooming, it decorates vertical supports in the garden with thick green foliage. This plant is called Clematis or Clematis.
How to plant and care for clematis in open ground, which varieties take root better and what kind of soil this plant likes will be described in detail below, because it is impossible to resist such beauty - every second person has the desire to create something similar for themselves.
Brief instructions for planting and caring for clematis
- Almost all species and varieties prefer well-lit areas; some need protection from the midday sun. When growing in the southern regions, it is strongly recommended to shade the “legs” - the lower part of the shoots and the soil around them.
- The optimal planting time is in the spring at the very beginning of the growing season or in the fall, at the end of September-October. After the buds have swollen, the plants can only be handled in a lump and very carefully.
- The soil must be light, well-drained, preferably fertile, slightly acidic, neutral or slightly alkaline. Some species require slightly alkaline soil (for example, Tangut clematis), others prefer slightly acidic soil, and all grow well in neutral soil.
- Watering is rare but plentiful. For young plants, about 5 liters once a week, for adults - two buckets every two weeks. Both young and adult plants tolerate overwatering and stagnation of moisture in the soil very poorly.
- Feeding - ideally at least three times per season. In the spring, a complex with a predominance of nitrogen, before the start of spring flowering (if any) - a complex with a predominance of phosphorus and potassium, before the start of re-blooming - only phosphorus and potassium. At the end of the years, it is recommended to spray with a solution of phosphorus and potassium fertilizers to increase the winter hardiness of shoots.
- Garter: Required by most varieties and species. Some may cling to supports with their petioles.
- Pruning is carried out in the fall. Depending on the pruning group, the plants are not pruned at all (group 1), pruned at a height of about 60...100 cm (group 2) or at a height of 30 cm (group 3)
- Reproduction: green and lignified cuttings, layering, dividing the bush. Many species of clematis can be propagated by cuttings.
- Diseases: from critical wilts, which are caused by some soil fungi. Sometimes powdery mildew, ascochyta blight and some other spots also occur, but they are rare and are not dangerous.
- Pests: nematodes, aphids are also mentioned in the literature.
Growing tips (video)
Clematis loves moisture very much, but does not tolerate stagnant water, so if you have a choice, it is better to use additional watering than to suffer from constant dampness. If you plan to get a lush garden as soon as possible, then you should plant the plants in the fall, since the growth of clematis in the spring will be slower - it takes a long time to take root. Thus, if everything is done correctly, clematis will turn your plot into a real miracle!
- Author: Svetlana
Rate this article:
- 5
- 4
- 3
- 2
- 1
(3 votes, average: 4.7 out of 5)
Share with your friends!
Description of clematis - the most important
Most varietal clematis have thick, succulent roots that are easily attacked by pathogenic fungi if there is a lot of water and little air in the soil. Thin roots in shrub species and varieties of the Atragene group (princelings). They suffer from overflow a little less.
Herbaceous clematis vines have very brittle green shoots. Therefore, they must be tied up well and, if possible, not disturbed until the fall. In autumn, the shoots become woody on the outside, but remain green on the inside. If we bend them down for covering, we must do this carefully so as not to break the shoot at the very base.
Clematis leaves are ordinary - green, with petioles. Depending on the type and variety, they can be simple, trifoliate or separate. Many varieties have one leaf shape up to 9 nodes, and another leaf shape above. The shape of the leaf and leaf blade is one of the varietal characteristics; in some cases it can help determine the variety.
Clematis flowers are very different, but always bisexual. Depending on the type and variety, they can be solitary or collected in inflorescences. Small flowers are found mainly in species clematis and in varieties of the Atragene group. Large in varietal forms. What appears to be petals are actually sepals. Usually there are from 4 to 8. Double flowers are formed not only by sepals, but also by staminodes - modified stamens. In double varieties, double and semi-double flowers are usually formed on last year's shoots and with a sufficient amount of active temperatures. On the shoots of the current year, the flowers are usually simple.
The fruit of clematis is a multi-nut with a long flying nose. In some varieties and species, fruits in the Moscow region do not have time to fully form.
Is it difficult to breed
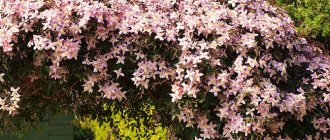
Clematis group Vititsella variety "Polish-Spirit"
Unique external features can give the false impression that the plant requires a lot of effort to care for. In fact, clematis vines are extremely unpretentious and can bloom for 20 years if simple maintenance rules are followed.
However, when growing, troubles may occur: freezing or disruption of the flowering process. To avoid these problems, the owner of the vine only needs to devote a little time to studying the flower and how to properly care for it and prepare it for winter.
Note that those flowers that lived in the wild are not susceptible to problems with flowering. They also thrive in conditions of -12º C. These plants are extremely frost-resistant, and flowers begin to appear on them in mid-winter.
Growing clematis from seeds
From the point of view of growing from seeds, all clematis can be divided into three groups:
- with small seeds - germinate within a few weeks and have good germination. These are species of clematis - Tangut, grape-leaved, serrate;
- with medium seeds - they germinate from a month to six months, many do not germinate without stratification. These are six-petalled, Manchurian, whole-leaved clematis;
- with large seeds - they germinate for at least three months, and some even take a year. Germination and germination energy are poor; stratification is almost always required. These are varietal large-flowered clematis, woolly, Texas and others.
The best germination rate is for fresh clematis seeds, recently collected and dried. However, if the seeds were stored in a dry place at a temperature of about 20 degrees, they will remain viable for 3...5 years, although the proportion capable of germination will decrease every year.
The timing of sowing depends on the group: small seeds are sown in March, medium ones at the end of December, and large ones a couple of weeks after collection (they germinate so slowly that in the first year they may not even get picked).
Many seeds do not germinate or germinate poorly without prior soaking or stratification. Soak the seeds for 7...10 days in clean water, which is changed several times a day. stratify the seeds in the refrigerator for 10...30 days at a temperature of about 4 degrees.
After soaking or sowing, the seeds are sown in light nutrient soil with a neutral soil solution. they are distributed over the surface of the soil and sprinkled with wet sand. The thickness of the sand layer is 2...3 times the diameter of the seeds. After this, the containers are covered with glass or film and placed in a warm place.
The optimal temperature for seed germination is 25...28 degrees. During the entire germination period, the soil is moistened by pouring water into the pan. You can also water from above through a strainer. After the seedlings appear, the temperature is reduced to 18...21 degrees and placed in a well-lit place.
How to preserve clematis from winter until spring
Fragile and vulnerable clematis need to be protected before winter frosts. The procedure is carried out with the first frost, while the weather is still dry outside. Peat or sand (layer height - 15-20 cm) can be used as protection for the winter.
Other wintering tactics. The air method performed very well. A wire frame is erected over the bush, and roofing felt or film is placed on it. However, you should not wrap it too tightly.
Video: How to preserve clematis before planting
Caring for clematis seedlings
Until the first pair of true leaves appear, the seedlings are kept in a common container and watered rarely but abundantly. After the true leaves appear, the plants are planted in individual pots and grown until the end of May-beginning of June. After this, they are transplanted into open ground.
For planting, it is better to choose a windless, well-lit, but protected from the midday sun place with light, well-cultivated soil. If the nights are not very warm, the plants can be covered at night in the first weeks. They should be watered as the soil dries, abundantly, but rarely; one comprehensive fertilizing is desirable, 2 weeks after planting.
The seedlings are covered for the winter and transferred to a permanent place in the spring.
When to plant clematis in spring: optimal timing
When is it better to plant clematis in open ground in the spring, in what month? Suitable planting dates are April and early May . But since climatic conditions on the territory of our country can vary greatly, it is impossible to give a universal answer to the above question. For example, in the South (North Caucasus, Krasnodar Territory (Kuban) - you can perform the procedure in early April, in the middle zone (Moscow region) - you can plant in mid-April, in the Leningrad region, Siberia, in the Urals - it is better to plant in early May.
When is it better to plant flowers - in spring or autumn? A seedling with a closed root system can be planted in autumn, spring, and even summer. But planting material with an open root system - in the spring before the buds swell.
Do you want to perform the procedure more efficiently? To do this, you need to know the most and least suitable time, and you can determine it by the cycles of the moon. Thus, the planting dates according to the Lunar calendar 2022:
- Favorable days: in February: 17, 18, 22, 23, 24;
- in March: 1, 3, 4, 20, 21, 29, 30;
- in April: 9, 10, 15, 16, 17;
- in May: 6, 7, 8, 9, 12, 13, 14;
- in June: 4, 5, 8, 9, 11.
- Unfavorable days: in February: 11, 27;
- in March: 12, 28;
- in April: 11, 26;
- in May: 11, 26;
- in June: 10, 24.
Planting clematis
How to plant clematis
Light, well-cultivated soils with a soil solution reaction ranging from slightly acidic to slightly alkaline are suitable for growing clematis. The best site for planting is well-lit in the morning and evening hours, but slightly shaded at midday and, if possible, windless.
Clematis are often planted against a fence or wall. This is normal, but the distance from the wall to the landing point must be at least 50 cm, and it must not be exposed to water from the roof. Exposure is also important. The descriptions of clematis varieties on the Manor almost always indicate which wall they can be grown against. Without exception, all varieties grow well on the eastern or western wall, many can grow on the southern, and some even on the northern. However, with northern exposure the plant always has fewer flowers.
Tangut, mountain, alpine, oriental and large-petalled clematis need alkaline soils, but in general they are undemanding and can bloom well in any soil if it is properly prepared. It is advisable to plant those grafted onto Clematis viticella in acidic soil so that they grow on their own roots.
Deadlines
Planting clematis is possible in spring, summer (only from pots and maintaining a coma) and autumn. In spring it is necessary to plant before the active growing season begins. If you plan to plant purchased clematis too late after the start of vegetation, you need to wait until the shoots begin to become lignified and pinch off the growing point. When planting in summer, you also need to pinch the growing point or cut off part of the shoot if it is long. It is best to plant in the fall, when intensive growth of green mass has stopped, but the roots are still growing.
What to do if seedlings are purchased too late?
At the end of autumn, garden centers reduce prices for seedlings by 2-3 times.
Now is the time to buy - for example, the seedling “The President” in this photo in C2 cost only 300 rubles. The trouble is that it is no longer possible to plant them in November, and especially in December - they must be preserved until spring. It is best to use the bottom shelf of the refrigerator for this - it is dark and cool there. During thaws, it is better to take the seedlings out for a couple of hours to air out. Video on this topic
Planting clematis in spring
It is best to plant clematis in the spring at the very beginning of the growing season - depending on the region, this is the second half of April or the first ten days of May. If the leaves on the seedling have not blossomed, it is highly advisable to remove it from the pot, wash the roots and remove rotten and damaged ones. If possible, it is better not to plant with an old lump: as a rule, the supply of nutrients in the soil has already been exhausted. In addition, wireworms and other pests are often found there.
It is better to prepare the planting hole in advance, as soon as the soil thaws or even in the fall. If possible, the hole should be deep and wide - approximately a cube with a side of 50...60 cm. It should be filled with the same soil that was taken out of it, but filled: It is mixed with 10...12 liters of humus or compost (not manure), add 50 ...60 grams of simple superphosphate and about the same amount of potassium sulfate. Under no circumstances should you fill a hole in an area with dense soil with looser soil and lay drainage down: you will get a drainage well into which water will collect from the entire area.
Planting depth is very important. According to the characteristics of their development, clematis are very close to herbaceous plants. The tillering center, where new buds and shoots form, is located in the soil: therefore, when planting, the plant must be buried. Buried plants form a powerful tillering center and suffer less from frost in winter and heat in summer. Bushes from buried seedlings turn out to be more powerful and durable, although they develop more slowly in the first years. Annual plants can be buried only by one node, so that the buds are at a depth of no more than 8 cm. Biennial and older plants can be buried by 2-3 nodes. If the internodes are long, and in some varieties they are longer than 25 cm, you can plant them diagonally rather than vertically. Sometimes you have to plant clematis in which only the lowest part of the shoot has become woody - approximately up to the first internode. In this case, the plant is planted in a hole so that three nodes are below the zero mark, but only the darkened, mature part of the shoot is buried. The plant will appear to be in the moon. In the fall, when the shoots have matured, the holes are completely filled up.
How it's done
- Dig a planting hole so deep that the expected number of nodes are in the soil.
- Place a small mound of earth in the middle of the hole.
- Carefully place the seedling and spread the roots along the slopes of the mound so that they do not bend upward.
- Water the mound and roots thoroughly to keep them moist for a long time. If you need to add soil to a mound, add it.
- Sprinkle the roots and buried node with clean sand and ash to protect them from pathogenic soil fungi. Fill the hole to the top and water again.
Planting clematis in autumn
Early autumn, when the growth of the above-ground part has already finished and the roots are still actively growing, is the best time to plant normally developed clematis seedlings. Giving the plant a month or more before frost sets in will give it time to establish roots and prepare for winter. All you have to do is cover it to protect it from frost.
Technology for preparing a pit for planting
The area that attracted attention is cleared of weeds. Dimensions: from 50x50x50 cm (light soil) to 70x70x70 cm (heavy soil).
If the chernozem in the area is excessively moist, a layer of drainage (for example, construction waste) is placed in the recess. Next, it is filled with a nutrient mixture - first humus (several buckets), next in turn - phosphorus-containing fertilizer (granulated superphosphate), 150 g of dolomite flour, then wood ash (a couple of glasses is enough).
At the next stage, it is recommended to dig a trench. It will be 15 cm further than the planting hole. Its task is to remove excess water, since excessive accumulation of moisture must not be allowed.
Clematis care
Caring for clematis after planting and in subsequent years is different. During the planting season, plants must be watered regularly. Water at least once a week, and in dry and sunny weather - every 5 days. The amount of water when watering should be such that it reaches the roots. In subsequent years, watering is carried out rarely, but abundantly: young plants are watered once a week, pouring about 5...8 liters of water at the root, adults - once every 2 weeks in a volume of about 20 liters. The water should be warm, ideally rainwater. Tap and well water should be allowed to stand for 6…12 hours.
If the clematis has a long shoot and you did not trim it when planting, this can and should be done later. About two-thirds of the escape should remain. If the shoot is short, only tweezing is needed to awaken the dormant buds and the plant to form more side shoots.
The second similar pruning is carried out in the summer before budding: for spring planting - in the year of planting, for autumn - the next year. The shoot is cut by about half. The third pruning is carried out before the first wintering after the second. It is needed so that clematis is better prepared for winter. It can be carried out in accordance with the pruning group, but it is better to trim the entire aerial part to the first true leaf. Subsequently, pruning is carried out in accordance with the group.
After planting, you need to feed at least once with a complex fertilizer with a predominance of nitrogen. This feeding can be timed to coincide with the second pruning.
Feeding clematis
Every year, clematis almost completely restores the entire above-ground part and therefore removes a large amount of nutrients from the soil. This removal must be replenished in a timely manner.
I recommend the following feeding scheme for clematis:
- At the very beginning of the growing season, adding 5...10 grams of ammonium nitrate to the tree trunk circle. Can be replaced with 4..8 grams of carbamide (urea).
- 10 days after the first feeding, the second application of ammonium nitrate in the same dosage.
- Two weeks after the second feeding - a full complex of fertilizers with microelements. Dosage: about 5 grams of NPK active ingredient per plant.
- The same fertilizing is carried out at the beginning of the first and second flowering.
- In September, shoots are sprayed with a 0.5% solution of phosphorus and potassium fertilizers to accelerate the ripening of shoots and increase winter hardiness.
Requirements for planting material
You need to know the basic requirements for clematis planting material:
- autumn planting requires the presence of developed vegetative buds on the plant;
- for spring planting, clematis must have at least one shoot;
- The seedlings must have at least three roots with a length of ten centimeters.
Plants with a weak root system must be placed in special containers for growing. It is required to use exclusively healthy planting material, and the root system must be elastic and free from damage, discoloration, thickening and swelling.
Garter
In the spring, when the buds begin to swell on the surviving clematis shoots, they must be carefully lifted and tied to supports. It is better to do this at the very beginning of the growing season, because then the shoots will become very brittle. When the average daily temperature rises to about 10 degrees, the shoots will begin to grow very quickly, up to 10 cm per day. At the same time, shoots with unexpanded leaves cling poorly to supports, but they cling well to each other. If you do not monitor the growth of the shoots, they will weave into dense balls, where the leaves will not have enough light. To avoid tangles, clematis must be regularly straightened and tied up.
Supports for clematis
Most varieties either do not cling to supports at all, or cling only to natural ones, but they cannot cling if the diameter of the support exceeds 1.5 cm. Moreover, the weight of an adult clematis is considerable, and a light wooden or bamboo structure can collapse. Welded metal supports and wooden supports with a stretched mesh of metal or nylon ropes performed best.
Pruning clematis
Depending on the type of flowering and winter hardiness, clematis are divided into three pruning groups:
- 1- very winter-hardy and bloom on last year’s shoots. They do not need any pruning or shelter, they simply overwinter on supports.
- 2 - the least winter-hardy and bloom the first time on the shoots of the previous year, and the second time - on the shoots of the current year. They are cut at a height of 60...100 cm above a pair of strong buds and the remaining shoot is carefully covered.
- 3 - blooming on the shoots of the current year and usually quite winter-hardy. Clematis of the third pruning group are cut at approximately a height of 30 cm and also covered. However, many varieties are quite winter-hardy, and a bucket of peat is enough for them, which is used to cover the tillering unit.
How to choose the right support
Clematis will be appropriate to support fading plants, as we know, daffodils and tulips do not look solemn in the period after flowering, but if you place an area with bulbous plants behind a trellis with clematis, then in the summer they will perfectly hide it from view with their lush flowering. When preparing the trellis, do not miss an important nuance - clematis bloom on the sunny side. If you decide to create a hedge from clematis, for example, to separate neighboring areas, then you should give preference to frost-resistant and small-flowered varieties that will not need winter shelter. Best suited: straight, Tangut and grape-leaved clematis. Many people consider clematis to be too capricious plants, and therefore do not dare to plant them in their gardens, and it is absolutely in vain, I must say. As such, clematis do not require care; the main success lies in choosing the area for their development and installing support. When choosing a support, you should pay attention to its practicality, convenience and strength, but do not forget about its beauty. The best option would be galvanized pipes, wooden gratings and even mesh. It is important to choose the right support - the clematis should seem to float in the air.
Clematis propagation
Propagation of clematis is a very broad topic and deserves a separate article. In general, clematis can be propagated by seeds (how to grow clematis from seeds is written above) and vegetatively - by dividing the bush, layering and cuttings.
The easiest way to propagate is to divide the bush, but this requires an adult strong bush, and you won’t be able to get many new plants. In the fall, the bush is dug up and divided into several parts with pruners or a knife so that each has a shoot with buds.
Propagation by layering is a little more difficult, but allows you to get more plants. In the place of future rooting, the ground is sprinkled with a mixture of sand and ash and moistened. Then the shoot is simply pinned to the ground next to the node and a mound of wet sand is poured on top. The leaves of the sprinkled node are removed. You can make several of these pins on each shoot. In the future, the tubercles should be regularly moistened. In about a month and a half, the shoot will form adventitious roots and new shoots from the sprinkled buds.
Propagation by cuttings is quite complicated and is described here.
How to prepare clematis seedlings
Before the start of the event, young seedlings are carefully inspected. If damage to the root is detected, it is advisable to cut it off, and soak the cut area with a solution of potassium permanganate, followed by sprinkle with ash or charcoal (crushed).
On the part located above the ground, the shoots that are located above the first buds are removed.
Pests and diseases of clematis
With proper planting and care, clematis rarely get sick. These are generally very hardy plants; killing clematis is not easy. If at least one living bud remains in the soil, even a dormant one, it will sooner or later wake up and sprout. Sometimes it takes 3...4 years, but the plant still recovers.
The most dangerous disease of clematis is infectious wilt, which can be caused by certain soil fungi. Fungi enter through damaged or rotten roots or buds and begin to multiply intensively, spreading through the vessels and blocking the movement of water from the roots. The affected shoot quickly withers and dies. It is impossible to completely get rid of wilt pathogens in the soil, and it is also impossible to cure the affected shoot. So it's best to do this:
- When planting, the root and shoot with the growing point should be sprinkled with a mixture of calcined sand and ash. The soil around the shoot can also be sprinkled with this mixture.
- Watering clematis should be plentiful, but rare: this creates conditions that are unfavorable for the development of soil fungi.
- Liming the soil also reduces pathogenic soil fungi, but some clematis do not grow well in alkaline soil.
- If the clematis has wilted, it should be removed as quickly as possible, and the soil around the clematis should be shed with phytosporin. Its effectiveness is not very high, but it is better than nothing.
Other diseases of clematis include ascochyta blight, powdery mildew and rust. They are rare and rarely cause much harm. For prophylaxis, copper-containing fungicides are used, and systemic ones for treatment. Measures to protect clematis specifically from these diseases have not been developed: therefore, fungicides are used by analogy with other ornamental crops.
Clematis rarely suffer from pests: only nematodes pose a serious threat. Externally, namatode damage manifests itself in the form of gradual wilting of the plant. Dead clematis must be dug up and the roots inspected. If swelling is found on them, it is a nematode. It is impossible to destroy it in the soil, but in a plant - only with the plant itself. Therefore, a quarantine period of 4–5 years is declared for planting clematis in an area infected with nematodes.