The land in front of the house - how to diversify it?
Not every person is tolerant of monotony. In an effort to fill their lives with bright colors, people transform their interiors, decorate their clothes, and use cosmetics.
However, sooner or later the desire for change goes beyond the boundaries of the home - straight to the bushes in front of the house, a vegetable garden that is familiar to the last garden bed, or just a vacant lot.
Unfortunately, street conditions differ from the usual home conditions. Sudden temperature changes, rain and snow, direct sunlight and wind - all these factors leave no chance for fragile decorative items.A material that is resistant to destruction is required, for example, specially prepared rubber.
General issues
Tires are not a material that can be easily processed. This is a rigid product made from a number of elastic but durable elements. Processing must be done carefully, carefully, and in compliance with safety precautions. It is advisable to involve children in the work only at the final stage of creating a craft.
To work you will need:
- electric drill, set of drills;
- jigsaw, grinder;
- knife;
- paints, brushes, solvent;
- self-tapping screws, sets of nuts, bolts, washers.
You can make various items from tires. Can be used for:
- economic needs;
- creating territory decor;
- equipment for play areas.
New life for tires
Crafts made from old car tires have become a part of the lives of summer residents and beyond. Durable rubber retains its elastic structure for years, is easy to process and, most importantly, is accessible to the average person.
We recommend reading:
DIY aquarium with fish. The best master class on creating unusual and beautiful crafts (140 photos + video)- Craft vase - how to make a beautiful and original vase with your own hands (105 photos)
- Curtains for the kitchen - photos of the best new designs and successful combinations
Used treads are thrown away en masse by drivers, so there are no problems with obtaining the base for crafts.
Beds for cats or dogs
These pets' resting places can become the most attractive for them, and if they can be used for games, such inventions have no price. Be sure to purchase a pillow for this design. The old feather version will also work.
A cushion must be placed in the tire, which must first be washed and trimmed. The height of the bed is selected in accordance with the preferences of the owner. As well as the size and capabilities of the pet. It is important and unusual to decorate such a product. It is advisable to paint with hypoallergenic paints that do not smell.
How to process rubber: tips for beginners
The first step is to determine the suitability of the tire for making tire crafts.
A master class of any product begins with a general assessment of the material and checking the necessary conditions:
- Tread elasticity. Rubber should not crumble under mechanical stress, be brittle or friable.
- No metal threads. The reinforcing frame in the tire negates the efforts of the technician and can cause injury or breakage of the tool.
- Non-toxic. An unpleasant odor from a tire is a sign that the material is not suitable for creative research.
- With intense solar radiation, such a craft will poison the air.
- Low thickness. Of course, thick rubber will retain its properties longer - but it is completely unsuitable for fine processing.
Using an ordinary sharp knife, the craft is given shape. Elements and patterns are cut out according to the markings applied in advance. If necessary, changes are fixed with wire, threads or wooden supports.
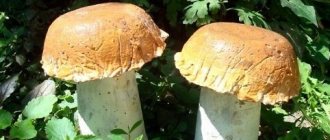
For example, in the popular DIY tire craft “Swan”, the neck of the animal depicted in the material is supported by a regular support.
We recommend reading:
Unusual crafts - 145 photos of beautiful and unique crafts with a description of their productionCreative crafts - 105 photos and videos describing simple and original DIY crafts
DIY home crafts: useful creative ideas for using scrap materials for home crafts (95 photos)
The second stage is coloring. Gray or black tires don't look good among greenery - so they need a little transformation.
The porous structure of the material absorbs pigment well, so you don’t have to worry about the safety of the color scheme. Both acrylic and oil paints are allowed for use.
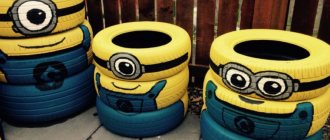
When painting, each master is guided by his own aesthetic preferences. As a rule, it is customary to dress crafts made from old car tires in soft, pleasing to the eye colors.
If the product depicts an animal or a famous object, then the colors should enhance the similarity. NK are recommended for use in bright, acidic shades.
Baby swing
Having rummaged around on the Internet, you can find many photos and ideas on how to use tires collecting dust in the garage and please children by making a swing.
Such swings have many advantages and advantages over plastic and wooden competitors: they are harder to break, there is more than one option for seat shapes, they tolerate temperature changes and bad weather conditions well, if the swing breaks and falls, the rubber will soften the blow, and they are easy to manufacture.
In order to make a swing with your own hands, in addition to tires, you need: a strong rope or chain, self-tapping screws, eye bolts and a drill. The swing can be installed vertically or horizontally, the installation process is not much different. Vertical:
- Tie a rope or chain to the chosen location (tree branch or metal support).
- Screw the eyebolts onto one side of the tire.
- Connect the ends of the rope or chain with the self-tapping screws screwed in beforehand.
- Measure the desired height that is suitable for your child, allowing him to climb on and off the swing independently.
- Drill holes in the bottom of the tires for rainwater (to prevent water from accumulating inside).
- Check the safety of the structure for strength.
The horizontal design is not complicated and by spending a few hours and a little money you will give your kids joy and bright emotions for a long time. The manufacturing process is not particularly different from vertical ones; you just need to screw in four bolts for fastening and install the seat horizontally, avoiding distortion.
Safety precautions
In addition to the form, it is necessary to pay attention to safety - this is especially important for children's swings and sports equipment made from tires. Crafts for the garden and yard should be smooth and have smooth, rounded outlines.
Sharp edges and nicks must be removed and polished. If a load is planned on the tire, then it is worth checking it for strength.
We recommend reading:
Decorative crafts - original craft ideas and do-it-yourself interior and exterior decorative options (115 photos)Original crafts: how are beautiful and unusual things made from improvised materials? (115 photos + video master class)
Crafts for the kitchen - tips, drawings, diagrams, patterns and options for using various crafts in kitchen interior design (95 photos)
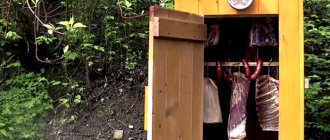
Garbage bins
A simple design of 3-4 tires will help solve the problem of placing garbage and putting things in order, either in a country house, on the territory of a private house or in the courtyard of high-rise buildings. In addition to the main element, you will need paint and garbage bags.
- Place the tires on top of each other one by one, securing them together with bolts or glue.
- Paint the resulting barrel any color you like.
- Place a trash bag inside and your new trash can is ready.
Where to place crafts
Of course, tires will take up space, depending on the size of the tire itself. It is recommended to place crafts made from tires for the garden along the roads, under the windows of the house, next to the fence.
The tire should not look appropriate and not disturb passersby. Don't get carried away - even in beautiful things there should be moderation. Protectors should be installed at some distance from each other.
If we are talking about flower beds, then their place is next to a water source. Being slightly raised above the ground, a homemade flower garden needs frequent and abundant watering. Without moisture, fragile plants will quickly die and will not be pleasing to the eye.
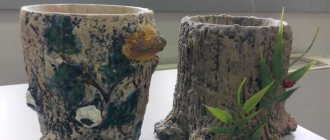
Decorative well
An unusual well can be easily created by placing three tires on top of one another. You can simply paint them a bright color or paint brickwork on them. A mayonnaise or paint bucket can represent a water bucket. And for stability, you can screw it with the same self-tapping screw. Small hanging plants will beautifully decorate the resulting well or bucket.
A craftsman with a screwdriver and the remains of old boards can easily provide the craft with a roof and decorate it with a small nest.
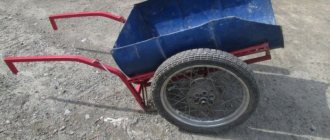
DIY yard
The tire has a simple hollow donut shape, so it is often considered as a primitive option for landscaping a site.
However, numerous photos of crafts made from tires from all over the Internet indicate the opposite:
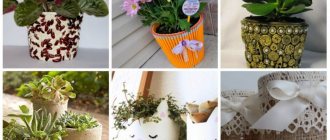
- Flowerbeds. All colors and sizes, from simple tires with flowers to figured compositions. Of course, making complex flower beds will require effort - but it's worth it!
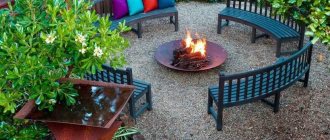
- Seats. It’s pleasant to sit on soft and warm rubber, and some craftsmen cut real chairs out of protectors.
- The complexity of the design is limited only by the skill and imagination of the master.
- Swing. This option needs no introduction - a swing with a tire instead of a seat is known to everyone in different variations.
- Figures. From cartoon characters to realistic animals, it all comes down to the patience and attitude of the manufacturer.
The list can be continued for a long time, because everyone has their own tastes and limitations. Tires can really become the basis for landscaping - but still, it is recommended to diversify them.
Making an ottoman for indoor use
To make this simple ottoman model, you will need a few materials, their list includes:
- an old tire with a diameter of 500 mm, which must first be washed with soapy water and dried;
- plywood for cutting out the base and seat, 10 mm thick;
- cord for decorating a tire;
Tools and materials for making the simplest ottoman from one tire
- polymer glue or silicone for a special gun - the adhesive is needed to fix the cord on the surface of the product;
- scissors for cutting cord;
- a brush and paint for painting the cord when it is attached to the tire;
- self-tapping screws for fixing plywood parts to the tire;
- if you plan to paint only part of the product, then you need to prepare the electrical tape necessary to separate the area that needs to be painted;
- if you want to make the ottoman soft, you will need foam rubber and fabric to cover it.
Table No. 1. The sequence of actions when creating an ottoman from a tire.
| Steps, photo | Description of actions |
| Step 1 | The first step to accurately determine the diameter of the plywood parts of the structure is to measure the flat surface of the tire. This procedure must be carried out, since different tires may have different diameters of the flat surface before rounding. |
| Step 2 | To determine the ideal circle of the required diameter on plywood, you will need a string ruler, a simple pencil and a ruler. Use a ruler to find the center of the circle. |
| Step 3 | Then, focusing on the found radius, take a piece of cord, tie a pencil to one end of it, and its second edge is pressed tightly to the center of the circle. Holding the end of the cord in the center, use a pencil to outline the diameter of the circle. |
| Step 4 | In this case, the radius of the circle is 250 mm. You will need two of these plywood circles - for the seat and for the bottom. |
| Step 5 | Now all that remains is to cut out the plywood parts. This process is carried out using an electric jigsaw. It is recommended to sand the edges of the plywood circles to remove burrs. If you plan to install roller wheels on the bottom part, which need to be secured with bolts, then this must be done before installing the bottom on the tire. There may be three or four wheels. Before fixing them, it is necessary to mark their location. |
| Step 6 | Next, polymer glue is applied to one side of the tire, onto which the bottom plywood part is glued. |
| Step 7 | After this, the plywood circle is rigidly fixed to the tire using self-tapping screws no less than 50 mm long. Fastening is carried out in four to five places. The top one is glued and screwed in the same way. |
| Step 8 | The next step is to glue the cord first to the plywood surface, then to the side parts of the tire. The cord will reliably hide the unesthetic technical appearance of the tire, giving it a cozy design. The decorative cord can be fixed with high-quality polymer glue or with molten silicone. |
| Step 9 | When choosing an adhesive composition, you should take into account that polymer glue takes time to dry, and silicone melted using a special gun hardens almost immediately. Therefore, when using a polymer composition, you will have to wait some time before moving on to the next stage of work. |
| Step 10 | So, starting from the center of the plywood seat, glue is applied to the surface using several turns of cord. The end of the rope must be securely fastened to the center point of the seat. Then the coils begin to spiral around this point. When the area to which the glue is applied is completely covered with the cord, the adhesive mass is applied to the next section of plywood. |
| Step 11 | When the entire seat is covered with decorative material, begin to apply glue or silicone to the side of the ottoman and also stick the cord on them until it runs out. |
| Step 12 | To prevent it from fraying, the end of the cord must be treated with glue and securely fixed to the surface. The beginning of the next section of rope is joined to the glued end of the previous section and pressed against the glued base. |
| Step 13 | Thus, the entire product is decorated with cord to the very bottom. |
| Step 14 | If you plan to attach legs or wheels to the ottoman, which are attached to the plywood not through, but with external fastening, that is, with self-tapping screws, then they can be installed after finishing decorating the product. |
| Step 15 | When the glue has completely dried, you can proceed to painting the cord, if planned. To separate the part of the product that needs to be painted, use any adhesive tape - it can be electrical tape or masking tape. |
| Step 16 | Painting can be done with acrylic paint, which needs to be diluted slightly so that it can be absorbed into the surface of the rope. The color of the paint is chosen according to the taste of the master. |
| Step 17 | Upon completion of painting, the adhesive tape is removed. After this, you can evaluate the result of the work done. |
| Step 18 | This ottoman model is intended for use in closed spaces, protected from moisture. If the product is constantly exposed to the open sky, moisture can seriously damage its decorative finish, as well as plywood parts. |
Articles on the topic
Simple but effective tricks
What to do in your free time
Additionally, I would like to add information regarding two nuances:
- the ottoman will be quite heavy, so moving it around the room will require some effort. Rotating wheels for such a product are simply necessary;
- You can expand the functional qualities of such an ottoman by making the plywood seat removable, but in this case, only the tire itself will have to be covered with decorative cord, and foam rubber will need to be glued to the plywood and the seat will need to be covered with a fabric of a suitable color and quality.
The space inside the tire ottoman can be used to store various useful things
Skill and patience
You don't need to be a professional craftsman to know how to make crafts from tires. Simple crafts are accessible to every person in the street, and experience will definitely come with time.
The secret of the owners of all incredibly beautiful products made from tires is simple - do not stop in your endeavors and constantly experiment.
Photos of crafts made from tires
0