The well often does not fit into the landscape design of the site. Therefore, improving its appearance is an important matter. At the same time, it should still be convenient to use. Therefore, you need to pay attention to the design of the gate and the strength of the cover over the well. The latter is especially important if the dacha is often visited by children.
Let's think about how you can harmoniously fit a well into the design of your territory.
Source: www.remontbp.com
Why do you need a well house?
The main purpose of the design is to protect water from dirt, insects, branches, etc. You can, of course, simply cover the top of the well with some kind of lid, but bare concrete rings are unlikely to delight anyone (and it’s more difficult to collect water ), so the second function of the house is purely aesthetic.
Moreover, such a house can be a whole work of architectural art and be the envy of your neighbors. To install a log house, you can seek the help of professionals, but we know very well that things made with your own hands always bring more pleasure, and they also save a lot of money.
Let's look at different house designs, study their pros and cons, and also learn how to make a house for a well yourself.
How to quickly make an automatic water supply system from a well, read this article.
How to make an Abyssinian well with your own hands - detailed instructions.
Water supply diagram from a well - details here.
Designs, diagrams and drawings
First, let's decide how many walls our house will have. You can choose a rectangular or hexagonal frame.
The tetrahedral version looks more traditional, but the hexagonal version also has its advantages. The design of such a log house will allow you to save space; it takes up less space and is well suited for small areas. Otherwise, it’s more a matter of taste; each option can be played up, decorated, decorated in its own way.
There are more simplified open-plan designs without walls. They perform their function just as well, but are easier to manufacture. There are also closed and open designs. The closed structure differs in that it completely hides the well, while the open one consists of walls along the height of a concrete ring and a roof.
Instructions for creating a house for a well
Let's consider the technology for creating different options for houses for a well. Regardless of which option you choose to build it, you will need to prepare the following tools and materials:
- plane, preferably electric;
- jigsaw;
- screwdriver
- nail puller;
- hacksaw;
- construction level;
- hammer;
- three-meter tape measure;
- handle;
- rounded laminated veneer lumber;
- edged boards;
- fastening parts (nails, screws, self-tapping screws, etc.);
- slate or any other roofing material;
- If you plan to install a door, you should prepare the necessary fittings: handles, door hinges and latches.
All parts must be given the proper dimensions, cleaned and treated with antiseptic agents. Such preparation will increase the service life of the wooden material.
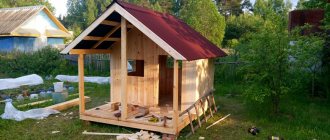
Option. House - roof with two slopes
We build the frame
To create the frame you will need an edged board and timber. There is no need to take materials that are too massive or, conversely, too thin. Since the former will give the structure an unattractive appearance, and the latter will make it too fragile. Therefore, for work it is better to take a beam with a cross-section of 8 x 10 cm, and an edged board 4 centimeters thick.
The first step is to prepare four racks, 8 cm wide. Next, you will need edged boards 12 cm wide and long enough for tying the racks. The boards are nailed one by one to the racks with nails, the length of which must be at least 10 cm. Such nails will allow you to securely connect the parts together. The result of the work done should be a stable and durable frame.
Advice! To make the work easier, it should be carried out in the following sequence: first connect the first pair of racks using boards, and then the second. Place the resulting two structures around the well and combine them with the remaining boards.
We are building a roof
The first step is to create a rafter system on which the sheathing will subsequently be installed. The rafters are made from boards more than 3 cm thick and 180 cm long. The longer the boards are, the higher the structure will be.
For crossbars and crossbars, boards with a thickness of 2.5 cm are suitable. In total, six rafters, eight crossbars and three crossbars will be needed for the work.
The upper ends of the rafters are connected in pairs to each other, having previously cut them at the appropriate angle, and secured with self-tapping screws. To make the structure more durable, a crossbar is mounted 30 cm below its top.
A recess is made at the place where the rafters are attached to the frame. Then the resulting structure is installed on the frame and secured with nails 12 cm long.
The fastening of the rafters is strengthened by installing jibs. You can also install a ridge to strengthen the junction of the rafters.
Next, the sheathing is installed on the created rafter system. It should protrude 10 cm above the walls of the house, and the spaces between all its elements should be equal and amount to 15 cm.
Roofing felt is placed on top of the sheathing, and slate is placed on top of it. The resulting corner joints are covered with wind boards.
Door installation
The house door is made quite simply. First, the boards are cut so that their width is 20 cm and length 85 cm. The cut boards are laid in a row, tightly next to each other, and secured with two wooden blocks with a cross-section of 2.5 x 3 cm. One block is attached closer to the top edge of the door, the second one is closer to the bottom. Fastening is done with self-tapping screws, four for each board. In order to fasten the boards more firmly and prevent them from moving relative to each other, another block is nailed diagonally.
The house for the well is almost completely ready, all that remains is to sheathe the gables, install a handle and latch on the door and hang it on the hinges. In order for the material to last longer and the finished structure to have a pleasant appearance, the outside is treated with an antiseptic and coated with waterproof paint and varnish.
You can also familiarize yourself with the technology for creating this version of a well house in the video below:
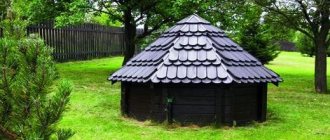
Option. House for a well in the form of a log house
This type of well house is often found in villages. It is made from logs and has a classic rustic style.
To build this version of the house you will need: rounded logs, edged boards, roofing, metal pipes or metal rods with a radius of 12 mm.
Let's look at the procedure for performing work on building a house for a well in the form of a log house.
First, logs with a diameter of 100 mm are piled into a log house. Curly protrusions are made on the protruding edges of the logs to decorate the well.
Next, massive racks with supports are mounted. These supports serve not only to strengthen the structure, but also to decorate the well.
The next step is to create a gate to raise the water. The base of the gate is a rounded log with a diameter of 20 cm or more. The length of this log should be 6–10 cm less than the gap between the posts so that it does not get caught on them when turning the gate. To eliminate the possibility of deformation of the log, the sides are covered with metal wire. Next, holes with a diameter of 3 cm are made in both ends of the log, as well as in the racks. In the gate, these holes should have a depth of 5 cm, and pass through in the racks. In addition, the holes in the gate and on the posts should be located opposite each other. Then you need to prepare the pipes for attaching the gate to the posts. To do this, you can use a water pipe or metal rods with a radius of 12 mm. One pipe is inserted through the right post into the right end of the gate. This pipe remains straight and can be of any length.
Attention! In order for the gate to hold as securely as possible, the end of the pipe protruding from the outer edge of the post should be more than 5 cm.
The second pipe is inserted through the left post into the left end of the gate. This pipe is first bent in two places at an angle of 90 degrees, as shown in the figure below.
This pipe will serve as a handle that turns the gate.
Advice! Before bending, it is better to heat the pipe, then the bend will be not only even, but also smooth.
After the gate is installed, they proceed to installing the roof of the well house. The roof is covered with roofing material. To make the house look attractive, it is better to take a brightly colored material.
The roof should be sized so that its edges extend beyond the perimeter of the log house; this will prevent rainwater and other precipitation from entering the well.
The final stage is to treat the outside of all wooden surfaces of the structure with antiseptic agents and then varnish.
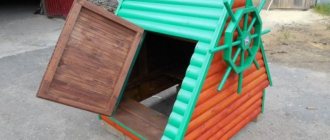
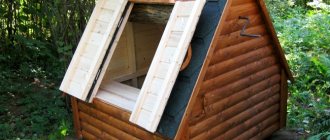
Option. House for a well with a hexagonal frame at the base
This version of the well house differs from the previous design in that the log house has an unusual hexagonal shape.
In addition, to give it asymmetry, the slopes are made of different lengths and covered with edged boards.
This building is small in size, which is especially appreciated if there is no free territory on the site. An additional decorative element is a wheel mounted on the gate to raise the water. The height of the finished house is 2.2 m, and the base has a diameter of 1.2 m.
Maintenance and operation
Maintenance of wood shafts must be done to maintain water quality. During the period of operation, mold, moss, and dirt deposits appear on the inside of the source wall, which must be removed. To carry out inspection and prevention, they go down into the mine workings.
- Before descent, pump out as much water as possible.
- Inspect the well from the inside for possible leakage of top fluid and the appearance of gaps between the crowns.
- Using a scraper, remove plaque from the walls.
- The filter crushed stone from the bottom of the well must be lifted, washed and put back in its original place.
- Identified deficiencies associated with repairs should be carried out as planned.
After completing the measures and filling the excavation with water, well maintenance can be considered complete.
Periodic inspection and timely preventive work in the mine, monitoring the quality of the liquid will help avoid possible infections.
Frame assembly
The wooden frame is made in the following sequence:
Frame structure diagram
1. The diameter or width of the well head is measured. This size must be known in order to calculate the distance between the parallel bars of the frame.
2. A wooden frame is assembled from a 5 x 10 cm timber. It is better to do this on a flat horizontal surface, controlling the assembly process using a building level. To fasten the bars together, nails or screws are used.
3. 2 vertical posts 5 x 10 cm are attached to the frame. Their length will correspond to the height of the house. The racks are connected to each other at the top by another beam. This beam acts as a ridge.
4. Vertical posts are connected to the corners of the frame with rafters. 5 x 5 cm bars are used as rafter elements. For ease of fastening, it is advisable to cut the ends of the racks and frames at an angle of 45 degrees.
Tip: For reliability, all bars and racks at the junction points with the frame are additionally reinforced with metal corners. For this, wood screws 25-30 mm long are used.
5. From the side of the future door, a wide board is placed horizontally on the frame, on which the bucket will be placed. A width of 30 cm is sufficient for a stable position of the bucket. The board must be thick enough to prevent it from bending under the weight of a bucket of water.
6. Narrower boards are placed on the remaining 3 sides of the frame. Their width should be sufficient to ensure that the well house is firmly held on the well ring.
The frame assembly is considered complete. It must have the correct geometry, since possible distortions will negatively affect the operation of the structure. The finished frame is attached to the well.
Frame of a house on a well head
Making a head for a sewer well
In an area with an autonomous sewer system, the upper part of the well is located above the ground surface. The well does not have racks for raising water. A clay head is built for it. It provides ease of use and protects the container from melt water.
Clay acts as a waterproofing material. It should be fat. It is prohibited to use sand or crushed stone instead of clay. They do not provide the necessary waterproofing and deteriorate the quality of drinking water. To build a head for a sewer well, a trench 150 cm deep and 60 cm wide is dug along the perimeter of the shaft. The clay is kneaded, moistened, poured into the resulting recess in layers 20 cm thick and compacted.
The top layer protrudes 15 cm above the soil surface. Clay is a filter. Melt water passing through it is purified. In the process of using a sewer well, sinkholes may form. To avoid such a problem, a blind area made of clay, concrete or natural stone is built around the well. It acts as a foundation.
To create a soft blind area, remove the layer of soil around the well and lay waterproofing. The gaps between the soil surface and the well are filled with clay and compacted.
Autonomous sewerage.
When water enters the pit, the clay begins to settle and cracks form again. Water is pumped out of the well and clay is again placed in the cracks. The holes are filled as the building material settles. Gradually the clay fills the space and stops settling. You can add liquid glass to the top layer.
Ideas for houses for a well, materials, drawings, production
There are various forms of houses, let's look at the most popular ones.
Option: Open Visor
This option consists of a simple metal or wooden canopy on two posts. To which the gate is attached.
Option: Gable house
First, a drawing is made based on the well ring. The diagram must display all elements taking into account their dimensions. The more accurate the drawing, the lower the likelihood of errors when creating a structure.
They purchase building materials and prepare tools. The list of the latter includes:
- electric plane;
- roulette;
- jigsaw;
- hammer;
- circular saw;
- Phillips screwdriver;
- hacksaw;
- nail puller;
- building level.
To create a well house with a gable roof, you will need the following materials:
- wooden beam (sizes 50x50, 50x100)
- log for the gate;
- boards and door fittings;
- edged boards;
- screws and nails;
- roofing felt or slate.
Don't forget to purchase an antiseptic. It is necessary for processing wooden parts. They must be sanded beforehand.
After everything is prepared, you need to follow the step-by-step assembly algorithm.
It includes several stages:
- Clear the area around the well, level, pour and compact crushed stone, first larger, then smaller (15-20 cm thick).
- Construction of the frame. The base is made from timber (section 50x100 mm). The perimeter of the future structure should be larger than the diameter of the well ring. Attach two support posts with the same cross-section to the frame with metal plates and connect them with a block (50x50 mm). Attach to the sides using 4 posts (50x50 mm), cut them at an angle of 45 degrees for a better fit.
- For strapping, use an edged board (width 12 cm, thickness 4 cm). The next step is to fill the resulting gaps with boards. Leave the side where the door will be located unchanged.
- Making gates. To do this, sand a round beam with a diameter of 20 cm and a width of 4-5 cm less than the gap between the vertical posts. Make holes in it on both sides with a diameter of 2 cm and a depth of 5 cm. The same, but through, drill in the racks and insert metal bushings there. Hang the beam on steel rods with a diameter of 24 mm. Bend the left one at a right angle, leave the right one in the same form. This will make it convenient to collect water. To prevent the gate from deforming, use metal wire. Attach a chain from which the water container will hang.
- Install the assembled system onto the frame. Attach the jibs (they act as amplifiers), install the sheathing, and lay the roofing material. The latter can be replaced with slate.
- Installation of door leaf. To make it you will need boards (20 cm wide) and screws. Secure the resulting canvas with beams (25x30 mm). All that remains is to mount the fittings and hang the finished door.
- Decorate the house as you wish.
Option 4: sheet metal house
Construction costs depend on the complexity of the structure. A well house made of metal sheets will fit well into any landscape design. The structure can have an octagonal, hexagonal or triangular shape.
In addition to sheet metal and corrugated board, you will need profiles, metal rods, a lock and door hinges. The procedure is not complicated:
- Prepare your work surface.
- Make a frame by soldering metal rods. Don't forget to leave room for the door.
- Assemble the roof.
- Weld it to the base.
- Place the structure in its proper place.
- Hang the door.
- Cover the building with a protective compound.
Gate installation
Another detail that you can’t do without if you get water with a bucket is a well gate, designed for winding a chain when the water rises. The material used for it is usually a thick log, often oak, since oak wood is one of the most durable. We make the length of the gate 4 cm shorter than the distance between the posts, and sand its surface. Then we make a wire wrap at the ends of the gate and drill holes 5 cm deep and Ø 2 cm strictly in the center of the log. Based on preliminary markings, we drill two holes in the pillars and install a gate adjusted to the length above the well using cap screws Ø 10 mm (photo 6).
Staining technology for wood blanks
To improve the strength qualities of oak and larch assortments, the staining method is used. The wood is placed in running water, and when wet, these tree species sink, and are kept in this position for at least six months. During this time, tannins that negatively affect water quality are removed from the oak. After water treatment, wood does not rot, its service life increases by 2-3 times.
The efficiency of the staining method increases after preliminary preparation of assortments.
- Logs cut to the design size are cleared of bark, and those with defects - rot, knots, cracks, sprouts - are rejected.
- Healthy assortments are placed in water. The longer the material is in it, the higher the quality of the stained wood.
- The timber for the structure is cut from logs immediately after staining.
- Dried assortment is more difficult to process, as the strength of the wood increases.
- After finishing the soaking process, the workpieces are dried during the summer period to a humidity not exceeding 18%.
- The assortments, stacked in a cage, are placed in a ventilated place, covered with a removable roof to protect them from precipitation and the influence of the sun, so that the wood does not rot or crack.
Variety of materials for construction
A well house can be built from a variety of materials. Wood, stone, brick or metal - any of these and many other materials are perfect for this task. Which one should you prefer? The tree looks very attractive, but only while it is new. Such a house will require regular maintenance - annual removal of old paint and application of new paint. If this option is not suitable for you, choose a metal structure. Only the frame or the entire structure can be made from the base material. In fact, choosing the best option is easier than ever. Why bother if you can decorate the well in the same style as the house. Thanks to this, the buildings will not look disjointed, but will be united into a single ensemble.
Do-it-yourself indoor well house
We are talking about this type of shelter for a well - with a door. If you also make a lid inside, dust will definitely not get in.
Closed well
A frame is built, then it is put on the head of the well and secured with anchor bolts.
DIY well house
- support post made of 100*200 mm
- short support posts made of the same timber 100*200 mm
- fastening beam 30*60 mm
- triangular beam
We assemble the frame and attach it to the ring using short bars. Then we begin assembling the pallet. Assemble the flooring from a board 30*100 mm or so. The frame is sheathed with boards or sheet material, such as waterproof plywood.
The procedure for assembling a house for a well
To ensure that the doors hold well, you can install additional jibs. We hang doors - one or two, as desired. To make it easier to navigate, below are drawings with dimensions.
DIY well house, drawings with dimensions
Using the same scheme, you can make a roof for a metal house. If you have a welding machine, you can use a profile pipe. It is easier to attach finishing material to it.
How to make a completely closed frame
You can also hide a concrete ring in the house. In this case, the gate posts are usually installed separately, and then the frame is assembled. Choose the dimensions so that the design freely covers the ring. The height is 20 centimeters higher than your height: so that you can calmly bend down and get the bucket.
Such a shelter for a well made of galvanized profile for drywall, metal tiles and siding
We take the profiles from thick metal, galvanized. From the guide we assemble two identical frames - the “floor” and the upper level of the ring. They are connected by racks (profile for racks). The result is a cube with filled sides.
Frame assembly
We cut off the sides of the guide profile, leaving the “back” intact. This way you can make a triangle. We attach a stand that is equal to the height of the entire house. If you want to have equal slopes, the rack is attached in the middle. You can make the far slope steeper, then the stand moves 15-20 cm from the center.
We attach the notched profile to the fixed rack. We get one of the elements of the rafter system. We perform the same operation on the other side. We connect the resulting tops of the triangles with a crossbar.
Preparation for the door
On the side of the door we add racks - on both sides. It is better to strengthen them - put wooden blocks inside and fasten them with self-tapping screws.
Start of roof installation
We fasten the roofing material, for example a profiled sheet, and cover it with plywood. Then soft tiles are laid and nailed onto the plywood - who has what technology. The “foot” and sides of the roof are finished with any material. If you want, you can use wood - clapboard, imitation logs or timber, or you can use siding.
In this case, the same materials were used as when cladding the house: so that everything looked like a single ensemble.
Siding well house
Another video example of assembly from a drywall profile in video format.
The construction of a metal gazebo is described here.
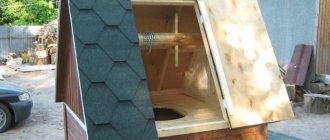
How to make a closed house
A closed house has a slightly more massive structure, so it is more difficult to complete. First of all, you need to make an accurate drawing of the house on the well and calculate the load of the canopy.
Important! The canopy of a closed house weighs quite a lot, so the frame must be quite strong.
Main details of a closed house:
- Frame-base
- Side gables-triangles
- Racks
- Roof frame
- Water gate
- Pallet
- Roof slopes with doors
First, the main frame of the house is made, which consists of a frame, posts and a roof ridge. After this, a pallet is assembled from the boards and installed on the frame.
Then the gate and side gables are installed. After that, the roof frame is assembled first, and then the roof slopes are hung. A hole for the door is first cut in one of the slopes. At the end there is a door hung.
Advice. To make the water source convenient to use in winter and to have a finished appearance, the house can be made completely closed. To do this, side walls are installed that cover the well ring. The sides are usually made of the same material as roof slopes and gables.
The need for houses over a well
Firstly, it is needed to protect the water from dirt. In the absence of a tight-fitting lid, various debris gets into the well. Water from such a source is allowed to be used only for technical purposes, for example, for irrigation. The canopy will ensure timely removal of precipitation and melt water, which contains impurities.
In addition, a well house is a way to ensure the safety of children and pets. For this purpose, the structure is equipped with locks and latches. To facilitate the process of collecting water, gates and racks are installed. The simplest version of such a device is a rotating log with a handle. This “duet” is complemented with a chain.
The appearance of a building is as important as its design. It must match the landscape design. An added bonus of a well house is its ease of maintenance.
Design and finishing
Various materials are used to make well houses:
- wood, straw, bamboo;
- metal;
- stones;
- decorative tiles;
- polycarbonate
Main material: stone
Most often, the headband is trimmed with stone, and the canopy is made of wood and metal. In this case, the stone can be natural and artificial, as well as imitation stone made of concrete. Sometimes the well tower is made entirely of natural stone, such as sandstone.
Wooden houses
Wooden well houses are the most common and fit into most garden plots. For their construction, lumber, logs, driftwood and branches without bark can be used as finishing. Wood is hygroscopic, so it would be correct to treat such materials with some kind of hydrophobic agent and anti-rotting agent.
Polycarbonate for well houses
It is appropriate to use polycarbonate when a garden gazebo, veranda or awning over a car is made using this material. It goes well with a metal frame, and can create a certain mood thanks to its color and relative transparency.
Original well houses
The imagination of designers and folk craftsmen is sometimes simply amazing. We have prepared for you a selection of the most unusual well houses.
How to make a well house from stones or bricks
When creating such a structure, it is difficult to provide exact drawings or diagrams; everything is decided by the imagination of the master. In fact, there are two options for such buildings:
- masonry is used for cladding an existing structure - concrete, stone, clay, old brick, and so on. At the same time, the cladding gives the structure a new, more aesthetic appearance;
- brick, blocks, natural stone or pebbles/boulders are held together with mortar to form a base. Often in such buildings, clay mortar is used instead of cement mortar - it looks more authentic.
Canopy stands are usually made of wood. Moreover, the larger the structure, the more massive the racks should be. Lightly processed tree trunks (pictured above) and large cross-section timber work well.
Wooden shingles, ceramic or stone (slate) tiles, less often metal tiles and other modern coverings are used as roofing materials for sheds.
Models with a turf roof look very aesthetically pleasing. It is not difficult to grow small plants on it, but you should take into account the increased load on the canopy posts.
Interestingly, in this design, the racks are often mounted not inside the well, but outside - this simplifies their fixation in the masonry.
The design of such a house for a well and the process of its creation are examined in sufficient detail in the video.
How to replace or repair a structure
The crowns of the logs, located at the interface between water and air, rot earlier than others in the shaft structure and require replacement. To repair a well, we perform the following points:
- pump out water with a submersible pump;
- above the shaft we arrange a device (a tripod can be used) that holds the frame above the place where rotten logs are replaced;
- we go down into the excavation and remove rotten elements;
- We install prepared crowns instead of damaged ones;
- We weaken the holding system and lower the structure onto new rims;
If it is necessary to restore the well, the frame is removed from the excavation and a new one is inserted using the described technology. It is easier to repair a shaft made of timber due to the rectangularity of the workpieces.
Subsequence
How can you make a house for a well? You need to decide on the material and action plan. For example, for a structure with a roof with two slopes, the sequence of actions is as follows.
Preparation
You will need the following:
- bars;
- boards;
- log;
- corners;
- two rods (one L-shaped);
- fastening parts;
- tile material, container and chain.
The material is dried, leveled, trimmed and treated with an antiseptic.
The following tools will be needed:
- hammer drill (drill) – drill concrete;
- saw (circular) – process wood;
- hacksaw;
- middle hammer;
- construction tools for wood.
Creating a wireframe
The dimensions in a do-it-yourself well house must be accurately indicated and observed during assembly. It is convenient to work according to the following scheme:
- the width of the well is measured to determine the size of the house;
- a wooden frame is made using a flat surface and level;
- a pair of beams is attached perpendicular to its base - this is a ridge;
- the base of the frame and the racks are connected by rafters. For a tight fit, the ends should be cut at 45 degrees;
- where the door is located, a wide board is attached for later installation of buckets;
- boards that are less wide are placed on the other sides, thereby increasing strength;
- the frame part and vertical beams must be bolted to a concrete ring;
- the gate is placed on posts and secured with plates;
- fasteners are carried out and a latch bolt is attached.
Roof for a house
Roofing:
- the fronts and the pitched part are sheathed. The boards should protrude above the structure, like a canopy;
- the fixed roofing material is covered with waterproofing.
Gate part
It is made independently from a log less than a meter long, so that the diameter exceeds twenty centimeters. Designed for smooth lowering and lifting of buckets. The larger the gate diameter, the easier it is for the chain to wrap around it.
The edge of the gate post does not touch the frame. The log is leveled and polished. There is a wire wrap or clamps on the edges. In the holes of the end parts there are washers of the appropriate size. Rods are driven in left and right. The chain and container are suspended.
Door
You can make a good door. Three beams are attached to one of the sides of the frame and the main part of the structure. The door itself is made from the same type of boards.
They are fastened with beams in a diagonal direction, as well as at the top and bottom, which is best done on a flat surface. Using hinges and screws, it is installed in its place. The main thing is that it does not touch the frame when closing or opening.
Required tools and materials
In order to make a quality frame for a well, in addition to theoretical knowledge and practical experience, you will need to select the necessary tool:
- bayonet and shovel shovels with short handles;
- scrap, in the presence of dense clay or rocky soil;
- buckets for removing soil and incoming water from the source;
- rope for lifting buckets to the surface;
- if there is an abundant supply of water, a submersible pump will be required;
- chainsaw for cutting corner joints;
- measuring tape, plumb line;
- axe;
- brackets for fastening;
- sledgehammer and mallet;
- rubber boots and warm overalls.
For drainage and filtration of well water, it is necessary to prepare crushed stone and river sand, which are poured layer by layer to the bottom of the source after the structure is installed.
Canopy for a well with a lid - an open house
Structurally, the device is simple: there are two racks located one opposite the other. They serve as a support for the canopy, and also a gate is attached to them - a device for lifting buckets of water. For a drawing of an open house with dimensions, see the photo below.
Drawing of a well canopy with a lid and a collar
Please note that the posts can be dug in after the well ring has been finished. Depending on this, the order of work changes, but the design remains the same in any case.
The posts supporting the canopy can be located inside the lining of the well ring or outside
About making paths on the site is written here.
How to make a canopy
First, the canopy is assembled. Make two side triangles according to the required dimensions. The drawing above shows only the approximate spread of the two extreme points. If necessary, it can be made more. The length of the canopy depends on where the posts will be placed - close to the well ring or behind the casing. The approximate dimensions of the canopy with a ring diameter of 100 cm are shown in the photo below.
Dimensions of a well canopy for a diameter of 100 cm
The structure can be assembled from a galvanized profile, a metal profile pipe or a wooden beam. To prevent the profile from bending, it is reinforced at the door fastening points - you can put a wooden block or a metal corner inside.
To ensure that rain does not get inside, the expansion must be made much larger than the size of the ring - at least 20 cm on each side.
The roof over the well should be much larger than its diameter
If the racks will be attached directly to the concrete ring, the order of work is slightly different. First, a frame is assembled that covers the ring. In the photo it is made from a 30 mm thick board. The racks are also made of the same board, the place of attachment to the concrete is reinforced with overlays. They also play a decorative role.
If the canopy turns out to be heavy, it is advisable to use timber of greater thickness, otherwise it will not withstand the load.
Frame for well head
Afterwards, the previously assembled roof is attached to the racks. You can make triangles right on the spot, but it’s more convenient to prepare them in advance, assemble the rafter system, and place them ready-made on racks.
Assembled but not finished
Next is finishing. Sew up with boards, clapboard, roofing material. Just keep in mind that if you use raw boards, they will dry out after some time and gaps up to 5 mm thick will form between them. There is no question of any hygiene then: rain and dust will fall in... Using a dry board is also not very good - in wet weather it will swell, the flooring will “go in waves.” In general, if you want to have clean water, build a house with doors - closed. There are more chances to protect moisture from contamination.
Do-it-yourself roof for a well: drawings and dimensions
Features of decorative wells
If there is a real water intake on the site, there is no need to make a decorative one. In this case, it is enough to finish the well with wood yourself.
Drawing of a wooden well over a real mine
In other cases, you can think about imitation, which will decorate your backyard area like nothing else.
A decorative well made of wood may be slightly smaller in size than a house above the head of a real water intake, but this is not important.
Average parameters:
- The height and width of the main part is 800*1,300 mm.
- The height of the canopy ridge above the ground is 2,400 mm.
- Ridge length – 1,700 mm.
- The length of the roof slope, taking into account 10-centimeter overhangs, is 1,500 mm.
- The distance from the overhang to the horizontal surface of the log house is 1,000 mm.
Other options are also possible, because the design of the wells may differ.
Ready-made drawings for making a well
What to make it from
To make a well in your dacha, you can use different lumber:
- timber (profiled or rounded);
- dies;
- board (including lining).
The width of the board depends on the size of the well itself, but the thickness should be at least 40 mm. When using sheathing material, you will also need frame bars with a minimum cross-section of 40*40 mm.
To prevent the wood from rotting and to last longer, it is better to use hard wood to make a well: beech, ash, larch. It would be good if the wood was also thermally treated. This way it will not absorb rain moisture and dry out.
An excellent well is made from cuttings from old garden tools. They can be found in every yard. One cutting can produce two or even three parts.
You can learn how to use such unusual material for work from the video:
Materials
In the classic design, the well house is made of wood. Timber is used for strength elements, board or block house is used for cladding.
Even the roof for closed houses is sometimes made in the form of shields from tightly fitted boards. The main disadvantage of wood is its tendency to rot. Especially in high humidity conditions.
Therefore, the house is often made of a combination: the strength part is made of a metal profile, the finishing of the lower part (around the well) is made of stone or moisture-resistant facade panels, the “rafter system” is made of wood, and the roof is covered with modern roofing materials.
You can find many ready-made projects on the Internet, choose the appropriate one and adapt it to a specific landscape design. And the most common way of selecting materials is compatibility with the decoration of the house and outbuildings. This is especially attractive when there are unused building materials left after construction.
Types of houses for wells, their pros and cons
All decorative buildings can be divided into two categories: open and closed. The former are considered easier to manufacture. They can have a pitched or gable roof. The advantages of such structures include a minimum amount of building materials, while the disadvantages are the inability to use them in winter.
To ensure a regular supply of water after the onset of cold weather, you must:
- insulate the building with expanded polystyrene;
- cover the lid and rings with several layers of wood.
The closed well house has more impressive dimensions; it is a real house with a door. The advantage of this design is good thermal insulation. The downside is that construction is more expensive in terms of price and time.
Self-installation
Typically, wood is used as the material for building a house. It is easy to process, durable and looks good. Both timber and logs are used to make sheathing. Bricks or cobblestones can be used to cover the above-ground part. This material goes well with wood.
List of building materials for all work:
- A wooden beam, the cross-section of which is 5 x 5 cm, or logs for a log house (depending on the design).
- Roofing material. It must be light, otherwise the supports may break.
- Log for making a lifting mechanism.
- Protective impregnation for wood, paint, varnish.
- Metal hinges, handle, latch or other latch.
- Nails, screws.
- Metal corners and bushings.
- Bucket, chain.
- Door materials.
A general set of tools that you will need in any case:
- To process logs we will need an electric planer, and for timber and boards - a jigsaw.
- You also need to have a grinder.
- Building level.
- Roulette.
- A hammer and preferably a nail puller.
- Hacksaw.
- Screwdriver Set.
Where the frame is installed depends on the design of the house. It’s easier to make a canopy or just a roof, in which case pouring a foundation will not be required.
As the foundation itself, concrete formwork or a tile base is usually used. You can use the well blind area, modifying it a little. Do not forget to take care of the drainage of rainwater in advance by using special gutters in the formwork for this purpose. It is also recommended to add a little liquid glass to the formwork solution to protect it from moisture and dampness, but this is not a necessary condition. Consider the size of the base so that when the house is ready, it will be convenient for you to collect water; the design should, first of all, be comfortable and practical.
Next, we will study the process of assembling the frame, first we will consider the option of a log house:
- Logs cut to the required length must be treated with a plane and then with an antiseptic for protection. Since the log house is traditionally not held together by anything, it is necessary to make grooves in the logs. An insulation underlay is required under the first layer.
- Then the log house is assembled layer by layer; the protruding parts of the logs can be made of different lengths. The last crown should be flush with the frame under the gate and roof.
- The racks are made of two logs, between them a gate made of a single log with a diameter of twenty centimeters is attached. Such a log should be processed and made smooth. Metal holders are installed at the ends; for them you need to drill holes five centimeters deep and two in diameter. Washers are mounted in them, and metal bushings are placed in the slots in the frame, so the wood will not crack and the gate will rotate easily. If the roof is supposed to be closed, the frame should be inside it, and vice versa if a hinged roof is used.
- A closed type roof is usually made of a gable roof; for this, a base is made from timber, which is then fixed to the upper crown, and a ridge is installed. The racks serve as a frame for sheathing. Open roofs are also common. The base is mounted on racks; the material used is strong timber.
Now let's look at a simpler and cheaper option for assembling from timber:
- Four pieces of timber are cut for racks and eight for sheathing. We calculate how much timber is needed for the cladding and do the same. We treat the material with an antiseptic. Be sure to add insulation.
- First, the lower sheathing and racks are assembled, then the upper. The level of the top sheathing should not be higher than the concrete ring. Then the cladding is done using a building level.
- The racks are made from boards with a cross-section of half a centimeter. We make a gate in the same way as in the first option, wrap a chain around it and install the skate. If the roof is closed, the racks are attached to its frame.
- Next, the roof is assembled according to approximately the same principle as in the version with a log house.
There is an even simpler type of house, it involves the presence of only two roof slopes and is made of boards.
How to make it:
- Place four posts at pre-marked distances. Don't forget to treat the boards with impregnation.
- Nail the boards at the top and bottom, connecting the posts.
- Next, cut the rafters and fasten them at the top. Install a deadbolt for added strength. It is mounted thirty centimeters below the ridge point.
- Cut a cut where the rafters will meet the top boards and fasten them to the frame. Install two jibs for reinforcement and connect the rafters with a ridge of two boards. Subsequently, the sheathing is installed on these two boards.
- Roofing felt is quite suitable as a roof; slate is placed on top of it, and the corner joints are covered with wind boards. A budget option would be to use corrugated sheets or ondulin.
Choosing a water supply system for a private home. Well or borehole, which is better?
How to drill a well with your own hands? Details here.
An integral element of the house is the door. To make it, attach 3 bars to the frame, which will serve as the door frame. Based on the dimensions of the frame, assemble the door, remember that its size should not exceed the internal size of the frame. To add rigidity, attach a piece of wood diagonally and then attach the hinges to the door and frame. Hang the door on the frame and install the handle. Check whether the door catches the frame when closing and opening.
So, our house is ready and we can move on to the decorative finishing stage. There are countless design options. You can decorate the facade of the house with carvings, paintings, and platbands. If you want to make a house in an oriental style, a hexagonal design, a diamond-shaped roof covered with tiles, is more suitable for you. You can also decorate the well with flowers, hang pots under the roof, and decorate the walls with climbing plants. A nautical theme is perfect, the gate is a great place for the helm, you can string ropes between the posts, and cover the roof with canvas. You can find old boards and decorate the house in an old, medieval style, or paint the existing material with gray paint. For modern dachas, a transparent polycarbonate roof and forged metal supports are suitable. A popular option is the mill house. In this matter, everything depends on your imagination and taste preferences.
If installing a well on your site is impossible (no space, poor soil, deep aquifer), you can still build a log house that will serve a purely decorative function. To complete the illusion, you can build a container of water inside.