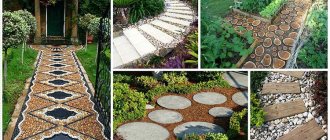
A short video lists the 8 most economical options for garden paths
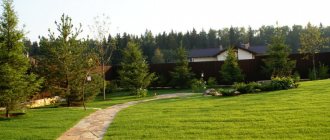
Garden paths play both a decorative role in the appearance of the entire summer cottage, and a functional one. Therefore, they should not only be neat and beautiful, but also comfortable and durable. And in order to decorate your garden with them, it is not at all necessary to hire expensive specialists - you can make them yourself.
- Landscape
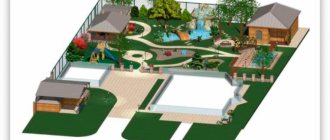
Making raised beds at the dacha: suitable materials and simple instructions
Gravel path
This is a budget option for designing a country path. Thanks to its structure, gravel will perfectly allow water to pass through empty areas, which will allow you to walk comfortably in rain and mud.
This material will help you easily give the desired shape for the garden path, which can always be changed or supplemented. This is a simple, effective and mobile option for landscaping.
One of the disadvantages is that gravel perfectly allows weeds and grass to pass through. And it will have to be cleaned periodically. Like any number of small elements, gravel is difficult to keep in one position. And to maintain the integrity of the design, it is better to use borders for garden paths.
Durable options
It is more rational to use lightweight bedding and agrofibre as a shock-absorbing and drainage layer for more durable and reliable materials. The compacting layer must be at least 5 cm. A good hard coating is laid on top. The passages between plantings are made using flat stones, bricks, tree cuts (various types of wood) or industrial products - paving, rubber or plastic tiles.
Capital construction in a vegetable garden is only appropriate for permanent placement of high beds planned for many years
You can cast concrete blanks yourself using molds of various configurations. Making homemade blocks will allow you to save a lot of money, while they also effectively fulfill their role. Whatever category of covering for organizing interbed space is chosen, you need to inquire in advance about its characteristics and application features.
Using lawn to create a path
What are the nuances when making garden paths from lawn? To maintain an attractive appearance, the lawn requires constant care. Watering, weeding and cutting.
It is also important to have constant natural light. With constant use, it quickly gets trampled, bald spots appear and the overall appearance deteriorates.
One of the advantages is that with proper care, the path looks very beautiful and creates a feeling of comfort and well-groomed. In addition, it is pleasant to walk on it.
There is an interesting life hack for caring for such a path. To make lawn maintenance easier, choose a width that matches the width of your lawn mower. This will save time significantly.
Clinker brick
This material is often used to cover yard paths.
Original clinker brick path
It is convenient to install, the existing various warm colors will make it easy to fit the approach to the house into the existing design. The same border will suit a clinker brick path, and stone blocks will also look good. This material is quite durable, inexpensive, and you must remember to lay it on concrete mortar.
Tile path
Paving slabs add a sense of elegance to the space. The main feature is the minimum requirements for care and maintenance. With high-quality installation, tiles will serve you for many decades. And keep a well-groomed appearance.
But there are also disadvantages to this style. First of all is the price. This type of design is considered the most expensive. Even DIY installation will not help reduce costs.
Some tips for laying paving slabs yourself:
- To add more rigor to the design, use a garden border.
- The tiles must be laid when it has not rained and will not rain for at least a week. This is the most important condition. It is its compliance that determines the service life of the track.
- If you live in an area with heavy and prolonged rain, you should consider drainage for the path.
What is the best material to choose?
When choosing material for the main track, it is desirable to achieve harmony and, if necessary, budget savings. The design of the route should fit into the overall style of the yard and look good with the fence.
- The rustic style will be decorated with paving slabs or terrace boards;
- A wrought iron fence is also suitable for tiles or a stone path;
- The now popular metal profile will look great with concrete, crushed stone and plastic.
In addition to being compatible with the surrounding design, the selected material must be practical, durable, easy to install, and have an acceptable cost.
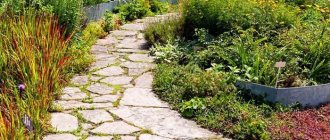
river stone
The simplest river stone can turn a path into a work of art. By selecting a sufficient number of light, gray and dark stones of similar shade, you can lay out any picture or ornament. This is long and painstaking work. But the resulting design will be absolutely unique. And you can be proud of yourself, listen to rave reviews from friends and family.
First of all, it is necessary to sort the stones by color, and also get rid of defective stones and stones with obvious flaws. To facilitate further work, you can sort the stones by size.
It is important to create a feasible sketch of the future path. You can use ready-made ideas from the Internet or come up with your own design. It's easiest to style curls or squares.
Calculation of the amount of concrete
The calculation is done using this technology. The area of one slab is determined (in m2). The value in m2 is multiplied by its height. The result is multiplied by the required number of slabs. When filling a site with a single mass, the area in m2 is multiplied by the thickness of the fill. If the slabs are laid with gaps, then 5–10% is subtracted from the result.
The standard width of a path in a country house will be 0.8 m with a thickness of 5–7 cm; for a path under a car you need 3 m with a thickness of 10 cm. Taking this into account, it is easy to calculate that for 1 linear meter of a pedestrian path the mixture consumption is 0.5 m3, for a path under a car, consumption is 0.3 m3 of concrete. It follows that 1 m3 of solution is enough for 20 m2 of a pedestrian path or 3.3 m2 for a car.
Composition calculation
Measure out the ingredients and proportions in buckets. A standard bag of cement has 50 kg or 38 liters. The best water consumption will be in the proportion of 1 part water to 4 cement, but as you stir, you can add a little more water to the composition for better plasticity. Solution and ingredient consumption for paths without heavy loads (regular path on a patio, in a country house): ½.5/4 (cement/sand/gravel). In buckets, the proportion will look like this (per 1 m3 of mixture): 18 – cement (4.7 bags), 45 – sand, gravel – 70.
Car path: 1/1.5/2.5 (cement/sand/gravel). Consumption in buckets: 28 (or 7.3 bags)/40/70. A plasticizer is also added, for example, SP-1, a dye (1–2% by weight of the solution). There is another composition for a solution of durable concrete:
- cement M500 and above – 1 part;
- sand – 3 parts;
- crushed stone – 1 part;
- water repellent additives.
Path using tree bark
Bark is a cheap material that can be purchased at any hardware store. An interesting feature of the bark is that it prevents weeds from growing. Accordingly, such a path will require a minimum of care and time.
Flaws:
- it is necessary to add bark to the path every season;
- Some of the material is carried by the wind or on the soles of shoes, which also affects the need to add bark to some areas.
Organic fills
These include widely used tree chips and bark, fallen pine needles, cones, pine nut shells, forest and swamp moss.
Peat, hay, straw and rotted leaves are also included here, but the difference is that they are no longer used for decorative purposes, but purely for the
business
- as a fertilizer that simultaneously retains moisture in the soil and eliminates the growth of weeds.
Organic mounds are a real godsend for those who want to save money while creating a beautiful and well-kept garden. Okorye, technological chips, peat, shells, sphagnum - all these materials are either inexpensive in themselves, or are industrial waste from various industries, which also makes them quite cheap. And pine litter, spruce, pine or cedar cones, if possible, are generally easy to collect on your own while walking in the forest, and in any quantity.
Perhaps the most popular mulch option is the bark of Siberian pine and larch,
so to speak, a by-product of wood processing enterprises. During the procurement process, the material is exposed to high temperatures, due to which it does not contain pests, microbes, or foreign impurities. It is especially good to use bark for filling all conifers, heathers, rhododendrons, and ferns. The bark takes a long time to rot and may not lose its decorative properties for two to three years. Sometimes it is colored using only natural pigments.
Obtaining wood chips for filling
Wood chips (sawdust, shavings)
obtained from tree trunks and stumps. Like bark, it can be dyed using organic dyes (the color palette ranges from yellow to black), although in itself it is very decorative. This is an environmentally friendly material, most often made from hardwood. If you have a plant waste shredder in your arsenal of gardening equipment, then you can make mulch chips yourself from tree branches cut when thinning the crowns.
Mulch from bark and wood chips is poured in a layer of 5–10 cm around the plants, leaving a short distance to the stems free for air circulation. First you need to remove the weeds and loosen the soil. If a layer of geotextile is used, then you need to remove the turf, select the top layer of soil (to a depth of 10 cm for flower beds, 20–25 cm for trees and 15–20 cm for shrubs) and embed complex fertilizers into the loose soil of the bottom. Then the site is leveled, lightly compacted, geotextiles are laid and mulch is laid. It is recommended to install a low but continuous border along the border of the fill - this way it will not spread beyond the tree trunk circle or mixborder and gradually litter the lawn.
If the area is sunny, the layer of mulch can be quite thick, but in those places where shade always remains, it is better to make the filling thinner - otherwise water will stagnate under it for a long time and the roots of the plants will begin to rot
Pine nut shells
An excellent mulch is made from the shells of pine nuts.
This backfill promotes the development of beneficial microflora in the root system of plants, prevents soil erosion, and has good moisture and air permeability. Since the shell contains substances such as lignin, phytoncides, flavonoids, it does not rot or decompose for a long time and retains its decorative effect for five years, you only need to add a fresh portion of the material from time to time, and in the spring, carefully loosen it over the surface with a rake.
In flower beds, shells cover the entire space between plants. Under the bushes and trees, the turf is removed (within a radius of at least 50 and 80–100 cm, respectively), the soil is dug up to a depth of 20–30 cm, slightly compacted and mulch is covered with a layer of 7 to 15 cm. After this, to prevent it from being blown away by the wind, The shell should be poured with water and lightly trampled.
In the spring, when cleaning the site after winter, the decorative fills should be renewed: they are slightly loosened, leveled and, if necessary, a fresh portion of material is added. First of all, organic mulch requires this, since in three to four years its lower layers rot and it sags
Decorative filling of the tree trunk circle
The disadvantage of the shell is that it is an excellent food for rodents and birds, which will attract them to plantings. The decorative properties of fills of organic origin often make one forget about the caution of their use, and yet they all change the properties of soils in one way or another.
For example, peat, pine needles, pine and especially spruce cones affect the agrochemical characteristics of the soil - as agricultural technicians say, they acidify it. Therefore, you can mulch with them only those plants that benefit from increased acidity - in particular, any conifers, heathers, rhododendrons, hydrangeas, blueberries - or use them in combination with fallen leaves, hay, and ash. In addition, along with pine litter and cones, fungal diseases (rust, root rot, etc.) can be introduced into the area, and they can easily spread from mulch to garden crops. Pre-treatment of the mulching material with fungicidal preparations will help protect against this.
From shells, tree bark and wood chips you can not only make decorative filling in flower beds, beds and tree trunks, but also create a soft covering on recreation areas and paths in the depths of the garden.
This process is not particularly labor-intensive. It is necessary to remove 10–15 cm of the top layer of soil, compact the base well and cover it with mulch. If the soil moisture here is high, it is better to first arrange drainage in the form of a gravel cushion 5–10 cm thick, and fill it on top.
Properties and approximate price of various organic fills
| Material | Conifer bark | Needles | Sawdust | Sphagnum (moss) | Pine nut shells | Hardwood wood chips |
| Terms of use | 2–3 years | 2–3 years | 1 season | Living moss grows, dry - 1 season | Up to 5 years | 1–2 years |
| Flaws | Oxidizes the soil | Oxidizes the soil | Sloppy look | — | Rodents appear | — |
| Price, rub./bag 60 l (consumption 1 bag/m² at a layer height of 6 cm) | 200-350 | 450 | 100 | 400 | 300 | 200-370 |
Homemade canvas
To make tiles with your own hands, you will need plastic molds for pouring. They can be disposable or reusable, soft or hard, shaped or of a strict geometric configuration. Food packaging also comes in handy here.
The AliExpress website offers a wide range of such shapes: multifaceted, brick, turtle-shaped, human feet and others.
Adding coarse gravel, other reinforcing fractions, special plasticizers, and coloring pigments to the cement mortar will help increase the strength and aesthetics of such workpieces. Such technologies are known and have been tested many times by hardworking summer residents. A competent, thoughtful approach to the stamping process and the low cost of consumables provide craftsmen with the opportunity to obtain raw materials in unlimited quantities, which are not inferior to purchased products in terms of technical properties.
When poured directly on the ground without the use of a backing, the concrete becomes only a temporary and minor barrier to weeds.
Forms generously greased with machine oil or covered with cellophane are placed on a vibrating table and carefully filled with prepared cement mortar. A vibrating table can be made from a spacious stand attached with springs to a driving mechanism, for example, an electric motor from a tool sharpening machine, a motor removed from a circular saw or a washing machine. It is desirable that the engine speed be from 1800 to 3000 per minute. Vibrocompression (manual or mechanical) is carried out to compact the mixture and release air bubbles. After shaking and shrinking the mixture in the molds, it is left to dry for a day until completely hardened on racks or chipboard sheets arranged in layers. It is not recommended to keep the workpieces in this form for longer, otherwise it will be difficult to get them out without damage or chips. After removing from the molds, the blanks are finally dried in air at positive temperatures (from 10 to 20 degrees).